Showing posts with label spellbinders dies. Show all posts

Tuesday, May 5, 2026

You Color My World {Shades of Blue}

It's Teacher Appreciation Week and for day 1, they wanted the kids to dress up in their teacher's favorite color. My son's teacher's favorite color is blue, so I decided to whip up a fun card and tag to go along with a blue-themed gift as well. They had the teachers list some of their favorite things so luckily some of those things came in blue packages. 
To begin, I created the shaped card using the Paint Your World Die collection from Spellbinders. It appears to be retired, unfortunately, but I wanted to share my project here anyway and maybe it will spark some ideas with products you already own! I cut the paint palette twice; once from white cardstock and once from Fine Linen to offset it a bit for added detail and depth.

Next, I added some ink to a scrap of white cardstock in a few different shades of blue and then cut it out using the Simon Says Stamp Fancy Teacher Die. I cut the shadow from vellum and then glued it together. I temporarily positioned it where I would place it so I could do the stamping. I chose the "thanks for coloring in my world" sentiment and I love how it fits in the curves of the teacher word so nicely. I used clear foam squares to attach the teacher word and then got to to work on the paint tube and brush.


I cut the main portions of the tube from Spring Rain cardstock and then added some ink around the edges to give it extra color and depth. The metallic bits are cut using silver cardstock and everything is attached with liquid glue. Back when I got these dies, I bought the entire collection, so one of the die sets had the flowers and leaves so I added those to the paint tube as well. 

The paint brush is cut from Fine Linen, silver cardstock, and white with ink blending at the tip to mimic paint. I attached everything with foam squares. I wanted to add all of the main larger elements so I would know how much "paint" spots to add. I colored them with different shades of blue and then popped them up with foam squares. A bit of ink splatter finishes it off and then I added it to the shaped base using liquid glue.

I created a quick tag with some of the same elements to attach to the bow on the gift.

I added Stickles to the paint and flowers for some sparkle! Thanks for fluttering by!


Wednesday, November 30, 2022

Please Deliver To Santa {A collection of holiday greetings}

Hello, friends! I hope you all had a fabulous Thanksgiving weekend and that your new week is off to a great start! We got a fabulous snow storm bringing a delightful blanket of snow; just perfect to cover the leaves I neglected to rake! ha ha!  I spent the relaxing weekend working on a collection of Christmas cards that I'm excited to share with you today! 

I ordered a bunch of delightful things from Spellbinders Paper Arts and they've been waiting patiently for me to use them! I always love a postal theme, no matter the season, but add in vintage Santa.....I just can't resist! I have three additional cards I'm sharing below without Santa, but he just HAD to make his way onto one!

Each of the 4 cards feature the darling Parcel & Post Mailbox Etched Dies paired with the Christmas Mailbox Greetings Glimmer Hot Foil Plates. I also bought the All-Occasion Mailbox Greetings Glimmer Hot Foil Plates because one of my favorite "Santa" designs is included AND I want to use the mailbox for all-occasion cards as well.


To begin, I die cut the main mailbox, the side panel, and the door from Pure Poppy cardstock. I added some Scarlet Jewel ink blending around some of the edges to give the illusion of depth, without using different colors of cardstock. I also did all of the hot-foiling for the main sentiments on the mailboxes using the gold foil included in this 4 pack. I actually use all of the colors from this set year-round, so it's perfect to keep on hand!

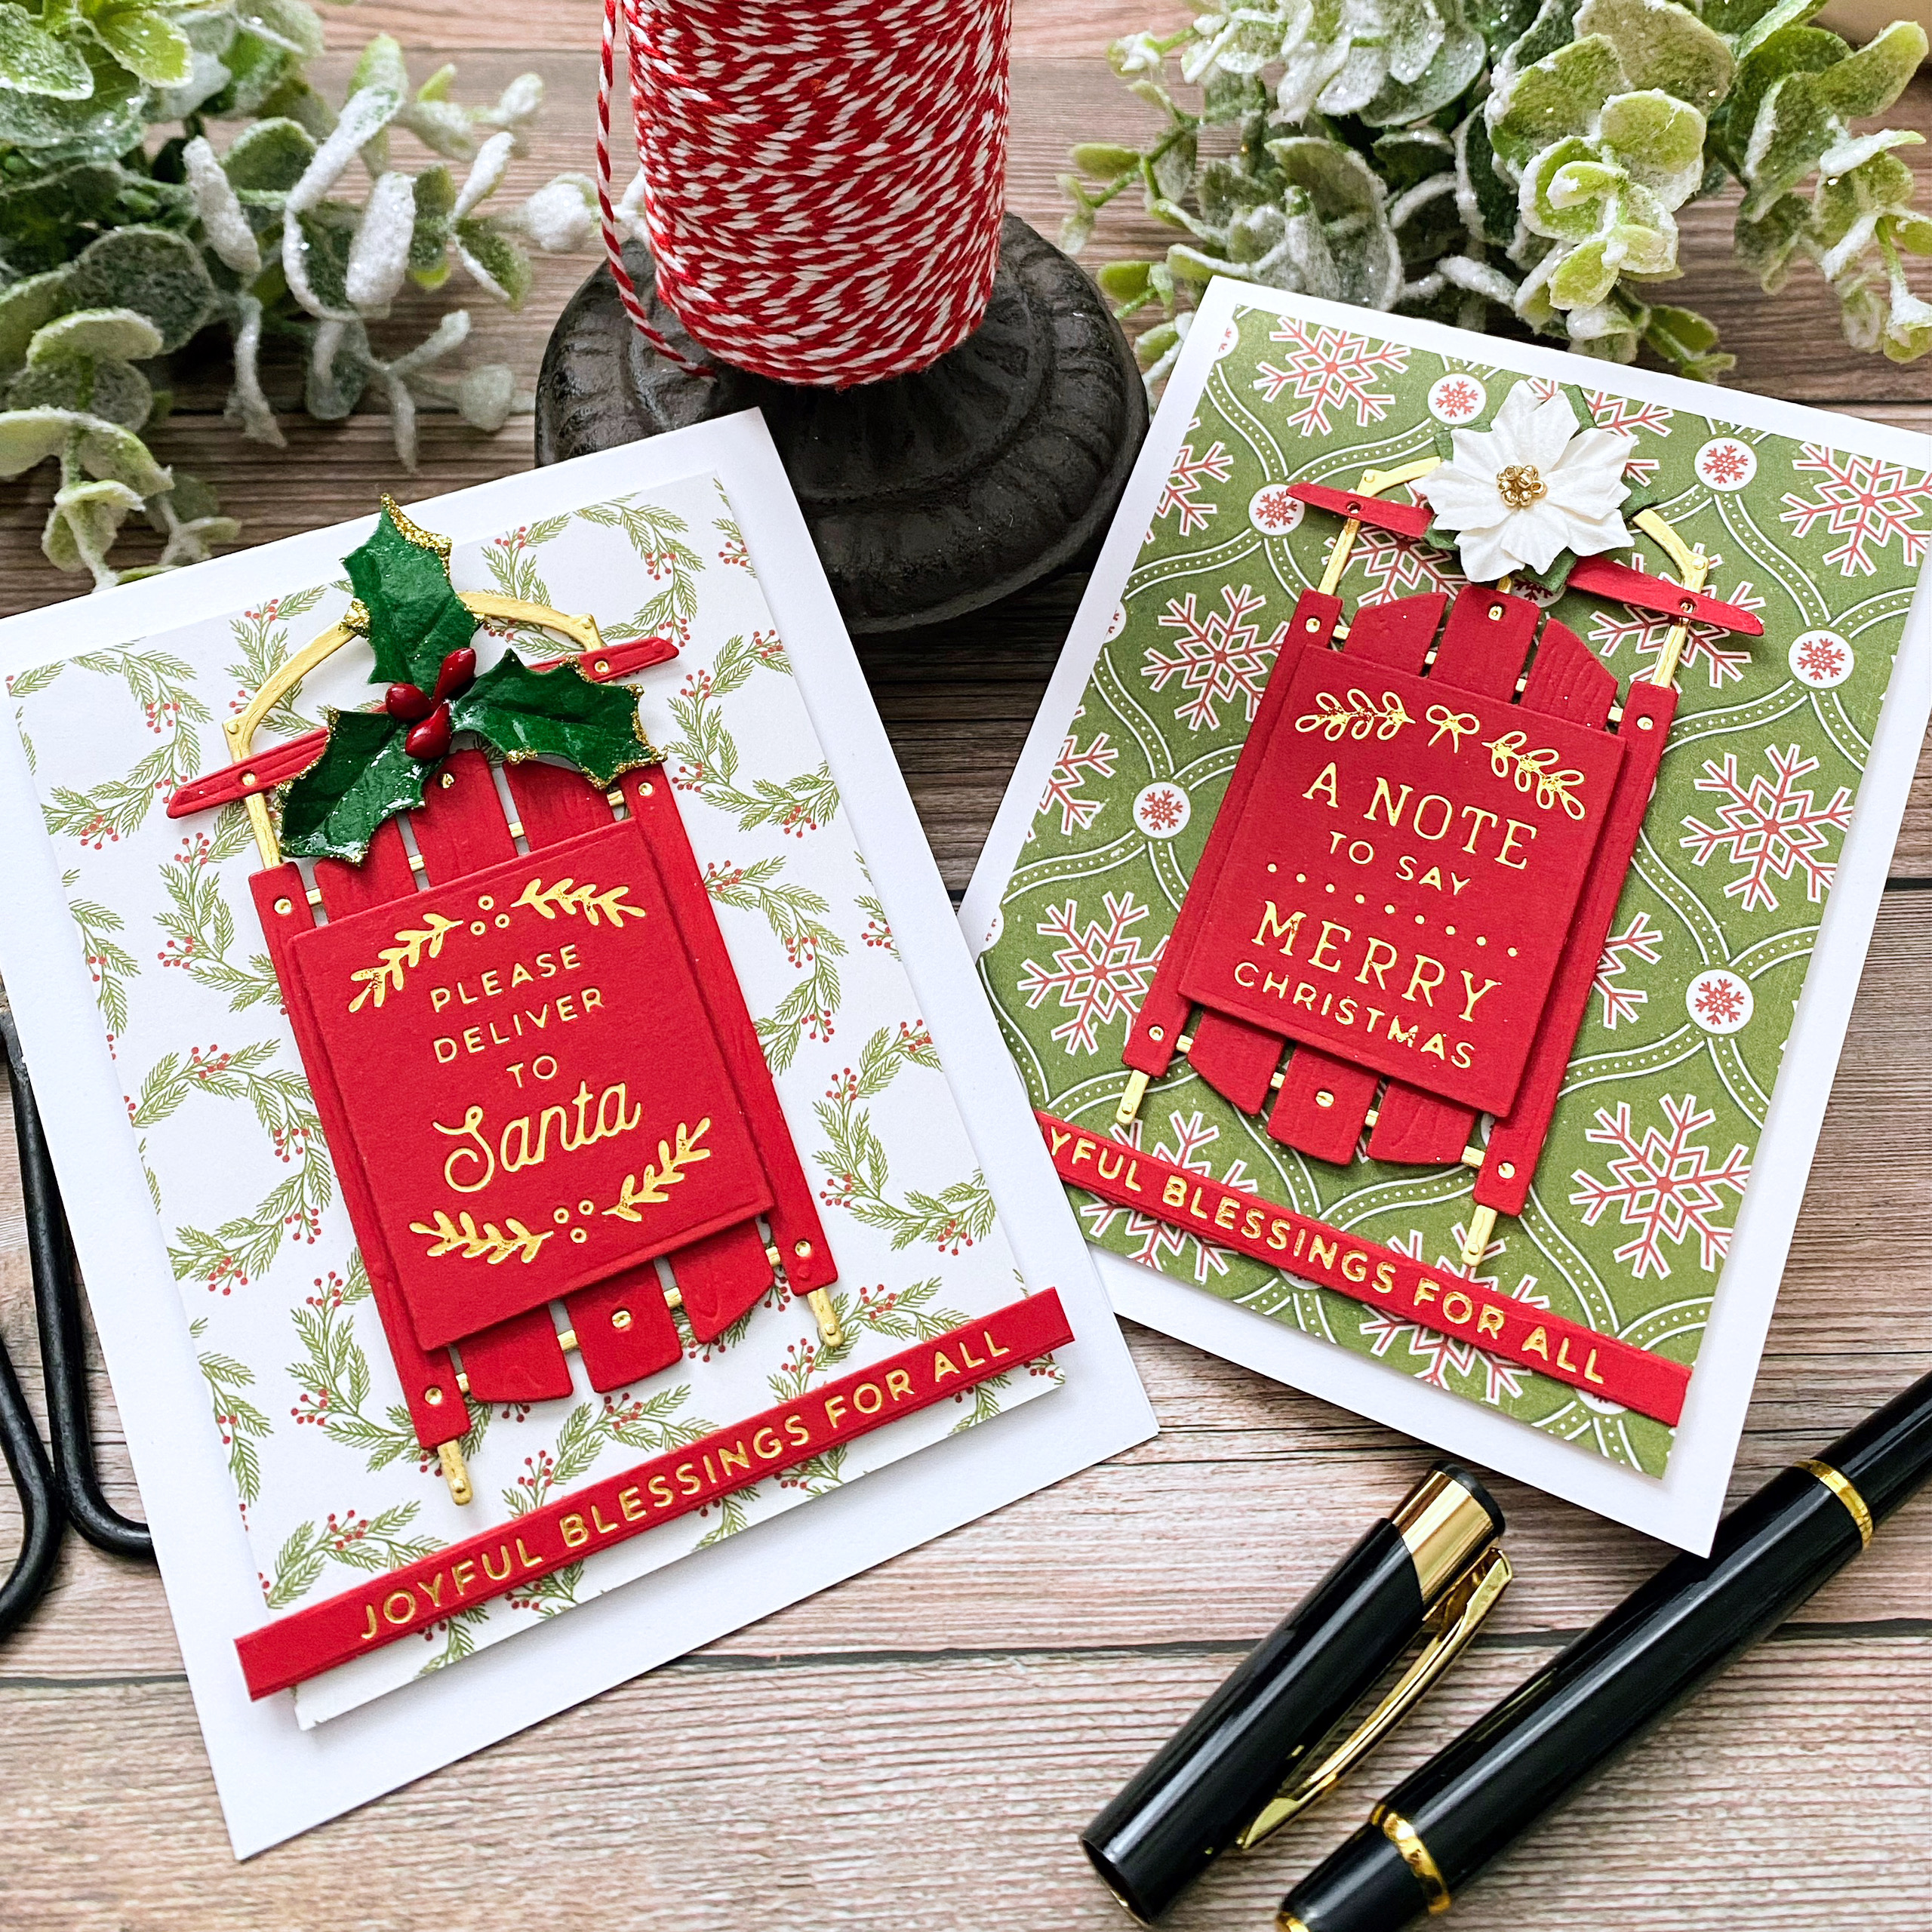
The mailbox dies come with the rectangle so you can die cut the foiled sentiments and they fit perfectly on the front of the mailbox. I didn't use foam squares on this particular card, but for the rest of the cards, I foam mounted the sentiments for added dimension. I used foliage that's included with the mailbox AND a few sprigs from the Winter Welcome Sled dies (I'm sharing a trio of cards using that set later in today's post).

I ended up finding some beautiful pre-made poinsettia embellishments at Hobby Lobby a few weeks ago that made their way into my cart; they're absolutely perfect for these cards! All 4 of the backgrounds were dry embossed using the beautiful Ski Lodge Embossing Folder; I chose Aqua Mist, White, and Pinefeather.

The cute little envelope dies are also part of the mailbox die set and they are just the cutest thing ever! I made some white and some two-toned red; Scarlet Jewel and Pure Poppy. The sentiment strips at the bottom of each card feature the Mini Christmas Sentiments Hot Foil Plates. These little guys were giving me all sorts of fits until I did some adjusting; I raised the temperature to medium, put the sentiments in the middle of the platform, timed them for 18 seconds and added a cardstock shim! voila! perfect! The set also comes with a handy-dandy die to cut them out perfectly once they've been foiled!

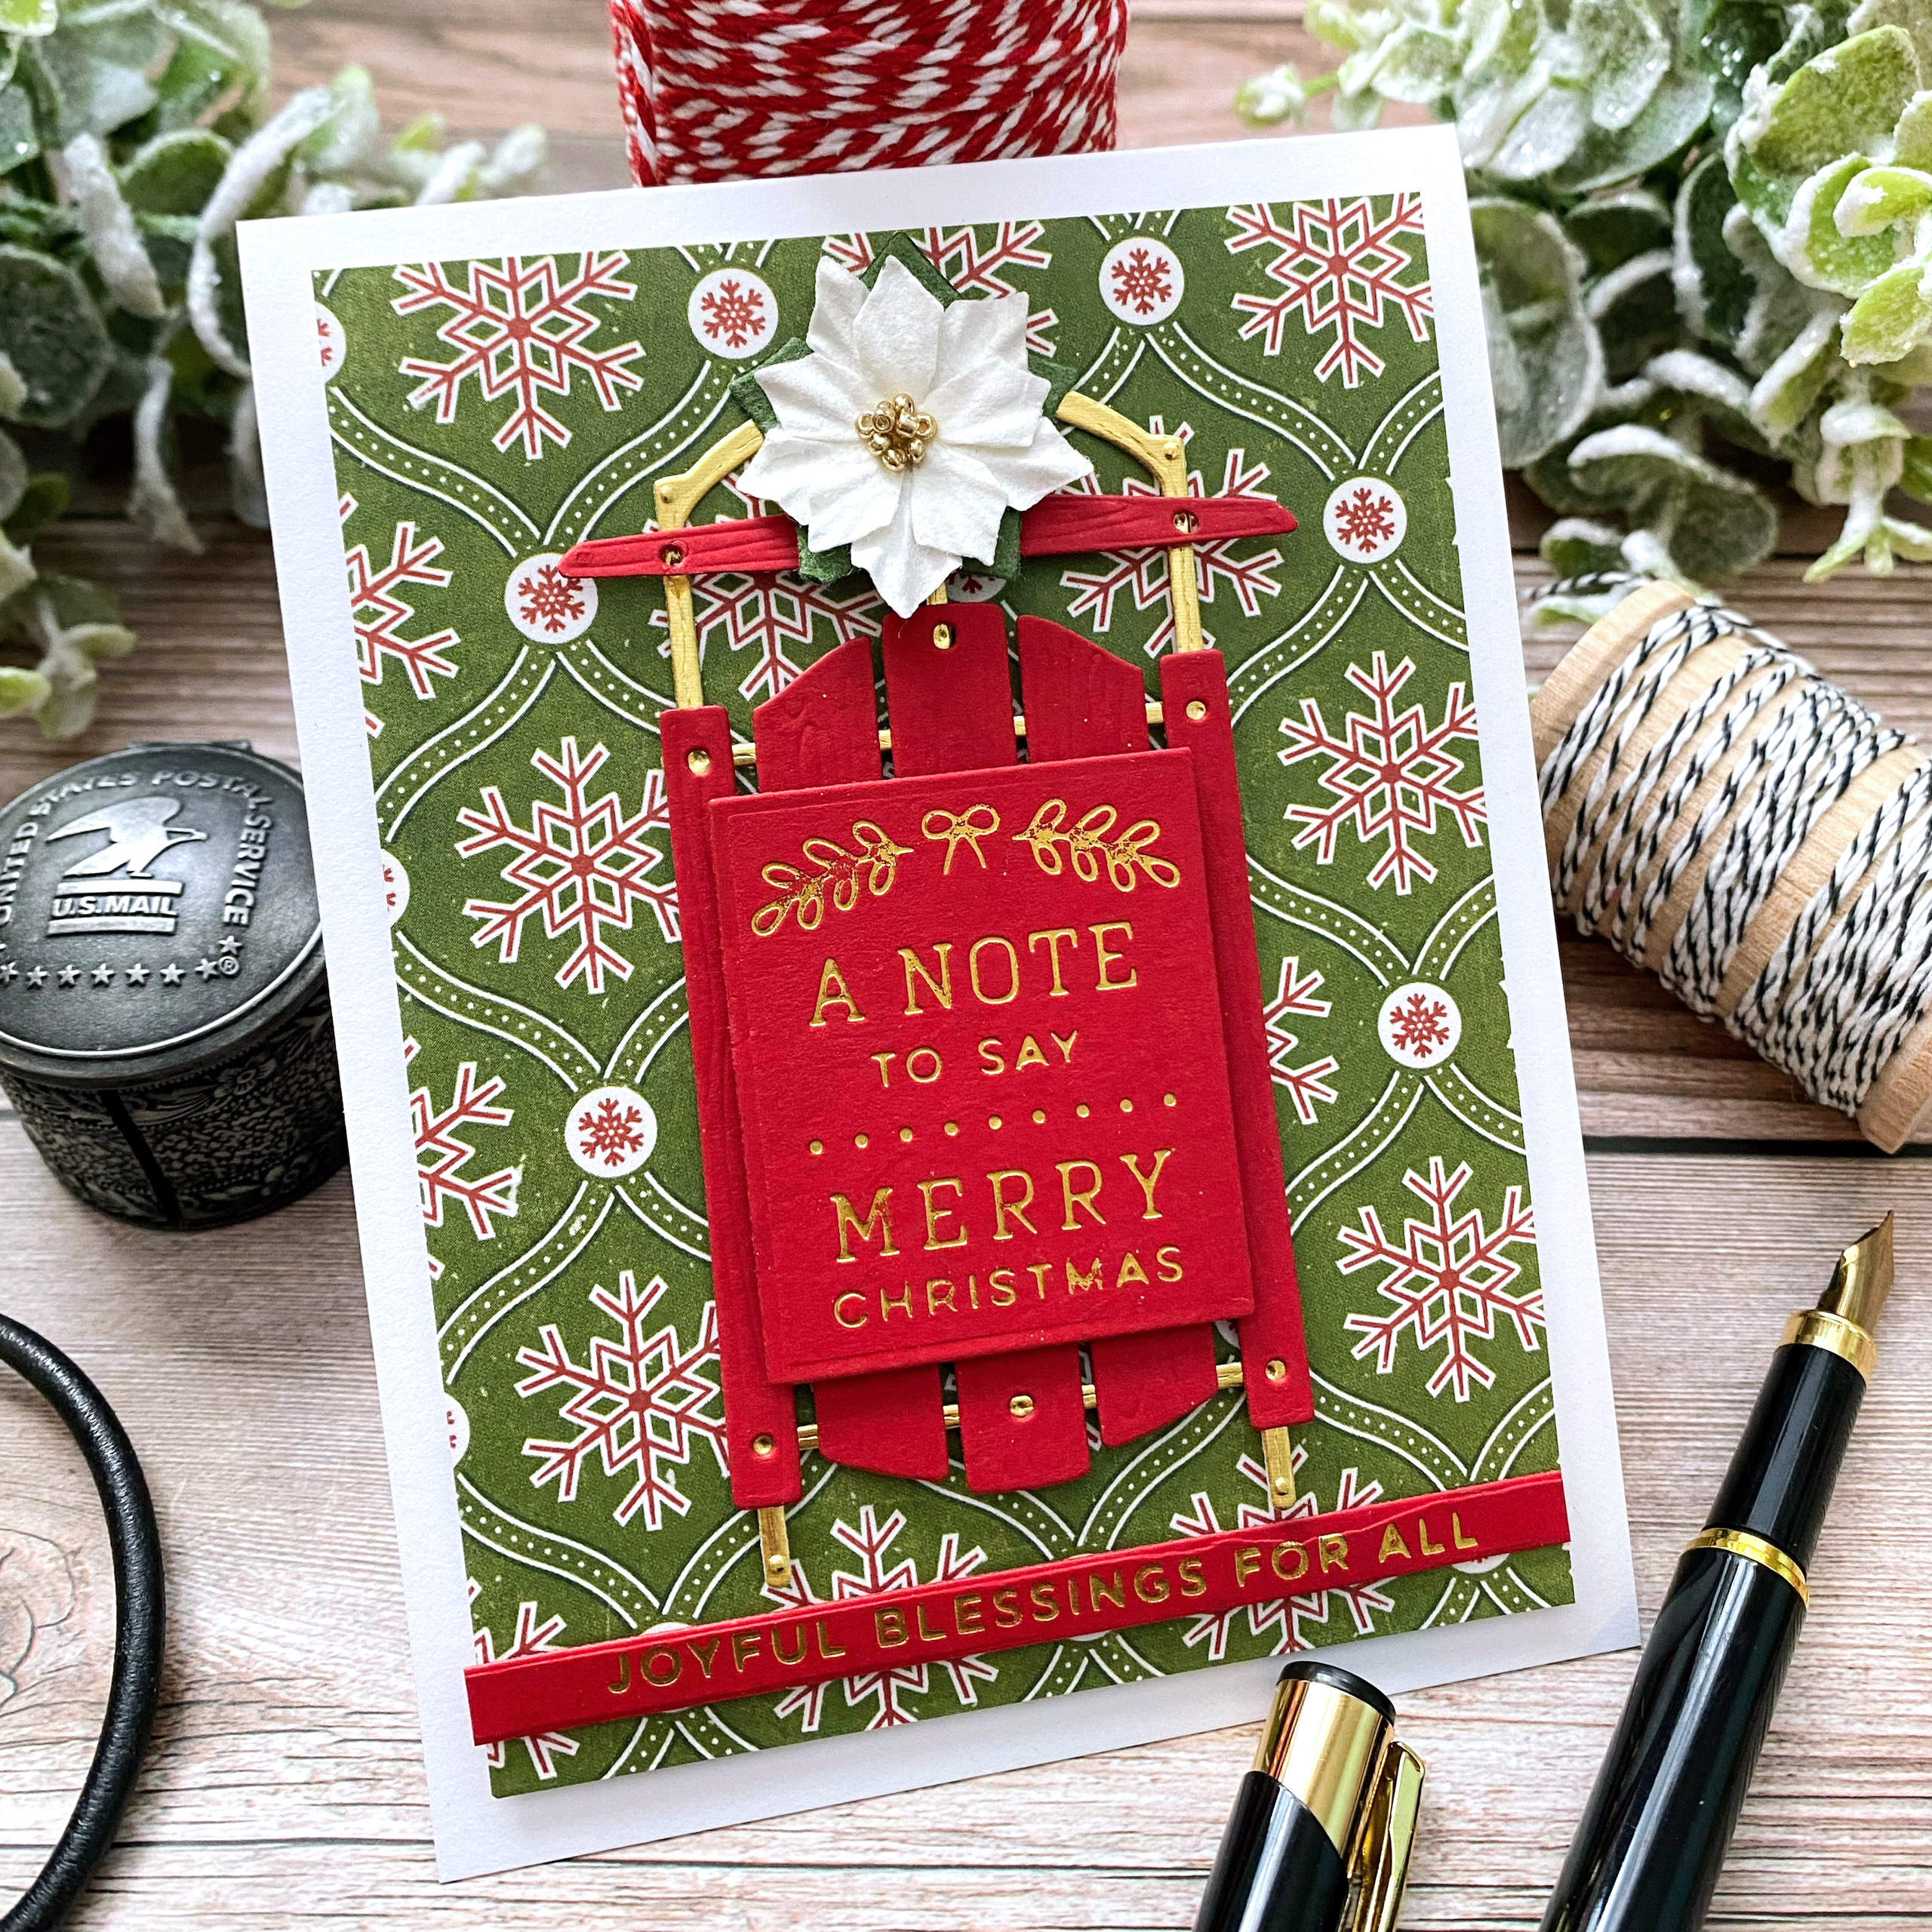
My next series of cards uses the ADORABLE Winter Welcome Sled that I'm obsessed with! One of my favorite sets of ALL TIME is the Two Feet Deep Stamp Set, so it's natural that I would fall in love with this sled, too! I actually can't wait to combine the two because the sentiments in the Two Feet Deep set are so fabulous!

I chose to use some pretty pattern paper that I bought HERE; it's double-sided so the main panel is one side and then I used the opposite side for another card I'm sharing next. The striped paper is from a SU! pack I've had for quite a few years.

I fell in love with the sled cards that Yana made last year and she used the sentiment on one of the planks, so I used her cute idea! 

I used the same foliage for the sled cards as I did for the mailbox cards. Once again, the poinsettia embellishments are pre-made and easy peasy!

My final pair of cards are on the CAS side, but I love that look! I love making cards that look like they came from Papyrus or somewhere like that! The hot foil really elevates them so you don't have to do a lot, if you don't want to! As I mentioned earlier, this is double-sided paper and these are two designs from one sheet. I absolutely love both of them for these cards.

I had some extra sentiments left over from my mailbox cards so I chose to use them with the sleds. I was hoping they would still look like sleds with the large sentiment, but I love how they turned out. This sprig of holly is also from  Hobby Lobby; I'm addicted to their holiday crafting section!

Each of the bases for the sled were die cut using the beautiful Mirror Gold Cardstock; I also die cut many of the elements on the mailbox cards using this same cardstock. It cuts like a dream and is the perfect holiday touch!


I had so much fun creating all of these cards using these amazing products! I didn't want to stop! Thanks for fluttering by!


Wednesday, April 15, 2020

Spellbinders April Stamp of the Month {Beautiful}

I hope you all had a wonderful Easter weekend! We did despite not being able to be with extended family! We made the most of it and tried to make it as special for the kids as possible! Today I'm sharing 3 cards using this month's Spellbinders Stamp of the Month! I had so much fun playing around with the different floral and leafy images that are included in the set, as well as the "Beautiful" sentiment!

This particular set comes with the rectangle outline that you can see on the card on the right. The "Beautiful" sentiment is separate so you can use it with the rectangle or separately like I did on the card on the left.

The sentiments are all embossed in gold and then I added some Crystal Glaze over the top of each letter to give it some added detail and shine.

To begin each card, I stamped the different floral and leaf images using my mini MISTI except with the card with the circle. I just did some free hand stamping to get the wreath look exactly how I wanted it!

I colored the images using an assortment of alcohol markers. This particular panel is trimmed down and then added on a top folding a2 card base with a strip of black and white striped paper adhered at the bottom. I used foam squares on the floral panel to give it extra dimension.

On this card, I added some black paint splatter to the floral panel and then adhered the striped paper in the center!

Each card also has a trio of sparkling clear sequins for some added shine and dimension!

I used the Nestabilities Standard Circles die collection for this card. I heat embossed the sentiment first and then die cut it to get it centered just right! These are my go-to circle dies and have been for years! As I mentioned earlier, I stamped the different images to create a wreath and then colored the images with alcohol markers! This card also has some paint splatter and a tiny strip of pattern paper at the bottom! These cards were so much fun to make and will get popped in the mail ASAP! Thanks for fluttering by!

Saturday, November 16, 2019

Spellbinders Large Die of the Month {Special Delivery}

Hello and welcome! I'm a bit late sharing my projects using the Spellbinders Large Die of the Month, but they are so much fun to use! This month's large die is called "Santa's Helpers" and I've also included the add-on die called Santa's Reindeer that I will talk about later in today's post!

My unexpected favorite in the collection is the elf; you can either create a boy or a girl elf, depending on your needs. I decided on this sweet little boy, which in the end, is reminding me of a Precious Moments figurine. I think it's the shape of the eyes and the placement of the white dot.

I added some color to his cheeks by adding some pink chalk using a ball of tissue. Do you think I could find my sponge daubers? Ugh! Oh well...this technique worked just fine as well!

To dress him up a bit more, I added some tiny jingle bells to the tops of his elf boots and to the end of his hat. I also added some buttons using liquid glue.

Mr. Santa is actually a top folding card, but he looks so cute next to this little muslin sack that I couldn't resist. I found these cute bags at the Dollar Spot in Target a few weeks ago and I bought a few of each design. These "Santa's Helpers" will be the perfect accent to attach to these bags.

I added some Liquid Applique to the pom pom on Santa's hat for some extra realism and dimension. I also added some chalk blush to his cheeks as well, but just before I added the beard.

Here is Santa's Reindeer all ready to guide his sleigh. I realized that I attached his hooves upside down, but oh well! LOL! I thought he looked like something was off!

Rudolph got a shiny red nose by adding some Nuvo Crystal Effects over the top. I also added some white dots to the top of his head using a white gel pen.

This festive crew will accent these cute bags perfectly!

These would be perfect to jazz up a treat sack or just to use as a tag for a Christmas package! Shaped tags like this are some of my favorites! I had so much fun working on these cuties! Thanks for fluttering by!

Spellbinders Small Die of the Month {Season's Greetings}


I'm a little late in sharing my cards using this month's Spellbinders Small Die of the Month, but I'm in LOVE with these beautiful Kaleidoscope Snowflakes! I know that I will be using these all winter long, and for years to come! They cut like butter and are so fun to use! I was able to die cut them from the heavy glitter cardstock without any trouble!

To begin both of these two designs, I watercolored  the panels using Zig Kuretake Gansai Tambi Watercolors in a green and purple. I also spritzed them with Shimmer Spray for some holiday sparkle. I set those aside to dry while I got to work on the snowflakes.


The purple card is more simple than the green design, only because these snowflakes are smaller in size and easy to add to the panel. I die cut each of the three sizes using gold glitter cardstock; actually, I prefer to use the name "Gilver" because it's got a hint of silver in the gold. It's one of my favorites for projects like this.

Once the panels were dry, I used one of my favorite embossing folder from We R Memory Keepers. It gives you two different looks depending on the side that you use up; you can see the difference in the green one because I flipped it for that one. I bought it on Amazon, but I can't find the listing anymore.

When using the folder on the opposite side, like I did on this one, it gives it more of a star looking appearance which complements the snowflakes nicely. This particular snowflake is assembled by die cutting each individual "segment" so to speak. I die cut the bottom portion from gold specialty paper, also found at Hobby Lobby and the top portion is die cut from the same "Gilver" glitter cardstock.

The sentiments are from an old SU! set called Many Merry Messages and is one of my very favorites; I will never part with it! These are the perfect accent for these fun Kaleidoscope snowflakes.

I added some white paint splatter to this card for extra detail. I really like the look and feel it gives the card. The purple one felt a little more elegant so I didn't add the splatter. The finishing touch on both cards is a sprinkling of sparkling clear sequins for some additional detail and shine! I had so much fun with these beautiful dies. Stay tuned for another post using the Large Die of the Month which is super fun and festive! Thanks for fluttering by!

Sunday, October 13, 2019

Spellbinders October Large and Small Die of the Month

Have you seen this month's Spellbinders Large and Small dies of the month? They are so much fun; I'm sharing both today on two seasonal cards that are sure to get you in the holiday spirit!

First up are two card using the Large Die of the Month called Fall Flora! This is such a beautiful collection of dies I know I will be using it year after year! 

To begin these two designs, I die cut the pumpkins and added some ink blending around the bottom for some detail, shadow, and dimension. I set those aside and die cut the "thanks" word that is included in the set out of gold specialty paper.

I love the little label that the pumpkin is adhered to; you can use it as a solid piece OR add the pierced detail/frame like I did on today's cards. I layered all of that onto a piece of Kraft cardstock that is die cut using the Nestabilities dies.

I love that the flower dies come separately so that you can die cut them from different colors of cardstock. I layered them onto the green vines using a 2 way glue pen.

The gingham pattern paper pairs nicely with this earthy autumn design!

Next up is the Small Die of The Month called Home for the Holidays and is just as sweet as can be! I'm so in love with this cute vintage gal bearing her perfectly wrapped gift! I kept these two cards VERY  clean and simple because I didn't want anything to distract from these cuties!

I was thrilled to discover that the vintage wrapping paper prints that my sister gave me were the perfect thing for these two vintage dresses!

I die cut all of the pieces and then got to work assembling these little ladies! The sentiment, which fits perfectly with the vintage vibe, is stamped at the top and then the die cuts are added using foam squares.

I had so much fun working on these seasonal cards! Thanks for fluttering by!