Thursday, October 31, 2019

Papertrey Ink Throwback Thursday {Grateful}

Happy Halloween, friends! I hope you all have a safe and frightfully fun evening filled with Tricks and Treats! As the "spooky season" comes to a close, our thoughts turn to gratitude as Thanksgiving draws near. I chose to revisit the charming Fence Line: Autumn stamp set to create a seasonal card of thanks for this week's Papertrey Ink Throwback Thursday feature!

To begin this fun design, I die cut all of the pieces using the Fence Line: Autumn die collection and got to work inking them up. Once that was done, I set them aside to work on the other design elements included on this card.

The card base is a 4 1/4 by 5 1/2 inch top folding A2 card base cut from Dark Indigo cardstock. I added a scallop piece that was die cut using the Scallop Stackers: Medium die collection out of Prairie Grass cardstock using foam squares for dimension.

I used Enchanted Evening ink and a blending brush to add the ink around the perimeter of a 3 3/4 inch by 5 inch piece of Linen Cardstock. I really love ink blending on this cardstock because it brings out the lovely texture!

I rounded the corners and stamped the "grateful" sentiment in black using the You Made My Day stamp set at the bottom. I also die cut the Shape Shifters: Circle 3 die out of Linen Cardstock. I used a circle die cut to add the blended portion to the middle.

I added the circle portion to the center of the card and then got to work adding in all of the stamped and die cut pieces using foam squares. I also added some ink flecks around the perimeter using a marker and a color spritzing tool. A few sparkling clear sequins finish this off! Thanks for fluttering by!

Tuesday, October 29, 2019

Halloween Wishes

You probably all knew I was lying when I said that the Halloween projects I posted recently were my last for the season! LOL! I am notorious for creating projects all the way up to whatever holiday or occasion is coming up, and this case, Halloween! I've been slowly but surely getting things ready for the teachers and secretaries at my boys' school and these were so fun to make!

I can't seem to stop making the Taylored Expressions Designer Dangles! I bought quite a bit of new faux leather during the summer and it's been waiting for me to put it to use. You might remember THIS post where I put a small dent in it,but this smaller gingham check was calling my name! I knew it would make some great earrings that would present well for Halloween, but get year round use!

I chose some gold flecked corkblack and white striped, and some black textured leather to add in as well. 
My go-to stamp set this year has been the classic Spooky Sweets II stamp set, which seems to make its appearance EVERY  year! ha ha! I couldn't resist making these earring tags a little more playful by adding this vintage witch image from a Tim Holtz cling rubber stamp set that my cute sister gave me!

I thought it would be super fun to have these witches be sporting these cute earrings made with the Designer Dangles-The Bigger the Better mixed media dies. I found some boxes at the Dollar Tree that look like Halloween spell books and such that were the perfect size to put these in! The book boxes are perfect for teachers, too, I think!

I also needed a few tags to package these goodies up! I've become a lazy mom and I like to just send my kids into the school with the teachers' gifts, so I bought some HUGE cellophane bags from Amazon so that I can put the gifts inside and just tie them up with pretty ribbons and tags. It's much less fuss for my kids and I know things won't get lost or damaged before it arrives in the classroom.

To begin these tags, I die cut 5 of the Basic Bookmark Die 3 out of True Black cardstock and then heat embossed the sentiment in silver using the Spooky Sweets II stamp set at the bottom. I set those aside and got to work on the rest of the design elements. I die cut the witch using the Spooky Sweets II die collection and then used my mini MISTI to stamp them all. The "halloween wishes" sentiment is stamped in black onto a strip of Canyon Clay cardstock. I used foam squares to pop everything up for some fun dimension! I had so much fun working on these! Thanks for fluttering by!


Friday, October 25, 2019

Keeping Christmas {O' Holy Night}


Hello and welcome to this month's installment of the Keeping Christmas Blog Hop! We're getting down to the wire here, aren't we? The holidays are upon us; the official start for me is Halloween and now that is less than a week away! You'll want to head to each of the designers' blogs to see what fabulous Christmas inspiration they have for us!
 I almost didn't have anything ready for you today because on the Night Before Keeping Christmas, all my creatures were stirring and maybe even a mouse! I had the best laid plans to work on another design commitment as well as Keeping Christmas in between volunteering at the school and a dentist appointment for my Kindergartner. Well, as I was  stamping away, the school called! Ugh! You moms out there know the sheer dread that the school's phone number popping up on your caller ID can invoke! My 8 year old had just thrown up and I needed to go pick him up. This was 1/2 hour before I was supposed to be at the school volunteering. I quickly applied my make up and ran to the school, but not before I sent a desperate text to another mom asking if she could take my volunteer spot! Of course she couldn't so I told the office I didn't know what to do. They offered the sick bed to my son so I could volunteer! LOL! I actually ended up by taking him home and going back to volunteer since he was just resting! I got home just in time to grab some lunch and head BACK to the school to check out my son for his dentist appointment. As I sat in the dentist office, I KNEW I wasn't going to finish my intended project. Instead, I opted for this quick card using some of the new Taylored Expressions dies that I haven't gotten a chance to use!

Let's just call this one a "trial run", shall we? LOL! I learned a few things NOT to do, but I still like the message it is sending. My day wasn't going so well even before the dreaded school phone call; you see, I had just learned that one of my 19 year old son's friends from school, that he played football with for over 10 years, had passed away from suicide. I'd been crying all morning and felt that sadness in the deepest part of my soul.

I don't usually share spiritual messages here and I should be ashamed, because the message that this card is sending is one that is of most importance to me! I love my Savior with all my heart and I know that because of His life and His love, example, Atonement and resurrection, all will be made whole again!  My daughter is friends with this young man's sister and it happened to be her birthday today; of all days! A few of her friends were going to get together for a last minute birthday party for her since her parents were gone because of the tragedy.

In the midst of the crazy, I needed to put a last minute gift together for her and get her to the high school where they were meeting. Of course, I helped her and got her where she needed to be. Her friend loved the gift and the card; thank heavens I have a nice stash!
Anyway, that is probably WAY too much information and more than you wanted to know, but I felt the need to share that life isn't perfect, just like this card, but the Savior is perfect and He knows us perfectly; his birth was a glorious event and that is why I love Christmas so much! After all that, I'll give you a brief synopsis of this card since it is so simple. I used the Follow the Star die set and A Savior is Born die set paired with the Label Stacklets 12 die collection. I die cut the largest label and then added some Tumbled Glass and Faded Jeans Distress Oxide ink. I spritzed it with Shimmer Spray to get the look of a starry sky, although it's hard to see in the photo. The sentiment is from the Penned Elegance Christmas stamp set and is heat embossed in gold and die cut using the Penned Elegance Christmas die collection. The star is die cut from gold glitter specialty paper and added using liquid glue. Thanks for fluttering by!


Thursday, October 24, 2019

Inspired By...table runner {Halloween Wishes}

Hello friends! It's been a while since I've popped in, but I've been enjoying a much needed break. We headed to San Diego for the kids' Fall Break which was lovely and relaxing and we all had so much fun! I'm back today sharing a trio of projects using the new Inspired By Challenge. This will most likely be the last of my Halloween crafting for the year, which is always sad. On a happier note, I FINALLY got my house all decorated, which my kids just love and me too, if I'm being perfectly honest! 

This week's inspiration piece is a fun table runner which uses an assortment of Halloween prints which I used as the jumping point for my projects. I was particularly inspired by the spider webs, the bats, colors, and stripes.

My first project uses the Favor It Box 8 die collection, which I used on another Halloween project this year that you can see HERE. I wanted to create a few more, but using some of my all-time favorite Halloween stamps. I also included some Martha Stewart Crafts 3D stickers to bring in some additional detail.

I used the Halloween Prints pattern paper which reminds me of some of the fabrics in the photo. I wrapped it around the box using ScorTape for security. The circle stamp is from the Spooky Sweets II stamp set as well as the "halloween wishes" and "open if you dare" sentiments. The stamp set has a coordinating Spooky Sweets Die Collection that makes using the coordinating images so much easier.

These are filled with an assortment of miniature Halloween candies and then tied off with some True Black Baker's Twine, which adds just the right amount of texture and detail without overwhelming the presentation.

I LOVE these glittery 3D stickers that are from Martha Stewart Crafts. My cute sister bought some for me years ago, and when I was running dangerously low, she bought me two more sheets! The designs include spiders, bats, cats, skulls, and more!

Next up is a fun treat bag using many of the same elements. Confession time: I actually made three of these in different colors and patterns, but the photos looked awful of the other two, so I'm only showing this one! I took color cues and patterns from the table runner for each of the three bags.

Each bag uses two of the Front and Center #2 die, which happens to be on sale for $10! I used a regular brown paper lunch bag in between the two to hold the tricks and treats that will be going inside! I was thrilled to use some of the Jack-O-Lantern jingle bells that my sister got me last year as well! I was hoarding them, but they're just too cute not to use!

My last project uses the inspiration of the bats once again, but this time for some quick pillow boxes to hold some gift cards. I used pattern paper from the Hocus Pocus Pattern Paper Collection and a piece from Hobby Lobby to quickly die cut these using the Essentials Pillow Box Die, which is back in stock! The bat image is heat embossed using Silver powder. This image is from one of my favorite stamp sets from the old Waltzing Mouse company! I sure miss her beautiful images! 
This wraps up my projects for today! I hope you're all enjoying this fun time of year! I still haven't used another one of my favorite sets, so don't be surprised if I pop back in with just one more Halloween post! LOL! Thanks for fluttering by!

Thursday, October 17, 2019

Pinkfresh Studio {Hold on to your Hope}

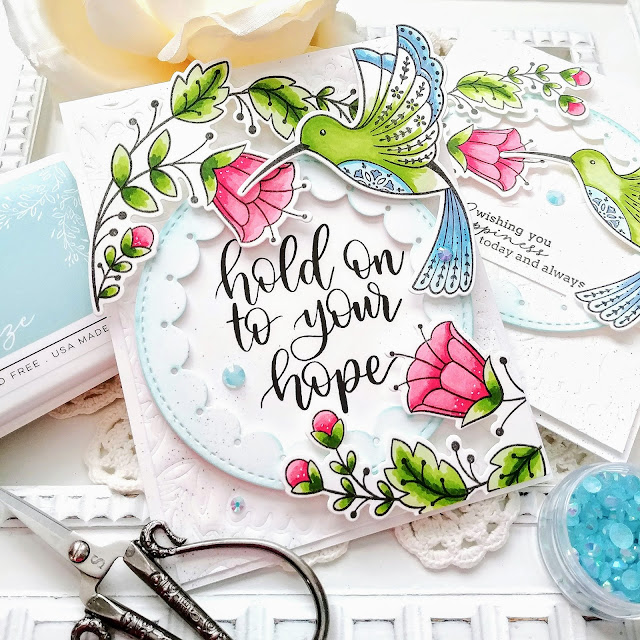
Hi friends! I'm over on the Pinkfresh Studio Blog today sharing these two cards of happiness and hope! I've been creating so many seasonal cards recently, it felt good to switch gears to create these using the Folk Hummingbird Stamp Set. I hadn't had a chance to use it yet and I can tell I will be using it often!

I've been on a dry embossing kick so I decided to use it on today's cards as well.I used the Folklore Die to dry emboss the two panels and then spritzed them with Shimmer Spray. I set them aside to dry and stamped and colored the images that I would be using. I die cut them using the coordinating Folk Hummingbird Die Collection and set them aside.

I die cut two of the Essentials: Inverted Stitched Scallop circles and one of the large circle so that I could stamp this beautiful sentiment from the No One Compares to You stamp set. I did some inkblending around the perimeter using the new Ocean Breeze ink pad for a hint of soft color.


 I also added some white details to the colored images using a white gel pen. It is a simple way to add some extra interest to your images.

I adhered everything to the dry embossed panels using foam squares. The panels are adhered to A2 top folding card bases using additional foam squares for added dimension.

This sentiment is from the Folk Hummingbird stamp set and is stamped in black and adhered underneath the circle. I added a trio of Essentials Jewel Mix to each card using liquid glue for extra sparkle and shine!

I added some ink splatter here and there for some added interest. I had so much fun creating these two designs! Thanks for fluttering by!

Tuesday, October 15, 2019

Layton's Legacy {Holding you in my Heart}


Today I am honored to be participating with SugarPea Designs in the fundraiser and card drive for Layton's Legacy. Please head to the the link to read all about this moving and worthwhile cause founded by my friend, Lea Lawson! October is  Pregnancy & Infant Loss Awareness month, and October 15th is what many in the loss world call Wave of Light. It is a public way to share the memory of your lost pregnancies and/or babies. You can get all of the information for the fundraiser and card drive HERE.

The card I created for this year's card drive will be mailed to Lea for her to donate to a local hospital for them to distribute to mothers in the maternity ward. I wanted to keep it simple and comfortable, yet pretty. As I pondered what I would create and the sentiment I would use, my thoughts flashed back to my own experience of pregnancy loss. While I can't compare my situation with Lea's or anyone else for that matter, I can still feel the pain and extreme sadness that I felt all those years ago. I received a touching card from my Sister In Law that was specifically created for miscarriage. I wish I could remember what it said, but unfortunately, I can't. I do remember that the gesture touched my heart tremendously. Lea wants these cards to be sensitive, so I picked this "holding you in my heart" sentiment from the Heartfelt Sympathy stamp set because it is simple, yet heartfelt without too many words.

My card design evolved from this particular sentiment and that is why I chose to use the heart that is included in the Postage Stamp SugarCut Collection. I die cut it twice and glued it together for a weightier piece. The background was created by dry embossing the Leaf Cover Plate and adhering it to a standard top folding card base. 

I added the heart to the embossed background using foam squares. The sentiment is stamped in black and notched at the end for detail and interest. I layered that over the heart using foam squares as well.

The flowers, which are from the Meadow Motifs stamp set, are stamped in black and then colored using an assortment of alcohol markers. I die cut them using the Meadow Motifs SugarCuts and added them to the card using foam squares. I also added some details using a white gel pen.

I used a 2 way glue pen on the leaves and some of the petals and then added some coarse crystal glitter for some shine.

A few sparkling clear sequins finish off this simple design! Thanks for fluttering by!
P.S. I  will be sharing another card in honor of this occasion this month, so stay tuned!

Monday, October 14, 2019

Pinkfresh Studio Ink Pad Release Blog Hop


I'm so excited for today's awesome blog hop! Today is the release of the Pinkfresh Studio Ink Pads! There are 48 beautiful and amazing colors that you are sure to fall in love with! You can see them all HERE ! Before I dive into my projects, there's some information I'd like to tell you about before I begin!
Pinkfresh Studios will be giving away the full 48 set to one lucky winner on their Facebook page and the full set of mini cubes on their Instagram page. Also, one of you will be eligible to win a 25 dollar gift card by commenting here on my blog. You will need to check the giveway page and claim your prize within two weeks.
Pinkfresh Studio will also be offering Free Shipping on orders of $100 d0llars or more within the United States. Wahoo!
There is a full line up of talent and inspiration on this HUGE blog hop to celebrate this epic release!
Kelly Lunceford {you are here}
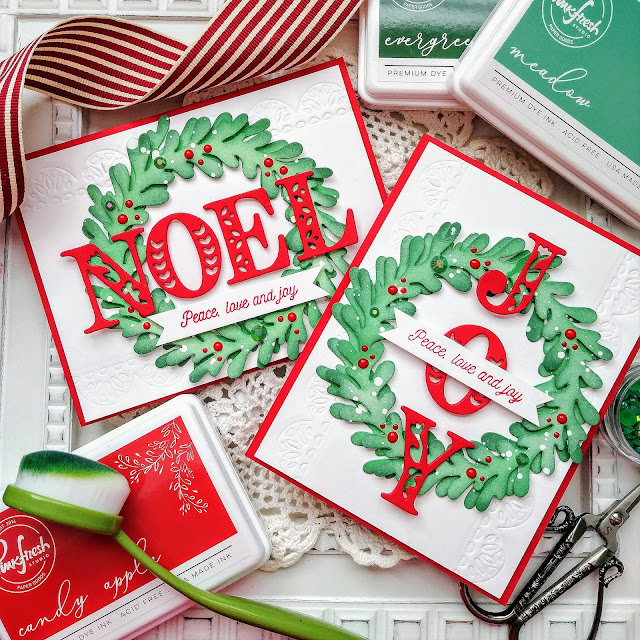
I'm in full-on holiday crafty mode so I'm sharing some Christmas designs using lots of the new holiday products paired with these gorgeous new ink pads! To begin these two designs, I die cut 4 wreaths using the new Layered Wreath Die. I didn't line the inside die up in the same place each time so that I would get 4 different wreaths so they could be layered together in a natural and organic looking way.

Once the wreaths were die cut, I blended some Meadow and Evergreen ink all over them to get the desired look I was going for. I added some white paint splatter over the top for a snowy look. Once that was dry, I added some Red Nuvo drops to mimic berries.

I set those aside to dry and got to work on the letters; I die cut two of each required letter using the Kelly Alpha Upper Dies and then glued them together to create weightier pieces. 

I dry embossed the lacy detail on the sides of two white panels using the Essentials: Lacey Edgers 1 die collection. I love the hint of detail it adds while keeping the cards crisp and clean looking.

I glued the wreaths to the center of each of the white panels using liquid glue. Once that was done I was ready to add the letters. The ones that touch the wreath are just glued using liquid glue. The letters that are in the center of the wreaths are adhered using tiny pieces of foam squares for height.

I used the new Candy Apple ink to stamp the sentiment, which is from the new Merry Days stamp set, onto a white strip and notched the ends with scissors. I love how crispy and juicy these INK PADS are!

On this card, I added the sentiment strip right across the "O" in the word JOY.  The finishing touch to both cards are a few green jewels from the Essentials Jewel Mix. They are the perfect shade of green to accent these ink blended wreaths. I layered the white panels onto red top folding A2 card bases using foam squares for dimension. I absolutely loved creating these two holiday designs! Thanks for fluttering by!