Wednesday, June 29, 2022

The Greetery Sweet and Sunny Collection Release Day

Happy day; it's release day for the Sweet and Sunny Collection from The Greetery! It's such a beautiful collection filled with so many things to love!  You can find the entire Sweet and Sunny Collection HERE! Please keep in mind that the release doesn't go on sale until 10 am ET.  I have a bonus card to share with you today; pulling in bits and pieces from the new release that I just love!


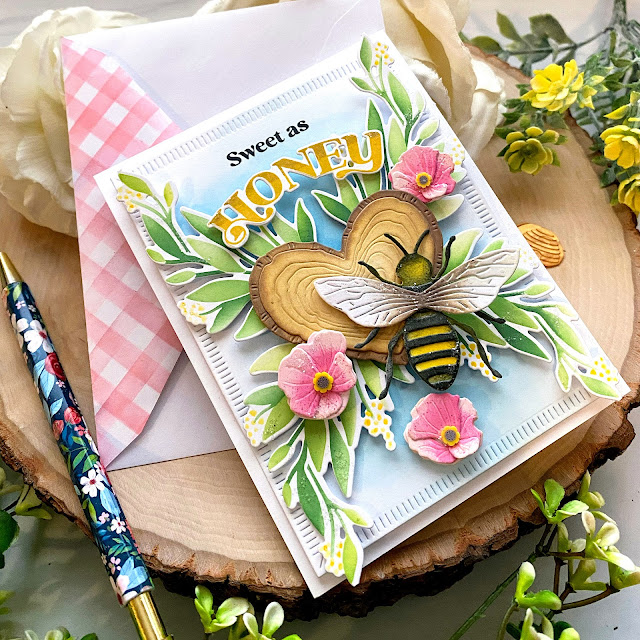
I mentioned yesterday how much I'm smitten with the new Leaves All Around die/stencil set and I had so much fun using it today in a bit of a different way. I decided to cut it in half and then flip it for something a bit unexpected! I REALLY like how it turned out; I thought it actually looked a bit like butterfly wings! I might have to try a design similar to this, but with the Jumbo Curiosity: Butterfly die!

To begin this card, I die cut the Leaves All Around piece and then used the coordinating stencils to add the color to both the foliage and the flowers. Once that was done, I simply snipped it at the most narrow part in the middle to separate it into the two pieces.

I already had the bee just waiting in the wings for her time to shine; so I got to work creating the heart wood slice using the Wood Slice Hearts Die. I colored them using Distress Oxide ink and then glued the two pieces together. I set it aside to dry and got to work on the sentiment. 

I die cut the "HONEY" portion using the Buzz-worthy dies and then stamped it in an ombre fashion using the Buzz-worthy stamp set. I prepared a panel that is die cut using the Crimped Frame Die and added some blue ink in the center and worked my way to center edges. Once that was done, I added the frame pieces using foam squares. I was able to add the "sweet as" portion of the sentiment at this point so I could center it with the foliage nicely.

I added the wood slice to the center using foam squares. I offset the bee so that you could still see the heart shape and then framed it with the Botanicuts Hollyhocks. If you look closely, you can see that I added some of the sunflower clay accents from the Buzzy Bits to the centers of each bloom.

I strategically placed the "HONEY" sentiment using foam squares on just the H and the Y so that it would "float" above the leaves.

I added a touch of glitter to the bee's wings and body, the flowers, the top of the HONEY, and the leaves. The entire crimped panel is added to a top folding A2 card base using additional foam squares! I had so much fun with this card and as I was editing my photos, it was reminding me of Critter Country at Disneyland. We were able to take a trip there in May, so the charm is still fresh in my mind. I think I might make a few more cards using Critter Country in mind! ha ha! Thanks for fluttering by!

Tuesday, June 28, 2022

The Greetery Sweet and Sunny Collection Day 2

Welcome to day two of full reveals for the Sweet and Sunny Collection from The Greetery! Thank you so much for all of your sweet comments; they're so fun to read! I'm glad to hear you're loving this release as much as I am! You'll want to head to The Greetery Blog for the official "meet and greet" for all of the new products being showcased today! Just like yesterday, there will be two winners chosen from the comments left on the designers' blogs and will receive a $50 gift card to The Greetery shop! 


As you can see, I wasn't quite ready to say goodbye to the bee theme that was introduced yesterday and I still needed to use this big and beautiful bee! I love the size and it will be perfect for tags and cards and all kinds of projects! This particular card also features the fabulous, and I mean FABULOUS, new stencil/die set called Leaves All Around! It makes the most beautiful frame of leaves and hanging clusters to accent so many cards and projects! you can cut it in half to use to cradle different containers and images. I think Wanda used it yesterday as an accent for her bee!

I added some blooms that were left over from yesterday's cards and then added the cute little honeycomb accents for the centers of the flowers. These little accents are included in the Buzzy Bits that are part of this release! I was positively giddy when I saw how cute they looked as the flower centers! I fear I may be using them quite a bit now! I arranged the bees in the corners and then added the sentiment, which is from the Buzz Worthy stamp set, in the center!

My next card uses the absolutely fabulous new Jumbo Curiosity Dragonfly, Moth, and Butterfly dies/stencils. I absolutely LOVE that you can add the beautiful patterns so easily with the coordinating stencils!

I found a really magical print that was the inspiration for today's card! Simple, yet bold! After I was finished, I thought that the beautiful new Leaves All Around would have been beautiful as well; I can't seem to stop dreaming up new ideas!

My third card for today uses the AMAZING new BotaniCuts Hollyhocks! I had so much fun inking them up using assorted Distress Oxide inks. I sat and fussed and fiddled with these beautiful blooms, but when it was all said and done; the watering can won! I have a few blooms left so I think I'll keep tinkering with them for a more "garden" type look!

Of course, I had to add another little bee flitting around the blooms! I feel like I've given the BotaniCuts Wildflower Mix a workout over the last few months, but they're just the perfect thing to tuck here and there!

The background was created using the Seed Catalog Background Stamp and then I layered the watering can and flowers over the top using foam squares.

Make sure to head to the other designers' blogs and leave a comment to increase your chances of winning! Thanks for fluttering by!


Monday, June 27, 2022

The Greetery Sweet and Sunny Collection Day 1

Hello and welcome to day 1 of the Sweet and Sunny Collection from The Greetery!  I hope you're all as excited as I am! I'm a huge bee/honey fan, so this release is RIGHT up my alley! I had so much fun pulling bits and pieces from previous releases to bring my cards to life! Of course you'll want to head to The Greetery Blog for all of the official introductions to the day 1 products! Leave a comment here and on each designers' blogs for a chance to win one of TWO $50 gift cards. Now that we're done with business....let's get onto the cards! I must warn you that I went a little bit crazy with this release and have A LOT to show you today! ha ha!

Up first is the fabulous new Honey Jar stamp/die set! I can't help thinking of honey without lemons and lavender. About 5 years ago, I put together a Lavender and Honey luncheon for the secretaries at my boys' school and had so much fun decorating and creating favors! Now I want to put on another one with all of these cute new products! The Honey Jar stamp set is just as cute as can "bee"; it is styled just like the mason jar, watering can, etc. It also comes with two different bees, the ruffled jar cover, and a honey dipper. I added some extra "honey" detailing by adding some Marmalade Nuvo drops to the honey dipper! Such a fun detail! I do want to note: the bee on this card is NOT the bee that is included in the Honey Jar set; this is from the new Honey Bees die! You're going to fall in love with these bees; this is the smallest of the three sizes included in the die collection. 
The fabulous sentiment is from the new Buzz-Worthy sentiments and I've used them on almost EVERY card for this release; they're just that fun! The honeycomb pattern in the corners is also from the new Buzz-worthy sentiments as well; so easy to add instant "bee" detailing! I added them to the corners of a panel that is die cut using the Deco Frames Die. I also added some lemons from the Lemon Blossom Stamp Set and a few Lavender sprigs from the recently released BotaniCuts Lavender Die. I just love how nicely they accent the honey jar!
The Buzz-Worthy stamp set has dies to cut out the large bold portion of the sentiment and then quite an assortment of companion stamp sets. For the honey jar topper, I die cut it from white cardstock and then added the gingham pattern using the Flappable Stencils. I then added the "ruffled' detail by using the stamp and the same ink as the stenciling. I layered the entire focal panel onto a top folding A2 card base using foam squares!
My next card features the beautiful new Honeysuckle Stems stamp/die set! I'm especially fond of this particular stamp set because I happen to have this exact flower creeping up the East end of my porch! It attracts Hummingbirds and I've enjoyed sitting on the porch watching them in fascination as they quickly flit from bloom to bloom! This particular stamp set features three different clusters of flowers for you to arrange as you please! I chose to use all three for this card!

The bees on this card are the two that are included in the Honey Jar stamp set, so you can see scale-wise what they look like! They look so cute with these honeysuckle stems! I chose the longest sentiment included in the Buzz-Worthy stamp set to highlight these beautiful flowers; even though it's not an actual honey card, it does use the honeysuckle, so I thought I could get away with it! ha ha!

Once again I used the honeycomb images from the Buzz-worthy stamp set to accent the corners. I added some black paint splatter for visual movement and added detail. I clustered the flowers on a panel that was cut using the Deco Notecard Die using foam squares for dimension. I added some glitter to the flowers and stems for some sparkle.
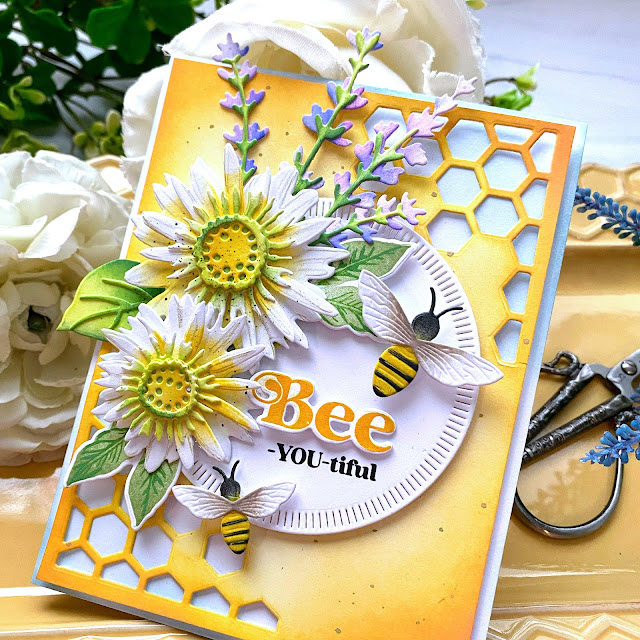
This might be my favorite for today! This one features the medium sized bee included in the Honey Bees Die. I saved the largest bee to share on a card tomorrow, so stay tuned! I'm sure you'll see plenty of that largest bee from some of the other designers. As you can see, this card also features the beautiful new Honeycomb Corners die. I love how easy it is to create these beautiful hexagon cut outs! I decided to sponge some blue ink on the card base so you could see it shining through the openings.


I framed the sentiment with daisies created using the BotaniCuts Sunflower Die; don't they transition into daisies so nicely? I tucked in some extra flowers that were created using the BotaniCuts Wildflower Mix dies and a leftover sprig of Lavender from my first card. I used these same yellow flowers on a card that I will be sharing tomorrow, but with the cutest addition to the flower centers that I'm just giddy about!


Now, the sentiment was probably created to say "always Bee Kind", but I just love how the "always" nestles inside the arc of the "Bee Kind" so perfectly!

I added yet another honey dipper from the new Honey Jar stamp set coated with some Marmalade Nuvo Drops....so fun!
My next card was 100% inspired by the Sweet and Sunny Collection graphic for this release! I couldn't help but create a card featuring the Honey Jar and the Honeysuckle Stems. I had a few lemons left over so I added those as well!

This honey pot is a little messy and got a bit of honey dripping out! ha ha! I couldn't resist adding in some Marmalade Nuvo drops on the jar and the stamped honeycomb in the corners.

I love this "What's the buzz?" sentiment and I thought it worked so nicely with this card!
My final card for today is a slightly different version of my "Bee Kind" card, but I was on a roll and just couldn't stop! 

I recently purchased a wax seal kit that features the beehive you can see on the left side. I've been having so much fun using it on a few different projects, but I'm positively giddy to use it as I close up envelopes to send these cards! 

This card features the "Bee" sentiment included in the Buzz-worthy sentiments stamp set with the companion "you-tiful" sentiment.

This one features both the small and medium bees from the Bee Die Collection.

If you've come this far, I applaud you! ha ha! Make sure to join me again tomorrow for day 2 of full reveals for the Sweet and Sunny Collection. Head to the other designers' blogs to see how they've used these AMAZING new products!
Laurie Willison

Tuesday, June 21, 2022

Papertrey Ink June Release Countdown Day 4

Hello summer!!  How fitting that I'm sharing this card today celebrating the first day of summer! I'm thrilled to be here for the last day of the June Papertrey Ink release countdown! There was a little mix-up over on the PTI blog yesterday and this cute Feathered Friend made his appearance a little early! ha ha! No worries, though; I'll still share him here and give you all of the details on how I made this tropical card! 

The focal point of today's card is the parrot from the new Feathered Friends mini 24 stamp set and die! I chose to ink him up in the traditional parrot colors for a colorful display! Despite the amount of images included in this set, this bird is delightfully easy to stamp and put together! I began with the red feather portion, then added in this order: feet, beak, green feathers, black eye/mask portion, teal feathers, yellow feathers and then the coordinating details. Easy peasy!

I had so much fun using the Floral Paradise stamp set for my Flash Sale a few weeks ago, I thought it would be fun to ink up a few more leaves and flowers to tuck behind the colorful parrot. I also snuck in a few leaves from the new Feathered Friends 24 dies that were showcased on day 2. 

I stenciled a panel using the Pool Water stencils that were showcased yesterday. I love the unique background it provides for this tropical design. It would also be cool to use as a stone wall or a stone path of some kind as well. In fact, you could create a deck for the pool with the smaller patterned stencil and then the pool water with the larger of the two stencils.
It's hard to see in the photo, but I used the Border Basics: Rectangle Die paired with the Border Bling: Tribal Frames Die. For those of you who don't know, the Border Basics: Rectangle Die is the base for ALL of the different Border Bling (not skinny frames) Frame dies. You simply die cut your cardstock using the basic frame and then drop in your Border Bling die and cut it again. So easy! The sentiments are both from the new Floating By Sentiments stamp set and I love them!

Monday, June 20, 2022

Papertrey Ink June Release Countdown Day 3

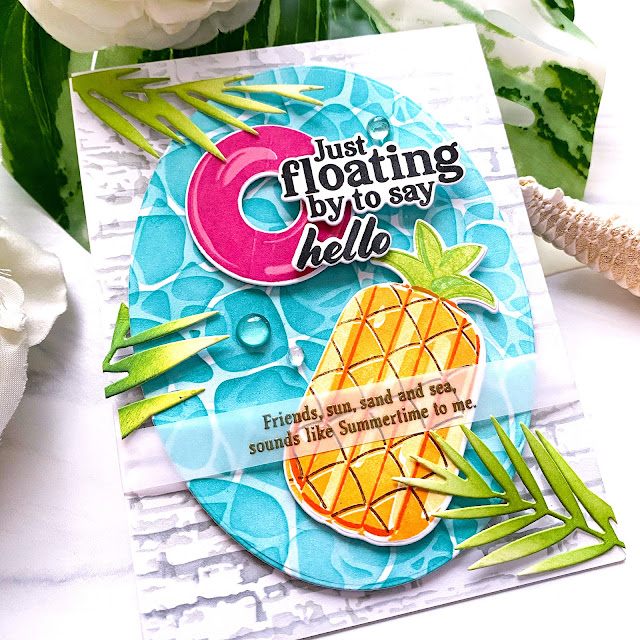
It's day 3 of the Papertrey Ink June release countdown and I'm sharing two fun, summery cards with you using some of my FAVORITE new products from this release! The new Floating By stamp/die set is a MUST-HAVE in my opinion! I'm absolutely in love with these cute floaties and the new Pool Water Stencils! The stencils come in a pack of two and I thought they were supposed to be used together, but I don't think they are! ha ha! This first card uses them together, but I've used them by themselves on my next card AND a card for tomorrow!

I wanted to create the illusion of a brick patio with the shaped pool, so I used the previously released Brick Wall Stencil Collection for the background. I stenciled a panel with the Pool Water stencils and then die cut it using the Nesting Basics: Ovals and added it over the top of the brick panel using foam squares.

The sentiments included in the Floating By stamp set are so much fun; the large "Just floating by to say" sentiment and then a few companion sets to finish off the phrase. I chose to use the "hello" portion for a fun summer card. The heat embossed sentiment at the bottom is from the new Floating By Sentiments stamp set. These are so much fun and I've used them a few different ways today and tomorrow.

I normally do all of my die cutting first and then use my MISTI to stamp everything. I would suggest that you stamp the circle floatie first and THEN die cut; it has the steel bars across the die to hold the circle in place and if you die cut first, it makes it hard to get a good inked impression. If you look closely at the pink floatie, you can see it. I also didn't learn my lesson on my second card and struggled with it AGAIN! Learn from my mistake! ha ha! I finished off the card using a few dew drops and the leaves from the Feathered Friends 24 die set.

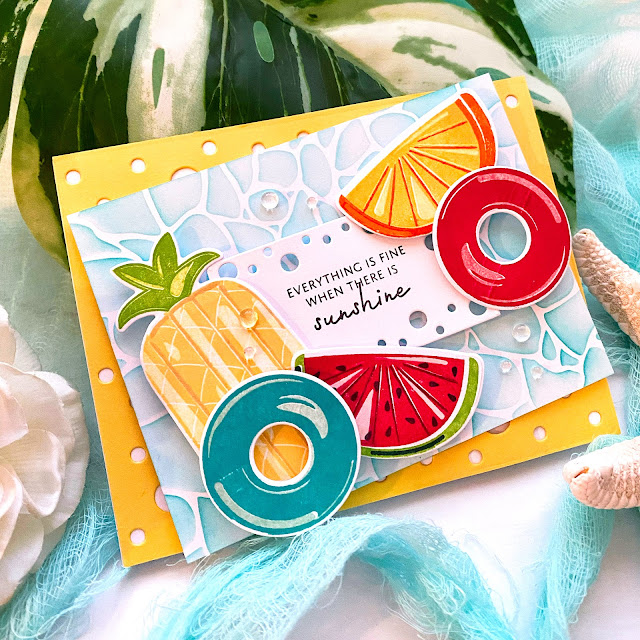
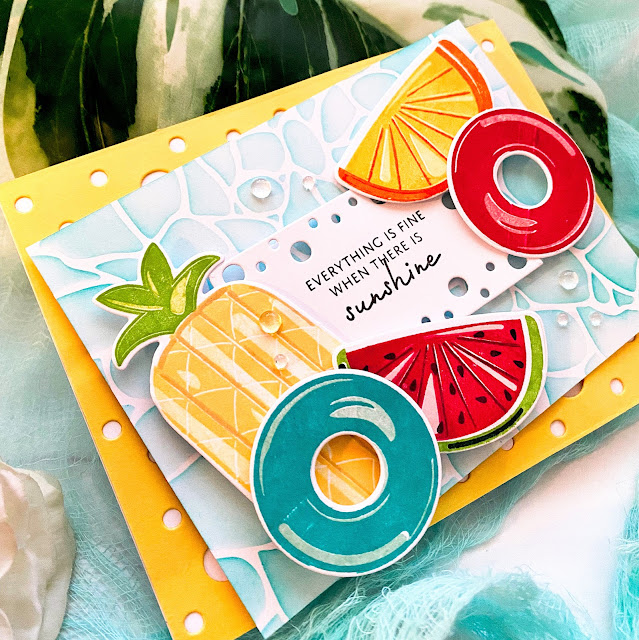
My second card for today uses ALL of the floaties! ha ha!  Aren't the fruity ones so absolutely adorable? I'm obsessed! The best part about the wedges is that they don't necessarily look ONLY like floaties, so you can use them in all kinds of summery ways!

The background and the sentiment piece are cut using the fun new Lotty Dotty dies! The sentiment is from the Floating By Sentiments and they are so much fun!

I used the Pool Water Stencils for the background and then added it at an angle to the Lotty Dotty background.

Join me tomorrow for one last card before the release! Thanks for fluttering by!