Showing posts with label SugarPea Designs. Show all posts

Monday, July 14, 2025

Happy Camper

Hello, friends! I hope your summer is going well so far! My son just got back from his first campout with the youth group at our church. Thanks are always in order for the daring leaders who take time out of their busy lives to help facilitate these types of activities! I'm using older (and mostly retired) products, so this is definitely more a "for me" post than anything else. I am one of those people that forgets what I have made unless I see a picture and then I get inspired all over again! ha ha!

I made three quick and easy CAS cards for the three leaders; they are all men, so I didn't need anything too fancy and even though I'm not usually a CAS type card maker, masculine cards usually turn out nicely with that style. I'm using a potpourri of products and companies to pull these three cards together.

All of the cards use the retired Summer Camp Stamp set from Papertrey Ink. I have held onto older stamp sets like this for this very reason. I always enjoy pulling out older sets to use in new and fresh ways.

I also used the darling lantern from SugarPea Designs, but the online store is currently unavailable so I can't link it. It is one of my favorites and I have used it on some of my cards that I personally like the best. 

Each of the three cards have gold foiled stars on white cardstock using the Cascading Stars Hot Foil Plate. For this card, I used the lantern die to cut out the center portion and then popped it in place using foam squares.

Each of the three cards also use the Scene It: Mountain View Die. For this one, I only used the trees to frame the lantern and then used one of the images from the Summer Camp Stamp Set and then punched it out using a circle punch.


This one uses all of the pieces to create the full scene. I added the gold embossed vellum strip over the top and secured it over the foiled panel with scotch tape. The bottom looked a little naked, so I added a strip of Summer Camp pattern paper  using liquid glue.

Cookies are in the oven as I type, so I thought it would be fun to decorate the bakery boxes the cookies will go in with ribbon and a tag. These are just quick and easy "Pinefeather" style tags. I did stamp a greeting on the inside using the Inside Greetings: Gratitude Mini Stamp Set. The timer is going off....better run! We don't want burnt cookies! Thanks for fluttering by!


Friday, February 26, 2021

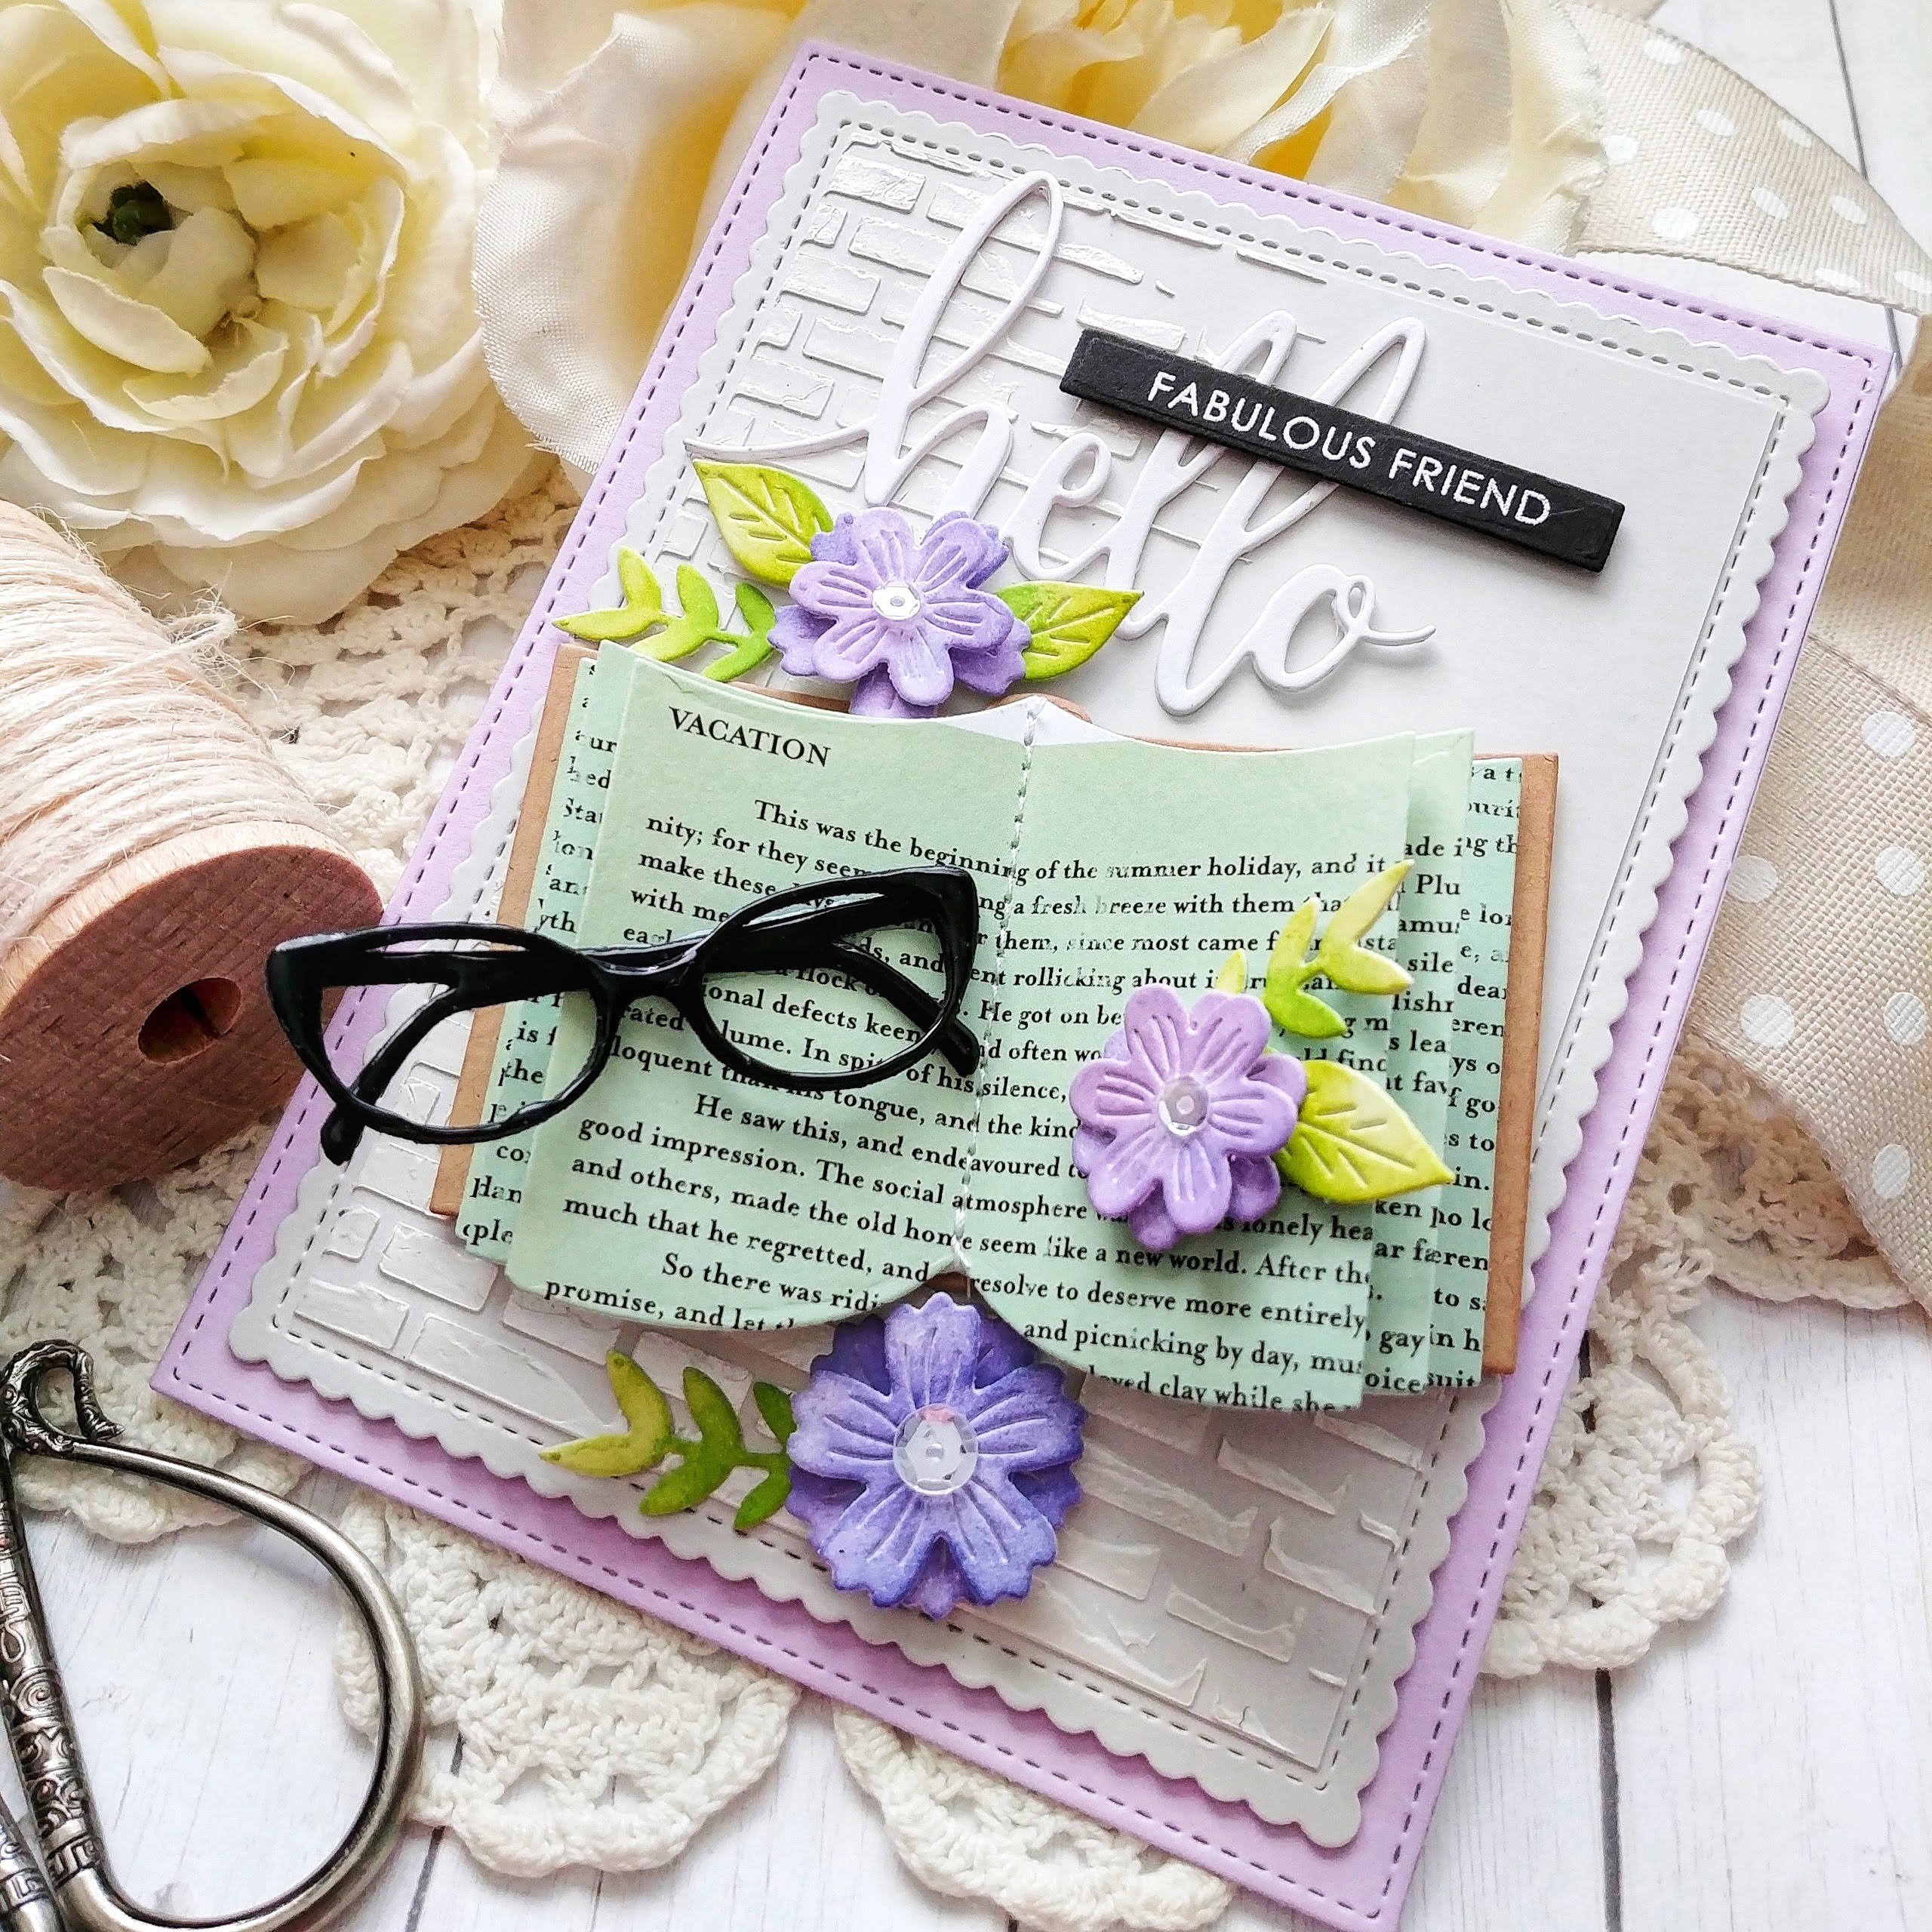
Hello, Fabulous Friend

Hello to ALL of my fabulous crafty friends! It's nearing the end of the month which means I have a little time to do some "just because" creating! I decided to spend that time creating  something for this month's SugarPea Designs Mix It Up Challenge! I don't think I have participated in one of these challenges since I stepped down from the Design Team, so it was super fun to create this card! 

I just HAD to have the Open Book SugarCuts when they were first released, but I haven't used them until now! That's why I wanted to play along with this challenge so much because these are just perfect! To begin this card, I die cut the scallop portion using the Card Front Element Builder SugarCuts as well as a panel to fit just inside. I knew I would be using the English Bond Brick Wall Stencil and I didn't want it to go onto the scalloped portion. I simply cut a panel slightly smaller and then used the stencil with some texture paste. I set it aside to dry and got to work on the other design elements.

I searched my stash of pattern paper to find a print that would work well for the book pages. I was thrilled when I found this particular pattern from a VERY old pad. I selectively die cut this particular portion of the paper since it talks about summer vacation starting up! I thought that seemed like a fun book to read, especially since this card will be going to the school librarian, who also happens to be one of my fabulous friends! ha ha! I die cut the cover portion of the book out of Kraft cardstock to fit the color parameters of the challenge. I did some quick stitching down the pages of the book and then secured them to the cover using foam squares.

The eyeglasses are probably my favorite part...I die cut them three times from black cardstock and then added Nuvo Crystal Glaze over the top and let them dry before I glued them together. The Open Book SugarCuts also come with some fabulous flower and leaf dies. I die cut them all out of white cardstock and then colored them with finger daubers and ink. 

I die cut the Hello word  twice out of white cardstock and then glued them together using liquid glue. I heat embossed the "Fabulous Friend" sentiment, which is from the Everyday Sentiments stamp set, onto a black piece of cardstock and then die cut it with the Sentiment Strips SugarCuts. Once I had all of the elements created, I put the card together using foam squares and liquid glue onto the dried brick panel. I added sequins to the centers of the flowers for a fun detail and some sparkle! I had a lot of fun creating this card! Thanks for fluttering by!


Tuesday, August 4, 2020

You're not old, you're a classic!


It's always a good day when I get to use the Greatest Hits stamp set and Greatest Hits SugarCuts! I have two male birthdays coming up and this is the PERFECT stamp/die set for them.  It is one of my favorite sets and it's so much fun to play with!

I also paired it with the Musical Cover Plate which I dry embossed on the Aqua Mist panel. I placed the record right in the middle using foam squares. From there, I added the rest of the records using additional foam squares and liquid glue. I trimmed the one in the upper right hand corner with scissors to make it fit the panel.

I went a little crazy with the white colored pencil to give the illusion of shiny vinyl, but I really do love the effect! The record player needle arm is die cut out of silver specialty paper. I added a silver brad in the die cut hole and then trimmed the extra prong portion off with wire snips.

The sentiment is heat embossed in silver onto a strip of red cardstock. I wrapped it around the corner of the card diagonally for some fun detail. I used to use this design detail a lot, but have fallen out of the habit! It's always fun to bring old techniques back into the rotation.

I stamped the "Happy Birthday" sentiment at the bottom using my mini MISTI and black ink!

Each panel is added to a red card base using foam squares for added dimension. I also added a trio of sparkling clear sequins for detail and shine. Even though these are male cards, I think for the look and feel of these cards, it works! I forgot to photograph the inside, but I added the "Hope your birthday is a hit" sentiment and another record. Thanks for fluttering by!

Friday, January 24, 2020

SugarPea Designs Sweet Peek Week Day 5


Hello and welcome to the 5th and final day of the SugarPea Designs Sweet Peek Week! This week has been so much fun with so many amazing products that are on sale NOW! I'm feeling some heartbreak as this week is coming to a close because I am saying goodbye to my SugarPea Designs family which has meant so much to me over these last few years! This will be my last release with the team, but I will still be sharing fresh inspiration using all of the previously released sets as I make cards for friends and family! So...today's card has extra special meaning for me...I am SO lucky to have made so many friends throughout this journey and I can't say thank you to Wendy enough! Make sure you head to the other designers' blogs to see how they've used today's amazing products!

I couldn't resist bringing back this cutie from the new Pandamonium stamp set to accent the new Friendship Sentiments and Friends Words with Shadows SugarCuts


To begin this design, I die cut the new Interlocking Circles SugarCut twice; once from Kraft and once from White cardstock and glued them together with liquid glue. 

Once that was done, I used the new Laurel Leaves Stencil to create the green leaves using Bundled Sage Distress Oxide ink. I layered that onto the scalloped panel using adhesive and then added the circle portion using additional liquid glue. From there, I was able to add the heat embossed "I'm lucky to have you" portion of the sentiment and the die cut "friend" word using foam squares.


The cute little Panda is the finishing touch perched there at the bottom! A few sparkling sequins finish off this design! Thanks for fluttering by!

Thursday, January 23, 2020

SugarPea Designs Sweet Peek Week Day 4

Welcome to day 4 of the SugarPea Designs Sweet Peek Week! What has been your favorite so far? We've got some fun products that the team is showcasing today so make sure to head to each of the designers' blogs to see the creative ways they've used everything!


I was feeling a little intimidated by the main image in the Jukebox Jive stamp set so I decided to head to Google to give me a few ideas on how a Jukebox should actually look. I found one and patterned my colors off of it.

I love all of the companion images and sentiments included in this set! They really help pull the 50's vibe together! I used the coordinating Jukebox Jive SugarCuts to die cut everything! There's also an AMAZING new die cut collection (picture below) called Rock and Roll Jukebox SugarCuts so you can put together a die cut jukebox! I can't wait to try it out!

Join me again tomorrow for the 5th and final day of the Sweet Peek Week! Thanks for fluttering by!

Wednesday, January 22, 2020

SugarPea Designs Sweet Peek Week Day 3

Well friends, we're halfway through the SugarPea Designs Sweet Peek Week and I just love today's sneak peeks! Today the team will be showcasing a fabulous new stamp set, stencil and stand-alone die!

This new Pandamonium stamp set is just as sweet as can be and is perfect for those of us who don't have the best coloring skills! wink wink! 
To begin this fun design, I used the new Geotrihex Stencil with some Distress Oxide inks to create the background. Once that was done, I die cut the Bamboo Garden SugarCut twice from Kraft cardstock. I used foam squares between each layer give it a dimensional look.


I stamped the hearts, which are from the Sentiments of Love stamp set, and the "I love you this much" in the open space. Of course I had to use the cute bear holding his arms open wide to demonstrate just how much he loves the recipient!

The bears were stamped and then die cut using the Pandamonium SugarCuts and added to the card with additional foam squares. I added the blended panel to a piece of Kraft cardstock that is die cut using the Card Front Element Builder SugarCuts . I love the detail it adds to the edges of my cards. Join me again tomorrow for day 4 of the Sweet Peek Week! Thanks for fluttering by!


Tuesday, January 21, 2020

SugarPea Designs Sweet Peek Week Day 2

Welcome to day 2 of the SugarPea Designs Sweet Peek Week for the January release! I just love today's stamp set that is being revealed and I'm sure you will, too! It's called Wheelie Amazing and is AMAZING! LOL! Of course you'll also want to head to the other designers' blogs to see what beautiful creations they have made!


I bought some Valentine's Day mailbox boxes at the Dollar Tree right after Christmas that have a bike and flowers on them and I knew right away that I'd have to create some coordinating cards! I've been having fun buying all kinds of little sweets and gifts to tuck inside the mailboxes and these cards will be the perfect addition!

I did all of my stamping first; the bike stamps are solid and the coordinating accessories are all line art. I die cut the bike and wheels using the Wheelie Amazing SugarCuts and set them aside. I colored the puppy, basket of flowers and the suitcases using Copic markers and then die cut them as well.
I used the Valentine Word SugarCut for the top of the card and then used a fitting sentiment from the Sentiments of Love stamp set above that.

The hearts are also from the Sentiments of Love set and I added some Nuvo glaze over the top as well as some crystal glitter for some juju jelly heart flair! ha ha!

These were such fun cards to make and I can't wait to tuck them in with the mailbox boxes! I'm really on a Valentine's Day kick this year! Thanks for fluttering by!