Showing posts with label watercolor background. Show all posts

Thursday, May 28, 2026

The Greetery {Hey Honey, It's Summer!}

Hello friends! I'm thrilled to be here with a fun mini release from The Greetery called Hey Honey, It's Summer! Memorial Day is over, which means it's the unofficial start of summer and that means summer cards and projects! I'm happy to begin the season with such a fun set of products to work with; each one is a joy and I can't wait to use them all season long! Make sure to head to The Greetery Blog for a listing of all the new products with details for each one! Also, make sure to leave a comment here, and on each of the designers' blogs, for a chance to win one of two product bundles! Each bundle will include:

  • Hey Honeycomb Crab, Seahorse, & Fish dies

  • Hey Honeycomb Summer Sentiments stamp set

  • Honeycomb Ball Heat Wave & Tricolor Tropics mixes

  • Making Waves stencil, embossing folder, and die


My first card for today features the Hey Honeycomb Seahorse Die paired with the new Making Waves Die, Embossing Folder, and Stencil. To begin this card, I took a larger piece of watercolor paper and secured it to a cardboard backer with washi tape. I spritzed it with water and then added the blue watercolor paint over the top. Once I liked the color and saturation level, I quickly dried it with my heat tool, but you could definitely let it air dry if you'd like. 

Once the panel was dry, I cut it using the Making Waves Die and the largest capsule shaped die included in the Capsule Basics Die. Once that was done, I embossed it with the coordinating folder. I chose to use the more detailed stencil to add a bit of teal ink to give it more interest. I realize this is more of a "backward" way of stenciling, etc. but with the watercolor panel, I didn't want to detract from that. That being said, when it was all said and done, I ended up covering most of it up, so on my next card, I did the same thing, but left it more open so you could see it better! haha!

I used the Capsule Fixed Border Large Die for the frame and then cut it using the Pretty Picado Die. I used watercolor paper for this as well so it would have the same pretty texture as the waves. I love watercolor paper and the inexpensive variety you can buy usually has the best texture! I did add a hint of the same teal ink over portions of the frame and then adhered it over the top of the waves. I love the Mediterranean feeling it gives the card! I layered it onto a teal card base and then got to work on the seahorse.


Here you can see the seahorse with it's tummy all inflated with the tricolor tropics honeycomb ball. I cut the base of the seahorse from Sweet Blush cardstock and then added the details with Melon Berry cardstock. Both the body and the details have ink shading as well with touches of glitter!


I used the Garden Tub Filler Die to create the underwater foliage! I just love the contrast between the blues, greens, and coral colors! I added Stickles to the greenery for a more luminescent look!

I used the Hey Honeycomb Basics cut from Melon Berry cardstock with white embossing powder using the new Hey Honeycomb Summer Sentiments Stamp Set. I love all of the cute seasonal sentiments that are included in the set, along with the essentials to let the recipient know to "peel open and stick".

As promised, you can see the beautiful Making Waves suite of products a little bit better on this card AND I made the card with the honeycomb already incorporated so you can see another variety in the tricolor tropics assortment. I created this panel exactly like I did for the first card, but this time I added green, which is included in the paint set I linked earlier.

This is a 5 by 7 card so you can see how large the beautiful waves are, BUT you could definitelyl cut the top portion of the waves and use it on A2 cards as well. There is a perfect break in the design that would allow you to do this very easily. I love this pearlescent paint for underwater/sea themed cards and with the addition of the Stickles, it looks so pretty in the light.

The fish was cut from Harvest Gold cardstock, including the fins, but I added heavy handed ink to give it dimension. The honeycomb ball is secured with the adhesive tab that it comes equipped with, and some additional liquid glue for an added measure of security.

I kept this card quite simple so you could really see the waves, but I did add two sentiment from the Laid Back Basics Stamp Set which I just love! 
Everything will be available for purchase tomorrow at 10 am EDT. You can find the entire new collection HERE; links will be live tomorrow! Don't forget to head to other designers' blogs to see the cute projects they've made and leave a comment to be eligible to win one of two bundles! Thanks for fluttering by!


Kelly Lunceford {you are here}


Friday, February 25, 2022

Papertrey Ink February Release Countdown Day 3

I don't like to play favorites, but today might be my favorite of the entire Papertrey Ink February release! I adore this sweet addition to the Feathered Friends family...isn't this chick just the cutest thing?? I mentioned yesterday that I wanted to tweak my carrot card and that addition would be one of these cute chicks!

I think the chick complements the new Elegant Egg dies perfectly, don't you think? I'm in love with these beautiful eggs and know I will be using them EVERY year! I was also having so much fun with this particular flower from the Into the Blooms II dies so I made a few for this card along with the two leaf options in the collection. To begin, I die cut all of the pieces from the Elegant Egg die collection using white cardstock. I colored them using ink and a blender brush, keeping the lighter color on the solid die cut and using a darker shade for the top, detail layers. Once that was done, I added some white paint splatter over the top to give them a speckled look. I also gave them a generous amount of Shimmer Spray for sparkle and shine.

The background was created by heat embossing the Weaved Background Stamp Set onto a panel of watercolor paper using white embossing powder. Once that was done, I blended some of the same inks that I used on the eggs here and there on the panel. I spritzed it with water to get a watercolor effect and then set is aside to dry.

There are two different chicks included in the Feathered Friends 20 mini stamp/die set, but I just used this one for this card. I used both of them on my second card of today's post. I ended up making 4 chicks in total, but threw one away because I did some ink blending that I didn't like. After it was all said and done, I should have made a BUNCH because now I want to go back and add a chick or two to ALL of my cards I've shown so far! ha ha!

As I mentioned yesterday, here is another cluster of grass from the Weave a Basket die set that was showcased on day 1 of the countdown. I just love it! The sentiment, which is from the new Inside Greetings: Spring Blessings, is heat embossed in white onto a strip of vellum. I strategically tucked it behind the egg with a foam square and added a tiny bit of liquid glue behind the embossing on the right side.

I love how the Weaved background gives this card a basket look, just like an Easter basket! I added a few sequins to finish off this card. The entire panel is added to a Winter Wisteria card base.

My second card for today uses those cute chicks again, but this time I used both. They are the cutest accents for this bouquet of flowers and eggs! 

For this card, I cut a panel of cardstock measuring 4 by 5 1/4 inches and used the Stencil Basics: Quatrefoil Stencil to blend in some pastel colors found in the flowers. I just added some here and there, just like I did on the embossed background on my first card. Once that was done, I arranged the flowers and leaves here and there, tucking the eggs in as well. I had some leftover flowers from one of my cards yesterday that were just begging to be used today.

I used another one of the new sentiments and stamped it on a strip of Bitty Big: Lilac Grace cardstock in black ink. I added it to the stenciled panel  just underneath the bouquet of flowers.

I had so much fun creating both of the cards I've shared today! Join me again tomorrow for the 4th and final day of the countdown! Thanks for fluttering by!


Wednesday, February 9, 2022

Happy Valentine's Day {A twist on an old favorite}

Valentine's Day is less than a week away....are you finished with your creating? THIS is one of my very favorite Valentine's Day cards that I've ever made. I shared it again last year on Instagram, but rather than sharing the same card again, I decided to try a fresh take on some of the things that I love most about that particular card.

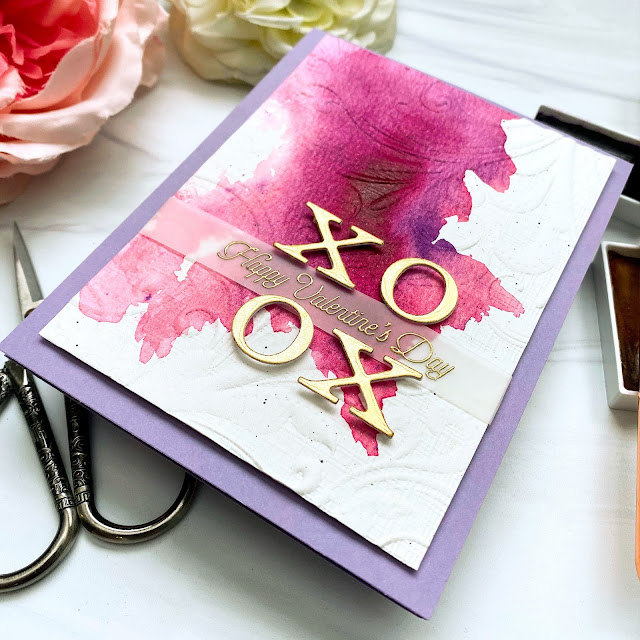
I don't pull out my watercolors nearly enough and after I do, I realize I need to do it more often. Rather than creating a watercolor panel that is completely saturated in color, I decided to go for a more organic look and just let the paint, paper, and water do the work. I spritzed a panel of watercolor paper and then added in red and purple watercolor paint and pushed them around until I was happy with the results. I sped up the drying process by heating it up with my heat tool. I set it aside to continue to dry while I got to work on the letters.

 I used the Bookprint Alphabet Upper dies to die cut two of each letter; two each from gold specialty paper and two each of regular white cardstock. I glued them together for a more sturdy piece since I knew I would be popping them up with tiny pieces of foam squares. I set those aside to dry as well.

The sentiment, which is one of my favorites, is from the since-retired Be Mine, Valentine stamp set from Papertrey Ink. You could use any sentiment that you like for this step. I heat embossed it in gold powder onto a strip of vellum.

Once the panel was dry, I dry embossed it using the Regency Swirls embossing folder that was included in my Gemini Jr bundle that I got for Christmas in 2020. It is still included in the bundle, but I'm not sure if it is sold separately. It is the same embossing folder that I used on THIS card. Once that was done, I adhered the letters using tiny bits of foam squares. The heat embossed sentiment is tucked between the two rows of letters and wrapped around the panel and secured with clear tape in the back. I did spritz it with a few good sprays of Shimmer Spray as well. The entire panel is added to a top folding A2 Winter Wisteria card base using additional foam squares. I had so much fun making this new version of an old favorite! Thanks for fluttering by!


Monday, June 21, 2021

Pinkfresh Studio June Washi, Stamp, Die, Stencil, and Hot Foil Release Blog Hop


Hello and welcome to the Pinkfresh Studio June release blog hop! I'm sharing two projects with you today using a few of the new products! Make sure to leave a comment here and on every stop of the hop to be eligible to win one of 10 $25 gift certificates AND leave a comment on the You Tube channel page and Facebook page to be eligible for a chance to win the ENTIRE June release! 

As I mentioned earlier, I'm sharing two cards with you today! Up first is this fun rainbow design which is similar to the last Pinkfresh project I shared, but I used a different rainbow and I added the darling new Small Butterflies Stamp Set as well as the Small Butterflies Layering Stencils and coordinating Small Butterflies Die.

To begin the butterflies, I used the stencils using shades of orange and yellow to create Monarch type butterflies. I thought they would accent the rainbow nicely without being too busy.

Once the stenciling was complete, I used the coordinating stamp to add the detail images. Once that was done, I used the dies to cut the butterflies out and set them aside.

I felt like this particular sentiment was absolutely perfect for this butterfly design and so I stamped it in black at the top of an A2 sized white card base. This sentiment is from the previously released Floral Bunch stamp set as well as the flowers.

I die cut all of the pieces of the Color Block Rainbow Die and then put them back together using foam squares for dimension. I layered the flowers hanging over the edge and then squared them up using my paper trimmer.

I added the butterflies here and there using additional foam squares. I'm thrilled about the fabulous new gold Metallic Pearls! They are so much fun and I added them to a few of the butterflies here and there!

My second project for today uses the new Floral Vase Layering Stencils which coordinate with the previously released Floral Vase Stamp set. I used to color this set with Copic markers, but now I can do it quickly and effortlessly with the new stencils.

I used the outline stamp on both images to give them the added detail over the stenciled designs.

I love the look of the vase, so I decided to add some watercoloring to the background using ink, a blender brush, and a few spritzes of water! Easy peasy!

I added a few jewels as well to add some sparkle and shine!

Don't forget to head to the other designers' blogs! Thanks for fluttering by!

You are invited to the Inlinkz link party!

Click here to enter

Sunday, April 11, 2021

Ink to Paper April Release Countdown Day 1

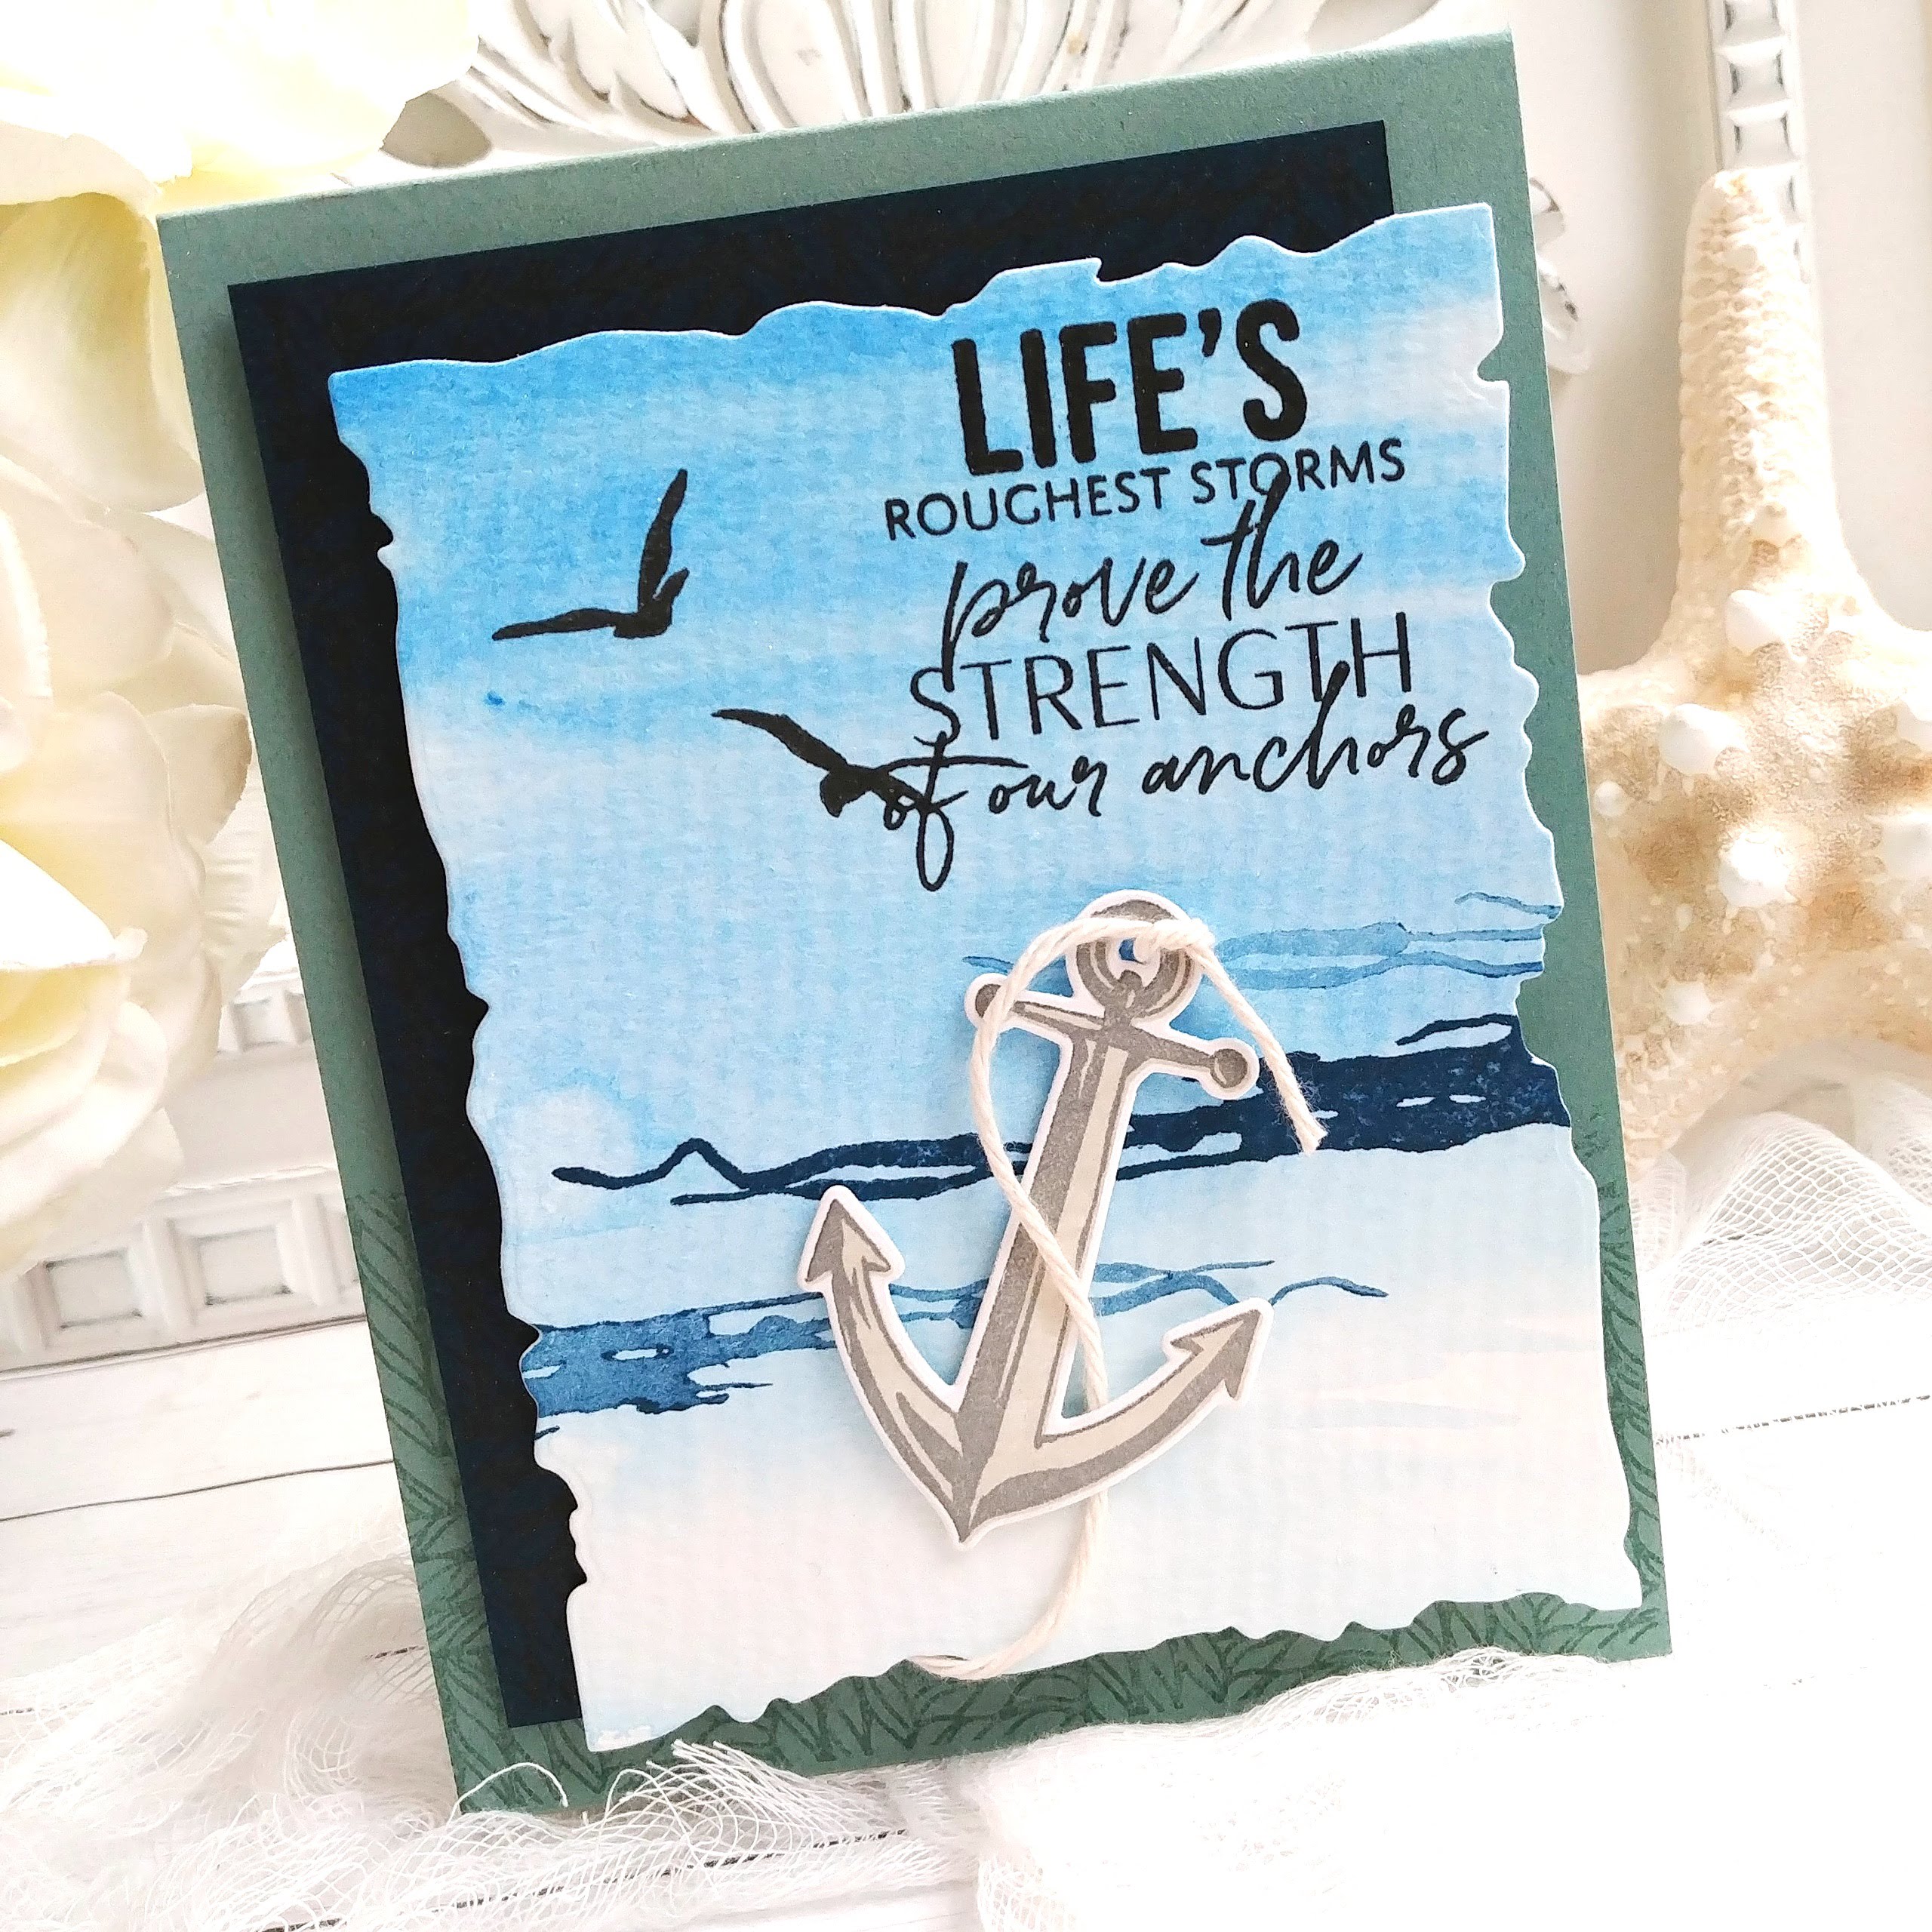
Hello and welcome, friends! It's day 1 of the Ink to Paper April release countdown! I have two projects to share with you today; first up is a card made using the new Seas of Life stamp set and the new Weaved Background! I really love all of the new sentiments included in the Seas of Life stamp set! This one was a particular favorite, so I chose to use it for the theme of my entire card.

To begin this card, I did a simple watercolor wash using a few different blue paints for some variation. I used my heat tool to dry it quickly so I could add the "wave" type image that is included in the Seas of Life stamp set. I inked it up heavily with Enchanted Evening ink and then just stamped it off for the 2nd and third image with the residual ink. I really like how it turned out. Once that was done, I die cut it using the previously released Love to Layer: Torn Edges Dies. I really like the effect it gives this watercolor panel.

I stamped the sentiment and the seagulls on the top using black ink for a stark contrast to the blue background. Did you know that the Seagull is Utah's State bird? We are very used to having many Seagulls all over, but it probably seems weird for others who visit our state to see them here when they are a coastal bird! The seagull is symbol of hope, miracles and prayers answered. If anyone is interested in hearing the story of the seagulls and why they are the State bird, I'd love to tell you! It is such a great story! 


Anyway, back to the card! LOL! I seem to get sidetracked a lot! I die cut the anchor image and then stamped it with the two step images; the solid image is stamped in Soft Stone and the detail image is stamped in Weathervane ink. I tied a knot of Cream Cotton Baker's Twine and then wrapped it around the anchor and secured it to the back of the watercolor panel with a bit of washi tape.

It is hard to see in this photo, but the Dark Indigo panel is stamped with the new Weave background using the same Dark Indigo ink for a tone on tone look. I also used the same background image to stamp the bottom of the Ocean Tides card base.

I offset the blue panel with the watercolor panel for a bit of a whimsical feel. 

I mounted the layers onto the card base using foam squares for dimension. I spritzed the entire things with Shimmer Spray for some sparkle. I love the way sand glints in the sun, so hopefully the recipient will get that same vibe with this nautical card!

My second card is bright and tropical using the new Feathered Friends 10 mini stamp set and die. I really like the sentiment that is included in this set, so I chose to keep it front and center! To begin, I die cut the bird and stamped it in the colors that are used in the assembled example guide. 

I used the fabulous Flourishing Florals stamp set to highlight this sweet colorful bird! I stamped the sentiment directly onto to the Love to Layer: Scalloped Circle

It's no secret how much I love a tone on tone background, so I used the Cover Plate: Trellis Die to die cut a panel of Hawaiian Shores cardstock and glued it onto a 4 1/4 by 5 1/2 inch panel of the same cardstock. I also layered a piece of Bitty Big: True Black pattern paper over the top of the background and then added the circle using foam squares.

I stamped the flowers in Hibiscus Burst and Raspberry Fizz , and a few in Lilac Grace and Winter Wisteria. The leaves are stamped in Green Parakeet and New Leaf inks.

I arranged the flowers here and there and secured them with foam squares. I tucked the bird in the bottom corner as though he's perched among the colorful blooms!

Join me again tomorrow for day 2 of the countdown! Thanks for fluttering by!