Monday, January 29, 2024

Papertrey Ink January Release Day 4

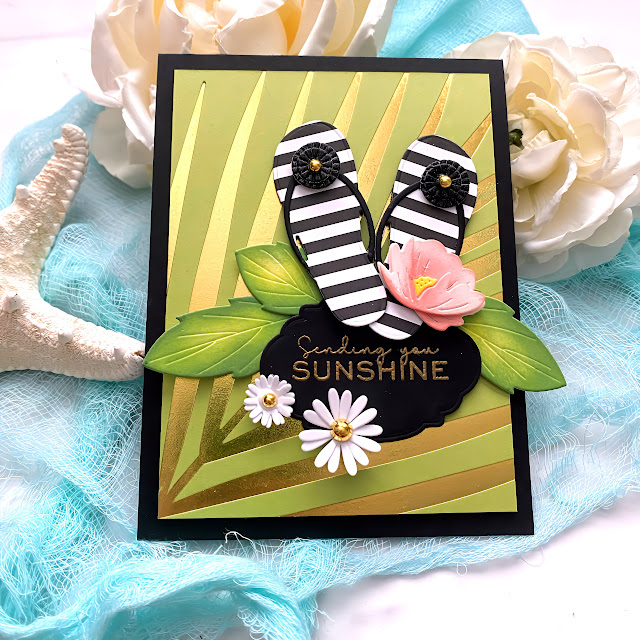
It's been a whirlwind, but we've made it the the 4th and final day of the Papertrey Ink January release! I have a few last projects to share with you; up first is a card using the new Tropical Frond Hot Foil Plate. I had so much fun creating with this unique plate. I used gold foil on Green Parakeet cardstock for a tropical feel!

I set my foil machine to the highest heat setting and then let it heat for 26 seconds. Once it was ready, I just wanted to look at it! ha ha! So shiny, so pretty!

I added a few daisies from the new daisy die set, some leftover leaves from my card yesterday, the super cute flip-flops from the Go-To Gift Card Holder: Beach Bag dies. I heat embossed the sentiment, which is from the Just Sentiments: Wish You Were Here, and then die cut it using the Just Tags Dies. I arranged everything and then added it to a top-folding A2 card base using foam squares.

My last two cards for today and the release use the new Scribble Balloons stamp/die set. There are a few different sentiments included in the set, so I chose to make some "super star" cards, one boy and one girl, to add to my stash to use for the kiddos at church! They're always doing amazing things so it's fun to have cards on hand!

This is the girl design stamped in pink and yellow.

and the boy design in blues, green and yellow! Thanks for fluttering by!


Sunday, January 28, 2024

Papertrey Ink January Release Day 3

I can't believe we're at the 3rd day for the Papertrey Ink January release! I hope your weekend is going well and you're finding time to rest and relax! I have a BIG post for today, so get cozy! ha ha! I have three cards using the new Into the Blooms: Daisies dies and the new Vintage Frames stamp/die set! You all know how much I love the Into the Blooms series, so I had a lot of fun with these cute dies! The thing I love about them the most is that ALL the types of daisies are included....the possibilities are endless! That being said, I only made yellow daisies for my cards! LOL! The other designers have showcased these dies beautifully so make sure to see their stunning creations!

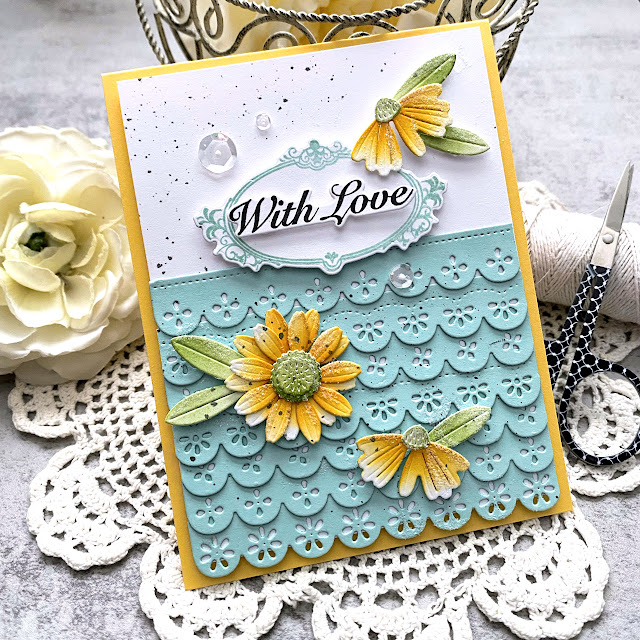
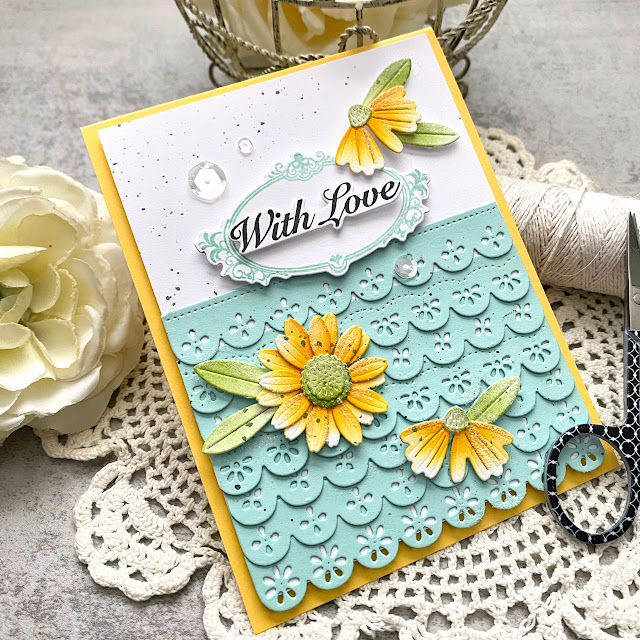
If you're like me, then your Aqua Mist cardstock stash might be dwindling or even depleted! I went through my scraps and used the On the Edge: Scallops die collection and die cut a bunch of scalloped strips. This allowed me to cover a nice area using the beloved cardstock in a fun and whimsical way.

I stamped the smaller frame included in the Vintage Frame stamp/die set and then used the included "with love" sentiment. I added some of the daisies here and there to create visual movement.

I added some black paint splatter and a few sequins to finish off this card!

My second card uses one large daisy as the focal point layered on top of the larger of the two Vintage Frames.

This card also features the cute corner detail image included in the Vintage Frames set. I used the Perfect Presents stencil collection to create the dotted background. Both sentiments are from the Birthday Your Way II stamp set that was showcased yesterday.

I like how the sentiment at the top is arced so that it hugs the focal panel nicely! I heat embossed the bottom sentiment in white on a black strip of cardstock.

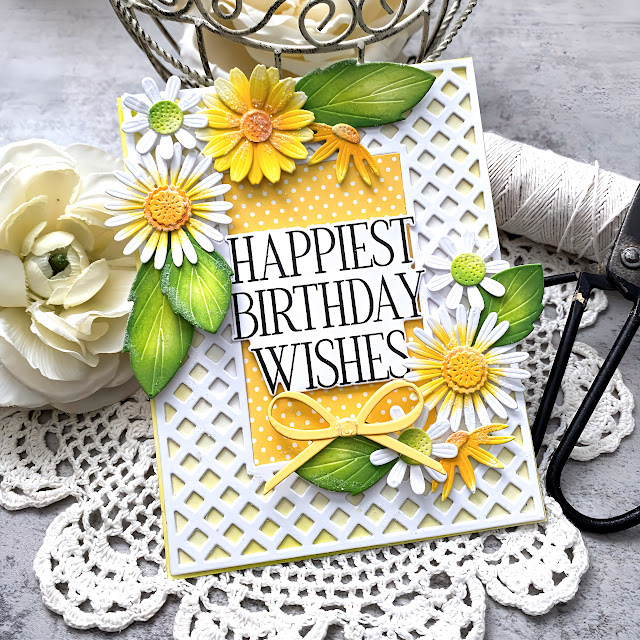
My third card using the daisy dies  showcases a few of the other different varieties. One of my favorite movies is You've Got Mail with Meg Ryan and Tom Hanks. Daisies are her favorite flowers in the film and she says "they're the friendliest flowers"....I tend to agree! 

I used Distress Oxide inks to color the flowers and leaves....please note: these leaves are from the Into the Blooms: Peonies. I have one cluster of daisies in my yard that bloom every late June/early July and the leaves look more like this.

I added a bow from the new Beautiful Bows die collection because it just seemed to need it! ha ha!

The sentiment is from the new Birthday Your Way II stamp set. I really like that there is an option to get the coordinating dies so you can die cut them if you'd like! It just makes more design possibilities.

My final card for today uses the new Reflections: January stamp set. This year we are out of Psalms and diving into the other beautiful verses in the Bible. This one happens to be one of my favorites. This was the theme for the youth of my church last year, so I heard it quite a bit last year.

There is a coordinating die; I used the largest of the three nested dies. They are all the same shape, but in three graduated sizes.

I stenciled two panels using the Wild Blooms Stencil Collection and then stamped the sentiment on one using Weathervane ink. I used the largest die and cut it out. I layered it over the top of the other panel using foam squares.

I did trim the panel to 4 by 5 1/4 inches and then layered it onto a top-folding A2 card base using foam squares. Well, this concludes my projects for day 3. Join me tomorrow for the fourth and final day! Thanks for fluttering by!


Saturday, January 27, 2024

Papertrey Ink January Release Day 2

I'm back for day 2 of the Papertrey Ink January release! I just wanted to let you know that Blogger is being super crazy and keeps flagging my posts as spam and takes them down! Ugh! Anyway, if you see a post and then it's gone, you'll know why! Yesterday's post went missing for HOURS!!!!
That being said, I am super excited to share the two projects I made today using some fabulous new products!

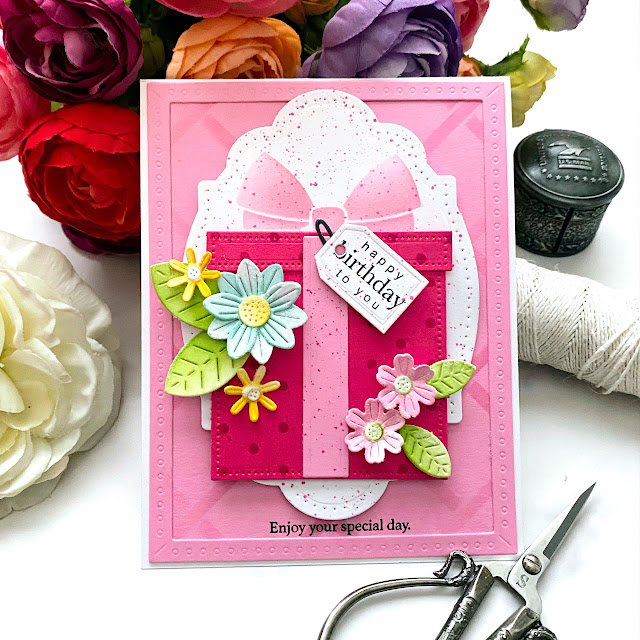
This card features the new Perfect Presents Dies, Beautiful Bows Stencils, and Perfect Presents Stencils! They are so fun and fabulous and I think you're going to love them as much as I do!

To begin, I die cut the pieces for the present and then used the Perfect Presents stencils to add the dots.  The Perfect Presents dies also come with three different tag options; I really wanted to add a sentiment so I chose this traditional tag shape. The b is lost in the tag's hole, but hopefully the recipient will just "fill in the blank"! ha ha! This particular sentiment is from the Just Sentiments: To and From Essentials stamp set (the PTI website is currently down so I can't add a link...I'm sorry)

I used the Psalm Reflections: April die for the mat the present is layered onto. I used the Beautiful Bows stencils to add the bow using Lovely Lady ink. From there, I added the present using foam squares.

I gussied up the present by adding a few flowers and leaves from the Into the Blooms: Wreath dies.

The background was created by using another one of the stencils from the Perfect Present stencils onto a 4 by 5 1/4 inch panel of Lovely Lady cardstock using Lovely Lady ink. I stamepd the "special day" sentiment at the bottom using black ink. It is from the new Birthday Your Way II stamp set. I added the Border Bling: Skinny Dotted frame over the top for added detail and dimension. 

My second card for today uses the Birthday Your Way II and the new Wrap-It Ribbon Dies. I'm obsessed with these dies.....such a cute idea!

I cut a 4 by 5 1/4 inch panel using Winter Wisteria Stripes, mounted onto a top-folding A2 card base. I die cut the bow  pieces using Winter Wisteria cardstock and glued them to the panel using liquid glue. I did add a little bit of Winter Wisteria ink to the bottom of the bow for depth.

I die cut and stamped the big sentiment and then added the smaller sentiment that is heat embossed onto a black strip of cardstock. Once again, I added a bunch more flowers, because they are just so cute!

I can't wait to try these cute Wrap-It Ribbon Dies for holiday cards! I'll be back tomorrow for a BIG post!! Thanks for fluttering by!


Friday, January 26, 2024

Papertrey Ink January Release Day 1

Hello friends! I'm happy to be hear today sharing a few projects with you for day 1 of the Papertrey Ink January release! My first card  uses the new stamp/die set called Lofty Petals paired with a new die collection called Fantastic Front dies.

Lofty Petals also includes a handful of sentiments, but I was particularly drawn to the "Stand Tall" sentiment to pair with these tall blooms.

To begin, I die cut all of the pieces included in the Loft Petals die collection, but only ended up inking up the sentiment and the blooms. I used Distress Oxide inks and a finger dauber to get good coverage, plus variation in colors for a realistic look.

I die cut both pieces included in the Fantastic Front die collection and then added green ink along the edge and then stamped the stems and leaves. I added the blooms using foam squares. The sentiment portion is adhered together using additional foam squares. I mounted the entire thing onto an A2 panel of white cardstock that has been stenciled with clouds. I added a few additional stems and blooms to peek around the sentiment to enhance the "stand tall" theme!

My second card uses the absolutely ADORABLE new stamp/die set called Occasional  Cupcakes! There are all kinds of combination ideas, but I chose to use the cute snowman pieces to create my card for today!

Between the designers, you should get a chance to see a few of the cute options! I was also dying the pair it with the previously released Larger than Life: Snow die and the coordinating Larger than Life: Snow mini stamp set

This card also features the new Love to Layer: Soft Scallops dies. As you can see, the scallops are quite loose and feature the beautiful pierced detail. There is also an additional set of dies to allow you to turn these into tags; there's a slotted die and a circle die.

I die cut the SNOW word three times from Soft Stone cardstock and then glued them together. I also added some Wow! White Puff embossing powder for the snowy effect!

The snowflake images stamped across the front are from the Sweet Holidays stamp set and I think they add just the right snowy touch! I had so much fun creating this card! Join me again for day two ! Thanks for fluttering by!


Friday, January 19, 2024

The Greetery {Love Letters P.S. Collection} Release Day


 Hello and welcome! It's RELEASE day for the beautiful new Love Letters P.S. Collection from The Greetery! I have one more bonus card to share with you today using  some of my favorites from the new release and one product that I didn't get a chance to use! The release will be available for purchase today beginning at 10 am ET. 


The inspiration for this card came from an unlikely place; an email! I usually delete my emails quickly and don't pay much attention to them if they are from places that I get them from daily. Anyway, this particular email came from Notebook Therapy and it had an illustration of a cute postcard done up in Kraft, cream, and chocolate colors! I took a screenshot and used it as inspiration for this card!


To begin, I used the new Airmail Border stencil on a panel of Kraft cardstock. I used Fresh Snow ink and Brushed Corduroy. Once that was done, I trimmed it down and set it aside to get to work on the "hello" sentiment. I used the new Typed Greetings die; this is one that I didn't get a chance to use on my release projects, but it was perfect for today's design. I die cut the pieces from Kraft cardstock and then used the same ink to darken the individual letters to spell hello. I glued them onto the Kraft shadow piece using liquid glue and reverse tweezers for delicate placement.

While that was drying, I got to work making more clusters of flowers. I depleted my original supply, but it was easy because I was leaving all of the flowers white so all I had to do was color the stems and leaves. The stamp is from the new Postal Modern stamp./die set, and I used the wavy "cancelled" image on the panel before I adhered it to the panel using foam squares.

The "Just a Note" sentiment is from the new Just My Type stamp set and works perfectly with the Typed Greetings die set. I also die cut some envelopes and notes from the Sent With Love die set and arranged them here and there on the card until I was happy with the arrangement. I tucked the flowers and leaves using liquid glue.

I adhered the "hello" piece using foam squares. I used a few more images from the Postal Modern stamp set to give it a more realistic postal look.  I also had a few hearts left over from my Stationery Box I shared on day 1, so I added them here and there. I added some glitter and called it done! Oh, but I DID add it to a white cardbase using liquid glue! ha ha! Thanks for fluttering by!
Thursday, January 18, 2024

The Greetery {Love Letters P.S. Collection} Day 2

Welcome to day 2 of full reveals for the Love Letters P.S. Collection from The Greetery! I have three more projects to share today using this fabulous collection! Just like yesterday, make sure to leave a comment here and on each of the other designers' blogs to be eligible to win one of two $50 gift certificates to the shop! Head to The Greetery Blog for the official "meet and greet" for each of the featured products today!
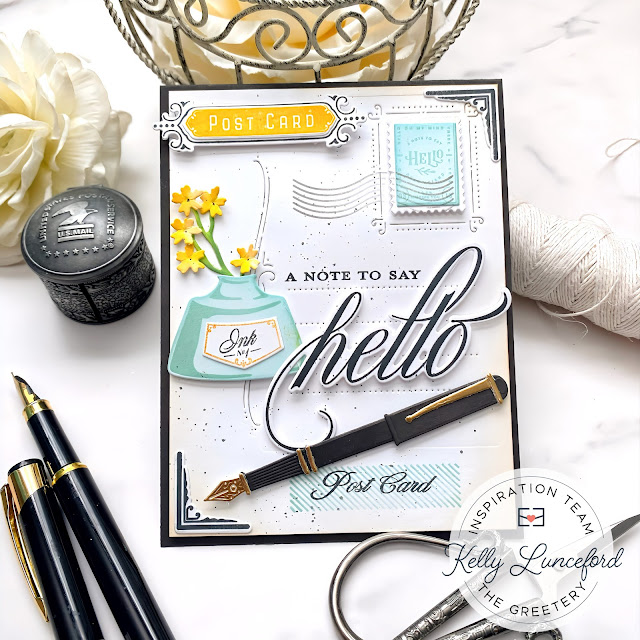
My first card uses a combination of new products: Inked Well stamp/die set, Postcard Details die, Scripted Sentiments stamp/die set, and the Postal Modern stamp/die set showcased yesterday! I also used the new Pen Pal die, but I want to make note that the Inked Well stamp set comes with two sizes of fountain pens that you can stamp. This one that is featured on my card is completely made using dies.

To begin, I used the Postcard Details die on a 4 by 5 1/4 inch panel of white cardstock. I stamped the "A note to say" sentiment, which is from the Scripted Sentiments stamp set, using the detail from the die as a guide. I also added all of the fun elements from the Postal Modern stamp set in the corners and at the bottom and top.

I'm obsessed with the cute new ink bottle; it is included in the Inked Well stamp set and comes in two sizes....this one is the larger size. You can see that another cluster of flowers made it's way onto this card as well. I die cut the "hello" word using the Scripted Sentiments die and then stamped it in black. I had fun putting the pen together; super quick and easy! I added some black ink splatter for details. The entire panel is added to a Smokey Shadow top folding A2 card base using foam squares.

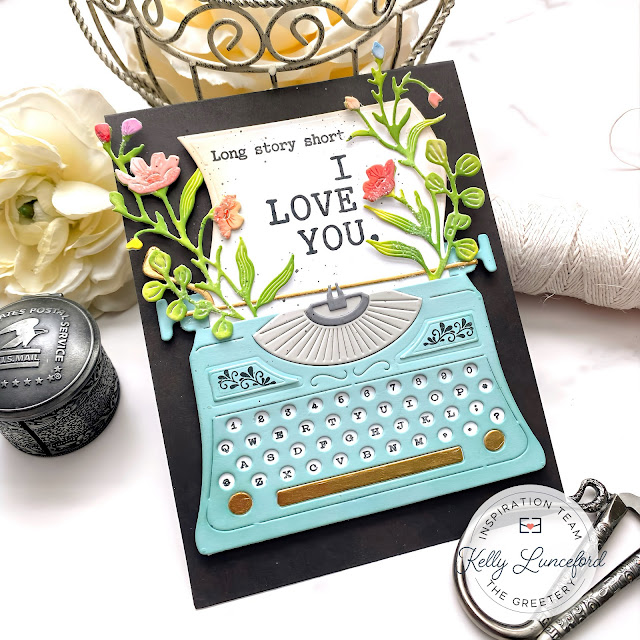
My second card for today features the adorable new Vintage Type stamp + cut combo. It is another easy-to-use die. I stamped the numbers and alphabet on a piece of white cardstock. I then added the typewriter over the top and lightly traced around it onto the white piece and then cut it inside the lines. I simple glued it over the top....easy peasy!

There is a stamp for the cute details on either side of the typewriter and a die to give it added dimension if you'd like. 

The die collection also comes with a die to cut out the paper so that you can slide it down inside the typewriter. I chose to use a few sentiments from the new Typed Greetings stamp set. I added some Antique Linen Distress Ink around the edges and some black ink splatter.

I framed it with the gorgeous new Graceful Stems; this is a die set that allows you to create two clusters of flowers as shown here. I simply cut them from white cardstock and then colored them using Distress Oxide inks and sponge daubers.

I added it all to a Smokey Shadow top-folding A2 cardbase using foam squares and liquid glue.

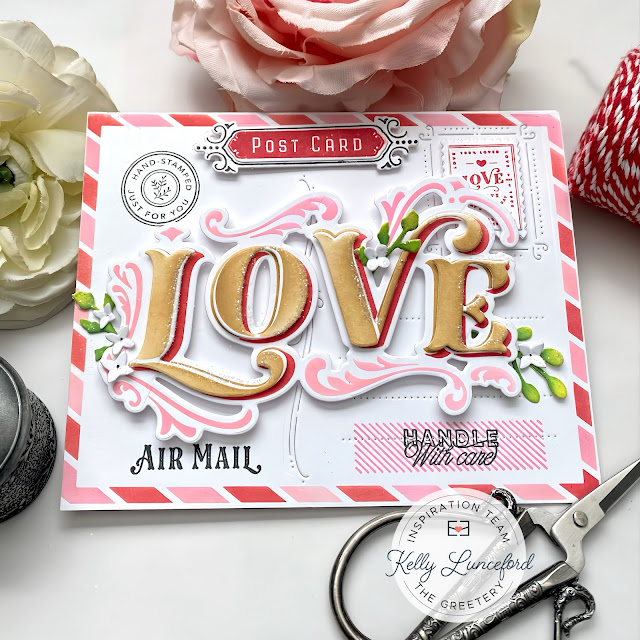
As promised yesterday, here is another card using the new Flourished Phrases, but this time I used the Love product suite!

The Airmail Border stencil also made another appearance and all of the cute things from the Postal Modern stamp set.

To begin, I stenciled the border onto a panel of white cardstock and then trimmed it to the right size. I used the Postcard detail die as well to provide a "guide" to layout my card.  I used Brushed Corduroy, Lumberjack Plaid, and Kitsch Flamingo Distress Oxide inks for the stenciled Love portions. I used the coordinating die cuts to cut everything out. I layered each individual letter using foam squares for optimum dimension.

I tucked more floral clusters here and there for added detail. I mentioned yesterday that the first thing I did to begin my projects was to create a bunch of leaves and floral clusters so that I would have them to use as I wanted. If I could give you one tip if you're going to be doing marathon crafting, is that having many details pre-made will make the assembly process so much quicker and enjoyable! You can play around with options and see what works and what doesn't! Well, this concludes today's post, but make sure you head to the other designers' blogs to see what they have come up with using these incredible new products and to leave a comment to be eligible to win one of the 2 gift certificates! Thanks for fluttering by!
Kelly (you are here)