Showing posts with label washi tape. Show all posts

Tuesday, May 19, 2026

Pinkfresh Studio {Missing Our Talks}

Hello and welcome, friends! I'm popping in today to share a couple of cards using some fun newish products from Pinkfresh Studio! I was 100 percent inspired by some mini slimline cards that Yana Smakula made back in April. I watched her video, placed my order, and waited patiently until my order arrived. One of the reasons why I fell in love with her cards is because of the washi tape accents. I have rolls and rolls of gorgeous washi tape leftover from my days on the Pinkfresh Studio design team and this is such a fun way to use it!

I don't have the variety of tape that she used, so I just went through my stash to find one that I liked and then I pulled ink to match the flowers. This was the inspiration for how I colored my buildings.

To begin, I stamped the buildings in black using the Darling District Stamp Set onto white cardstock. Both buildings are on one stamp, so it makes it easy to make the two very easily. The Darling District Stencil Collection also colors both buildings at once so it's so easy and time saving!

Once the stamping and stenciling was done, I used the coordinating Darling District Die to cut both buildings. I cut them again and glued the two together for a sturdy piece. I really just followed Yana's tutorial to a T....ha ha! I chose the same sentiment that she did as well because it fits so nicely on the card, but there are quite a few other sentiments and the die includes the coordinating dies for each sentiment, except the little shop names. 

I arranged the washi flowers around the buildings and secured them with foam squares. It's been awhile since I used Shimmer Spray, so I gave each panel a spritz or two for sparkle and shine and then added some gems using liquid glue and then mounted the panels onto white mini slimline card bases using foam squares. 
I love how these came out and it was just the perfect personal creative project I needed before I dive into design team projects! Thanks for fluttering by!


Saturday, May 13, 2023

For Mom + more Gingham Inspiration!

Happy Saturday, friends! I'm popping in today to share the card I made for my Mom for Mother's Day and a few tags that I made using the new Gingham Gorgeous from Bath and Body Works as inspiration!
I happened to be sick during the release where we used Mother's Day products, so here I am at the last minute getting something put together! Please note: this card was HEAVILY inspired by a beautiful card that I saw HERE; I loved the gate-fold design, the MOM down the center and the washi touches!


I decided to take a more colorful approach to highlight the beautiful Hydrangea and Rose washi tape; my mom loves these citrus hues, so I hope she likes it!  I cut a piece of Green Parakeet cardstock measuring 11 by 4 1/2 and then scored it at 2 3/4 on each end and then folded the flaps to the middle.

I also die cut the Modern Blooms die (retired) out of the same Green Parakeet cardstock, cut it in half, and then glued it on either side of the opening lining up the blunt cut for precision.

I adhered the washi tape to a 4 1/4 by 11 piece of white cardstock and then die cut it using the coordinating Hydrangea and Rose die and set the pieces aside. I just HAD to buy the Jeff Alpha die; that is what originally caught my eye on the inspiration card! I die cut the shadow from white cardstock and then the detail portion out of Sweet Blush cardstock. I layered them together using foam squares and then added them to the left side of the opening at the half-way point.

Once that was done, I fiddled around with the placement of the washi tape pieces until I was satisfied with the arrangement. You can see in this photo that I actually layered two of the clusters together on the right side until I was happy with the way it looked! I heat embossed the sentiment using the Larger than Life Mom stamp set and then glued it under the "o" in  MOM.

I gussied up the inside with the same stamp set and another left-over flower cluster!

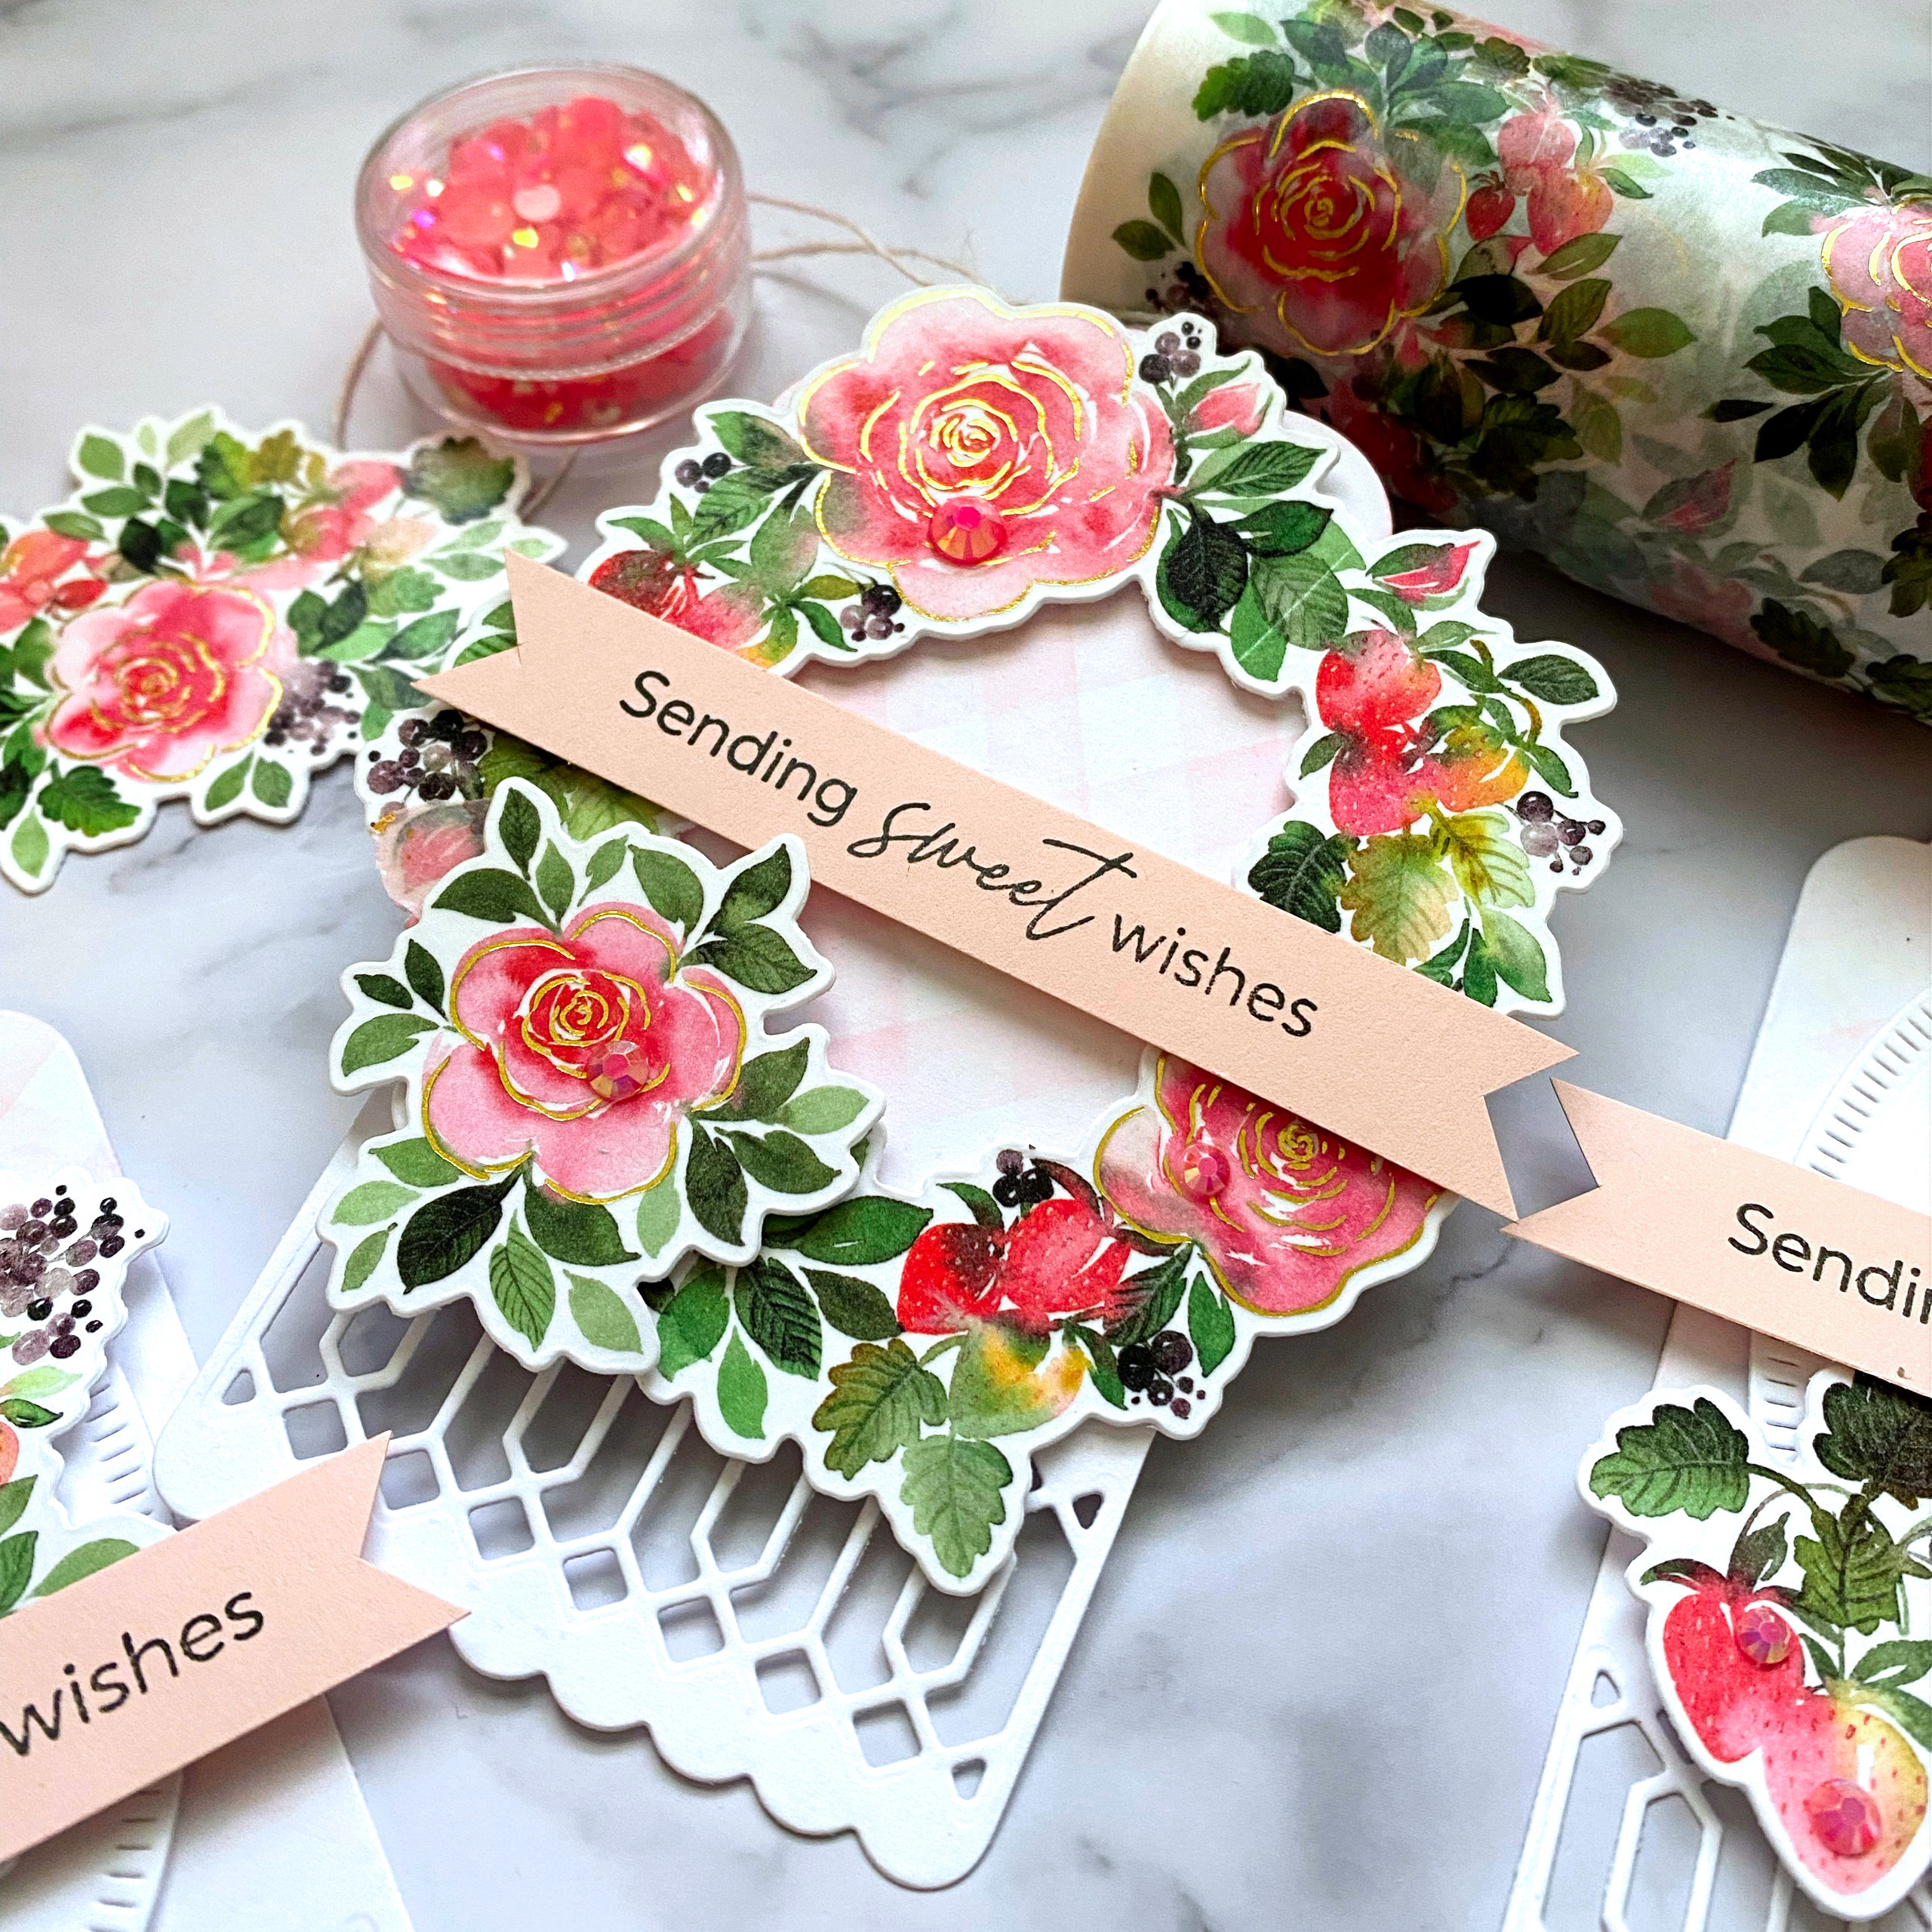
If you stopped by the other day, then you probably saw my birthday card I made using the new Gingham Fresh as inspiration; this time I used Gingham Gorgeous as inspiration! I'm giving a few ladies in the neighborhood a little Mother's Day gift, and I included some of the Gingham Gorgeous products! Lucky for me, the Blossoms and Berries washi tape is a match made in heaven!

I made 4 tags in total, but I'm only sharing three since the 4th is almost identical to one of these. I adhered and die cut the washi exactly as I did for the Mother's Day card. I set the pieces aside and then got to work on the tags.

I used my most favorite tags: the Essentials: Classic Tags with fillable elements! These are nice and big and you can customize them with all of the the different fillable elements; I chose this lattice-y look for today! I used a diagonal striped stencil to create the soft blush gingham on the background. It's hard to see, but it's there; soft and sweet like it looks on the lotion and soap packaging.

From there I was able to decorate them with the washi pieces; this one features the large wreath.

The sentiment is from the Blossoms and Berries stamp set and is perfect for these tags. Since these ladies aren't MY mom, but I want to celebrate them, I though this worked!

I'm also obsessed with this gingham ribbon I found at Hobby Lobby; the perfect finishing touch!

This is a "for me" photo. (wink)  I made these for the 7-11 year old boys' group at church to give to their moms for Mother's Day. I had them make little Shrinky Dink charms to attach to the ring; they turned out really cute! Anyway, I added them because I wanted to remember that I did this! ha ha! Thanks for fluttering by!


Thursday, June 24, 2021

Pinkfresh Studio {Happy Birthday}


 Hello and welcome! I'm happy to be here today sharing a birthday design using a few of the new release items such as the new Small Butterflies hot foil plate and the beautiful new Hydrangea and Rose washi tape. I had stenciled a bunch of butterflies to use on a project for the release, but they ended up being WAY too bright for the project I planned. I was thrilled to find that by using the hot foil plate with vellum, it was the perfect overlay for these stenciled butterflies. It toned them down just enough for this soft birthday design!

To begin this card, I used the Layered Sunburst Stencil set to create the soft background using Sparkling Rose, Soft Lilac, and Raspberry Bliss inks. I used the Essentials: Stitched Rectangles to die cut the edges for a finished look. I set that aside and got to work on the other design elements. As I mentioned earlier, I had already stenciled the butterflies, so all I needed to do was add the hot foiled vellum overlays! I used clear liquid glue to secure them in the center.

I die cut the gold circles using specialty gold cardstock and the Essentials: Stitched Scalloped Circles and then added them to the stenciled background using mini foam squares. I added the beautiful flowers from the Hydrangea and Rose washi tape and then let the butterflies float here and there for an organic feeling!


I used the Perfect Sentiments hot foil plate for the sentiment. I used gold foil so that it would match both the hot foiling on the butterflies and the gold on the washi tape. I added a few gems here and there for additional detail and shine! Thanks for fluttering by!

Sunday, April 18, 2021

Pinkfresh Studio {sending you lots of love}

I can't believe the month is already halfway over! Have you had a chance to participate in the Pinkfresh Studio Monthly Challenge? This month's challenge theme is "gold goodness"! It's no secret that I LOVE creating with gold, so this was a fun one for me! That being said, I chose to use muted golds for today's card to create something with a "cooler" palette, rather than the warm gold that I usually use!


The only washi tape that I haven't had a chance to use yet, is this gorgeous Indigo Vines pattern. Now, the funny part is that this one is the ONLY one without gold accents, (go figure), BUT that allowed me to use these cooler tones to give this card a different feel than I originally thought I'd go with.

As I was looking closely at the different vine pieces, I noticed that a few of the leaves had an aqua color at the tips, so I decided to use that as my base color and then add in the muted golds.
To begin, I layered the entire panel of the Indigo Vines washi tape onto white cardstock. I used the coordinating Indigo Vines die to die cut the entire panel and set the different pieces aside.

Next, I die cut the gorgeous Fancy Oval Frame out of a brushed gold glitter cardstock that I found at Michael's. I attached it to a 4 by 5 1/4 inch panel of cardstock that has been die cut using the Stitches Die. I layered that panel onto another panel of the same cardstock measuring 5 1/2 by 4 1/4 inches. 

The "hi" portion of the sentiment is die cut using the fabulous Lea's Ornate Lowercase Die set out of another fun gold paper I found on my trip to Michael's. I love the mermaid scale texture that it has! I know I'm going to be having a lot of fun using this particular paper. I attached the letters into the frame using mini foam squares for dimension. I also heat embossed the sentiment, which is from the Simply Sentiments-Hello stamp set, using gold powder. I layered it underneath the "hi" sentiment for continuity in the greeting. From there I just had fun adding in the die cut Indigo Vine images using additional foam squares. A few sapphire gems finish off this design! I hope you get a chance to join us this month! Thanks for fluttering by!


Saturday, March 13, 2021

Pinkfresh Studio {You're All Kinds of Wonderful}


Hello friends! I'm over on the Pinkfresh Studio blog today and I'm excited to share with you my latest project! I initially sat down to create a trio of tags, but when I finished, I was inspired to create a coordinating card using the same products! (You can see the tags at the bottom of this post) I used the beautiful new Anemone Magic washi tape to embellish my design. I love the variety of colors in this particular tape making it easy to create different looking cards with the one tape. The tags I wrote about earlier were to accent some mini loaves of Blueberry Buttermilk Banana bread so I decided to pull out the blues and focus on that.

To begin, I cut a panel of white cardstock in half vertically to give me a long thin panel so I could adhere the washi tape. I mentioned on release day that this washi tape is VERY forgiving and easy to use so you can quickly fix any mistakes that are made as you apply it to your cardstock. I used the coordinating Anemone Magic die to die cut the images.


What I love about the dies is that they are all connected in one large piece so you can lay it over the washi panel and cut everything once! It's so fabulous! I kept thinking to myself that these tapes make it feel like I'm cheating! ha ha! They are just THAT easy to use and they are gorgeous!
I set the flower embellishments aside and got to work on the base layer! I die cut two of the Essentials: Classic Tags with Fillable Elements. I positioned them without adhering them down just to get an idea of where the placement of the sentiment should be. Once that was done, I heat embossed the sentiment, which is from the Friendship Blooms stamp set, onto the blue panel measuring 4 by 5 1/4 inches.


Once that was done, I adhered the bottom cut-out portion of the tags using foam squares. I used my paper cutter to trim off the top pieces. When I set out to create this card, I didn't know what part of the tags I would be using, so it felt silly cutting off the tag part! ha ha! As you can see, I DID end up by using one of the top pieces! I'll talk about that in a bit!

I was super inspired by Lea Lawson's card she made earlier using the Indigo Vines tape where she added the gold details with the Leafy Circle die, so that is what inspired that fun detail! I added the die cut Anemone embellishments using foam squares for a lot of dimension! As I mentioned earlier, I went ahead and added one of the tops of the tags and tucked it behind the panel with adhesive. This gave me the perfect opportunity to add a gold bow at the top of the tag portion for a little extra touch! 
As promised, here are the tags I created for the loaves of bread!


I used all three of the different tag shapes for variety.

This one ended up being my favorite and the inspiration for the card!

I added some gems to each of the tags for some sparkle! This was such a fun collection of projects to create! Thanks for fluttering by!


Thursday, September 19, 2019

Inspired By...L is for


Welcome to this week's Inspired By Challenge! I'm happy to be back after taking two weeks off because of the insanity that was my life! ha ha! 

Here is the inspiration photo for this week. I was inspired by pretty much all of it! Of course the L...and for me, L is for "joy and love" and as always, Lunceford! I use the letter L in a lot of my decorating so it was fun to use it on a card as well! I was also inspired by the greenery tucked in the metal bucket/basket with the twine handles. I used the shiplap look for my card photography, so does that count? LOL!
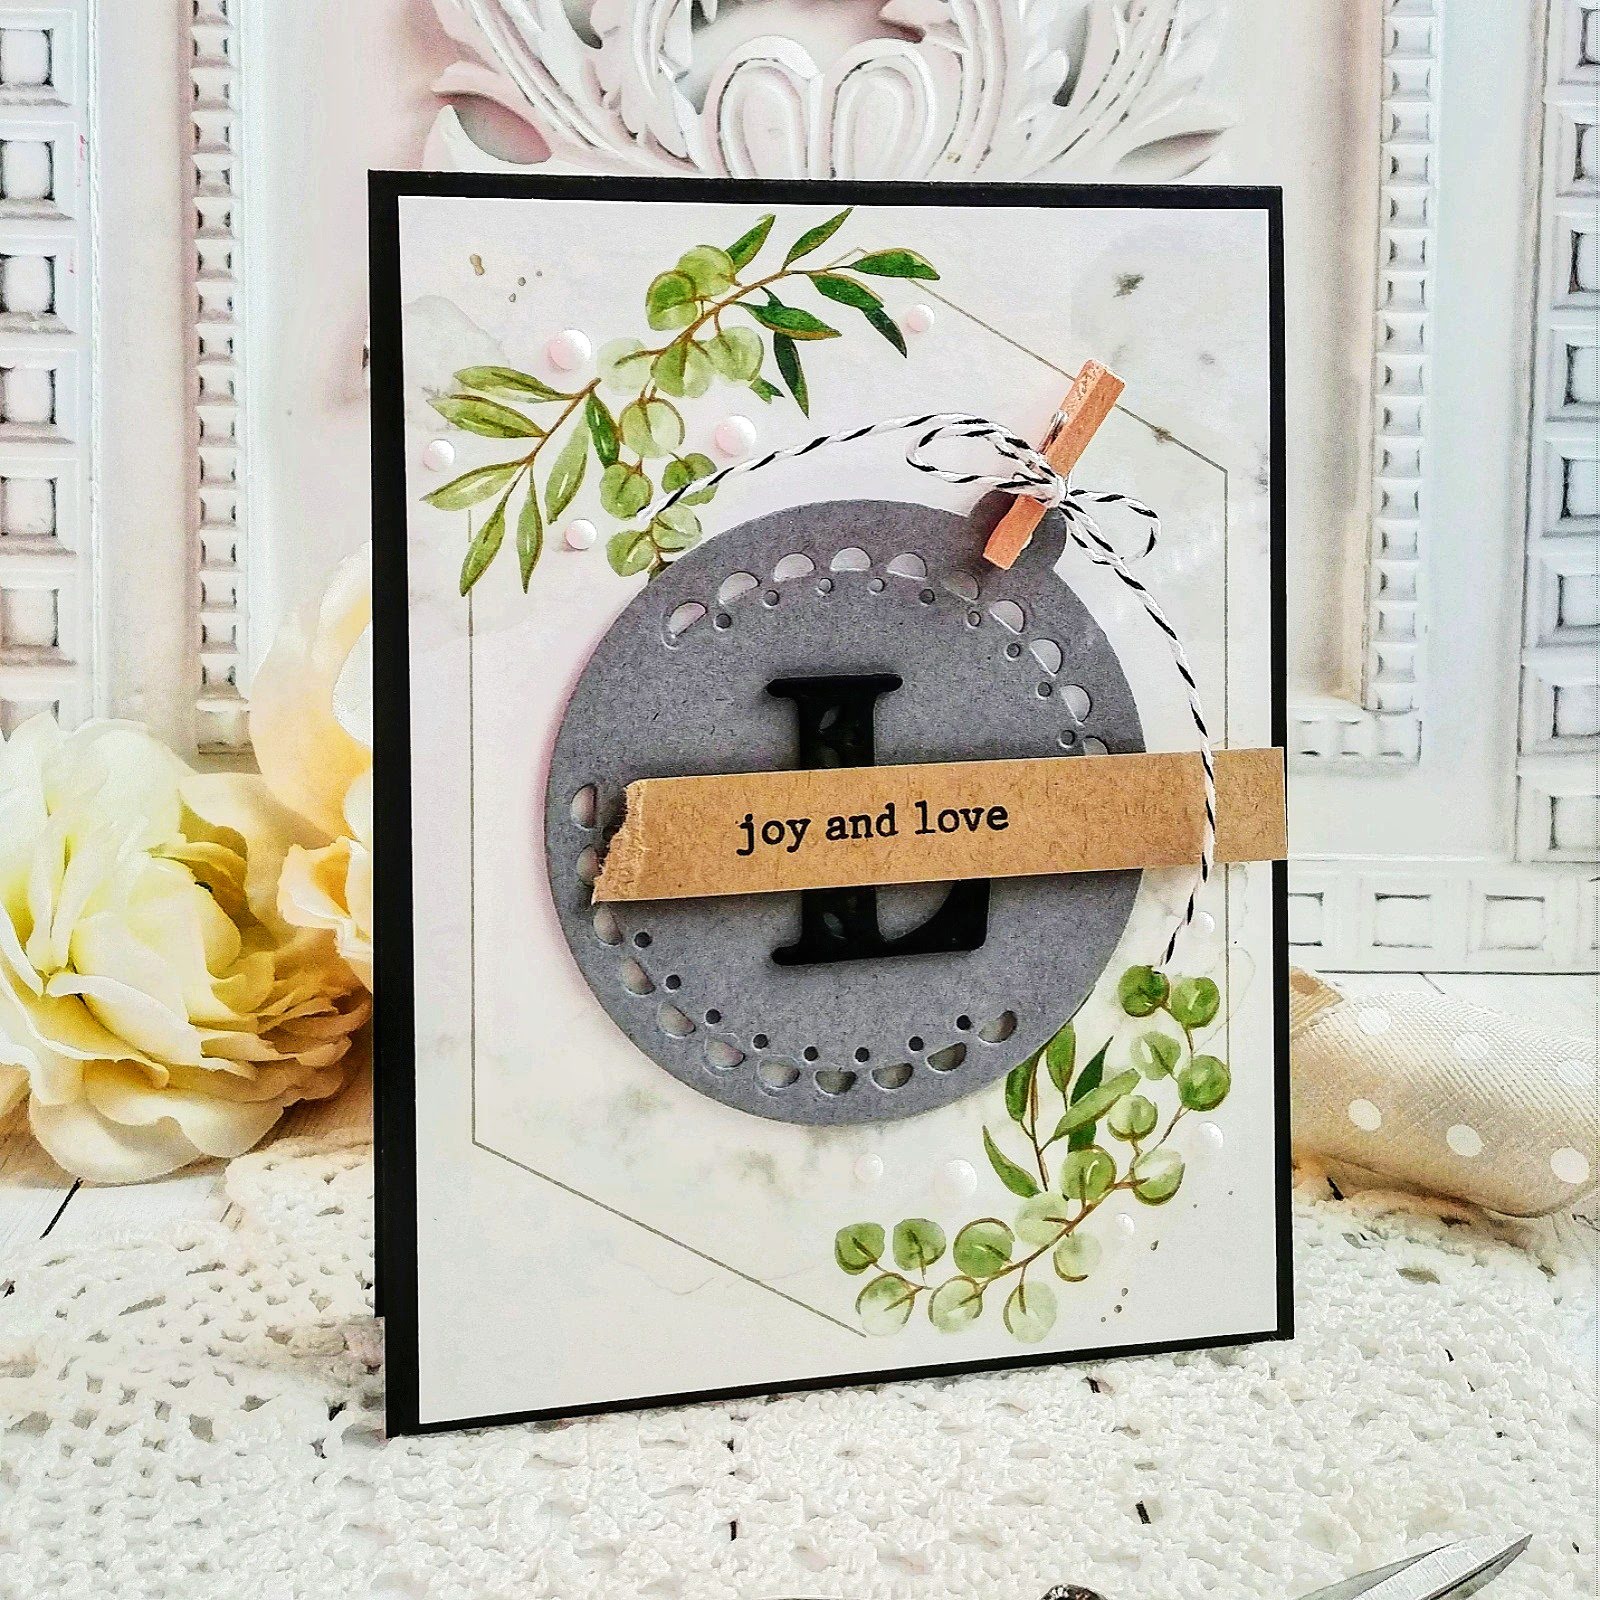
I was thrilled to finally have an excuse to use the awesome Eucalyptus Fantasy washi tape ; it was the perfect choice to use for the touch of greenery in the photo. There is a coordinating Eucalyptus Fantasy stamp set and coordinating die collection. The awesome thing about the die is that is can die cut the images from the washi tape, all except the portion of the tape that I used today! LOL! This portion doesn't have a need to be die cut, but the other sections, do! Anyway, I was excited to use it!
I added the washi tape panel to a standard top folding A2 black card base using foam squares. I created the tag by die cutting the Essentials Classic Tags with fillable elements out of grey cardstock. I used the little dots and scallop portion of the "fillable" elements in the tag set to mimic the look of the galvanized bucket/basket in the photo. 
I die cut the "L" three times using the Kelly Alpha  and glued them together using liquid glue. I added it to the center of the tag using liquid glue as well. Once that was done, I added a tiny clothespin to the hole on the tag that is tied with black Baker's Twine.
The "joy and love" sentiment is from the Floral Vase stamp set and is stamped in black onto a strip of Kraft cardstock. I had stamped it a few other times trying to the "finish" just right, but in the end a ripped edge won! Go figure, right? My daughter said,"Mom, did you see that the edge is ripped?" Yes, yes, I did! She didn't understand the aesthetic I was going for, but oh well!
I added some white Nuvo drops around the greenery in the washi tape for some added detail and interest.
I had a lot of fun putting this card together. I never would have made it if it wasn't for the challenge! I hope to see your card in the gallery this week! Thanks for fluttering by!