Wednesday, August 30, 2023

The Greetery Harvest Fest Collection Release Day

Well friends, today is the day; the Harvest Fest Collection from The Greetery will be available for purchase beginning at 10 am ET! I'm sharing a bonus card with you today using some of my favorites from the release! I had a leftover panel that was die cut using the Herringbone Parquet die that I decided to use for the starting point for my card today. You all know how much I loved using the Sketched Wildflower Frame stamp for a few of my projects over the last few days, but I couldn't resist taking a gamble and stamping it on the die cut background! I wanted to try doing this earlier when I was making my release projects, but I didn't dare mess up, so I didn't take the risk! Today however, things are more relaxed and I decided to try it! I love how it turned out; it's not a crisp image, but I don't think that matters at all....it just adds to the rustic charm!

I die cut all of the pieces from the Jumbo Curiosity: Acorns die three times from white cardstock and then colored them using Distress Oxide inks. I also die cut the leaves from the BotaniCuts Mighty Oak die so that I could fill in the scene with more color and interest. 

I was hesitant to try stamping any of the sentiments directly onto the Herringbone Parquet background for fear they wouldn't stamp well, but after I saw Betsy had done it on a few of her cards, I knew it would work! I'm so glad because I love how this sentiment looks between these clusters of acorns!

I die cut and stamped the "thankful" portion first so that I could get the placement right for the rest of the sentiment. I simply placed it where I wanted it and then used my mini MISTI for the "my heart is ever" and "you're in my life" and stamped them using Distress Oxide ink. I used foam squares to pop up the "thankful" portion.

I arranged the acorns around the sentiment, adding in leaves here and there. I also used one of the single acorns to fill out the cluster on the top left for balance and visual movement.

I added a hint of glitter to the acorns and leaves to give it a touch of sparkle and shine! 

I added the entire panel to a top-folding A2 card base using liquid glue. I hope you've enjoyed all of the beautiful new products as much as I have! Thanks for fluttering by!


Tuesday, August 29, 2023

The Greetery Harvest Fest Collection Day 2

Hello and welcome to day 2 of full reveals for the Harvest Fest Collection from The Greetery! I have some fun things to share today, but I also want to let you know that the official "meet and greet" for the new products can be found on The Greetery Blog if you want to see the details on each of the showcases products today! Also, make sure to leave a comment here and on each of the designers' blogs for a chance to win one of two $50 gift certificates to the shop!
My first card for today uses the fabulous new Elegant Entrance: Arches Die! This is such a fun die collection that allows you to create a cute porch scene like I've done here! It is also perfect for other kinds of card as well; you don't HAVE to cut out the panes and embossed detail at the bottom. Those are separate dies so you can just have solid arched openings for fun "lift-the-flap" ideas!

I always enjoy decorating my porch for autumn so I thought I would create a cute porch card with a thanksgiving sentiment! I used the Thanks All Ways stamp set again for this card because I just love it so much!! To begin, I used the Elegant Entrance: Arches die without the inserts to cut the main door portion using Kraft cardstock. Once that was done, I dropped the "paned" inserts on both sides and secured them with Washi tape and ran them through my die cut machine again. The dies come wired together so you don't HAVE to snip them apart if you don't want to, but I didn't want the impressions from the wire where they are connected to show, so I opted to snip them apart.

I added some ink around the arched doorway and the edges of the card for some added depth, dimension, and realism. Once that was done, I die cut all of the pieces from the Autumn Harvest die collection twice from Vintage Cream cardstock and then colored them with assorted Distress Oxide inks.

I wasn't planning on having the doors actually open, so I just added the wheat stalks and pumpkins with foam squares. I also added the sentiment to the top and then added the larger die cut sentiment across the doors. 

My second project for today uses the AMAZING new floral set called Wildwood! I die cut and stamped a BUNCH of flowers and leaves so I was able to make two cards. There are three sentiments included in this set so I chose to use two of them on this pair of cards. The third sentiment is on my last project for today, so you can see that in just a bit.

The backgrounds are created using the new Herringbone Parquet die and I die cut them from white cardstock and mounted them onto top-folding A2 card bases using liquid glue. I added some ink around the edges for an antique look.

I used the stamping guide that is included as a reference for the flower arrangement; I thought it was so beautiful I couldn't wait to try it out!

I added the flowers and leaves using foam squares and then adhered the sentiment pieces over the top. Please note: the Wildwood die set cuts out the flowers and foliage and the Wildwood Sentiments die includes dies for the three sentiments. I have become quite partial to having dies for sentiments, so this is a great die to have if you like that as well! I just feel like your design options open up if you don't have to worry about where you will stamp the sentiment!

This card is a not-so-spooky Halloween card just perfect for something more subtle. I used the new Fall Folk Stencil for the background using muted browns and oranges. Once that was done, I decided to add the new Plump Pumpkins, Cinnamon sticks, and a buckeye leaf!

The sentiment is heat embossed in silver and is from the new Tear Strip Tags: Halloween stamp set.

I can't wait to try using the Wildwood stamp set paired with the pumpkins! I'm certain that one of my fellow designers probably tried it and I can't wait to see what it looks like!

I think these Plump Pumpkins would be super cute paired with the pie dies from yesterday as well! So many design ideas running around in my brain! ha ha!

My final project for today uses the new Round About Fall Foliage die paired with some other favorites from the new release! I made a set of tags that will most likely get attached to loaves of pumpkin bread for some fun, fall neighborly gift-giving!

This particular tag uses the new Jumbo Curiosity: Acorn die and that third sentiment from the Wildwood stamp set I was telling you about!

Each tag uses two of the Round About Fall Foliage die; die cut from white cardstock and then colored using Distress Oxide inks.

This tag uses another one of the Tear Strip Tags Halloween sentients.

Well friends, this concludes my projects for today! Tomorrow is RELEASE DAY! yay! Everything will be available for purchase starting at 10 am ET! Don't forget to stop by the other designers' blogs and leave a comment for more chances to win on of the gift certificates! Thanks for fluttering by!


Kelly (you are here)


Monday, August 28, 2023

The Greetery Harvest Fest Collection Day 1

I'm so glad you've joined me today! Welcome to day 1 of full reveals for the Harvest Fest Collection from The Greetery! You've come to the right place if you're searching for some autumn inspiration! This new collection is absolutely wonderful and I think you're going to love it as much as I do! Please head to The Greetery Blog for the official "meet and greet" for each of the featured products for today. Also, please make sure to leave a comment here, and on each designers' blogs, for a chance to be eligible to win one of TWO $50 gift certificates to the shop!

My first card features the new Jumbo Curiosity: Acorn dies and the new Cinnamon sticks dies. I was thrilled to see these cute cinnamon sticks; I don't know if you remember when I made a a bunch of cinnamon sticks last winter for my wreath! ha ha! This will be so much easier to use in the future! I also snuck in the Jumbo Curiosity: Buckeye Leaf that was released last year for added autumn flair!

To begin, I stamped the Sketched Wildflower Frame onto a panel of Vintage Cream cardstock. I used the Hoopla Oval Inserts Die to add texture inside the stamping. I used the largest size directly onto the stamped panel and then used the smaller sizes to create the focal oval for the acorns. The acorns, cinnamon sticks, and other leaves are all die cut from white cardstock and then colored using assorted Distress Oxide inks. I added a few more oak leaves from the BotaniCuts Mighty Oak die collection. I wanted some variation in sizes, so this was the perfect choice!

I arranged all of the die cut elements on the stamped panel and then got to work on the sentiments. I used the beautiful new Thanks All Ways stamp set and die for this card. I heat embossed the "for who you are and all you do" portion in gold onto a strip of brown cardstock. The thankful portion is stamped in Ground Espresso Distress Oxide ink and then die cut using the Thanks All Ways die collection. I added some glitter for some sparkle and shine and then added it to a top-folding A2 Vintage Cream card base.

I think Betsy really knocked it out of the park with this To Pie For die! I'm smitten!!! There are a few different options so you can make all kinds of pies for year-round fun! I chose to keep with the autumnal theme and created a Thanksgiving pie because it's just so classic! I'm itching to make a cherry pie, lemon pie, etc! 

I used the same background for this card as I did with the first. I just love the quick and easy detail it adds to the edges of a card! All of the pieces for the pie was die cut using the To Pie For die set out of white cardstock and then inked up using assorted Distress Oxide inks. This is one time that I have complete control over not having burnt edges on my pie! ha ha!

As you can see, I used the same sentiment set for this card, but Betsy has come up with another sentiment set called Fall Foodie Phrases that incorporates some punny pie phrases that would work nicely as well! I used that set on my next project, so stay tuned!

One of the things I like best about the new Thanks All Ways stamp set is that is has an assortment of curved sentiments that work perfectly over the tops of the different arched stamps/dies that have been released recently. As you can see, I chose to use one at the top of this card and then the remaining sentiment over the pie and at the bottom.

I love a highly decorated pie, so I am glad that Betsy included the different leaves to decorate the edges or center of the pie. I chose to use some of the leaves in two of the corners in traditional fall colors for added detail and color!

I added some sugary glitter to the pie and the the leaves for sparkle and shine! I have a feeling that Betsy is going to be showcasing a cute cherry pie...I can't wait to see!

Eeep! The new Caramel Apple die is one of my absolute FAVORITES! There is a local ice-cream shop that carries caramel apples year-round so I like to give them as gifts. I particularly enjoy giving them to my boys' teachers, so you can guess where these two cards are headed! ha ha!

These apples are so easy to make; I simple die cut everything from white cardstock and then colored the pieces using assorted Distress Oxide inks. The "caramel" portion got a generous amount of Nuvo Crystal Glaze for that realistic caramel look. Believe me, these look good enough to eat! My mouth is watering just thinking of a juicy caramel apple!

My favorite is a Granny Smith apple with caramel. This card features the adorable new Nutty Bits on the caramel! It looks SOOO realistic, don't you think? Like I mentioned earlier, for the two cards I used the new Fall Foodie Phrases stamp/die set. I also used the new Herringbone Parquet die for the background of both of these cards! I know I'm going to have so much fun with this die!

And how about a Halloween Candy Apple? This little tag features the new Apple Spice Bits and the new Tear Strip Tags Halloween stamp set! I was thrilled with this new addition to the Tear Strip Tags family! Well friends, this concludes day 1! I hope you've enjoyed things as much as I have! Make sure to head to the other designers' blogs to see what fabulous things they have come up with and to leave a comment to be eligible to win one of the two gift certificates! Thanks for fluttering by!
P.S stop by tomorrow for day 2 of full reveals!


Kelly (you are here)


Papertrey Ink August Release Countdown Day 4


Welcome to the 4th and final day of the Papertrey Ink August release countdown! My first card features the new Build-a-Turkey dies and the new Fun Frame: Leaves! I also couldn't resist adding another plaid background that was created using the new Watercolor Plaid Stencil set! I think I'm addicted! ha ha!

To begin, I die cut all of the pieces I would need for the turkey; you will definitely want quite an assortment of feathers to give him a lot of color and fulness! I simply cut everything from white cardstock and then colored it using Distress Oxide inks. I find this approach the easiest so that you don't have to run your die cut machine a thousand times using different colored pieces of cardstock! I also like being able to add different tones of each color for added realism.
I glued the turkey together using liquid glue and foam squares. I added googly eyes rather than the eye pieces that come included in the die collection for some whimsy and fun! I die cut the frame from white cardstock and then used residual ink from my blender brushes to color the frame! I like using green as a base for autumn leaves like this because then you can add the fall colors over the top and it looks like real leaves changing colors for the season!
I layered everything onto the plaid background using additional foam squares and glue. The sentiment, which is from the new Give Thanks Sentiments, is heat embossed in gold onto a strip of vellum. I simply wrapped it around the front and secured it in back using clear tape. I glued the entire panel onto a top-folding A2 card base using liquid glue.

My second card for today features the new Delicate Trees Stencils. This is a collection of stencils that allows you to create different tree scenes using the varied sizes of trees. This would also be a fun collection to use in the spring with pinks and purples. I chose to use it as a backdrop for my pumpkin scene featuring the new Farm Fresh Pumpkins that was showcased yesterday.

To begin, I stenciled the different trees using Distress Oxide inks. Make certain that you use the right side of the stencil! woops! I realized that I had some upside down and it really makes a difference when you're trying to add the trunk or the top, depending on what you started with! ha ha!

Once the tree scene was set, I added the different pieces to create the Farm Fresh Pumpkins addition! I just love how it turned out! I used the large Thanks sentiment from the Give Thanks stamp set to finish off the design. I added the stenciled panel to a top-folding Saffron Spice card base using foam squares!


I had a lot of fun creating all of these projects for the August release! All of the new products will be available for purchase tomorrow night at 10 PM ET. Thanks for fluttering by!

Sunday, August 27, 2023

Papertrey Ink August Release Countdown Day 3

Welcome back for day THREE of the Papertrey Ink August release countdown; I can't believe we're halfway done! It's been such a fun few days showcasing all of the beautiful new autumn/Halloween products! My stash has been replenished for the new season and I can't wait to start baking all of my favorite autumn treats to share with family and friends! I love adding a handmade card or tag to a plate of goodies!

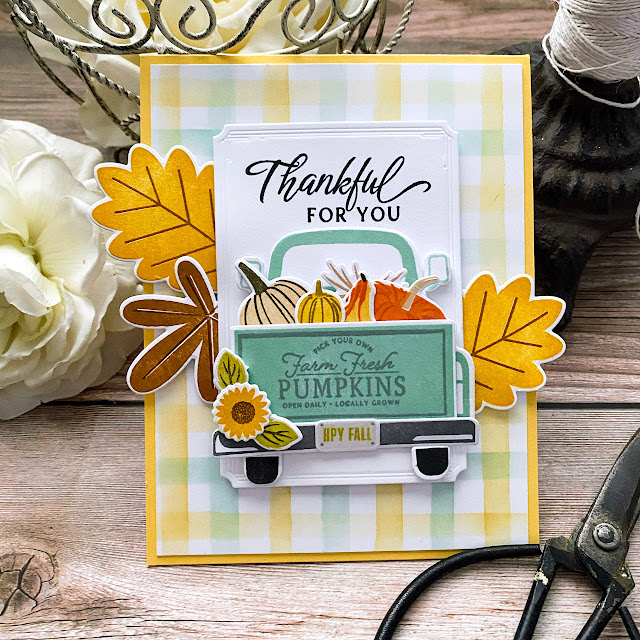
My first card for today features THE cutest new stamp/die set called Farm Fresh Pumpkins! I love the back view of the truck all filled up with the pumpkin harvest! There is another option and that is to have the tail-gate down so that you can add a blanket, haybales, and pumpkins! I chose to use the back up so that I could stamp the fun "farm fresh pumpkins": sentiments on the back!

The team is also showcasing the fabulous new Watercolor Plaid stencil collection today! It is a set of four stencils to allow you to create plaid backgrounds like I've used here!

As you can see, I used a few more leaves from the new Leave It To Me stamp set that was featured yesterday! I told you I can't seem to stop using them! ha ha!

I also snuck another opportunity to use the new Just Thanks sentiment set to accentuate the "harvest" feeling of this card!

My second card for today uses the adorable, and easy-to-use Spooky Halloween stamp set.  I also used the new Spider Web stencils, which I mostly covered up because I just HAD to use the hotfoil plate again! ha ha!

I die cut ALL of the pieces from the Spooky Halloween die set and then stamped them (mostly in black). There is a really cute pumpkin, but I didn't end up by using it on this card.

I arranged the stamped pieces here and there over the hotfoiled panel. I added the heat embossed sentiment, which is included in the Spooky Halloween stamp set, over the top of the broom. I layered the entire panel onto the stenciled cardbase using foam squares. Thanks for fluttering by!
P.S. Don't forget to join me again for the 4th and final day of the countdown!