Tuesday, December 28, 2021

Papertrey Ink Flash Sale {Anywhere Together}

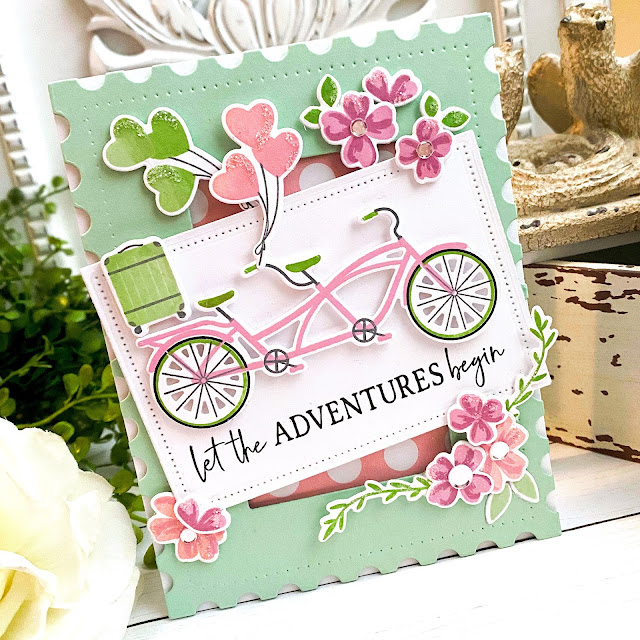
I hope you all had a fabulous Christmas! We sure did! Things were a bit hectic getting everything ready this year, but we still had a wonderful day with family! I'm looking forward to the new year and all of the possibilities and new opportunities! I guess this particular sentiment that I chose for today's card fits pretty well with a fresh, new start!
I chose the super cute Anywhere Together stamp set for my Papertrey Ink Flash Sale this week! 

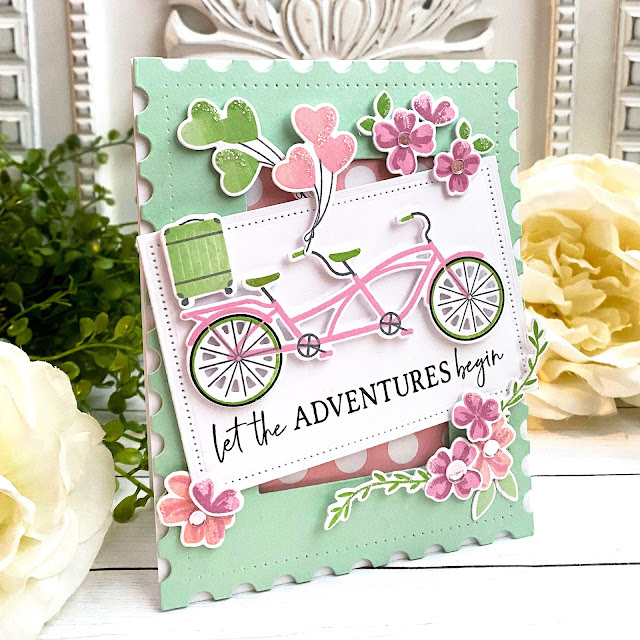
I die cut the bike, suitcase, and balloons using the coordinating Anywhere Together die set. I used my mini MISTI to stamp all of the pieces; the bike is stamped using Lovely Lady and New Leaf ink, paired with Weathervane and True Black and the suitcase is Mint Julep and New Leaf with Weathervane details. I chose to stamp two bundles of balloons; one in Pale Peony and Lovely Lady and the other in Mint Julep and New Leaf inks.

I love adding floral elements into most of my designs, so I thought the scale of the flowers from the Floral Breeze stamp set would be perfect for this card! I stamped some using Pale Peony for the base layer and Lovely Lady for the detail images and the others are stamped in Lovely Lady with Autumn Rose details.

I die cut the Postage Frame using Mint Julep cardstock and layered it over a white card base with a piece of Bitty Big: Pink Posey pattern paper peeking through the middle. I had originally planned to have a horizontal card, but in the end, I decided that the tilted panel looked more playful on the vertical card.

The sentiment is stamped in black onto a panel that was die cut with both the Nesting Basics: Rectangles and the companion Nesting Basics: Pierced Rectangles. I like that the pierced detail echoes the detail on the frame. Once the sentiment was stamped, I was able to start putting all of the stamped pieces into place using liquid glue and foam squares. I added some Moonshine sequins to the center of a few flowers and then sprinkled some glitter over the balloons and flowers for some added sparkle! Thanks for fluttering by!


Monday, December 27, 2021

Papertrey Ink {What Do I Do With This?}

Thanks for joining me today for the "What Do I Do With This?" feature for Papertrey Ink. I'm sharing a little bit of my process over on the Papertrey Ink blog, but decided to go a little bit more in-depth here! The product(s) that I'm using today is the Tim Holtz Distress Holiday Texture set. I ended up using both of the pastes on today's cards, which is something I don't think I would normally do. Because the grit paste is so subtle on this design, I felt like I could get away with using both!

You can see the beautiful crackling on the poinsettia leaves in this photo. Let me get started telling you how I created this Christmas design! To begin, I cut a 3 3/4 inch by 5 inch panel of white cardstock and stenciled some Vintage Jadeite ink using the Stencil Basics: Diamonds Stencil. I purposely didn't extend the pattern all the way to the edges, but rather focused on the middle and working my way outward. I also added the grit paste over the top and set the panel aside to dry.

I die cut enough pieces to create three poinsettias; one large, one medium, and one small, using the Into the Blooms: Poinsettia Dies. The large bloom uses all three sizes, the medium bloom uses 2 of the middle size and one small, and the small bloom uses 2 small pieces. I inked these up using Festive Berries and Aged Mahogany Distress Oxide ink making sure to leave a little bit of white space for realism.

I assembled each of the flowers using foam squares and liquid glue and then used a paintbrush to apply the Crackle paste. I set these aside to dry and allowed the crackle effect to emerge. The leaves and pine sprigs are inked using Mowed Lawn, Rustic Wilderness, and Pine Needles Distress Oxide inks.

While the background and flowers were drying, I got to work on the sentiment. I chose something large and a sentiment that has a coordinating die. I knew that I couldn't do anything direct-to-paper since I added the grit paste to the background. The Grand Christmas Sentiments stamp set is the perfect choice for this card! I also added another sentiment to reinforce the "JOY" theme, which is from the Season of Joy stamp set

Once everything was dry, I got to work putting it all together. I added the JOY to the bottom right corner using foam squares and then added the flowers and leaves using liquid glue and foam squares. The finishing touch is a bit of glitter and a bow from the Tag Creations: Modern Gift die. I mentioned over on the PTI blog that I kept each application of these products very minimal which allowed me to be able to use both on one design. I enjoyed making this card and experimenting with these fun products! Thanks for fluttering by!


Tuesday, December 21, 2021

Papertrey Ink December Release Countdown Day 4

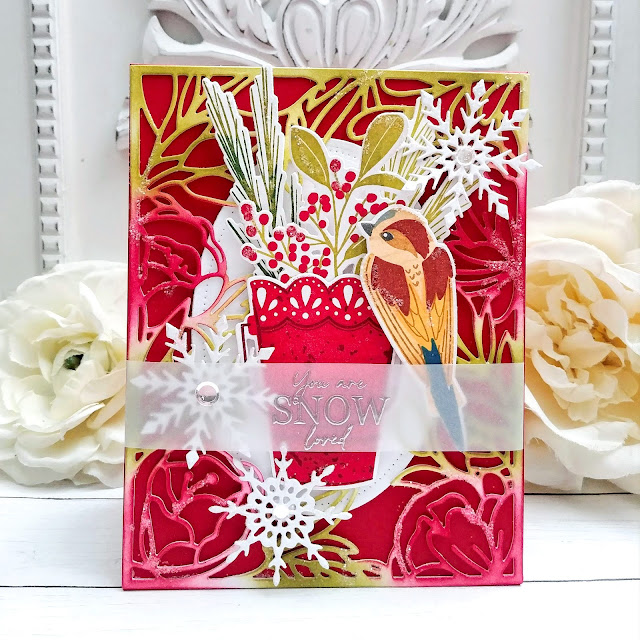
It's the 4th and final day of the Papertrey Ink December release countdown! I'm sharing two cards with you today; first up is the fabulous new Vase Collection 6! I think this is my favorite in the series so far! I love the fun detail and the cute handle....I can tell this will be one that I reach for often.


Many of you are probably finished with all of your Christmas cards, so I thought I'd share something that would be fun to work for the winter months with the "you are snow loved, sentiment and a scattering of snowflakes.

I had an extra bird leftover from my projects on day 1 so I thought it would look cute perched on this bucket of winter foliage.

I added a few snowflakes with sequins in the center for some added detail.

If you're not interested in winter cards, this would look just as nice in spring colors with flowers inside the bucket.

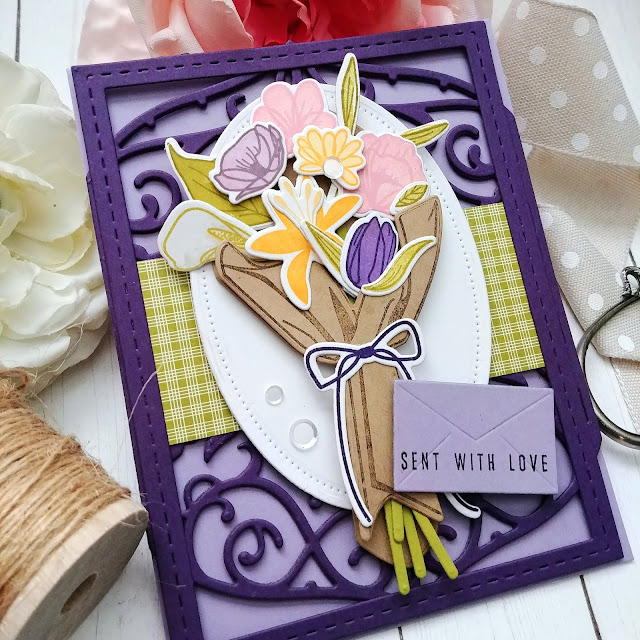
My last card for today and the release uses the new Towering Stems stamp/die set. I also paired it with the new envelope dies that were featured yesterday with the mailbox collection.

This set features quite a few different flowers and leaves with the long stems to tuck out of the bouquet wrap.

The December release will be available for purchase tomorrow at 10 PM ET. Thanks for fluttering by!


Monday, December 20, 2021

Papertrey Ink December Countdown Day 3

Welcome to day 3 of the Papertrey Ink December release countdown! There's some really fun new products being showcased today that I know you're going to love! Up first is a fun next set called Jar Accessories and it is designed to dress up the Mason Jar Dies that were released earlier this year. I absolutely love all of the sweet images and details included in this new stamp/die set.

I chose to use both the large and smallest size jar to create a shaped card, but with both jars as part of the design.

As you can see, the large red jar opens up and the small pink jar is simply attached to the side of the jar.

I wanted to use ALL of the cute stamps and dies, but opted to keep it valentine-y and sweet.

This set has a ton of possibilities and I can't wait to use it again and again!

Up next is THE CUTEST little mailbox you ever did see! If you've been around awhile then you know how much I love a postal theme and these new stamps and dies have me giddy!

I can't wait to use these for santa post projects for Christmas, but of course the set was designed to be used for Valentine's Day. The possibilities are endless and I've only scratched the surface. 

There are two different designs of mailbox; one that is open so you can see a bag or treat coming out, or this one that is closed. I chose too use a clip to secure it, but ribbon or twine would look cute tying it shut. I never like how bows look in my photos, so I opted for this quick and easy clip, but rest assured that come gift-giving time, these will most likely have bows!

The die set has a BUNCH of different envelope and letter dies that you can use in so many ways! I wish it wasn't such a busy time of year so I could have gone crazy with this collection of products! I'm sure once January and February roll around you'll definitely be seeing more of these cute boxes!

Thanks for fluttering by!


Sunday, December 19, 2021

Papertrey Ink December Countdown 2

Welcome to day 2 of the Papertrey Ink December Countdown! I hope you're all enjoying this last week of Christmas! I'm sad that it will be over before we know it so I'm savoring every second! Earlier this week we had a wonderful snowstorm which means we don't have to dream of a white Christmas, we will HAVE a white Christmas....my favorite! 
I have two projects to share with you today; up first is a cute new set that goes along with the previously released Holiday Wagon stamp set called Loads of Love. I had so much fun filling up the wagon with sweets and treats for Valentine's Day!

My favorites are the sugar cookies, strawberries, and the chocolate box. The balloon is suepr cute, too, of course! Actually, what am I talking about? The whole thing is cute! LOL! Once I had all of my images die cut and stamped, I got to work putting the card together.

I'm a sucker for doilies for Valentine's Day, so the Delicate Doilies die set was the perfect backdrop for this cute wagon. I also layered the middle size in the Love to Layer: Scalloped Circles over the top for even more depth and detail. I added the cute wagon over the top. 

The sentiment, which is from the previously released Just Sentiments: Love Mini stamp set, is heat embossed in white for a nice crisp look! I added some of the pretty blooms from the Loads of Love stamp set around the sentiment.

I added a sprinkling of glitter for some sparkle and shine!

My second card, or project I should say, is a set of cute tea cup tea pockets using the Loads of Healing stamp set. This can be used in the same way as the Loads of Love set with the wagon, but I wanted to show some other ways to use the little images.

I die cut the Cup of Love Die twice; once from Bitty Big: Aqua Mist paper and once from the Bitty Big: Pale Peony paper. I folded them in half and glued them carefully on the handle and the fluted portion at the bottom. I knew I would be tucking a tea packet  into each cup, so I wanted to make sure the top was open and big enough to hold the packet. Please note: I had totally forgotten to tuck the tea in when I was taking photos, so this is the only photo with the actual tea packet! LOL!

For the sentiment portion of each cup, I die cut the piece using the smaller pattern, or should I say "bitty" pattern (ha ha) of the two papers and then stamped the sentiments from the Just Sentiments: Thinking of You stamp set that was featured yesterday.

I added the little images here and there with the tulip bunch on the the little tag.

These will be cute to tuck in with a get-well basket for anyone who is in need of some healing wishes! Thanks for fluttering by!


Saturday, December 18, 2021

Papertrey Ink December Countdown Day 1

Welcome to day 1 of the Papertrey Ink December countdown! I'm currently listening to Christmas music and pining for a cup of hot cocoa (which I'll probably make before the post is through), but it's looking like spring around here! ha ha! Aren't these new Into the Blooms: Pansies dies fabulous??? As hard as it is for me to transition from Christmas crafting, these beautiful dies make it a little bit easier! That being said, I'm not completely done with all of my crafty Christmas, so stay tuned this next week for a few more projects!

I paired these pansies with one of the sentiments from the new Just Sentiments: Thinking of You stamped in black. This sentiment is perfect for a sympathy, get-well, and more....I will tuck this one in my stash for just the perfect time. I die cut all of the flowers from white cardstock and then inked them up using finger daubers and assorted Distress Oxide inks. I added some tiny black dots in the center of each flower using a fine tip marker.

Once the flowers and leaves were all done, I set them aside to create the different design elements to finish this card. I die cut a panel of Royal Velvet cardstock using the Border Bling: Tin Stitch Die and then added the beautiful new Cover Plate: Elegance die over the top that is cut from Lilac Grace cardstock. I actually cut three of them and glued them together for maximum dimension.

Although I hated covering up the beautiful details of this new Cover Plate, I really wanted to ground the sentiment so I die cut an oval using the Nesting Basics Ovals die and added the pierced detail using the Nesting Basics: Pierced Oval dies. I had toyed around with the idea of stamping a different sentiment on a BANNER, so I decided to add that bit of detail coming from behind the oval. I love when things like this fall into place...something I don't think I would have tried otherwise.

From there, I added the flowers and leaves here and there using foam squares and liquid glue. I added some glitter to both the leaves and flowers for some added detail and sparkle.

My next card uses the latest in the Feathered Friends Mini collection. This particular set is a little bit bigger than the other sets and includes two birds, some berries and leaves, a nest, and a perfect branch to perch!

This particular set has quite a few images so I stamped my birds using the stamping guide. I love how these birds come to life as each step is added. I always like to add a little bit of extra shading to different parts of the bird using two colors of ink and a blending brush to tap the colors together and remove any harsh lines.

Once all of the images were  stamped and ready to go, I set them aside to get the background created. I die cut the On the Border: From the Heart Frame die twice from Stormy Sea cardstock and glued them together with liquid glue.

I layered it onto a top folding A2 card base using liquid glue. I stamped the sentiment at the top of the heart using black ink. This is a new sentiment from the Just Sentiments: Thinking of You stamp set. I die cut the heart frame using the Border Bling: Skinny Heart Frames die from the same cardstock and glued it over the top.

I added all of the stamped pieces using foam squares and tucked a few more leaves from the new Pansies set to frame the birds. Thanks for fluttering by!
 

Monday, December 13, 2021

Papertrey Ink Flash Sale {Joy to the World}

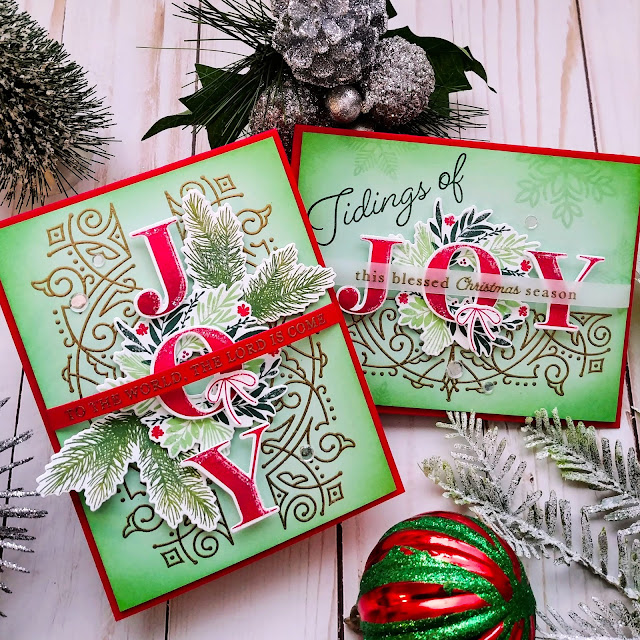
I couldn't resist making a few more Christmas cards for this week's Papertrey Ink Flash Sale...and you can probably bet that next week's will be Christmas, too! I promised a few weeks ago that I would try to avoid red and green, but I decided to switch it up a bit and go with my favorite vintage Christmas combo! I started with two panels of Mint Julep cardstock measuring 4 by 5 1/4 inches. For the vertical layout, I heat embossed the fancy design using the Deco Notes stamp set on both sides of the panel, and just once for the horizontal layout.

I added some Vintage Jadeite and New Leaf ink around the edges of both panels using a blender brush. Once that was done, I set them aside to get to work on the letters and foliage.
I die cut 2 wreaths, 2 bows, and 2 sets of letters using the Season of Joy die set and then stamped them using the Season of Joy stamp set. I used the multiple step wreath images to give it a lot of color and detail. I stamped the darkest portion using Pinefeather ink and then the other portion using both Mint Julep and New Leaf ink. The berries are stamped in Scarlet Jewel and the tiny red flowers are stamped in Pure Poppy.

I happened to have two pineboughs stamped and ready to go from the Corner It: Festive Holiday stamp set so I added those to this vertical design as well. I heat embossed the "to the world, the Lord is come" portion using gold powder on a strip of Pure Poppy cardstock.

The Season of Joy stamp set is one of my all-time favorites, and partly because of the script-y "Tidings of" and the "Christmas" sentiments included in the set. They are that perfect vintage look that I love so much! I stamped it in Pinefeather ink at the top making certain that the wreath would tuck nicely between the loopy letters.

I added some tone-on-tone snowflakes around the perimeter of this design to add some extra detail. I added the heat embossed vellum strip and secured it on the back of the Mint panel. Both cards are adhered to a Pure Poppy card base using foam squares. Each card also got a sprinkling of glitter and a trio of Moonshine sequins. Thanks for fluttering by!