Showing posts with label Martha Stewart Crafts. Show all posts

Thursday, October 15, 2020

The Greetery {Autumn Blessings}


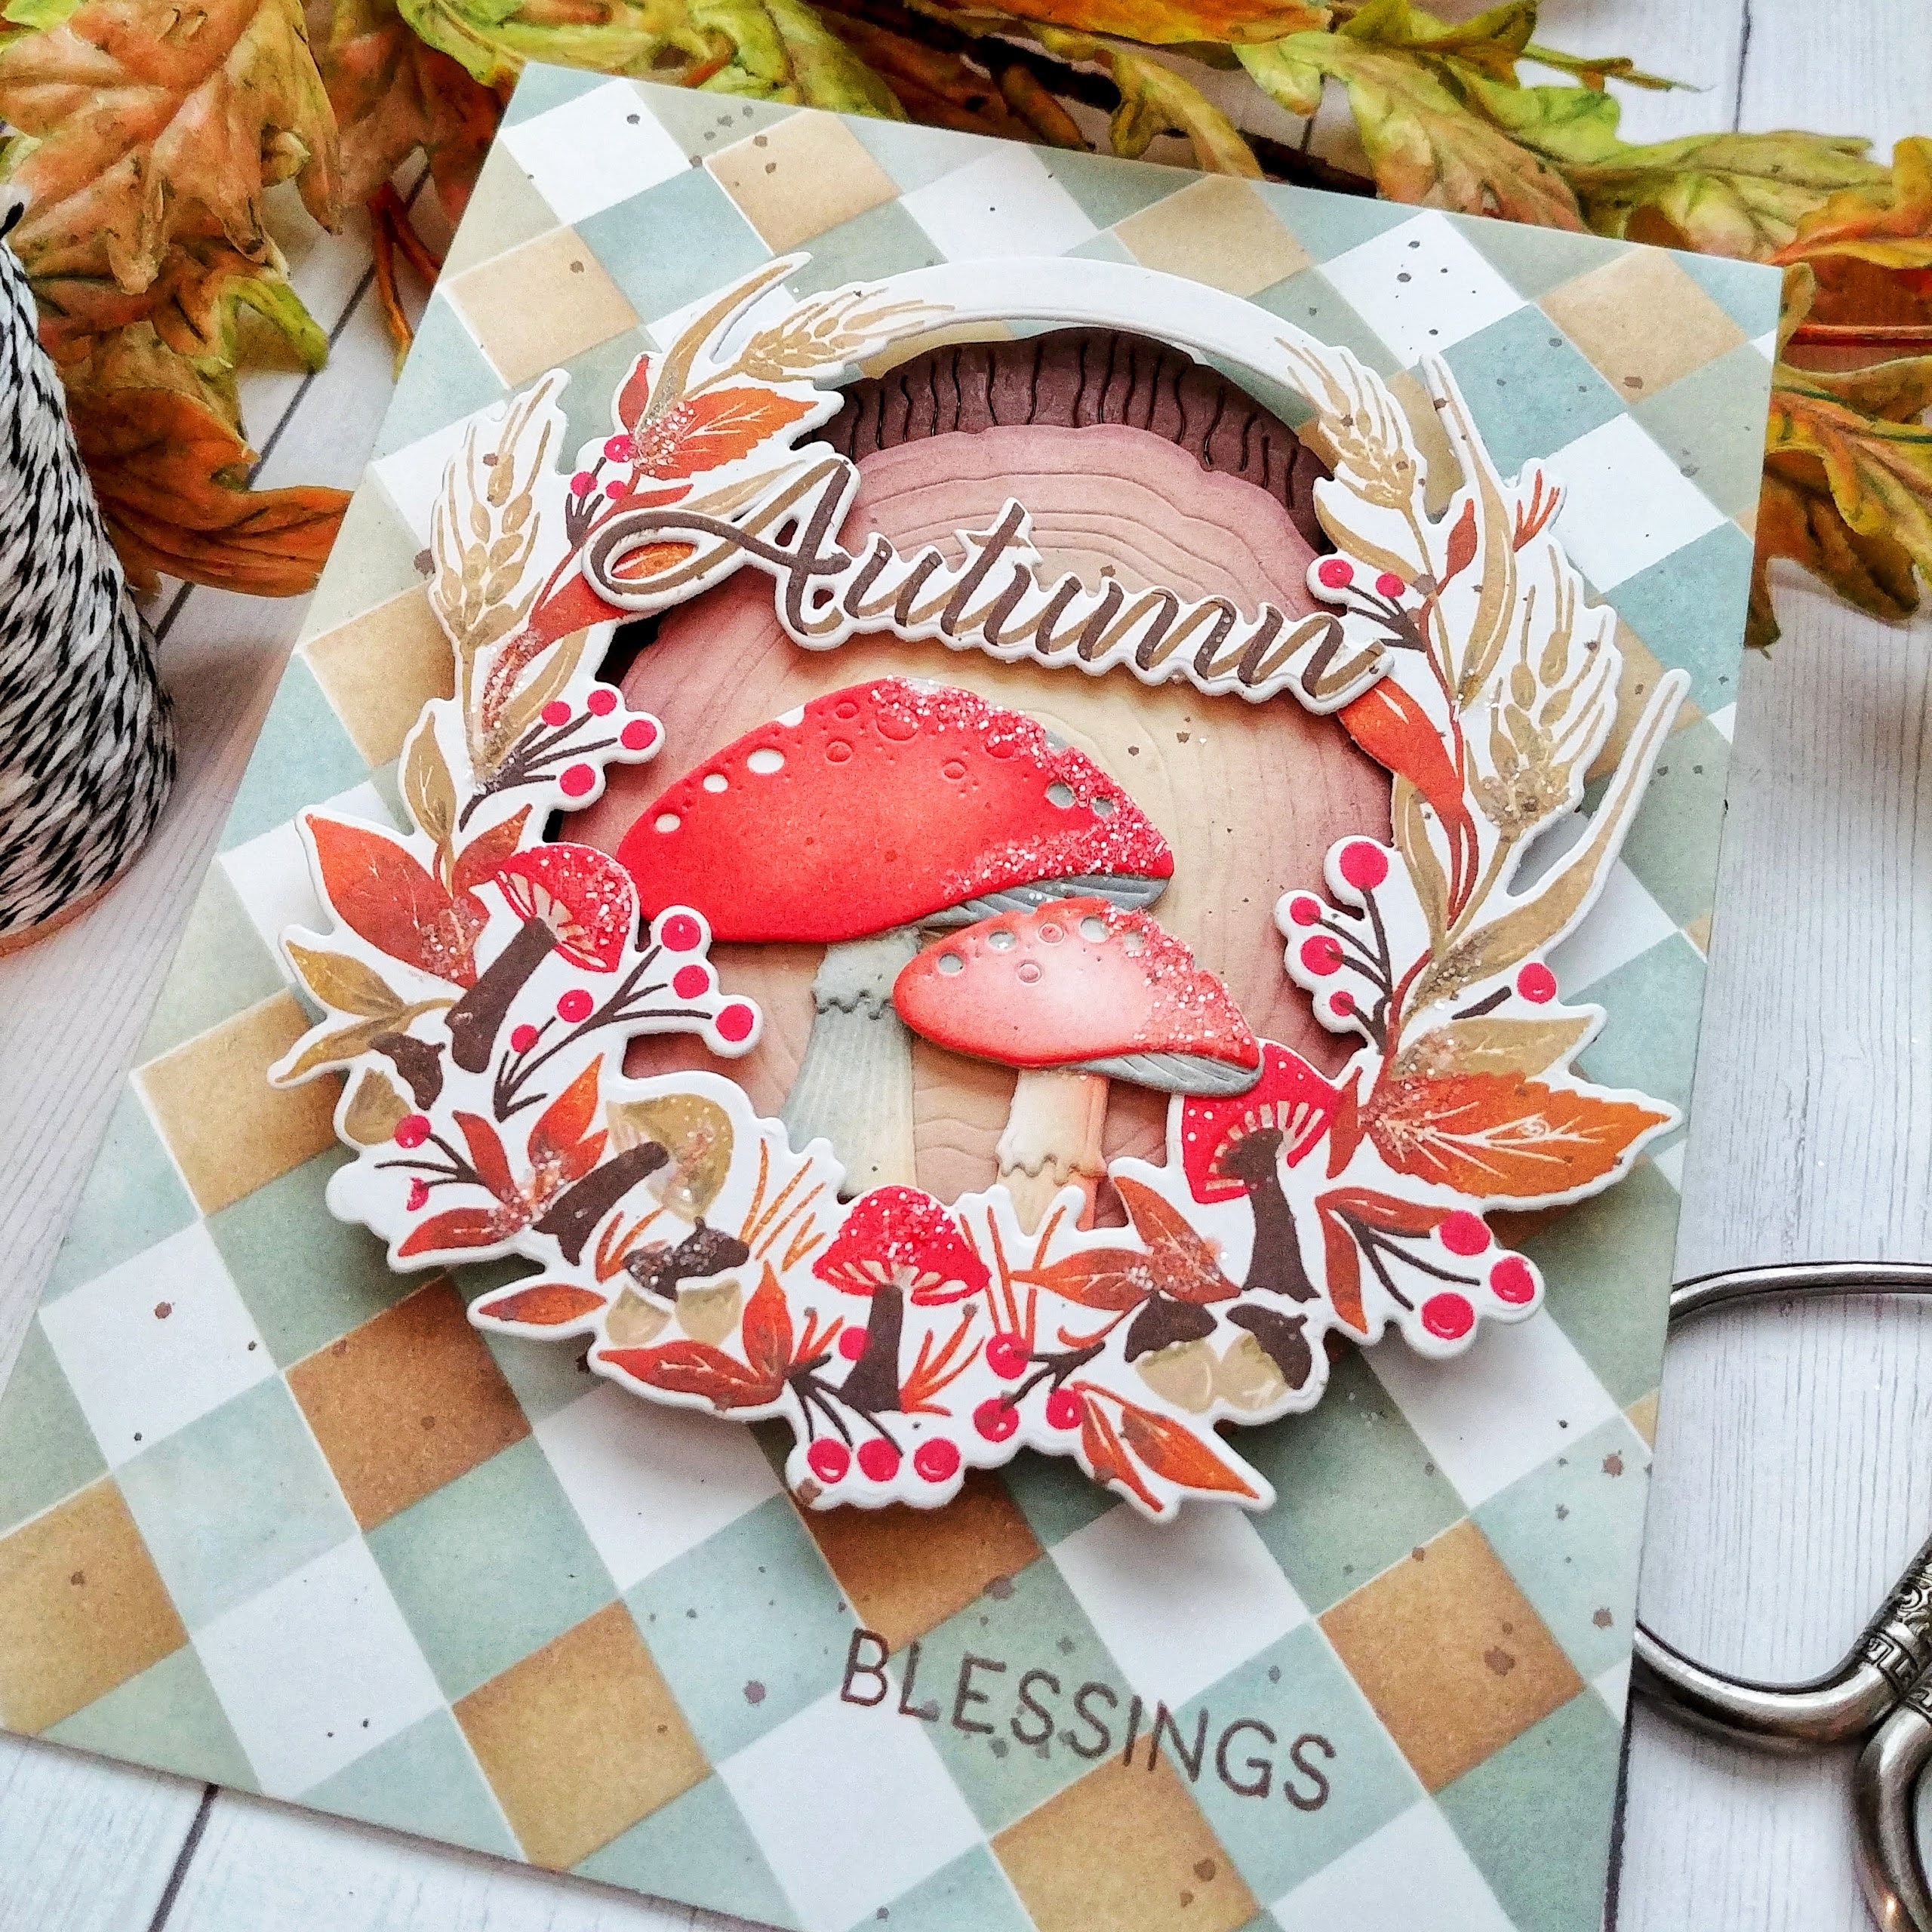
I snuck a little time yesterday morning to do some autumn crafting! I just haven't gotten my fill and there are stamps sets and dies that have been calling my name! I turned on a Nat King Cole album, got comfy and had so much fun putting this card together!  Autumn is one of my favorite seasons and I haven't done nearly enough seasonal crafting!
I had an extra Wood Slice left over from the latest release and I really wanted to try using the BotaniCuts Toadstool Garden with it! I have also really been wanting to combine the toadstools with the Bountiful Wreath stamp set so it all just worked out so well! I was able to combine three things on my "to-make list" onto one card! 
To begin, I die cut the outer portion of the Bountiful Wreath using the Bountiful Wreath die. I did all of the stamping using an assortment of Distress Oxide inks in warm, autumn tones. Once the stamping was done, I die cut the inner portion of the wreath. I added a few extra details using colored pencils to a few of the different stamped images.

I layered it onto the Wood Slice using foam squares. The toadstools were leftovers from THIS card, so all I had to to was tuck them a little bit behind the bottom of the wreath and adhere them with foam squares. I added some Martha Stewart Crafts coarse crystal glitter to both the wreath and the toadstools.

die cut the "Autumn" word, which is from the Bittersweet Bouquet stamp set, and then stamped it using Distress Oxide inks. I added it above the toadstools using mini foam squares. 

I used the Square Dance Stencils on an A2 panel of white cardstock. I fell in love with this particular color combination that Betsy used when these stencils were released, so I wanted to recreate it for today's card. I accidentally turned the Stencil C upside down, so this isn't perfect (don't look too close) ha ha! This was my second attempt so I just went with it! I stamped the "blessings" portion of the sentiment at the bottom and then added the entire wood slice portion directly to the panel using a tape runner. I finished it off with just a touch of ink splatter for some added detail! This was such a fun card to create and I'm glad I snuck a little "me" time to put it together! Have your Merry Makings orders arrived yet? I'd love to hear what you're working on! Thanks for fluttering by!


Monday, September 7, 2020

Flash Sale {Blessed}

Welcome to this week's Papertrey Ink/Ink to Paper Flash Sale post! I've picked some colors and products fitting for the season! I don't know about where you live, but Sunflowers are EVERYWHERE right now!  I thought it would be fun to put together a birthday card/tag combo together using these cute images! The sale will go from Sept. 7th at 12 noon until Sept. 9th at 12 noon! The products included on this week's sale are:


To begin the card, I used my mini MISTI and stamped a row of sunflowers on the top and bottom of the white panel using Summer Sunrise and Cocoa Bean ink. I die cut the pieces for the "Blessed" word and then stamped them using Ocean Tides ink. I arranged them here and there for a whimsical look using foam squares. I stamped the "Wishing You" portion of the sentiment using black ink directly to the panel. I actually did that before I added the Blessed word, but arranged them before hand for placement of the stamped sentiment.

 I stamped the sentiment on the coordinating tag using my mini MISTI as well to get good placement as well. All of the extra sunflowers and leaves that I used on today's projects were die cut first out of white cardstock and then stamped. 

All of the die cut sunflowers and leaves have some added glitter on the edges for some shine! I just love adding glitter to my projects for added sparkle!

This tag can be used along with the card to package up a birthday gift, or used separately on a different gift or some goodies! I always love a coordinating set, how about you? And...I know I ALWAYS say it, but if you're not a tag maker, this little tag would make a great focal point on a card as well! I like to make tags with the leftover pieces from my projects for something quick and easy! Thanks for fluttering by!


Monday, August 24, 2020

Flash Sale {You are AMAZING to the core!}


Welcome to this week's Papertrey Ink/Ink to Paper Flash Sale! As usual, the sale will run from 12 noon today until 12 noon on Wednesday, August 26th! I'm revisiting the darling Tag Creations: Delightful Bunch stamp set which is just perfect for this time of year! I chose to use some different colors for the apples to change things up!
This week's Flash Sale will include:


Dies: Tag Creations: Delightful Bunch this will be for pre-order. The other items in your order will be shipped out and then the dies will arrive in 2-3 weeks.

My kids are headed back to school tomorrow for 2 days each week and 3 days at home for remote learning. These tags will be the perfect addition to the teacher gifts that will be headed out the door. I made THESE a few week's ago for the Flash Sale and these tags will complement them beautifully! I just love the pink and lime apples! I think I'd really enjoy picking apples from an orchard filled with pink and green apples! 
Whenever I use this stamp/die collection, it reminds me of the Anne of Green Gables series with Megan Follows as the actress, when her and Katherine are out picking apples. It's right before she meets Gilbert on the bridge, which is always such a fun part! ha ha!


I couldn't resist adding some coarse crystal glitter to the apples and leaves for some added detail. The Nuvo drops help make the apples look crisp and juicy, don't you think? The sentiment on each of the labels are heat embossed in silver for a fun touch!
The kids were able to pop in for a socially distanced Open House last week, so they got to meet their new teachers. They seemed pleased, which is always nice! I hope the teachers like their Back-to-School gifts. I ended up getting some Apple soap from Bath and Body Works, gum, gourmet popcorn, EOS lip balm, a KIND bar, lotion and a gift card to Amazon so they can get a few things that they need. These tags will be attached to the bow that ties up the cellophane that the baskets will be wrapped in! I'm using the little baskets I bought for May Day which will be just the right size! Thanks for fluttering by!


Tuesday, July 21, 2020

Sending so much love your way

I've been having so much fun using the new Into the Blooms die collection and today I'm sharing two more ideas using these fun new products! It is so easy to create lifelike blooms with just a little bit of ink, a blender brush, and some foam squares! You could also die cut them from different colors of cardstock and add additional ink around the edges for dimension. Either way you choose, you're sure to have fabulous results! 

The reason why I like using the ink blending technique is because I can easily die cut all of the pieces out of white cardstock and then decide on the colors as I go along. For today's cards, I have two each of the pink flower, the purple flower, and the large yellow flower.


I also added some crystal glitter to the edges and centers of the flowers and leaves for some sparkle and shine. I just love how they turned out with the addition of the glitter! If glitter isn't your thing, you could also try adding some Nuvo drops to look like dew, or for additional detail to the stems or centers.

I love the sentiments from the Blossoming Branches stamp set and knew they would look great with today's cards. I heat embossed two of the included sentiment onto black strips of cardstock using silver powder. I'm a sucker for heat embossed sentiments if you can't tell!

As much as I wanted to use these two sentiments, I'm also in need of birthday cards so I chose a light sentiment to add to the bottom of each card. It is from the Just Sentiments: Tagged stamp set and I recently used it on THIS card as well. I felt like it is a nice complement to the card with out competing with the embossed sentiment.

I die cut the True Black and Pink Posey Bitty Big Pattern Paper using the Love to Layer: Notched die to give the background some extra detail. The flowers are also layered onto one of the notched panels that is die cut from white cardsock.

On this next card, I JUST used the Pink Posey paper for a different look. Originally, I had only planned on having the previous card have the small swiss dot background in black, but then I realized that I wouldn't have a place for the "Sweet Birthday Wishes" sentiment, so I added the pink panel to the bottom of that card.

I also added some black ink splatter over the top of the card, but I did cover up the sentiment at the bottom. I didn't want to run the risk of a big splatter hitting the petite sentiment! LOL!


Rather than just making a sentiment strip, I decided to actually wrap the entire piece around the pink panel to give it just a bit more detail. I usually wrap my vellum sentiments around like this, but chose to do it with the cardstock on these two cards.


The panel on the left is added to a True Black top folding A2 card base while the card on the right is added to a white card base. It's always fun to experiment with different options to get the results you're hoping for! Sometimes I have a clear plan in my head, but when it comes time to execute it, it's just not quite right! These will be headed to their recipients for their birthday soon! Thanks for fluttering by!

Monday, July 20, 2020

Flash Sale {You are so dear to my heart}

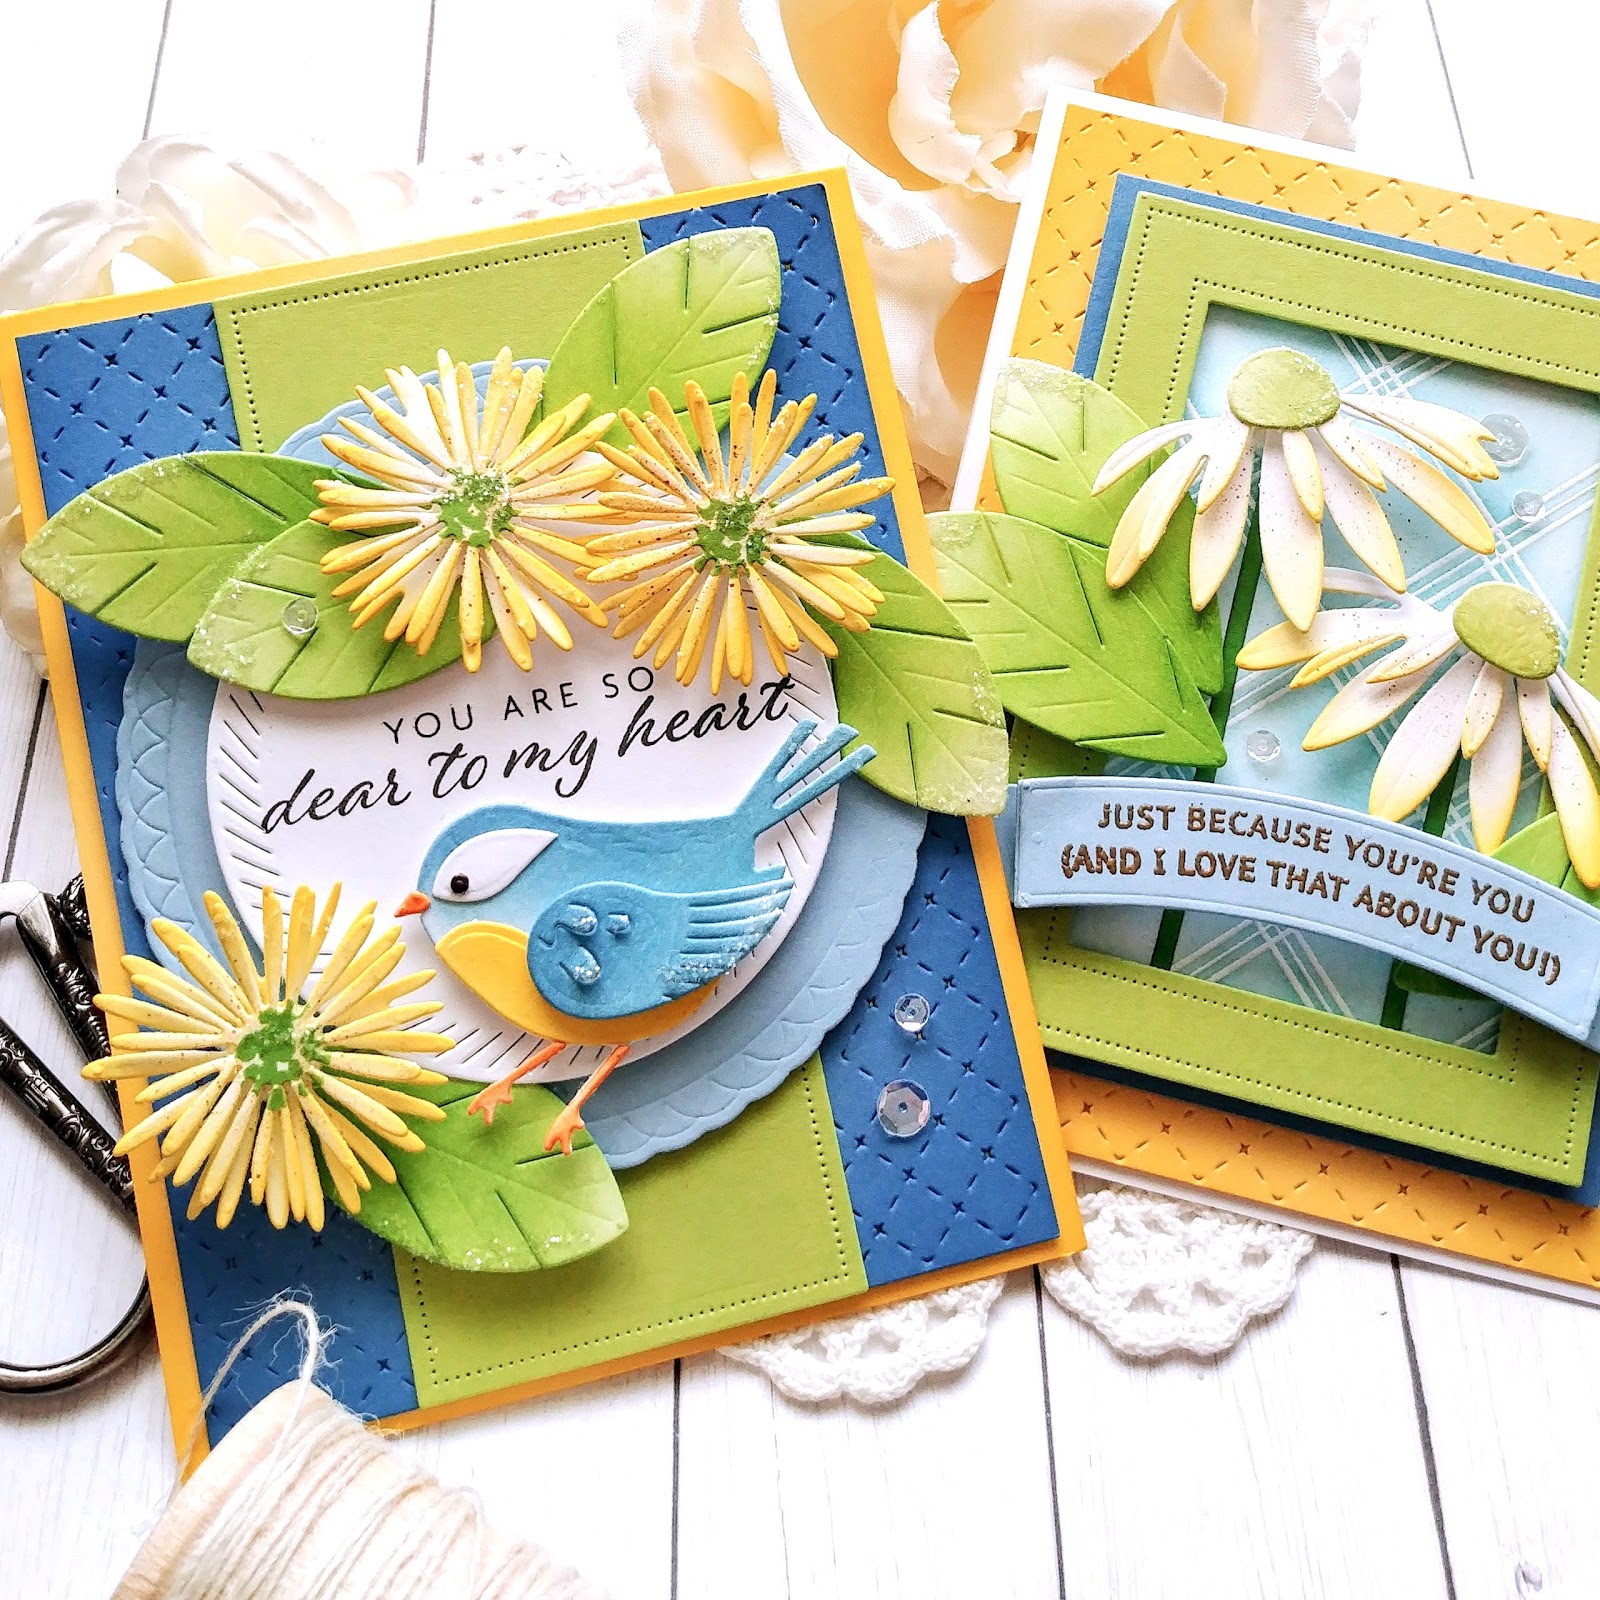
I'm super excited to be hosting the Papertrey Ink Fabulous Flash Sale with 5 different colors of cardstock and ink ON SALE! I've used the 5 colors on today's projects to show you how fun they are when they're paired together! My color picks for this week are Blueberry Sky, Spring Rain, New Leaf, Green Parakeet, and Harvest Moon cardstock and the same colors of INK! These colors just scream summer to me...blue skies and sunshine! The sale will go from 12 Noon EDT today until 12 Noon EDT on the 22nd! Check your stash and see if theses colors need to be replenished OR if they need to make their appearance in your craft room!

Playing with color is one of my favorite aspects of card making, but I do admit that I fall into color ruts where I used the same combinations over and over again! Anyone else feel this way? It was so fun to pull out this summery combination and enjoy the process of creating each of these two cards!

I'm having so much fun using the fabulous Into the Blooms die collection (I'm sharing another set of cards using it again tomorrow) because they allow me to create so much dimension and detail to accent my projects!

I knew the bird from the Feathered Friends 2 die collection would look perfect in these colors as well! Doesn't he/she look so cute perched below the sentiment, which is from the Floral Delicacies stamp set. The center of the flowers is also stamped with one of the images from this same set to give them a fun look!

The bird and flowers are added around the fabulous Love to Layer: Scalloped Circle Dies with the sentiment stamped directly in the middle. The background is created by die cutting a piece of Blueberry Sky cardstock using the Border Bling: Tin Stitched die with a bit of Blueberry Sky ink blended around the corners for dimension. The Green Parakeet portion is leftovers from my next card...ha ha! It is the center of the smallest of the Pierced Feature Frames: Rectangles and I simply cut it in half and added it to the top and bottom of the background panel. It gives the illusion that it is one continuous piece, but it's really just cut in half! LOL! I added some crystal glitter here and there for some added detail and sparkle!

You can see how that portion is taken from the center of the card on the right! It was a great way to get double duty from one cut! My second card uses the Into the Blooms Die again paired with the heat embossed Nifty Plaid Background. I added some Spring Rain ink over the top using a blender brush. I love the variations in color that it gives as the ink adheres to the edges of the embossed background.

The blooms and leaves are all die cut from white cardstock and then colored using the different inks that are on sale! The stems are cut from New Leaf cardstock and adhered to the emboss/resist background using liquid glue. I added the frame over the top using foam squares and then added in the leaves and daisies using foam squares.

I also added some ink splatter using a marker and my color spritzing tool to give the daisies a more realistic look. The sentiment, which is from the new Inside Greetings: Just Because, is heat embossed onto a banner that is cut using the Banner Builder Basics die. I just love these banners as you all know, since I use them so much!

More glitter is sprinkled onto these blooms and a few sparkling clear sequins add even more shine! These colors were so much fun to use and I encourage each of you to challenge yourself to use colors you don't normally reach for! Thanks for fluttering by!

Saturday, April 25, 2020

Keeping Christmas {There's no place like HOME for the Holidays!


Oh, there's no place like HOME for the holidays! I don't think that phrase has hit me quite like it does now, am I right? Welcome to this month's installment of the Keeping Christmas Blog Hop! I missed out on last month, which was a first for me, but I'm back this month with lots to share and see! As you can see, I went with a "Home for the Holidays" theme because I felt it was very fitting for the times. Before I dive into the details of my projects, here is the list of the other designers who are participating in today's hop!
Kelly Lunceford (Creator)
 Vicki Finger (off this month)

Today's projects consist of a set of tags and 6 gift pouches! I absolutely love making these little pouches and have made several variations for different holidays as well. I've been loving this paper pack that my sister gave me. I used it for THESE projects and for THESE. As soon as I saw the particular paper sheet that says "Home Merry Home", I knew the direction I wanted to head for this month's projects.

When I was finished with the 6 pouches, I wasn't quite ready to be done, so I made 3 coordinating tags! These will be perfect for gifts or to package up treats and sweets! I had a comment on THIS post from a sweet reader asking about the caramels that I make. I happened to make some the other day for a friend's birthday, but I usually ONLY make them for Christmas. The recipe I use is from the recipe book called Christmas Recipes from the Lion  House and I wrap them in these cello candy wraps. Gone are the days of me cutting up wonky pieces of waxed paper to get them wrapped! LOL! I buy these by the hundreds from a local kitchen supply store. 

These caramels also gave me the chance for you to see the pouches with a little something inside. I normally have candy canes on hand for photography purposes, but I couldn't find one for today's post. I decided to tuck a few inside so you could see it opened up a bit. When I get these ready for gift giving, I like to put the little tubes of hand lotion and lip gloss from Bath and Body Works, a Truffle bar, a candy cane and maybe some loose little candies as well. Because I do the machine stitching around the edges, it makes these super sturdy and I am able to stuff quite a bit inside!

I cut up one sheet of 12 by 12 pattern paper. This particular sheet of paper is one with lots of different pattern strips so there were three pieces with the "Home Merry Home" printed on them, so I made three like the ones shown above. I also have three others which I will show later on!  To begin, I cut the paper 4 inches by 6 inches which gave me the 6 panels. I cut 6 pieces of Kraft cardstock measuring 4 by 6 1/2 inches. This gave me a little bit of extra space for me to add the diagonal striped paper at the top. I just added a strip so that it would peek out without wasting an entire sheet of paper.  I sewed around the sides and bottom using my sewing machine. Once that was done, I was able to have fun with the embellshments.

I used some oldies, but goodies on today's projects! To begin, I die cut 9 of the snowflakes and added some Vintage Photo distress ink to the edges using the Taylored Expressions Blending Brushes. Next, I added some Martha Stewart Tinsel Glitter to the edges. I set those aside and got to work on the stamped labels that are on the snowflakes. I die cut them with the Mat Stack I die and then stamped them using the Mat Stack I stamp set using black ink. I created the wreath by wrapping a Canadian Pine stem around a Nuvo drops bottle and then glued it with a hot glue gun. I added it to the center of the Mat Stack die using additional hot glue.

I die cut the houses and stamped them using my Mini MISTI. They are from the "Love Lives Here" stamp set that has been discontinued, but the "All Hearts come home for Christmas" is from the Love Lives Here: Holiday stamp set and is the perfect accent for these pouches. I added a bow of ribbon and a silver snowflake embellishment to finish these off! I left one without a bow so you can decide if you like it better with or without the bow. There used to be a day where not having a bow wouldn't have been an option for me! LOL!

This next set of pouches uses the portion of the pattern paper that didn't have anything that I wanted to show necessarily, such as a focal phrase or image, so I took the opportunity to add some longer embellishments.  These are sewn just like the others and the snowflakes and mat stack piece are created exactly the same. For these, I die cut the Ribbon Slider Tag Pattern Paper, which is on sale for $2 by the way, with the coordinating Ribbon Slider dies. I also die cut another one out of Kraft cardstock so that I could layer them for a sturdier piece. There is also a coordinating Ribbon Slider Sentiments stamp set so you can stamp as many as you'd like!

I normally wouldn't tie the bows so early in the year, but I wanted you to be able to get an idea of how they will look when they're ready to go. I did leave the ribbon a bit long, since I may need some additional length once they are stuffed with all of their goodies!

I hot glued a holly sprig embellishment right below the bow. It is not attached to the bow at all, but rather the pattern paper so that I can still get it untied to fill it up when the time comes! These have always been favorites of mine and I have been able to find them at Hobby Lobby every year. These are leftover from last season, but hopefully they'll have more this year, too!

I don't think any of us really has any idea what the holidays will look like this year, but whatever they bring, I know that I will still have my family and friends! A little pouch like this is perfect thing to drop off on a doorstep!

I happened to turn the TV on while I was editing these photos and Dr. Phil happened to be on and he was discussing that "home" isn't the same for everyone during these trying times. I've been so grateful for my safe and comfortable home, with my children and husband around me as we weather this together. He was talking particularly about the foster care system and how people aren't wanting to take in extra kids right now and if they do happen to have these kids, they are needing activities and things to keep them occupied. Dr. Phil said that we could contact our local Child Abuse center or hotline to find out how we can help these sweet kids! It brought me to tears thinking about it all!

My last project for today is a trio of tags (only two pictured here) using most of the same elements as the pouches. The Basic Book Mark 3 die was the perfect choice for these tags. It is large enough to hold the embellishments, AND the stamped sentiment.

One of our favorite traditions is making Christmas cookies and these button embellishments are the perfect addition. I bought them during last year's holiday season, but I never got a chance to use them! I'm particularly grateful to have them since Hobby Lobby is closed and there's no chance to get any right now! Being a crafty hoarder has been a blessing during all of this!😂😂😂

I added all of the wreaths and embellishments using hot glue for a nice sturdy tag. These would be so cute to package up holiday cookies and treats! I hope you've enjoyed today's hop! Thanks for fluttering by!
P.S. Here are a few things I am thankful for today: My home, my family and friends, my beautiful blossoming trees that smell and look heavenly, uplifting music to keep my spirits up, my Savior Jesus Christ, the smell of cut grass, Christmas, spring flowers, laughter, technology, good books, good movies! What's making you grateful today?