
Welcome to the first EVER Simply Sweet Christmas Inspiration Hop! Lesley has put together a fabulous hop dedicated to LAST MINUTE SIMPLE BUT SWEET Christmas cards! I have lots of tips and tricks to share with you today as I share my design for the hop! I had so much fun putting these together! You'll want to head to Lesley's Blog Always Playing With Paper to read about her giveaway as well read all of the rules to qualify to win! This is also my "Keeping Christmas" project for the month! This will be the last one, but don't fret, I will be posting Christmas projects all month long, so stay tuned!


I am doing a giveaway of my own. I have put together a few of my favorite Christmas card supplies (mug not included ha ha) for one lucky winner! For my giveaway (US residents only), simply comment below what your favorite Christmas tradition is and be a follower of mine on Instagram. You can find me @kellylunceford. I share projects and ideas almost daily there! My giveaway will end on Dec 3rd 8:00 am MST and I will have my daughter randomly pick a winner. The winner will be announced that day as well.


For my project, I decided to turn one of my tags I created for the 25 Days of Christmas Tags which you can see HERE into a focal point for my card! Tip #1 You don't need to reinvent the wheel! Try using a design for a tag or smaller project you have already done and use it on your card. Keep these things in mind when deciding on your design; does it have pattern, texture and shine? If you include these three things, you should come up with a winner! None of those elements need to be overly abundant to create something worthy of the fanciest of stationery Shops!
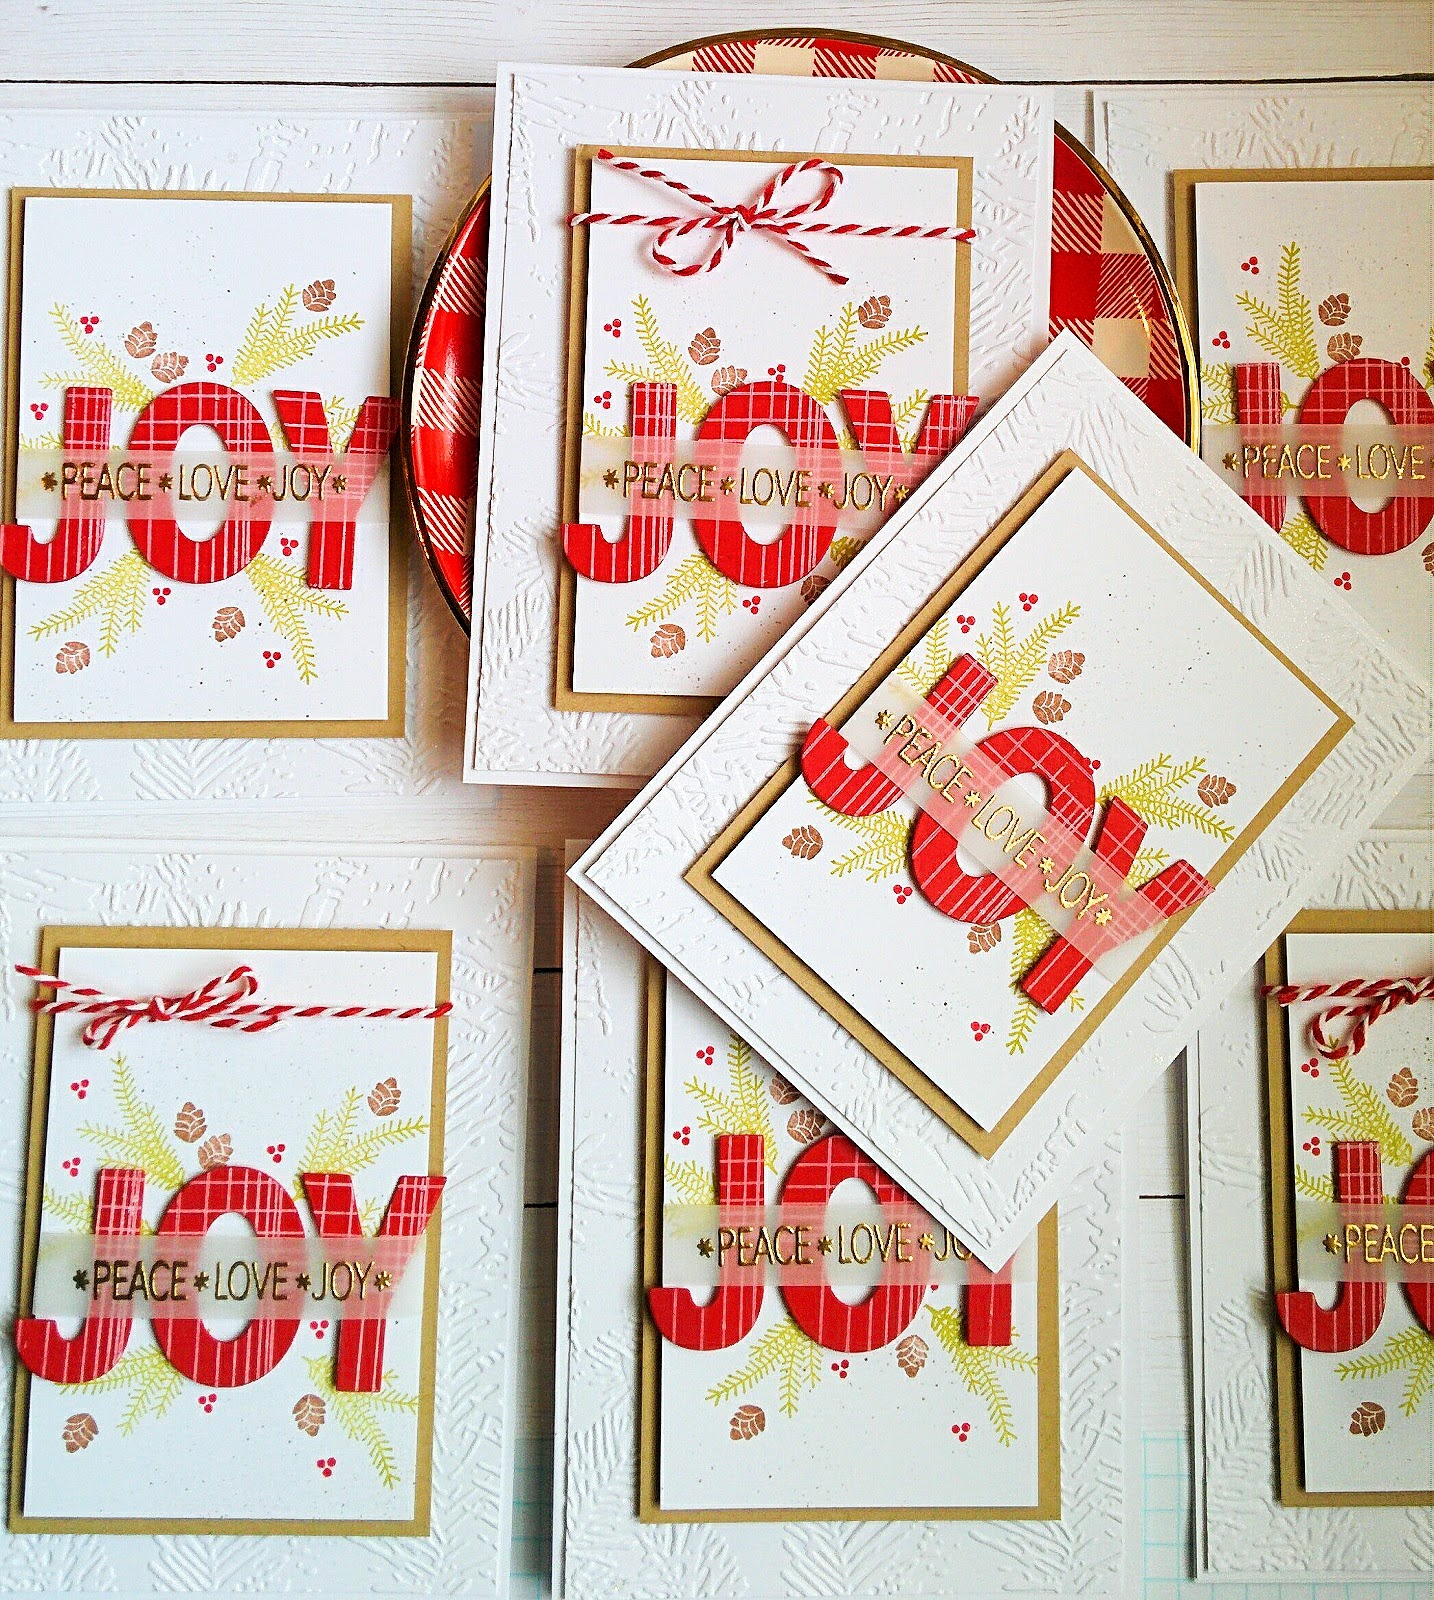
I made 8 cards in total and they didn't take much time at all! 4 of them have baker's twine around the top and 4 are plain. It's always good to think about what the mailing costs will be when you add a lot of layers and embellishments. I finally have some awesome people working at the Post Office that embrace my love of Snail Mail and are always willing to help me with my mailing needs!

Tip #2 Try maximizing your time and supplies by getting a "2 for 1" deal out of your efforts. I did this by using the negative space that the letters created when I die cut the word "JOY" for my cards. I used the red part to create 8 tags, but you could also make 8 additional cards!

All I needed to do was emboss the skinny "JOY" in gold in the negative space and add another sentiment over the top! I glued some red jingle bells from the dollar store to some clothespins for an easy embellishment as well as a quick way to attach it to the ribbons on my Christmas presents.

I wanted to make sure I didn't neglect the inside of my cards. A large sentiment on the inside really makes them feel like a store bought Christmas card without too much effort. This particular sentiment is from the Year of Psalms: October Mini Stamp set with the addition of the holly leaves and berries from Concord and 9th's Joy Bundle. That is the stamp set that I used for the entire project.

Before I start on a mass produced project, I make sure my work surface is clean and tidy as well as making sure I know where all of my supplies are and that I have enough to finish the project. There is nothing worse than beginning a big project, only to find that it can't be finished because you don't have what you need. It is times like this, that could have you abandon the project all together because of frustration.
To begin, I cut all of the pieces that I would need:
8-A2 card bases (white)
8-4 by 5 1/4 inch panels embossed with the Richard Garay Pine embossing folder spritzed with Shimmer Spray
8-2 3/4 by 4 inch white pieces for the focal greenery
8-4 1/4 by 3 inch Kraft cardstock to mat the focal panel
8- 3 1/2 by 2 1/4 inch red pieces for die cutting the letters
Tip #4 try and optimize your paper and supplies by using dimensions that will get you the most from one piece of paper.
After everything was cut, I stamped the inside of each card as well as a simple "homemade" image to the back. This really doesn't take any extra time at all, but really adds to the charm.

For my design, I chose to use the striped image from the JOY stamp set to create plaid letters. I have used the stripes by themselves, but I think making plaid is the perfect way to use them and to maximize the uses for your stamp set. I stamped them in Fresh Snow ink and let them dry. It was important that I keep all of the letters together so that the plaids would line up properly. That meant I would need to use a large portion of my desk to keep them together. I also needed to keep the centers of the "Os" with the correct die cut red rectangle so the plaids would line up on the tags as well.

After that was done, it was time to stamp the focal panel. I have found that it is good to get all of the stamps on their blocks and have the ink pads ready to go. I used the small images on one block and it is easy just to rotate the block when you need it. I only stamped the greenery in red once, on accident, but caught my mistake before it was too late! LOL!

The "Peace, Love, Joy" sentiment is embossed in gold onto strips of vellum. Tip #5 Do everything assembly line style so you can clean as you go. I like to emboss everything at the same time so my heat tool is nice and hot. I also like being able to clean as I go, so I just do everything using that particular tool at the same time so it can be put away. I hope you have found this information useful and informative! Thanks for fluttering by!
33 comments:
Your cards are so beautiful. Thank you for inspiring me to start creating some of my own--Christmas is around the corner after all. My favorite Christmas tradition is buying each of my children an ornament that represents something that was special to them for the past year and a Christmas book. Both are opened on Christmas Eve.
Great tips to share about mass producing! My favorite holiday tradition is baking cookies with my grandchildren. They love to come over and “help Granny”! It is usually lots of licking, colored icing everywhere, and eating the sprinkles, but the end results is livening memories. Merry Christmas to you and your family! Thank you for sharing.
Kelly this is wonderful! I love to look at your blog and see all your beautiful inspiration! My favorite family tradition is baking the cookies with my kids, with Christmas music playing!
Kelly, your cards/tags are absolutely stunning! Thank you for the tutorial and, especially, the inspiration! I hope you don't mind if I case these, I'm nearly at the 'press the panic button' point for getting my Christmas cards done. I'm wondering - if you have a chance to reply - what you used to add the white stripes to your red cardstock. Pigment ink or...
Thank you for the incredible inspiration! This hop is so timely!
~carol
I'm so happy you like them! Thank you for your sweet comment! I used Fresh Snow ink from Papertrey Ink. I will edit my post to add that!
Oh my goodness! Amazing cards and tags mydear! And I love your jingle bell clothespins for clipping them to the packages! Our very favorite tradition is making cut-out cookies and frosting them. We also make traditional Italian Christmas cookies like Terluck and Pizelles in honor of our great grandma Bernice Ambrosio and Grandma Michelene Scarpello who we called Maggie! Have a joy-filled holiday! Thanks for the fabulous inspiration all year long! Your heART always inspires me to create!!!!
Oh my WORD!!! These cards are FABULOUS and I love how you mass produced them. Using your negative as well as the positive and taking your design from a tag is GENIUS. I thank you for this wonderful idea. I will be CASEing this for the future!!
These are so fabulous, Kelly! Love the two for 1 idea and each card is just perfect. My favorite Christmas tradition is doing the 12 Books of Christmas with the boys. I have fun selecting and buying the books throughout the year, then wrapping them up. It's always a mystery which one the boys will open on the 12 days leading up to Christmas and we have a ball snuggling and reading together. Can't wait for them to read the books I've selected this year!
Wow! You babe inspired me so much with this post, Kelly! Your projects are all so pretty! I love the idea of using the negative die cuts too! So clever! Thanks for being a part of this Hop!
I do this in my classroom! The kids love it and so do I! I do 24 books because there are 24 students in my class and that way everyone gets to select a story to unwrap! It’s lots of fun!! Can’t wait to do this with my own daughter!
oh my , these are all so beautiful!!!!!! LOVE the JOY! Wish I had that!!!
Who cleans as they go??????
I love the clean layers of your cards and the wonderful idea of using negative die cuts, too. I love to wrap our family scrap book for the year and open it after we read the Christmas story.
Wow, I'm blown away! These cards are simply stunning!
Oh Kelly, these are all so pretty. I love the way you used this Joy stamp set in so many ways, especially the cards with the negative cut. I have to confess you enticed me to get this set when I saw a card you did with it several weeks ago. My favorite Christmas tradition is having my family over for Christmas dinner and enjoying the time together, especially the little ones.
Kelly, it's ALL gorgeous!! I want to CASE each and every one I love them sooo much! I'd love to know what you used to emboss the gold letter inside the die cut - what a fabulous effect! You've just knocked this blog hop clean outta the park!!
Stunning and so on trend! WOW!
Gorgeous cards, Kelly! Great way to double use the die cuts/negatives.
Wow, Kelly! Love these!
Your cards are beautiful! What a brilliant idea to use the negatives for a separate set of cards!
I love that big JOY with the vellum overlay - great idea!
These JOY cards are really beautiful! I love feeling the happiness they give me! Our best holiday tradition is wine! Bottles and bottles of wine!
I LOVE how you used the positive and negative die cuts! Fabulous cards!
Wow, what fabulous cards Kelly. So much inspiration with your wonderful designs.
Wow! Your cards are wonderful and I am so impressed at the way you got a two for one out of those die cut words. Your first design is so pretty with the vellum strip and white embossing, and your second design is warm and cozy! My favorite Christmas tradition is making all of my cards and tags, and crafting with my two little granddaughters to help them make a little handmade gift for their parents. Following on IG as karenladd510.
Super tips! I like the one with saving "joy" from "joy"!!!! The cards and tags are cheerful and perfect for the upcoming Christmas celebrating. I don't do Instagram, however I would really love a chance to win the giveaway. We had a house fire in August that we are still displaced in a rental so I lost about $150-200 worth of craft supplies that were in the kitchen. The part of that which bothers me the most were the 8 Christmas cards I had made in June and July that were stacked with papers and cardstock on the kitchen table. Ugh. Starting over and with few supplies because I don't want to pull from those stored in garage. That means moving stuff twice once the construction company gets finished. God spared our lives so that is most important and what I need to focus on and let the crafting slide or change or morph for awhile as we have these forced life transitions. Christmas tradition favorite is attending Christmas Eve service filled with candlelight, carols, and Christ. Whether you make an exception to include me or not, I'm still glad I took time to visit these participating blogs and see what other crafters are creating.
These cards don't look like they were mass produced at all...but look like each one is a little work of art. How fun to use the diecut JOY in two different ways, for completely new looks. I usually send out photo cards of our family and only make cards for close family. My favorite Christmas tradition is getting the kids together and taking our Christmas family photo. There are bound to be lots of outtakes and goofy shots, but we always have a blast and then have hot cocoa and cookies afterward. I am following you on Instagram and left some love there too.
LOVE, LOVE, LOVE the cards, your blog, the tips and all this creative inspiration! You rocked this blog hop! Thanks for sharing! Love your photos, too! XX
Jill.... congratulations! You are the winner of my giveaway! Email me your address at kellyrory1@msn.com and I'll send your prize! Thank you so much for your comments and wonderful tradition! ❤❤❤
Love all of your cards Kelly! I have been a long-time stalker of your blog and I'm always blown away by your creativity!
Thanks for the great inspiration, Kelly! Hugs!
Hi Jill...just reaching out again to let you know that you are the WINNER Congratulations!!! Email me at kellyrory1@msn.com with your address!
What is the name of the Joy stamp dies?
Post a Comment