Saturday, January 20, 2018

PRS Daily Thoughts Blog Hop-Thinking of You


Welcome to the newest release blog hop for the Precious Remembrance Shop! The team is featuring the amazing new set called Daily Thoughts! I am in love! Head over to the BLOG as well as the rest of the team's blogs for lots more inspiration! Would you like to win this set? Simply leave a comment on each designer's blog post as well as at the PRS Blog (linked above). One lucky winner will be chosen randomly and will be announced on the blog and all other social media sites! Entries will be taken until Jan. 24th, 2018 at midnight.

Kelly Lunceford (you are here)


Remember, you can still take advantage of a 10% off discount from an order of $30 or more using this code: DTKELLY10


For today's card, I thought it would be fun to do some watercloring to really bring out the 80's vibe of the card! Cassette tapes were a MAJOR part of the 80's for me, so I couldn't wait to get started using this fabulous set! I did a watercolor wash as well as some paint spatter onto some 140 lb. cold pressed watercolor paper. While that was drying, I got to work stamping and splattering the cassette tape image as well. I cut it out with scissors so that I could follow the stamp lines for a more organic feel.

I knew that I wanted to create some of the actual "tape" coming out of the cassette. I cut a narrow strip of black cardstock and then stamped the "when life is tough, just pause and breathe" sentiment repeatedly in white ink. I used my quilling tool to wrap it tightly in a coil. Once that was done, I taped it to the back of the cassette image using scotch tape and got to work manipulating it how I wanted it on the card. This card is 100% NOT mailable, but oh, so fun!

Because I dried the watercolor piece with a heat tool, I knew that it was ready to accept embossing powder. I heat embossed the "thinking of you" sentiment directly onto the watercolor piece. I also stamped a few stars around the sentiment as well, which are included in the set. I wanted to repeat the sentiment that I used on the "tape" so I stamped it at the top, stamping it off as I went down the card. I also created a sentiment strip to add to the front of the cassette as well for continuity. 

I also added the tape player "button" images along the bottom of the card as well since it uses the word "pause". I really like how all of the sentiments coordinate so well with the images AND they are ones that I know I will use again and again.

You can see the detail of the tape spilling out of the cassette a little bit better here. I also added a few burnished gold sequins to add to the sparkle! Thanks for fluttering by!

Friday, January 19, 2018

Sending our Sympathy!

It's never fun to NEED a Sympathy card and I have found myself in need. It's times like this when I wish I had one on hand, but I never seem to. I think I'll make it a point to make a few to tuck away and hopefully I won't need them too often. 


I've been re-watching the entire Downton Abbey series and I am in awe of all of the beautiful floral arrangements that are in each episode. I can't imagine having something so lovely all over my home, ALL.THE.TIME. I have been itching to make a floral card using some beautiful florals and this is the perfect opportunity. 

I began by die cutting all of the images and then stamped them in a variety of colors. I used both the Rosie Posie stamp set as well as the companion; Rosie Posie Step 2. I spritzed all of the flowers and leaves using some Shimmer spray. While those were drying, I created the grey background piece. I used the Round Off Edger Dies after I had dry embossed the quatrefoil design. 


I layered all of the flowers onto the grey piece using foam squares for dimension. I added some Sparkling Clear Sequins onto the leaf, flower and a few on the grey embossed piece. The "with heartfelt sympathy" sentiment is from a REALLY old SU! set, but I will never part with it because I like it so much. I heat embossed it using Antique Gold embossing powder to help add in some warmth. I also heat embossed a sentiment on the inside using the same powder.


Hopefully this will bring some cheer to the recipient! Thanks for fluttering by!

Wednesday, January 17, 2018

Mix it Up Challenge #39-You are WONDERFUL!

It's the first Mix it Up Challenge for the new year! It's perfect for those of you who are getting LOTS of snow this year and sad for us in Utah, with zero snow! The funny part? One of our license plate designs says "The Greatest Snow on Earth"! LOL! You can check out the challenge HERE and I hope you'll get a chance to play along! There's a $50 dollar gift certificate to the SugarPea Designs store up for grabs!

For my card,  I chose to use both sides of the challenge! To begin, I sponged a piece of white cardstock with Black Soot Distress Oxide ink using a heavy hand in some places and lighter in others to mimic the look of the inspiration photo. Once that was done, I spritzed it with Shimmer Spray and then stamped the snowflakes from the Flurry of Warm Wishes stamp set using white ink. I also stamped a few snowflakes onto a piece of gray cardstock as well with dimensions appropriate for the sketch. The "are wonderful" sentiment is heat embossed in silver onto a strip of white cardstock using the Sweet Sentiments-You set. I also die cut the "YOU" sentiment using the YOU Sugar Cut using silver glitter paper. It is stacked on top of three other pieces of white cardstock for a thick piece. I adhered all of these elements onto the card base as per the sketch. I added a few sequins for some added sparkle and detail! A bow of silver cord finishes off the design! I hope you will join us for this fun challenge!

Tuesday, January 16, 2018

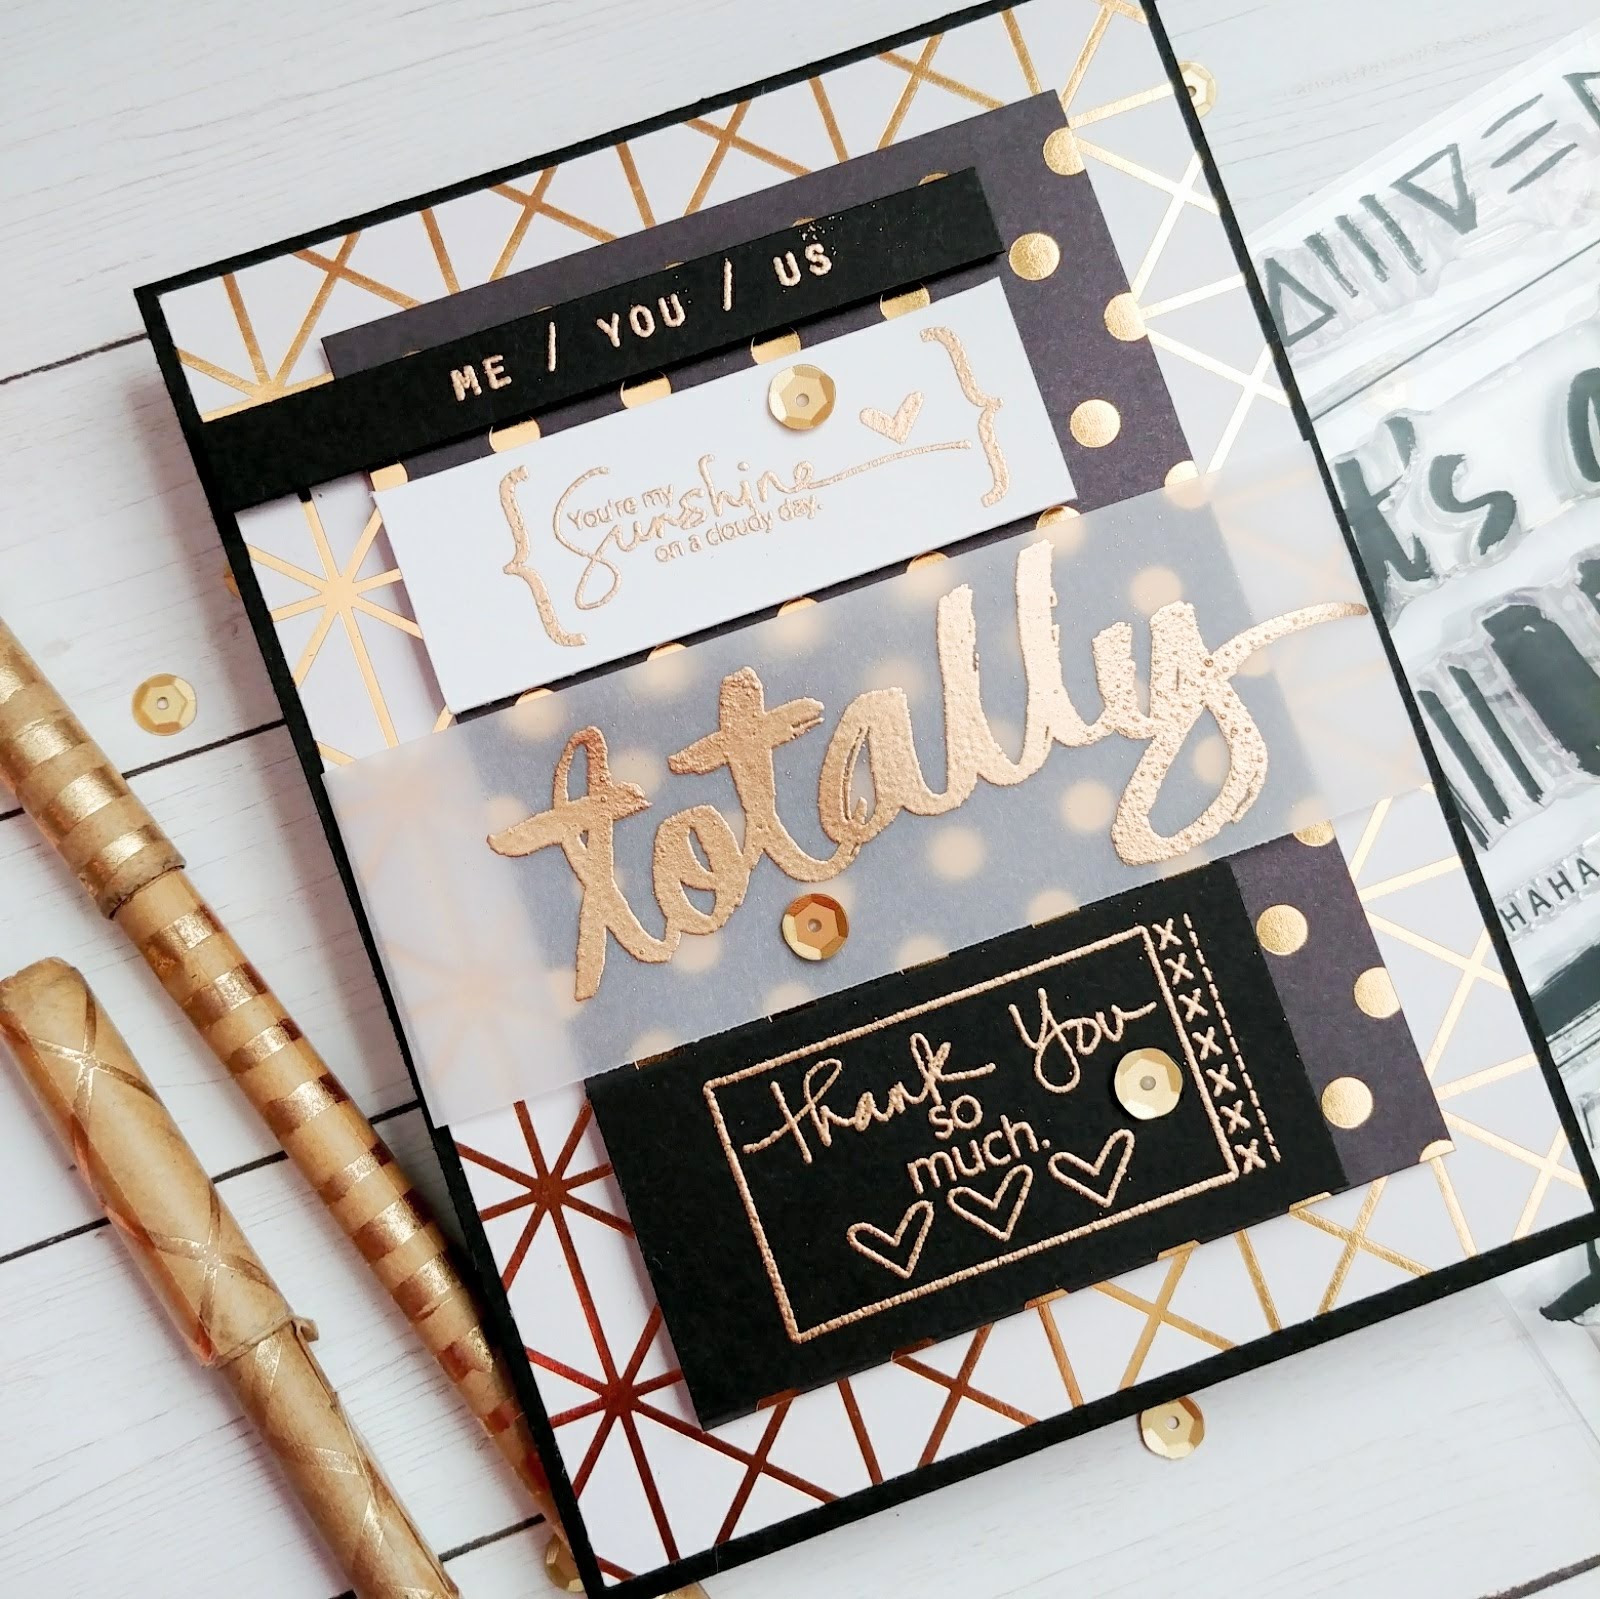
Tuesday Ideas {You're my Sunshine!}

I'm really excited to be sharing my first installment of "Tuesday ideas" on the Precious Remembrance Shop Blog today! Also, don't forget you can take 10% off of your online order by using code: DTKELLY10 on your order of $30 or more throughout the month of January! 
 It's been a while since I've used pattern paper on a design, so I chose to use it today to create something with a modern feel. I used to use pattern paper on EVERYTHING and I really miss it! I think I am going to try and make a better effort to pull some into my designs on a more frequent basis.

I love the contrast between the bold, graphic paper and the script font of the Totally sentiment! I love how nicely this stamp set looks when teamed up with the Thanks Stamp Set

All of the sentiments are heat embossed in gold powder to play off of the pattern paper. I love how they look against the black and vellum, as well as the white!

I also added a few burnished gold sequins for some extra sparkle and shine! Thanks for fluttering by!
P.S. Don't forget to enter to win my drawing for a $50 PTI gift certificate on my post from Sunday!

Monday, January 15, 2018

Merry Monday #273 The Sweetest Christmas

Before I get started on today's card, I just want to say thank you for all of your sweet comments on yesterday's post. You still have all week to leave a comment to be eligible for the drawing of the $50 PTI gift certificate!
Welcome to this week's Merry Monday Christmas Challenge! I had so much fun with today's card! I based it off one of my favorite cards that I made last year which you can see HERE. I wanted to give it the same feeling, but change it up, of course!

Marcia challenged us to use Red and Turquoise which is definitely up my alley! I use it on the majority of my cards, for some reason! LOL! You can see some of my favorites from last year HEREHERE and HERE. I was trying to make a better effort NOT to use it this year, but look what Marcia made me do! LOL!


To begin, I created the background exactly the same as the Ho, Ho, Ho card I linked up above. My sweet sister gave me a gift certificate to PTI for Christmas, so I used it to buy a few new Christmas stamp sets to use this year. The one I chose to use on today's card is Candy Cane Christmas. It has a lot of fun images that I can't wait to use, but I'm saving them for a few of the future challenges. I only used one of the sentiments and the large peppermint image for today's card.

I also couldn't resist getting the Simple Gift Bow Die because I knew that it would come in handy for a lot of projects! I really wanted it when it was first released, but never bought it. I'm happy to add it to my stash! I used this cute little Santa  from the Tremendous Treats:Christmas. I really like how round he is and how nicely he pairs with the peppermint swirled candy.


The sentiment is heat embossed in white on a strip of red cardstock. I added some sparkly sequins for some shine! Thanks for fluttering by!

Sunday, January 14, 2018

10 YEAR BLOG-IVERSARY!!!!

Welcome, Welcome! Today I am celebrating a BIG milestone...my blog turns 10 today! I can't believe it's been 10 YEARS! What a journey this has been...an amazing journey! I want to share a verse of song with you that I sang in church a few weeks ago that really struck a chord with me (no pun intended); it says" Our talents improve, by the patience of hope and the labor of love." This blog has definitely been a labor of love and I've definitely needed patience of hope many times when I felt like quitting and questioned why I was even continuing keeping up with it. For those of you who have been with me since the beginning, you know of my journey. While I set out to share my love of papercrafting, my life took a course that led away from my ability to share as often as I liked or wanted. I wouldn't trade my beautiful children for the world and I am so grateful for them. Things have gotten easier and I made a New Year's resolution at the beginning of 2017 that I would blog more. Wow! I am so glad that I did! It has been SO MUCH FUN getting back into the creative world and reconnecting with old friends and making new ones!


As I have shared my love of papercrafting this year, I have been introduced to so many new friends, companies, products, etc. Not only that, but I have had so many fun opportunities come my way that I am so grateful for! For a while, I felt like my time had come and gone and that there wasn't a place for me here anymore. That certainly isn't true and I'm happy to say that I didn't let the negativity get the better of me! I would encourage all of you, if you are struggling, to simply press forward! If you feel passion for something, it will always be a part of your life! My life has been so much happier, mentally, as I have taken the time to work on the things that bring me joy. Creating is a central point of my happiness and I am so thrilled to have this little place to call my own where I can share what I love! As a thank you, I am offering a $50 Papertrey Ink Gift Certificate to one of my lucky readers! Leave a comment on how you found my blog and I will draw a winner next Sunday the 21st!


 I thought this sentiment said it perfectly and is from A life she loved from Taylored Expressions. I heat embossed it in white onto a strip of red cardstock. I stamped the paint brush image using black ink onto  a piece of white cardstock and colored it using Copic Markers. After it was colored, I die cut it using the coordinating DIES. I added a little Wink of Stella to the paintbrush handles for some sparkle. Once they were cut, I added them onto a circle of Sea Glass cardstock to help ground the image.
For the background, I ran the Hexagon Die coverplate through my Cuttlebug, but I used the tan embossing pad so that it wouldn't cut, just emboss it. I wanted it to look more like a quilt and I like the embossed lines. After that was done, I ran it through again, but this time cutting it so that I would have the little Hexagons to stamp. I used the coordinating Happy Hexagons stamp set to stamp the images in a variety of colors. I adhered them to the background with foam squares for some dimension.

The entire focal panel was added to an A2 Sea Glass card base. This was such a fun card to make and I appreciate you stopping by today! Thanks for fluttering by!

Thursday, January 11, 2018

Color Throwdown #475 Big, HUGE thanks...and hugs!

I'm slowly...very slowly, getting a few thank you cards done for all of our fabulous Christmas gifts! I normally do it the week between Christmas and New Year's Day, but it didn't happen this year. At this pace, I might get done by NEXT Christmas! LOL! Anyway, I saw this week's Color Throwdown Challenge and knew I wanted to play along! I love the beautiful colors and I was in the mood to do some watercoloring!

Because I did a color wash using my Kuretake Gansai Tambi Watercolors, I have quite a color gradation between them, but I really like how the background turned out. I decided to just put down a lot of color using a flat brush onto a wet piece of 140 lb. cold pressed watercolor paper from Strathmore. I just kept adding color until I got the colors that I wanted. I sprayed it with Shimmer Spray while it was still wet and set it aside to start drying.


I hadn't made up my mind what stamps I would be using for the finished card, but ultimately decided on these cute hippos from the Happy Hippos stamp set from My Favorite Things. I've only used them the once on THESE cards, but they are some of my favorites! I decided it was time to pull them out again. I also paired them with the Words for Friends die set which is another favorite. I stamped the hippo using Palette Noir ink and then colored her using an assortment of gray markers. I also added a little bow colored turquoise to add in a little bit more of the colors from the challenge. I also die cut the hippo once she was colored.
Once the background was dry, I ran it through my Cuttlebug using a Next Level embossing folder from American Crafts. I just love how the watercolored piece looks embossed. It is one of my favorite techniques. You can see a few other examples HEREHERE, and another one HERE. I haven't done it in a while so it was fun to try again.


The sentiment is heat embossed using some old silver detail powder from SU! I added it to the embossed panel using foam squares. The hippo is added as though she is standing on the panel, reaching up to add the "s" to the HUGS sentiment. Each letter is stacked 4 times using liquid glue and then colored using a pool colored copic marker to match the cardstock. I also added some Nuvo Glaze. I also added a few Sparkling Clear sequins from Pretty Pink Posh for some added interest and shine. The embossed piece is mounted onto a sheet of white cardstock and then added to an A2 card base using lots of foam squares. I had so much fun with this card! Thanks for fluttering by!