Tuesday, March 31, 2020

Live life in full Bloom!

Hello friends! Thanks for joining me today! I'm sharing a couple of cards that I made earlier this month for a feature on the Simon Says Stamp Blog, but I wanted to share them here as well! This was a feature using Pinkfresh Studio products and I decided to go for a spring theme!

It's no secret how much I love the Kelly alpha lowercase because it is so easy to create custom sentiments/words to highlight on my projects. In this case, I die cut the letters for the word "spring" twice out of each letter and glued them together. I layered them onto a panel of pink cardstock that was dry embossed using the Folkdance die and then die cut using the Diagonal Stitched rectangles set with mini foam squares for dimension. 

The sentiment, which is heat embossed in gold, is from the Layered Bouquet stamp set. I heat embossed it on a strip of vellum and then adhered it to the back of the pink panel using clear tape. I stamped the Curvy Floral Vine images using INK in these colors: Fresh Pear, Olive, Lemon Whip, and Sweet Mustard. I have been using these inks almost exclusively on most of my projects lately, unless the project is from I2P/PTI.  They were die cut using the Curvy Floral Vine die  and added to the card using foam squares. I added some Essentials Jewels in both yellow and green to accent the stamped images.

You can see the detail and dimension of the alphabet a little bit better in this photo. I just love these letters look raised up so the cut outs leave shadows. The entire pink panel is added to a top folding white card base using additional foam squares.

My second card uses a few more of my favorites; I can't seem to put these down! LOL! I stamped a piece of yellow cardstock using the new Enchanted Blooms background in Sweet Mustard ink for a tone on tone look. I also used the Diagonal Stitched Rectangles around the edge of this panel as well. I used my Taylored Expressions Blender Brushes around the edges using the same Sweet Mustard ink to give it some added defintion.

I added a white frame that was die cut using the Ornate Oval Frame and added it to the yellow panel using foam squares. I stamped the Blooming Bouquet in Ballet Slipper and Sparkling Rose INK and the leaves in Fresh Pear and Olive. I die cut the image using the Layered Bouquet die and added it to the frame using additional foam squares for added dimension.

The "so proud of you" sentiment is also from the Layered Bouquet satmp set and is heat embossed in gold and added  to the yellow base with clear tape secured in the back. I added the "YOU" sentiment is die cut from both vellum and white cardstock and added using foam squares. A few jewels finish off this design! I had so much fun working on both of these designs! I've been sending out TONS of cards these past few weeks and I know they are cheering up the recipients during this challenging time! I urge each of you card makers to actually send out those cards you make because they really do help; this is our time to make a difference in the lives of others. I know that it really does bring some cheer and joy! Thanks for fluttering by!

Thursday, March 26, 2020

The Greetery Fresh Air Collection Day 3 {Budding Beauties Spring and Fresh Air Collection}

Well friends, we've found ourselves at the 3rd and final day of the full reveals of the Fresh Air Collection from The Greetery! I've created a BUNCH of cards using today's products because I just couldn't stop making backgrounds, blooms, and blossoms! If you love what you've seen the last 3 days, make sure to leave a comment here to win a $50 gift certificate to The Greetery Shop! Since I've got so much to share today, let's get right to it! But before I do, make sure to head to the other designers' blogs to see their projects as well!

My first card for today uses the new Budding Beauties: Spring stamp set paired with the new Painterly Stripes background and a few older favorites that accent these cards so well! It seemed that you all liked that I used some previously released sets yesterday as well, so I hope these make you happy as well!

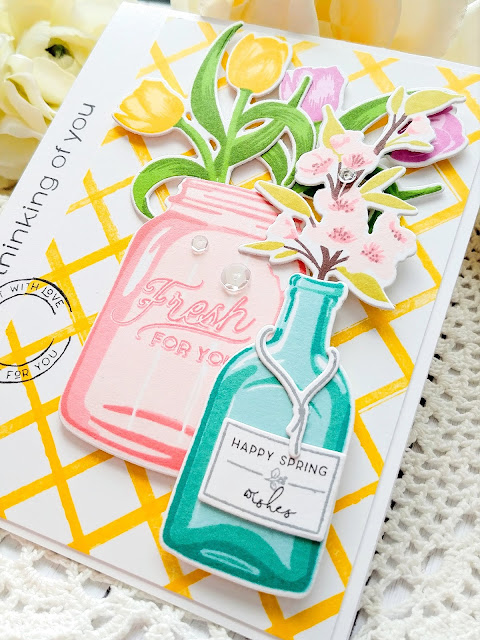
To begin this series of cards, I die cut a BUNCH of the budding beauties shapes and then worked on them assembly line style, switching colors as I went! Once that was done, I got to work on the jars and bottles.  This card uses the mason jar from the Just Mason Around stamp set and the coordinating Just Mason Around dies. I had fun playing around with different colored flowers, jars, and bottles!

I also used the Postal Frames Dies, which have been a favorite with this release, and the Pretty Postmarks stamp set. The Sentiment Suite: Thinking of You stamp set and the Sentiment Suite Basics die added just the right touch! I think there's a lot of people that we've been thinking more fondly and frequently about!

Each of the cards in this series is similar in feel and form, but with a few tweaks here and there. I only ended up with this one photo of this lone card, but this is one of my favorites! I paired the Mason jar with one of the bottles from the Bottled Up stamp set. I used the "Happy Spring" and "wishes" sentiments that are included in the new Budding Beauties stamp set, but the label outline and center line image are from the Bottled Up set. I just love the blue background paired with these bright yellow tulips!

Before I started on the bottles, I had created a host of backgrounds using the Painterly Stripes background and lots of fun springy cards. It was so fun to use them trimmed down on the Postal Frames or just 4 by 5 1/4 inches like this one! 
Of course I couldn't resist adding a few more postal elements to this design as well! I used the heart from the Pretty Postmarks set popped up in the upper right side.
This one uses a single bottle with the fun sentiments from the Just Mason Around stamp set. I just love the cherry blossom stamp; it pairs so nicely with the tulips. There is a baby's breath stamp as well, and I inked up four of them, but didn't end up by using any of them. 

Each card has a trio of sparkling clear sequins here and there for some added detail and shine!

This is my last card in the series; this is one of my favorites because it is so cheery! My kids are home because of the COVID-19 situation, so they've been seeing me make quite a few cards. My sweet son asked me " what inspired me to start making cards". We had a fun conversation about that. My daughter was watching me while I was making this particular card and I gasped when I stamped the "thinking of you" sentiment crooked! She said it looked fine, but fine wasn't going to cut it! LOL! I told her this was a "make it work moment" and I lopped the crooked sentiment off and added the panel to the white card base!

I had originally stamped the sentiment on the right hand side of the yellow stamped background, but moved the panel over to the right and added the sentiment to the left hand side! What do you think? Did I make it work? LOL! I really like how it turned out!

I'm so in love with this next collection of stamps; the Fresh Air Collection, which technically, the entire release is called that, but this is the actual stamp/die set that bears the name! I had so much fun on all of my budding beauties cards, that I only have this lone card to share using this set, but man-oh-man, it is coming right back out for me to play!

This is one of those fun and versatile collections; for this card I used the Fresh Air stamp set ***die delayed*** and the window frame die ***die delayed***. I also used the Brick Layer die as well, which is so much fun!

I was going for a Mediterranean look for this and when my daughter saw it she said it reminded her of Mama Mia! I was so happy she got that vibe!

This is a very simple design, but with all of the special details like the die cut brick and window frame, it really makes it feel special! I added a simple "hello there" to the top, which is included in the set. All of the sentiments are perfect for our current situation and any card made with these would brighten anyone in quarantine right now! I added some grey ink blending around the edges to make it seem like an older structure! I hope you've enjoyed today's reveals! Everything will be available for purchase on March 27th at 10 AM EST! Thanks for fluttering by!

Wednesday, March 25, 2020

The Greetery Fresh Air Collection Day 2 {Fresh Florals and Alphabuds}

Welcome back to day 2 of reveals for the Fresh Air Collection from The Greetery! I know you all fell in love with yesterday's new products and today will be no different! Thank you so much for all of your sweet comments; you really are the best! Today's products are so much fun to work with and will blend nicely with so many of your previous purchases! Don't forget to leave a comment here today for a chance to win a $50 gift certificate to The Greetery Shop. Also, make sure to head to the other designers' blogs to see how they've used these products as well!

My first card uses the same Painterly Stripes background that I used on yesterday's cards! It won't be the last time you see it, either! LOL! The soft pink background sets the stage nicely to add the new die cut Sentiment Starters die ***please note, because of manufacturing issues and COVID-19, this die will be delayed***. There will be a few issues like this, but I will be sure to note them in my post!  I used the amazing new Alpha Alignment guide to get all of my letters straight. This will be a wonderful tool to keep on hand to make your sentiments and alphabets straight and neat.

The Sentiment Starters die is perfect to get your phrase or greeting started and then you can highlight the focus word by using the new Alphabuds: Slim stamp set and matching die collection. These are SO MUCH FUN to work with and you'll be wanting to create all kinds of sentiment specific cards with them.

Each of my cards that I created with the Alphabuds collection uses the Backer dies; these are the background pieces that have the flowers and foliage stamped on them. They also use the Slim dies; I die cut all of my letters from specialty gold paper. I also used the flowers and foliage from the stamp set, but not the actual letter stamps, if that makes sense. This is a fun collection that you can mix and match in all kinds of ways. The dies also come with the ability to die cut the individual floral/foliage sprays; you can see an example in the center of the postage stamp image in the corner. The postage stamp images are all from the previously released Pretty Postmarks stamp set and I die cut the stamps using the Pretty Postmarks die collection. I've used these quite a bit for this release!

My second card uses both the Sentiment Starters die collection as well as the Alphabuds again, but this time I paired them with the new Floral Background Rubber stamp. This is such a fun and easy way to create a beautiful floral background in any color you can imagine...or ink that you have! LOL!

I continued on with the postal theme by using the Postal Frames Die as well as the fun Signed and Sealed Stamp Set. The envelope is heat embossed in gold and then I used the coordinating Signed and Sealed die collection for the liner and envelope.

My third and final card for today takes the background up a notch by using the AMAZING new Fresh Floral Stamp, Stencil, and die. *** die delayed*** This is similar to the Easter Jubilee kit as it has both stencils and stamps to make the entire background come together!

Once I had the background made, I couldn't decide how to dress it up. The background by itself is just beautiful; I keep dreaming up more and more color combinations that I can't wait to try! I tried to use minimal products to allow a lot of the background to show. In the end, I chose to use the Alphabuds and the Sentiment Starters dies once again.

I stamped the Speed Tagging Christmas Rubber Stamp and then die cut it using the coordinating Speed Tagging Christmas Rubber Stamp dies. I just love how wonderfully it pairs with this new background collection. I also used the smallest die from the Nordic Frames dies to "ground" the tag. 

Well, this concludes the reveals for day 2. I hope you've enjoyed what I've shared today! Please join me again tomorrow for the 3rd and final day of the countdown! You're gonna love it! Thanks for fluttering by!

Tuesday, March 24, 2020

The Greetery Fresh Air Collection Day 1 {Top Down Kind of Day}

I'm so glad you've stopped by today! Today is day 1 of the AMAZING new Fresh Air collection from The Greetery! I've had so much fun with this entire collection, and each day you will find something more to love! Up first is a fun collection of products that you're sure to love. I made quite a few cards for today's countdown because these little cars, flowers, balloons, etc. are just so much fun to create with! I'm also wanting to send out even more cards with the world the way it is right now; how about you? I sent out about 20-30 cards last week and I sure hope they brought cheer to the recipients! Before I dive into each card, you'll want to make sure to head to each of the designers' blogs to see how they've used these fun new products! Don't forget to leave a comment here for a chance to win a $50 gift certificate to The Greetery shop!
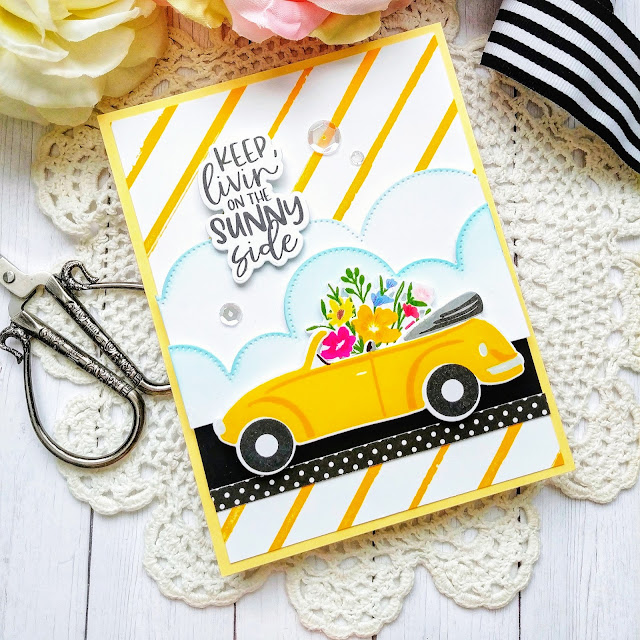
Betsy has made this fun new set so versatile; you can stamp the outline around the card, leave it solid, or just use the outline and color it with your medium of choice. For my cards today, I used the solid images paired with the outline and just the solid image by itself on one further down. I also used the new Painterly Stripes background stamp to create all of the fun backgrounds for today's cards.

Another thing that I love about this new stamp set is that each of the sentiments has a coordinating die so you can die cut them to add anywhere on your design. The new Silver Lining die makes creating clouds a cinch as well!

For this card, I used both the flower image and the balloon image to really make the card fun!

I'm late to the party, but I've added some color penciled details to the flowers and the balloons on the pink card. I love the extra bit of dimension that it gives!

To begin, I just sat down and started stamping the bugs in an assortment of cheery colors! It is so fun to watch them come to life as each image is added!

I added some ink blending around the clouds on this design and only used diagonal stripes from the background stamp rather than turning it again to get the cross hatch design.

I just used black cardstock and pattern paper to give the look of the road. 


You can see the difference between the stripes above and the plaid on this card.

This card just uses the solid images and I popped the cute little driver inside as well. Isn't she just the cutest?

I layered the clouds and card onto a pink piece that was die cut using the Postal Frames dies. You will see in the coming days that these have been my "go-t0" frame! LOL!

I added some Crystal Glaze and Wink of Stella over the top of the balloons for some extra detail and shine. I had so much fun working on all of these cards for today's countdown! I can't wait to pop them in the mail soon! Join me again tomorrow for day 2 of the countdown!

Monday, March 23, 2020

Pinkfresh Studio March 2020 Essentials Slim Cuts Release Blog Hop


Hello and welcome to the Pinkfresh Studio March 2020 Essentials Slim Cuts Release Blog Hop! This has been such a crazy time that it feels good to do something fun and enjoyable, am I right? This new release is incredible and is perfect for someone like me who is still new to the "slim line" card making style. I've made some here and there, but these new Essentials dies will allow you to make fabulous designs in a snap!
As usual, there will be a $25 dollar gift certificate up for grabs to one lucky person who leaves a comment here on my blog. 
One lucky winner will receive the entire release on the Pinkfresh Instagram page as well as on their Facebook page so don't forget to leave your comments there as well! You must check the Pinkfresh Studio give away page and redeem your prize within two weeks!
And now, here is the list of amazing designers who are participating in today's hop!

You are invited to the Inlinkz link party!
Click here to enter

I have three cards to share with you today; the first 2 using the AMAZING new Slim Stitched Scallop Circles Die! This is one that has my name written all over it, so I was thrilled to use it on two of my designs today! 

Up first is this purple and yellow card using some of my favorites. These colors sit opposite of each other on the color wheel so I knew that they would make a bold statement. The delicate flowers in three shades of purple keep it sweet and simple in nature as well. I will link the INKS and then just tell you which  colors I used where, if that makes sense. 

To begin, I die cut the slim panel using my Cuttlebug and white cardstock. These dies are long, and I don't own the extender plates, but I was able to cut these without any hassle by just cutting half and then sliding the uncut portion onto the plates for the second pass. I added  some Marigold ink around the edges keeping it lighter in the center and more concentrated around the edges. The flowers are from the Wildflower Sketches stamp set and I die cut six of the same flower using the coordinating Wildflower Sketches die set and then used my mini MISTI to stamp them all assembly line style. The three shades of purple are: Candy Violet, Lavender, and Soft Lilac. I love that you can easily create multi colored blooms with this particular image since each cluster of flowers is a separate stamp. The leaves are stamped in Fresh Pear ink.

I used the "Live life in full bloom" sentiment, which is from the newly released Layered Bouquet stamp set. I've been thinking a lot about the way life is now and the things that I have taken for granted in the past. I hope that I can always remember to live life in full bloom! I added some black paint splatter for some added interest as well as a little bit of green ink splatter. As usual, I just can't resist adding the beautiful Jewels here and there.

My second card uses the same panel but this time I decided to create a vertical design. I kept my color combination the same as well, but using the Soft Lilac ink for the card base. I also broke up the sentiment in the top and bottom circles to keep the eye moving along the length of the design. These flowers are from the Layered Bouquet stamp set linked above.

I also added the fun Diamond Tiles pattern to the top portion of the design for some added detail and interest. I also used the Frame Builder: Botanical diamond die set to add the die cut details to the top and bottom corners.

My third and final card for the hop uses the new Slim Ornate Banner die set. I noticed that the link was incorrect for this, so just head to the Pinkfresh Studio shop to see that one. I used the smallest and second smallest pieces for this design.

To begin, I stamped the floral cluster from the Full Bloom stamp set and then colored it with an assortment of alcohol markers and then die cut it using the coordinating Full Bloom die

It's no secret how much I adore the Kelly Alpha Lowercase dies and kept it simple with a basic "hi". I also added the heat embossed "smiles and hugs" sentiment which is from the Floral Vase stamp set.


I layered all of that onto a black slim line card base that measures 3 5/8 by 8 5/8 inches. That is the standard measurement for all of the new Essentials Slim dies.

Some jewels and black ink splatter finish up this floral design! I had so much fun working on these three designs! I'll definitely be adding more slim line cards to my card making routine from here on out! Thanks for fluttering by!