Welcome to day 2 of the Ink to Paper July release countdown! I have quite a bit to share with you today using some of the new, fun products! First up is this AMAZING new die called Gift Card Holder: Pencil! This will be getting A LOT of use around here and today I'll be sharing 3 different ideas on how to use it!
For my first project, I just used it as it is intended; a gift card holder that is just as cute as can be! It is designed so well; you just pull the end of the eraser and out comes the portion with the slits to hold the gift card. I created a "cover" for my gift card to make it all cohesive, but really, since it slides into the pencil sleeve, you could just have the gift card showing.
I used the new "To Die For Sentiments" to decorate the outside of the pencil sleeves. These are so much fun and I have used different ones on each of the 3 projects I created using this pencil die.
I kept things pretty traditional by creating the standard "Number 2" pencil in yellow with a pink eraser! These will be perfect to give to teachers, artists, or anyone who loves pens and pencils!
For my next project, I created a little treat slider that could be used for teachers OR for a note of encouragement for a child. My cute little 5 year old is headed to a special "Kindergarten Summer Camp" in a few days so I thought it would be fun to give him this when he is finished! These would be awesome for teacher appreciation, too!
I gave this pencil a spiffy look by using one of the pieces of pattern paper from the Men of Life pattern paper pad, which is a steal of a deal right now! In fact, there are so many amazing paper pads that are on sale for 2 dollars! They are perfect for projects like this!
I used the new To Die For sentiments on this one as well, as well as the new banner die that was showcased yesterday and the new sentiment set called Simply Sentiments. I used it on the first project as well. It is fun because it has different sizes of the same sentiment so you can tailor it to your needs.
I slipped a Hershey's bar inside the sleeve! I contemplated wrapping it in some coordinating paper, but realized that for photography purposes, I should show it like this.
The candy bar fits perfectly inside. I left the foil sticking out, but you could totally tuck it in if you wanted. I just really liked the idea that you could see that there was a goodie tucked inside.
My 3rd project probably doesn't come as much of a surprise for most of you. I realized when making the gift card holders, that I could create a box by adhering two of the die cuts together to create a box. I absolutely love making paper boxes, so of course I had to give it a try!
The only reason why I hesitate to make projects like this for blogging is because they are incredibly difficult for me to get good photos, so hopefully you can get the gist!
I used the Men of Life paper for this pencil as well and added some flowers using one of my new favorites, It's a Sign: Beautiful. This box is quite large and can hold quite a bit of candy or whatever you decide to fill it up with.
I created a base to glue to the bottom so that it can hold something. It is just a tiny box that I created and slid underneath and glued it with liquid glue.
I put a cellophane bag inside filled with candy. I can't wait to make more of these for my kids' teachers!
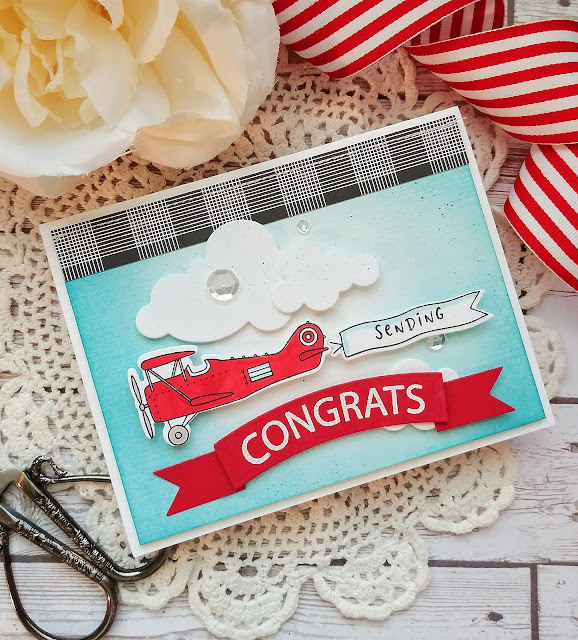
My final project for today uses a fun new set called Bon Voyage! This one is so versatile and comes with so many fun sentiments that you can mix to create fun phrases. I decided to use the "sending" sentiment paired with the new banner dies and the Simply Sentiments stamp set.
To begin this design, I blended some ink onto a panel of Linen cardstock. I really like how it looks like fabric once it gets ink on it. I used it on a card I'll be sharing tomorrow as well! Once the blending was done, I added the Clouds and then the banner with the word CONGRATS embossed in white. I added some ink splatter using my color spritzing tool.
It's really easy to bend your stamps to get them to curve the way you need on these new border dies.
The airplane and flying sentiment banner are stamped in black and then colored with copi markers. The stamp set comes with the solid image to add to the outline, but I like coloring, so I chose to do that.
I added a strip of Bitty Big: True Black pattern paper to the top and then used my sewing machine to stitch it along the top. Once that was done, I adhered it to a standard A2 card base using foam squares for added dimension.
A few sparkling clear sequins tucked here and there finish off this playful design. This will be perfect to give to new parents or someone headed off on a fun new adventure that requires congratulations.
Join me tomorrow for Day 3 of the release; there are some beautiful new products that you'll definitely want to see! Thanks for fluttering by!


2 comments:
this is such a cute card - I love how you used both of the “banners” for your sentiment!
Thank you so much!
Post a Comment