Tuesday, July 21, 2020

Sending so much love your way

I've been having so much fun using the new Into the Blooms die collection and today I'm sharing two more ideas using these fun new products! It is so easy to create lifelike blooms with just a little bit of ink, a blender brush, and some foam squares! You could also die cut them from different colors of cardstock and add additional ink around the edges for dimension. Either way you choose, you're sure to have fabulous results! 

The reason why I like using the ink blending technique is because I can easily die cut all of the pieces out of white cardstock and then decide on the colors as I go along. For today's cards, I have two each of the pink flower, the purple flower, and the large yellow flower.


I also added some crystal glitter to the edges and centers of the flowers and leaves for some sparkle and shine. I just love how they turned out with the addition of the glitter! If glitter isn't your thing, you could also try adding some Nuvo drops to look like dew, or for additional detail to the stems or centers.

I love the sentiments from the Blossoming Branches stamp set and knew they would look great with today's cards. I heat embossed two of the included sentiment onto black strips of cardstock using silver powder. I'm a sucker for heat embossed sentiments if you can't tell!

As much as I wanted to use these two sentiments, I'm also in need of birthday cards so I chose a light sentiment to add to the bottom of each card. It is from the Just Sentiments: Tagged stamp set and I recently used it on THIS card as well. I felt like it is a nice complement to the card with out competing with the embossed sentiment.

I die cut the True Black and Pink Posey Bitty Big Pattern Paper using the Love to Layer: Notched die to give the background some extra detail. The flowers are also layered onto one of the notched panels that is die cut from white cardsock.

On this next card, I JUST used the Pink Posey paper for a different look. Originally, I had only planned on having the previous card have the small swiss dot background in black, but then I realized that I wouldn't have a place for the "Sweet Birthday Wishes" sentiment, so I added the pink panel to the bottom of that card.

I also added some black ink splatter over the top of the card, but I did cover up the sentiment at the bottom. I didn't want to run the risk of a big splatter hitting the petite sentiment! LOL!


Rather than just making a sentiment strip, I decided to actually wrap the entire piece around the pink panel to give it just a bit more detail. I usually wrap my vellum sentiments around like this, but chose to do it with the cardstock on these two cards.


The panel on the left is added to a True Black top folding A2 card base while the card on the right is added to a white card base. It's always fun to experiment with different options to get the results you're hoping for! Sometimes I have a clear plan in my head, but when it comes time to execute it, it's just not quite right! These will be headed to their recipients for their birthday soon! Thanks for fluttering by!

Monday, July 20, 2020

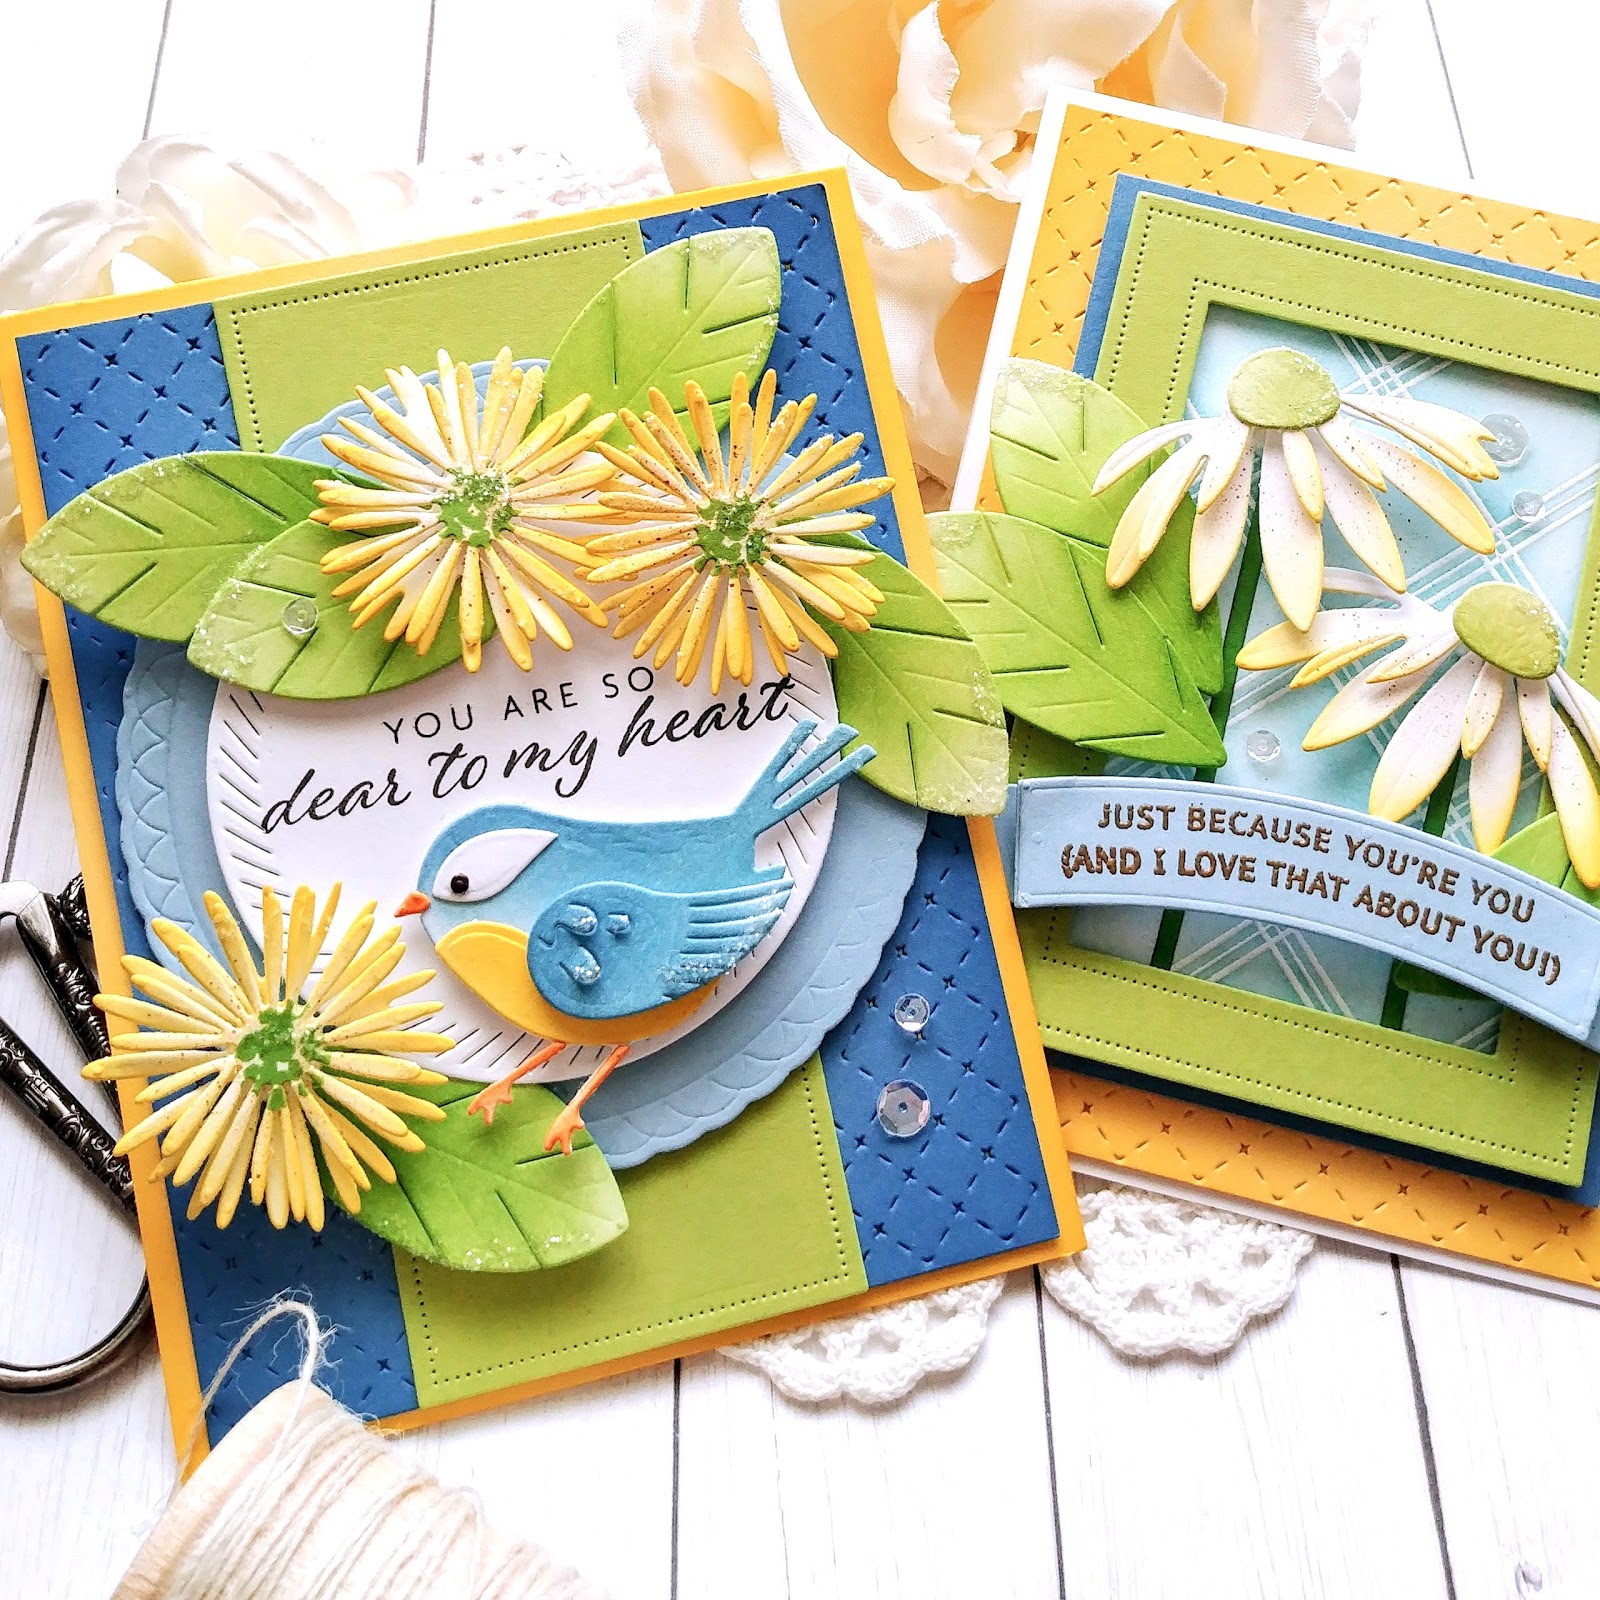
Flash Sale {You are so dear to my heart}

I'm super excited to be hosting the Papertrey Ink Fabulous Flash Sale with 5 different colors of cardstock and ink ON SALE! I've used the 5 colors on today's projects to show you how fun they are when they're paired together! My color picks for this week are Blueberry Sky, Spring Rain, New Leaf, Green Parakeet, and Harvest Moon cardstock and the same colors of INK! These colors just scream summer to me...blue skies and sunshine! The sale will go from 12 Noon EDT today until 12 Noon EDT on the 22nd! Check your stash and see if theses colors need to be replenished OR if they need to make their appearance in your craft room!

Playing with color is one of my favorite aspects of card making, but I do admit that I fall into color ruts where I used the same combinations over and over again! Anyone else feel this way? It was so fun to pull out this summery combination and enjoy the process of creating each of these two cards!

I'm having so much fun using the fabulous Into the Blooms die collection (I'm sharing another set of cards using it again tomorrow) because they allow me to create so much dimension and detail to accent my projects!

I knew the bird from the Feathered Friends 2 die collection would look perfect in these colors as well! Doesn't he/she look so cute perched below the sentiment, which is from the Floral Delicacies stamp set. The center of the flowers is also stamped with one of the images from this same set to give them a fun look!

The bird and flowers are added around the fabulous Love to Layer: Scalloped Circle Dies with the sentiment stamped directly in the middle. The background is created by die cutting a piece of Blueberry Sky cardstock using the Border Bling: Tin Stitched die with a bit of Blueberry Sky ink blended around the corners for dimension. The Green Parakeet portion is leftovers from my next card...ha ha! It is the center of the smallest of the Pierced Feature Frames: Rectangles and I simply cut it in half and added it to the top and bottom of the background panel. It gives the illusion that it is one continuous piece, but it's really just cut in half! LOL! I added some crystal glitter here and there for some added detail and sparkle!

You can see how that portion is taken from the center of the card on the right! It was a great way to get double duty from one cut! My second card uses the Into the Blooms Die again paired with the heat embossed Nifty Plaid Background. I added some Spring Rain ink over the top using a blender brush. I love the variations in color that it gives as the ink adheres to the edges of the embossed background.

The blooms and leaves are all die cut from white cardstock and then colored using the different inks that are on sale! The stems are cut from New Leaf cardstock and adhered to the emboss/resist background using liquid glue. I added the frame over the top using foam squares and then added in the leaves and daisies using foam squares.

I also added some ink splatter using a marker and my color spritzing tool to give the daisies a more realistic look. The sentiment, which is from the new Inside Greetings: Just Because, is heat embossed onto a banner that is cut using the Banner Builder Basics die. I just love these banners as you all know, since I use them so much!

More glitter is sprinkled onto these blooms and a few sparkling clear sequins add even more shine! These colors were so much fun to use and I encourage each of you to challenge yourself to use colors you don't normally reach for! Thanks for fluttering by!

The Stamping Village July Collaboration Stamp Set {We Stand With You}


I'm thrilled to be sharing my card using the fabulous new collaboration stamp set from The Stamping Village called We Stand With You! I've used the fabulous sentiment from the Pinkfresh Studio portion of the set to create this colorful design! The entire set is really great and you will definitely want to add this one to your collection, especially with all that is going on right now!

I'm a little late to the "Lacey Edgers" background party, but I've been dying to try this look and I'm thrilled with the results! I used them on THIS card and couldn't resist using them again because they are just so much fun! This particular technique/look is just perfect to highlight this sentiment. 

I also added this fun floral image from the Keep Going Stamp Set for some added interest. I stamped it using black ink and then colored it with an assortment of alcohol markers and die cut it using the Keep Going die collection. I added it over the edgers using foam squares.

I stamped the sentiment right at the top of the card using black ink for contrast. I also added the bow using hot glue for security.

A few Essentials Jewels in coordinating rainbow colors placed here and there finish of today's design! Thanks for fluttering by!

Saturday, July 18, 2020

The Greetery {Just Peachy}


Welcome, friends! It's just me again with EVEN MORE inspiration using the new Destination: Summer collection from The Greetery ! I can't seem to stop using all of these amazing new products! As you can see, I've got a peach themed card using so many of the fabulous peachy products!

I decided to use the Create-a-Crate elements on a card , which makes this die collection even more versatile! Did you see how Betsy used the boards to create a shiplap background? Genius! I can't wait to give that a try!

The crate for the card uses two of the die cut board pieces which have been embossed with the wood grain texture as well as the "Picked Fresh" detail. I love it so much...it adds just the right amount of charm!

I can't seem to stop with the partially stamped Windowpane Plaid background paired with some additional ink blending to the center! I just love the "glow" that it adds to the background!

I stamped the peaches in two different color combinations; Peach Fuzz and Apricot for the lighter peach and Apricot and Passion Fruit for the darker peach. I stamped all of the leaves and blossoms as well so that I would have a lot of options when it came time for assembly.

I tucked the peaches into the crate using foam squares and added a few to the bottom of the crate as well. You can really see the wood grain and Picked Fresh detail well on this particular photo.


I stamped the "JUST" portion of the sentiment onto the card using brown ink leaving just enough room to add in the "Peachy" portion of the sentiment. This is probably my favorite detail of the card because of the ombre ink blending and Crystal Glaze over the top!

I die cut the word twice from white cardstock, glued it together, and then used Apricot and Passion Fruit inks to blend into the word. I used additional liquid glue to adhere it to the shadow portion that is die cut using a sheer vellum.

Once that was done, I went ahead and carefully added the Nuvo Crystal Glaze over the top. Once it dried, I added tiny strips of foam tape to the back of the letters and adhered it to the card front.

I added a few sparkling clear sequins for a juicy looking detail. The entire panel is added to a top folding Melon Berry A2 card base using ScorTape. The card base has just a touch of Passion Fruit ink around the corners for additional detail and contrast. I used a Color Spritzing tool and a peachy marker to add some ink splatter here and there.
I'm having so much fun with all of these summertime stamps/dies! Thanks for fluttering by!

Friday, July 17, 2020

The Greetery Destination: Summer Release Day

Well friends, it's the day you've been waiting for! It's the best time of the month, am I right? The new Destination: Summer release from The Greetery is on sale today starting at 10 AM EDT! Do you have your wish lists made? What are you loving? I couldn't stop playing with this month's release, so I have two more cards to share with you today using the new Budding Beauties Summer stamp set paired with the Sprinkled with Kindness set! I've also used a few of my older favorites to bring these two cards to life!

I'm in desperate need of birthday cards, so both of these designs are birthday designs, but you could easily switch out the sentiments to make them work for your needs. I mentioned on day 1 that I made quite a few different watering cans and this card uses one of those leftover cans!

I had these two bottles left over as well as the blue pinwheels. I forgot to mention on day 1 that the pinwheel hydrangea card was inspired by THIS photo. I decided to use the leftover pinwheels again on this birthday card.

I didn't have any of the flowers left over so I die cut two of each variety and then stamped them in bright, summery colors. I made a yellow and pink peony, purple and pink hydrangeas, and pink and yellow daisies. These all complement each other nicely and are so cheerful!

I also stamped the "Happy" and "birthday to you" sentiments using the Written in Ribbons stamp set stamp set. These are so much fun to use and really make your cards special!

The pinwheels are die cut using the Pinwheel Party dies and then I added color using the Pinwheel Party Stencil. These are so easy to make and such fun additions to any birthday or party design!

Both backgrounds were created the same, I just ended up with one horizontal card and one vertical card. I used the Windowpane Plaid Background stamp to ink up just a portion of a 4 1/4 by 5 1/2 inch panel of white cardstock. I just inked up part of it and gave pressure to the center only. I really like this partial print and the unexpected look it gives to the background.

I did a little ink blending in the center using Aqua ink and then around the edges as well. I used the largest and middle sizes of the Crimped Frame dies to create the frame. I layered it over the top of the background using foam squares for dimension.

I stamped the "Fresh Picked" and the "for your birthday" sentiment, which are from the Just Mason Around stamp set onto the panel using black ink. I also added the postal details using the Pretty Postmarks stamp set

Once that was done, I was able to get the watering can filled up with the gorgeous blooms! I taped them to the back of the watering can using clear tape and then adhered it to the card using foam squares.

I finished off the bouquet by adding a few of the new Petite Eucalyptus branches. These are the perfect finishing touch, don't you think? I had so much fun working on these two cards! 

You can find all of the new products in The Greetery Shop at 10 AM EDT TODAY! Thanks for fluttering by!

Thursday, July 16, 2020

Pinkfresh Studio {Pretty in Pink}

Welcome friends! Can you believe we're halfway done with July? So crazy! I'm over on the Pinkfresh Studio Blog today sharing these two "Pretty in Pink" cards and here as well! I had so much fun creating both of these!

One of my favorite things about Pinkfresh Studio stamps are the fabulous sentiments. They have so many for just about any occasion you can think of, and some that you can't! LOL! I love how they always think of everything!


I have felt like some of my favorite supplies have been neglected, so I decided to use them on today's card. To begin, I stamped the beautiful floral image from the Just Because stamp set and colored it with an assortment of alcohol markers. I love the whimsical feel of this image so I colored it with a bit of whimsy as well. Once I was done with the coloring, I die cut it using the Just Because die and set it aside.

I die cut the Intricate Mandala out of white cardstock and only popped out the first two rows of holes. I didn't want too much of the background to show through and cause visual distraction! I adhered the floral piece to the mandala using foam squares for dimension.

I stamped the "Just because" and "days with you are better" sentiments at the bottom of a top folding A2 card base using my mini MISTI. I cut a 4 1/4 by 4 1/4 inch square panel of white cardstock and stamped it using the Diamon Tiles Background stamp in black. I adhered it to the top of the card base using additional foam squares.

I added the floral mandala portion to the center of the background panel using foam squares. I love the dimension that foam squares give to my designs so I usually end up using quite a few!

I die cut the pieces for the Artistic Bow out of white cardstock and then added color using a blender brush and Raspberry Bliss ink. Once that was done, I assembled the pieces using a hot glue gun. I find that this gives the bow the most security. Once it was all dry, I added some ink splatter using my Color Spritzing tool and a marker. I attached it to the card using additional hot glue.

Of course, none of my Pinkfresh Studio cards seem to be complete without a sprinkling of Essentials Jewels! LOL! I added some pink ones to the flowers, green to the leaves and the white to the mandala. I spritzed it with a tiny spritz (or two) of Shimmer Spray for a little bit of added sparkle and shine!
My second card uses the fabulous Lacey Edgers I die collection like I used on yesterday's card, but in three shades of pink for today's card! I think any frilly, pink loving girl would love to receive this card for their birthday! I used Ballet Slipper, Sparkling Rose, and Raspberry Bliss ink to add the ink to each of the edgers I used on today's design.

I added them to a panel of white cardstock that is die cut using the Diagonal Stitched Rectangles using liquid glue. I like using liquid glue for a project like this so it gives me some wiggle room to make sure I get them on straight. I added the center panel that is stamped using a portion of the Enchanted Blooms background using foam squares. This set the stage for the die cut HI letters and the heat embossed sentiment

I added the sentiment strip as well as the letters using foam squares for extra dimension. The bow is adhered using hot glue! I can't get enough of these fun bows, if you can't tell! ha ha!

I added some Essentials Jewels here and there for some shine and added detail. The entire focal panel is adhered to a top folding A2 card base using foam squares.

I had so much fun working on both of these pink cards! Thanks for fluttering by!