Monday, May 27, 2024

Papertrey Ink May Release Countdown Day 4

It's the fourth and final day of the Papertrey Ink May release countdown! I'm so in love with this new Suited For Summer stamp/die set! It's so absolutely adorable and I had so much fun using it on three projects I’m sharing today!

This card was inspired by some art pieces that I saw on Etsy and couldn't wait to translate the idea onto a card! These swimsuits are just SOOOO much fun and SOOO cute and vintage-y!

We have been invited to a wedding this summer and I just HAD to make their wedding card using this fun sentiment!

I used the same paper pad as my picnic card I shared the other day and a few leftover geraniums.

This is also a larger card; the blue pattern panel is the size of an A2 size card for reference!
Not only is there this darling stamp set, but there is also a Suited For Summer Stencil Collection! I used it for the background!

I ended up covering up the cutest bathing suit on the stenciled panel so I opted to just recreate the same suit for the focal piece!

The foiled panel was done using the new Shoreline Finds Hot Foil Plate. My next card shows more of it, but for this card I liked the subtle gold detail.

I also used the new Into the Blooms: Violets (also not purple) ha ha! to give the card some tropical vibes!

You can see how awesome the Shoreline Finds Hot Foil Plate is on this card.

I decided to create my own 'shoreline finds' by adding some Summer Shells and greenery!

I heat embossed the sentiment on Berry Sorbet cardstock and added it to the bottom of the foiled panel. 

The Hello sentiment is die cut three times and glued together and is from the Pro Stamper's Box from March.
My final card for today also features the new Suited For Summer stamp set. All of these darling bathing suits are so fun to use!
I chose to create a fun poolside scene, using quite a few of the different bathing suit styles

To begin, I used the pool water stencils that were released a few years ago. I added the postal frame over the top to create a vacation type feeling.

Once that was done, I just had fun adding the different bathing suits using foam squares. I added some Nuvo crystal glaze to the sunglasses for some realistic shine. And, I can’t seem to get enough of the shimmer spray for this release, so I added it over the top of the pool water panel.
Thanks for fluttering by!


Sunday, May 26, 2024

Papertrey Ink May Release Countdown Day 3

I can't believe we're halfway through the countdown! My first card for today uses the new Reflections: May stamp/die set and the new Into the Blooms: Violets die. I feared that the design team would all make purple cards because of the violets, so I decided to switch it up with some pink/coral blooms for today's card!

I also decided to switch things up and add the flowers to the corners rather than framing the scripture, but I'm on the fence with how I like it! ha ha! 

I heat embossed the scripture using white detail powder on Ocean Tides cardstock and then cut it out using the Reflections: May die set. I die cut the flowers and leaves from white cardstock and then colored them using distress oxide inks. I cut a panel of Bitty Big: Harvest Gold paper and added the Border Bling: Skinny Diagonals Frame over the top using liquid glue. I placed the scripture in the center using foam squares and then arranged the flowers in each of the four corners keeping each one slightly different for variation. I layered the entire panel onto a top-folding A2 card base using foam squares. A trio of sparkling clear sequins finish off the design!
My second card for today features the new Through the Palms Hot Foil Plate! I love adding hot foiling to my cards because it gives them that little bit of flair that takes them up a notch! 

To begin, I blended a panel using speckled egg, tumbled glass, and uncharted mariner Distress Oxide inks. Once it was blended, I added the foiling; 25 seconds on the highest setting using gold foil. I added shimmer spray over the top of the panel and set it aside.

I created some flipflops using the Go-To Gift Card Holder: Beach Bag die collection and some older Martha Stewart pattern paper that fits the mood and feeling of the card. 

I also used the Into the Blooms: Violet dies (once again, not purple) in each of the bottom corners for a tropical feeling. The sentiment, which is one of my favorites from the Just Sentiments: Days of Summer mini stamp set, is stamped in black over the top of the flipflops in black ink. I mounted it onto a larger card base than usual. The panel is A2, so it is probably more like5 by 7, but probably slightly smaller! Thanks for fluttering by!

Saturday, May 25, 2024

Papertrey Ink May Release Countdown Day 2

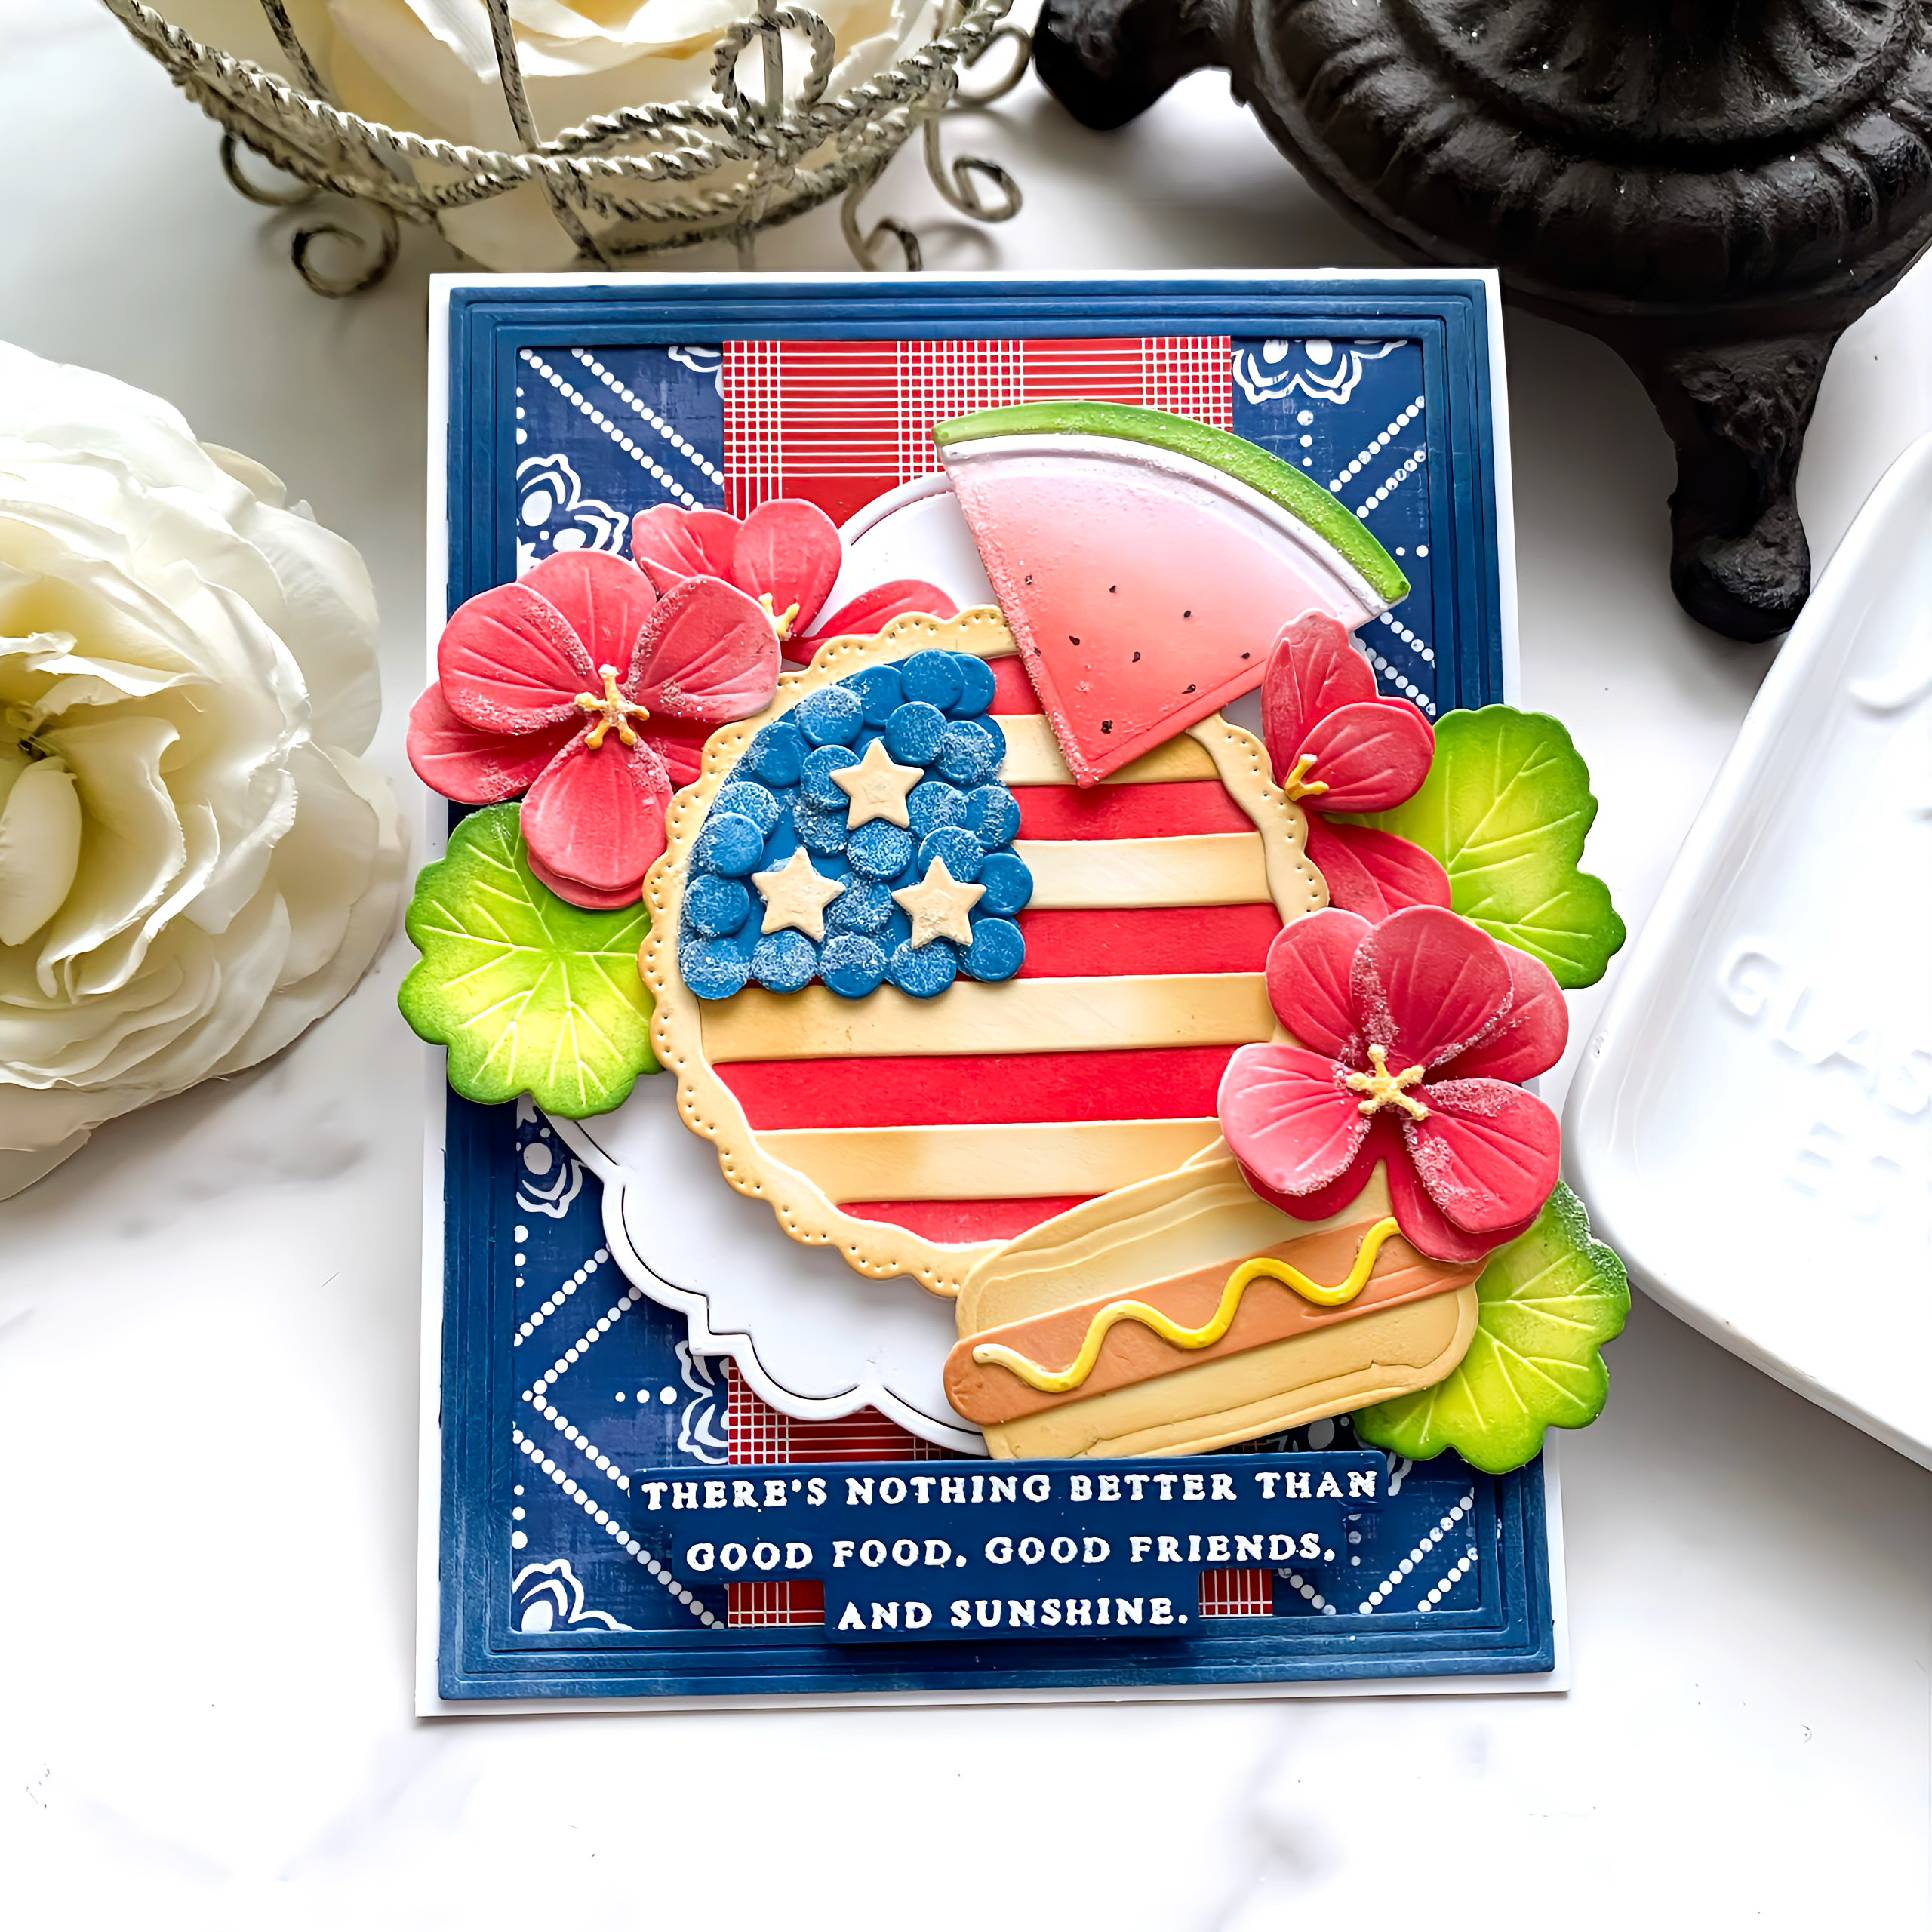
Hello and welcome to day 2 of the Papertrey Ink May release countdown! I think we're all looking forward to summer picnics and barbecues this summer; I know I am! There's something so wonderful about summer cuisine and being together with family and friends! I'm so thrilled with this adorable new Picnic Time die collection and the darling Life's a Picnic sentiment stamp set!

Isn't this patriotic pie just the cutest thing ever? I had so much fun creating this card! I die cut all of the 'food' and flower pieces using white cardstock and then colored them using an assortment of Distress Oxide inks. You could definitely die cut all of the pieces from colored cardstock, but I find that more time consuming in the long-run, but it could be equal! ha ha! I just prefer to do the coloring and some people might prefer to the diecutting!

 For my card, I chose to use the pie, the hotdog and mustard, and the watermelon wedge. There is also a hamburger with ALL the fixings that is SO super adorable! I can't wait to give it a try! 

The background is created by adding the Border Bling: Skinny Embossed Frame cut from Enchanted Evening cardstock over the top of a piece of pattern paper. I added a little bit of Fresh Snow ink around the edges to give it a similar feeling to the pattern paper.

I also added a strip of Bitty Big: Pure Poppy pattern paper to the middle. The focal panel is die cut from the new Reflections: May die set that will be showcased tomorrow. I added it to the middle using foam squares and then layered the picnic pieces and the geraniums

The sentiment is from the new Life's a Picnic stamp set and is heat embossed using detail white embossing powder on Enchanted Evening cardstock and then cut using the coordinating dies. ALL of the sentiments in the set are so super cute; there's even one you can use at thanksgiving time with the pie. I should have mentioned earlier that the patriotic look is just one of the options with the pie so you can use it in a variety of different ways!
My second card for today uses the new Cornered: Summer Sun! I've paired it with the new Frozen Delights stamp/die set that was featured yesterday!

To begin, I used the Pleasing Pineapple Hot Foil Plate on a panel of Orange Zest cardstock using gold foil. I cut a 4 by 5 1/4 inch panel of Aqua Mist cardstock and used the Cornered: Summer Sun die on the top. I added some Summer Sunrise ink to the top portion of an A2 white card base using a blender brush (the area where it will show through at the top). I gave that blended portion a spritz of shimmer spray.

I glued the aqua panel to the card base using liquid glue and then added the foiled panel using foam squares. 

I used the darling Frozen Delights stamp/die set for the focal image. The sentiment is from the Just Sentiments: Summer stamp set and is heat embossed in gold on a strip of Aqua Mist cardstock. I layered it over the top using foam squares. I added sequins and glitter for sparkle and shine! I also decided to give the entire thing another spritz (or two) of shimmer spray! Thanks for fluttering by!


Friday, May 24, 2024

Papertrey Ink May Release Countdown Day 1

 Thanks for joining me for day 1 of the Papertrey Ink May release countdown! It's officially summer card making season and I'm SO excited! This month's release is filled with so many fun products to get your creative juices flowing all summer long! My first card for today features the new Elegant Edges: Summer Sun die. I pulled in some older favorites to bring this card to life!
To begin, I die cut the sun and edge portion using the new Elegant Edges: Summer Sun die from Hawaiian Shores cardstock. I also die cut it again from white cardstock and blended some Summer Sunrise ink so it would show through where the sun is. I glued them together using liquid glue and set that piece aside.

I had already mentally put this card together in my mind, so I just had fun creating the rest of the design elements. I die cut the flamingo using the Feathered Friends 12 die and inked it up using an assortment of Distress Oxide inks. I did the same thing with the flowers and leaves from the Into the Blooms II die.

For the background, I cut a panel of Hibiscus Burst cardstock and foiled it using the Pleasing Pineapple Hot Foil Plate and gold foil. I ended up needing to do it twice because the first time I didn't get good coverage. I simply went up to the highest setting on my machine, added time (20 seconds) and it came out beautifully. I did end up with some over-foiling in one spot, but a sand eraser does the trick to easily remove any unwanted foil.

I added the foiled panel to a top-folding white card base using liquid glue. I added the sun portion to the top using foam squares for dimension. I added the flamingo and flowers. The sentiment is from the Just Sentiments: Summer Mini Stamp Set and is stamped in black and then die cut using my new favorite go-to die: Just Tags! All of these fun dies are perfect for most of the sentiments included in the 'Just Sentiments' series! I added sequins and glitter for sparkle and shine!

I'm seriously obsessed with the new Frozen Delights stamp/die set I used on this card! It is seriously THE cutest and is SO easy to use! I know I will be reaching for this one all summer long for all kinds of cards and tags! I think one of the reasons I like it so much is because of the large size of the images and all of the fun accessories to dress up the frozen delights!
There is another style of ice cream to go on the cone; it is a scooped style rather than soft-serve like this one is on my card. That is the only image that I didn't use on this card. As you can see, the die set also includes this cute awning that you can use in a variety of different ways. I chose to use it in a traditional way for my card today! Join me again tomorrow for day 2 of the release! Thanks for fluttering by!


Thursday, May 16, 2024

Project Inspiration {Berry Sweet}

Hello and welcome, friends! It's my turn for this month's Project Inspiration from Papertrey Ink! I'm sharing all of the step-by-step photos that are included in the newsletter, but I will add  more details to explain the process even more. One of my fabulous and supportive blog readers asked a question about one of my cards during the March release; I had mentioned that I used inspiration from Pinterest and she wanted to know more about that. I decided to incorporate that answer into this post as well, so Becky, this is for YOU!! Thank you for your sweet support and kind words!

I have saved things on Pinterest that pop up on my feed that 1. remind me of a stamp set I have 2. remind me of a die set I have 3. I like the colors 4. I like the theme etc. Hopefully you get the idea. For today's card I was inspired by a baby shower invite that I had saved. When I saw the truck and the berries it reminded me of the Patriot die collection and the Sweet Celebration Die so it went to the inspiration folder! 
To begin, I die cut all of the pieces for the truck from white cardstock and then colored them with Spun Sugar, Saltwater Taffy, Abandoned Coral, and a touch of Festive Berries.
This is the inspiration photo.


I assembled the truck using liquid glue and then cut and colored the leaves, flowers, and berries using the same technique as the truck.

I used the Exquisite Leaf Frame Hot Foil Plate and champagne foil on a panel of Berry Sorbet cardstock and trimmed it down. I used the Nifty Plaid Background Stamp using Fresh Snow ink and then die cut the panel using the middle size in the Love to Layer: Rectangles. I also die cut my favorite in the On the Edge: Scallops Collection from Pale Peony cardstock.

I adhered the scalloped piece to the hot foil panel and added it to an A2 card base using foam squares. I also added the plaid panel using additional foam squares.

I stamped the sentiment, which is one of my favorites and is included in the Feathered Friends Mini 3 stamp set, in black ink and then die cut it using the smallest die in the Love to Layer: Delightful Brackets. I placed the truck and then the sentiment above it using foam squares.

I filled the truck with foliage and berries and one berry blossom. I also tucked bits and pieces underneath the truck and off the side of the sentiment.

I ended up with quite a few pieces left over, so I will most likely put them to good use!

I added glitter to the leaves, berries, and flowers for sparkle and shine! As you can see, the inspiration photo was a great starting off point, but from there, I just had fun doing my own thing! This card was a joy to create! Thanks for fluttering by!


Friday, May 10, 2024

The Greetery {Welcome, Little Sweet Pea}


Hello and welcome! I'm sharing a pair of baby cards for two sweet little bundles of joy! I feel like everyone is having babies lately and they’ve all been girls! I wanted to make two cards tailored specifically for the two most recent babies who I am delivering gifts to, and the Baby Face suite of products is the PERFECT choice!  I’ve paired it with a few of the postal themed products that were released earlier this year; every time I stamp the “handle with care” sentiment or look at the “special delivery” sentiment, I think how fun it would be to make a baby card with them, so here we are!

I actually “copied” myself and used the same layout as a pair of lilac cards I made for release day a few months back. Sometimes is nice to not have to reinvent the wheel and just get straight to creating! I was absolutely giddy when I was making those little sweet peas! To begin, I die cut the pieces for the peas using the Baby Face: Sweet Pea Die. I used finger daubers and Distress Oxide inks to color them and added the faces using the Baby Face Sentiments Stamp Set. I chose to use one of the green inks that I used to color the peas to stamp the faces. I wanted them to be more subtle, but you could definitely stamp them in black for more contrast, depending on the style of your card. I also added some colored pencil details to the stems, blossoms, and to give definition to each of the individual peas.

Since I was copying myself, I knew I would want more coverage on the card front, so I also die cut the smaller blooms and leaves from the BotaniCuts: Hibiscus Die to mimic some larger pea blossoms to fill in the arrangement. I really like how they look with the smaller peas for a more dramatic presence! Sometimes it’s fun to mix and match things that you wouldn’t otherwise think of!

Once that was done, I got to work on the postcard base. I used the Air Mail Border Stencil in the same pink and green from the peas on a white A2 panel and then added the pierced details using the Postcard Details Pierce Plate. I had so much fun gussying up the rest with the Baby Face Sentiments Stamp Set on the pierced lines….so many fun sentiment options!


I used the Postal Modern Stamp/die set for all of the fun “postal” details, including the perfect “handle with care” and “special delivery”! I placed the peas and the additional blossoms and leaves using foam squares for dimension. I added the entire panel to A2 card bases using a tape runner. I usually like to use liquid glue, but it can be tricky with the pierced details…you don’t want it seeping through the tiny holes! Ha ha! I was especially excited to use the postage theme, because I am packaging up the baby gifts in some darling decorative pink/gold polka dot suitcases, rather than a gift bag! I’m so excited to put everything together! My daughter had a decorative suitcase when she was a little girl and it held her Barbie clothes and accessories, so I know these new mamas will be able to put the suitcases to good use in the future! Thanks for fluttering by!

Wednesday, May 1, 2024

You Are My Happy Place

Hello and welcome friends! Happy May Day!!! It's my turn for this week's Papertrey Ink Flash Sale! I've chosen the fabulous Into the Blooms: Geraniums dies as the focal point for my card today! These are some of my favorites that were released last year and the best part? They are SO easy to use and put together! A win in my book!!!

To begin this card, I die cut enough pieces to create this arrangement. I actually just used the guide on the website that shows a suitable arrangement. I inked them up in assorted Distress Oxide inks using finger sponge daubers. I layered them together using foam squares and liquid glue for dimension.

I die cut the Border Bling: Lattice background from Rasperry Fizz cardstock and layered it onto a top-folding A2 card base using strategically placed liquid glue. I die cut the medium oval included in the Love to Layer: Ovals die collection from white cardstock and then layered over the lattice background using foam squares.

I arranged the geraniums using the guide on the website as I mentioned earlier.  The sentiment is stamped in black and is from the Just Sentiments: You're on My Mind and then die cut using the Just Tags dies and then tucked under the flowers.

I added glitter to the flowers and leaves for some additional detail and some sparkle and shine!

I took photos of the card and once I was done editing them, I realized that the card needed something extra, so I added the Border Bling: Skinny Embossed Frame cut from Raspberry Fizz cardstock. There is a picture underneath WITHOUT the frame, so you can compare! Let me know if you like it better with or without. I think the frame "grounds" the card a bit better!

Here it is without the frame! Well....thanks for fluttering by!