Monday, November 15, 2021

Papertrey Ink Flash Sale {Joy this Blessed Christmas Season}

It's Monday and that means it's time for a new Flash Sale from Papertrey Ink! If you saw my card last week, I went in the same direction by using  non-holiday stamps to create a holiday design! That being said, the Brighter Days Stamp Set is such a nice set for your get well, thinking of you, sympathy cards. You can see the card I made last year for the release of this set HERE. It's the second card in the post so you'll need to scroll down. I ended up giving that card to a family who all got COVID last year!

Anyway, as I mentioned earlier, I chose to use these beautiful branches and blooms to create a holiday wreath. To begin, I die cut 5 branches and 5 blooms, and one bow using the Brighter Days die collection. I used my mini MISTI to get the images stamped; I stamped two of the branches using Ripe Avocado ink and three in Pinefeather. The blooms are stamped using both Pure Poppy and Scarlet Jewel ink.

I used liquid glue to attach the blooms to the branches and set them aside to dry. I die cut the circle using the fabulous Love to Layer: Scalloped Circles and then layered the stamped images to form a wreath using foam squares for dimension. The letters are die cut using theSeason of Joy die set and then stamped in black ink using the Season of Joy stamp set. I layered them over the top of the wreath using additional foam squares.

I had an extra cardinal left over from this card so I decided he would look super cute perched on the wreath! I cut a panel of Pinefeather cardstock and added the heat embossed sentiment from the Season of Joy stamp set. The snowflakes are from the Splendid Snowflakes stamp set and are stamped using Fresh Snow ink. I added a trio of Moonshine sequins to the center of the three snowflakes that the centers are showing. I also added a touch of white ink to the corners of the panel for a frosty look.

I heat embossed the "sending" sentiment, which is also from the Brighter Days stamp set, onto a strip of vellum. I layered a piece of Bitty Big: Pure Poppy pattern paper over the Pinefeather panel and then glued the circle focal panel using liquid glue. I decided against foam squares, like I would normally do, because the wreath and letters are already so dimensional. I wrapped the vellum sentiment around the panel and secured in the back with tape. The entire panel is adhered to the top folding white card base using foam squares (yes, more dimension) ha ha!

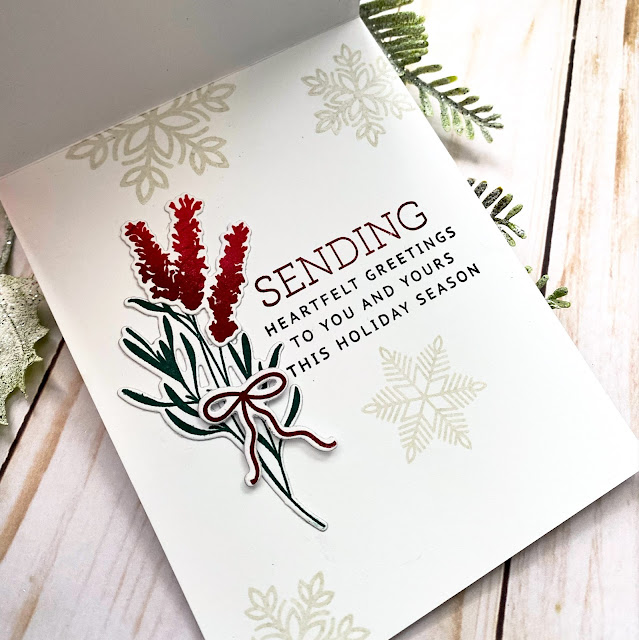
I had an extra branch/bloom combo left over so I decided to gussy up the inside of my card, which is something I really enjoy doing for my holiday cards. They seem more finished and professional. I added more snowflakes stamped in Soft Stone ink. The main sentiment is from the Inside Greetings: Season's Greetings. I have had this one on my desk for a few months now so I can quickly stamp the inside of my Christmas cards. I also added the "sending" that I used on the front, but this time I stamped it in Scarlet Jewel for some interest with the sentiment.

The branch is glued on the side and then I added the bow using a mini foam square. I don't like to add too much dimension to the inside because I want the card to close! ha ha! I had a lot of fun putting this card together! Thanks for fluttering by!


Friday, November 12, 2021

The Greetery Tags & Toasts Release Day

I'm sharing a fun bonus project with you today to celebrate the release of the new Tags & Toasts release from The Greetery that will begin at 10 am EST today! Don't forget about the sale that will begin at the same time and run until Saturday at 11:59 PM EST.
My project for today features a set of tags all packaged up for gift-giving! This would be the perfect gift to present to your Thanksgiving host, don't you think? 


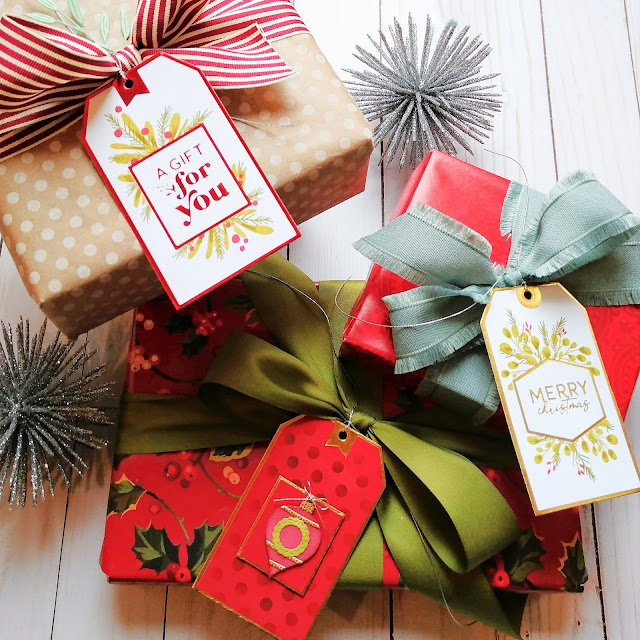
I used the Stationery Box Die to create this little box to house the collection of tags! I also used the Handmade Labels Stamp Set to heat emboss the "handcrafted JUST FOR YOU" sentiment that works so nicely for this gift! The box fits the set of tags and a nice length of red baker's twine to add to the tags!

I wanted to keep the packaging quite simple, but with a few holiday touches to make it special. For the tag, I used gold foil on New Leaf cardstock. Once it was foiled, I used the Tag Team Duo stencils to add the tone-on-tone green stripes. I layered the heat embossed sentiment over the top using foam squares.

The Merry Sprigs Stamp Set was the perfect choice to accent the bottom of the tag to give it just the right amount of holiday charm. I also added a red paper bow to the top of the tag that was die cut using the Fit to Be Tied Die and then adhered using a mini foam square. I used a post-it note to cover up the sentiment and then added some white paint splatter for a snowy look!

Before I assembled the stationery box, I trimmed it down a bit so that it would be the right height for the tags. I used the included half circle detail die to give it that finished edge that I love. It also allows the recipient to be able to see what's inside and pull them out easily.

I made quite a stack of very simple tags, just like something you'd find at a stationery shop. I had so much fun trying out all sorts of different paper/foil combinations. I had fun adding the stenciling and stamping as well. In the end, I made so many tags that I could probably make a few more boxes to create multiple gifts.

All of the tags I made for this project are single layer and don't have any foam squares or anything. If you make more embellished tags, you won't be able to fit as many in the box. It is totally up to you as to what you want to do, if you decide to make something similar.
I hope you've enjoyed today's project! I had so much fun and could have kept going and going!

I really want to make more stenciled, dimensional tags with the Merry Sprigs tucked here and there!  Thanks for fluttering by!


Thursday, November 11, 2021

The Greetery Tags & Toasts Release

I'm so glad you've joined me today for full reveals of the fabulous new release from The Greetery called Tags and Toasts! This is a mini release, yet packed with a punch, to get your holiday crafting off to a great start! (who am I kidding...we've all been Christmas crafting for months, right? ha ha) This release has a unique and beautiful new suite of products in the Tag Team Duo collection, we'll also be showcasing some New Years/graduation themed products to make 2022 special, and a fun new addition to the Opposites Attract family! As always, make sure to head to The Greetery Blog for ALL off the details! Make sure to leave a comment on each designers' blog to be eligible to win one of 2 $50 gift certificates to the shop! Now, for some fun news! There will be a SALE happening on Friday at 10 am ET when the new release goes live and last until November 13th at 11:59 ET.

Up first is the "tags" portion of the "Tags and Toasts" release! We ALL need tags during Christmas, and as paper-crafters we like to MAKE our tags, right? Sometimes I see beautiful tags in the store and think how amazing they are with their foil touches, and wishing that I could make something like that myself! Well, with the new Tag Team Duo suite of products, we can! This collection includes a hot foil plate and 6 coordinating hot foil sentiments to elevate your tag making!

Betsy designed the foil plates so that the sentiment could drop right into the opening so you can do the foiling all at the same time! I brought out my gold, red, and silver hot foil for today's tags, but I can't wait to try pink, silver, and more!


Once you've got the foiling portion done, there is a die that cuts out the two tags with one pass of the die cut machine. After that, you can go ahead and do the stamping with the coordinating Tag Team Duo Surround stamp set. There are two groups of stamps; one for the rectangle opening and one for this particular tag. I just LOVE how beautiful and easy these stamps are to use!

This is the rectangle tag using a different cluster of greenery and berries to give you two looks. If you're not quite into hot-foiling yet, there is a stamp set called Tag Team Duo Labels stamp/die set that you can simply stamp the tags and then add the greenery/berries around the labels.

Once I got the basic tag figured out, I had some fun adding some additional layers. I had fun die cutting the sentiment portion and popping it up onto the tags to give them even more dimension.

The tag tucked down in the bottom mixes paper and foiling to really give it some added detail. I hot foiled the tag onto white cardstock with gold foil, but die cut the sentiment that was hot foiled in red onto a piece of Kraft cardstock.

And of course, the collection wouldn't be complete without coordinating stencils! The Greetery will be offering the Tag Team Duo Dots and Stripes Stencil collection. I used the dots on the red tag on the bottom to give it some added detail. 


You can see it a bit better in this photos. I used red paper with gold foil and then stenciled the dots using scarlet ink. I cut the rectangle portion from another tag and then opted for an image rather than a sentiment on this one. I used one of the cute Curio: Attic Ornaments Die to create this little ornament to accent the tag.
The tag on the left uses the stripes stencil, and you can put two of the stripes together to create gingham. I can't wait to try that!


I wanted to try some bold stamping on the other red tag by adding black leaves and white fir over the top of the stenciled tag.

I also used black for the sentiment, which is from the Tag Team Duo Labels stamp set. I had a lot of fun 

Whew! That was a lot of tags! Now we're moving on to the "Toasts" portion of the release with some fabulous new Year In Year Out products to help you ring in the new year with style! You can continue using these themed products for graduation, birthdays, and anything else that you want to commemorate with the year 2022. I do want to add that the Year In Year Out 2022 specific products will only be offered until the end of 2021 with one restock after the initial release. Once they sell out at the end of the year, they will not be restocked. The coordinating stamp set called Year In, Year Out sentiments will stay available in the shop since it can be used with any year and is not specific to 2022. Hopefully that makes sense!

I chose to make something simple, yet dramatic for my new year card! To begin this card, I die cut the Year In, Year Out 2022 die from a silvery glitter cardstock. This cut like butter going through my Gemini Junior and the pieces came out easily. I used the It's the Year 2022 Hot Foil plate to foild the 2022 in silver onto black cardstock. I didn't get a good, solid foil, but really liked the vintage look, especially since I used the deco background. I could have done it again, but opted not to since I liked it so well. 

I used the same die to cute out the foiled portion and then added it to the glitter piece using foam squares. I die cut the banner from Soft Stone cardstock and stamped the "Happy New Year" in black. This is from the Year In, Year Out sentiments.

This is all layered onto a piece of black cardstock that has been foiled using the Deco Triangles hot foil plate using silver foil.
There is also a coordinating stencil that works with the die. I can't wait to give that a try as well! I know it will make graduation cards a breeze and allow me to make the cards custom with the graduates' school colors!

My last project for today is a trio of cards using the new Opposites Attract hot foil plates! You asked and The Greetery delivered! These will be offered in both the holiday and everyday sentiments!

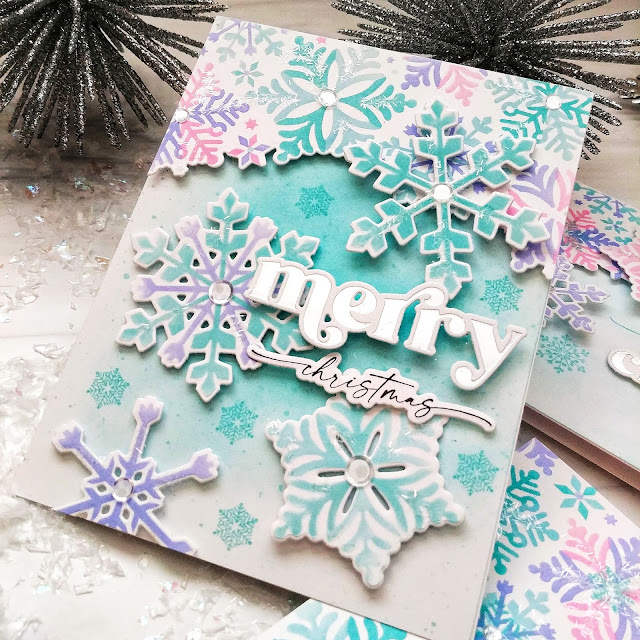
I used silver foil on white cardstock for these snowflake cards. I couldn't resist pulling out the older Snowflake Soiree to enhance the icy feeling of the foil! Once you get the foiling done, you can simply lay the Opposites Attract Holiday die right over the top (I didn't cut mine apart) and they line up perfectly over the foiling, so you can cut them all out with one pass!

I used theOpposites Attract Holiday stamp set for the script portion on each of the cards. On the other two I stamped it directly to the paper using Vintage patina ink and for this one, I stamped it in black and then die cut it using the Opposites Attract Script die.


It was a little bit tough getting pictures of the foil, but the shine is just incredible and really enhances these snowflake cards! Thanks for fluttering by!


Monday, November 8, 2021

Papertrey Ink Flash Sale {Merry Christmas}

I hope you're all having a fabulous day! I spent the better half of last week/weekend stuck in bed sick, so it feels good to be here sharing a card, even if I'm not 100 % quite yet! It went from one child to the next and of course, I had to have my turn, too, right? ha ha! 3 came out unscathed and let's hope it stays that way! Fingers crossed!
I created my card for this week's Flash Sale using quite an assortment of some of my favorite products; lots of dies and cute stamps to pull this holiday design together!

I fell head-over-heels in love with the Abundant Blooms stamp set when it was released last year! I especially love the cute pitcher and the ease of use that it provides! I decided to stretch this stamp set a little bit further and see if I could work it into a holiday design, and sure enough, it works! 
To begin, I die cut the pitcher, the stems, and flower pieces using the Abundant Blooms dies and then used my mini MISTI to stamp everything. I used Soft Stone and Weathervane ink for the pitcher, keeping it light and rustic. The stems were stamped using Dark Chocolate ink and Pure Poppy and Scarlet Jewel ink for the flowers. I will explain about the greenery further down in the post, but I do want to mention that I added white paint splatter to both the greenery and flowers prior to gluing anything down.

The thing I love most about this stamp set, aside from the cute pitcher, is the way the flowers float perfectly on top of the stems to really create the illusion of a big, bold arrangement of flowers! The best part is how easy it is to put together!

Next, I die cut the snowflakes for the bottom using the On the Border: Splendid Snowflakes Border Die and set it aside until I was ready to assemble the card. I had mentally visualized all of the bits and bobs I wanted to add, so it was simply a matter of getting them all die cut, inked, stamped, and glued! ha ha!

The pine branches, tag and bow are all die cut using the Tag Creations: Modern Gift Die. I've kept this one close at hand over the last few weeks because all of the different pieces are so perfect for so many holiday cards and projects! The bow is die cut from Pure Poppy cardstock and then I added some Scarlet Jewel ink near the center and on the ends so that it would look more realistic. The tag is cut from Weathervane cardstock and stamped with the Merry Christmas sentiment from the Just Sentiments: Be Merry stamp set. This is another one of those go-to sets that I use all season long!

I die cut the oval using the Nesting Basics: Oval dies and the Nesting Basics: Pierced Ovals to add the cute detail around the perimeter. The last die cut piece is one of my favorite frames: the Border Bling: Skinny Embossed Frames. Once all of those pieces were prepared, I got to work assembling the card. I layered a piece of Bitty Big: Soft Stone pattern paper onto a top folding Soft Stone card base. I added the oval using foam squares, centering it in the middle. I then added the snowflake border, making certain to only glue the part that would be on the bottom edge so it could overlap the oval. I wanted to tuck the pitcher down under it so that the snowflake detail wouldn't be lost. The frame is adhered using 1/8 inch ScorTape for security. I added the pitcher with the flowers and then tucked in the greenery using liquid glue. I added the tag using a mini foam square and then hot glued the bow over the top for security. The finishing touches are tinsel glitter (of course) and a few Moonshine sequins. Thanks for fluttering by!


Reverse Confetti New Release Blog Hop

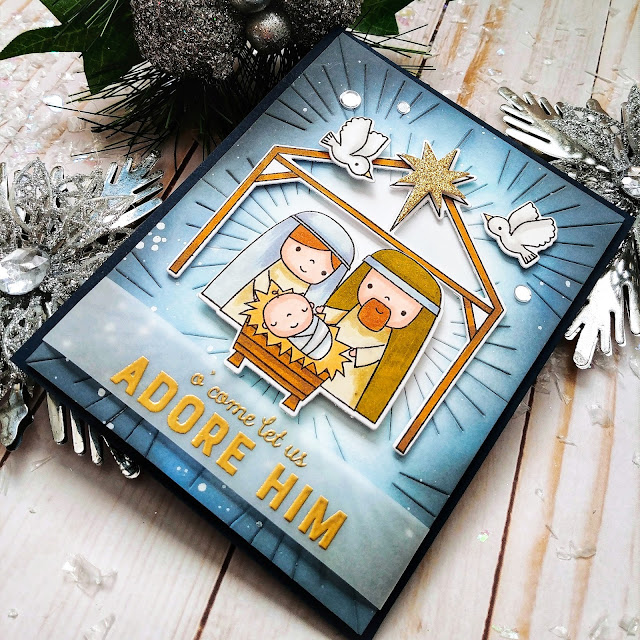
There's a lot of fun and fabulous new products included in the November Reverse Confetti release this month! I had a ball creating this cute nativity scene using the new Adore Me stamp set! I always love creating cards and projects highlighting the true meaning of Christmas and these cute images couldn't be any sweeter!


I love this new Brilliance background! I die cut it from white cardstock and then added Distress Oxide ink around the edges to create the night sky. I left the middle white so that it would light up the scene, just like the star would in real life. Once that was done, I added some white paint splatter to give the illusion of stars twinkling in the background.


I stamped the stable, the birds, and baby Jesus, Joseph, and Mary using black ink and then colored them using an assortment of alcohol markers. I die cut the star from glitter cardstock and heat embossed the sentiment in gold onto a strip of vellum. 


I used the coordinating Adore Him Confetti Cuts to die cut the images. I added them to the card using foam squares for dimension. The glitter star is popped up right over the top of the stamped image. 


I wrapped the vellum sentiment around the panel and secured it with adhesive on the back. I attached the entire panel to a top folding Navy blue card base using foam squares. I added a few moonshine sequins to give the card some additional sparkle!

My next card uses the fun and funky Retro Holiday stamp set! I adore retro Christmas cards; they evoke sweet memories from my childhood that I love! I also used the new snowy sentiments (which I believe is a freebie) for the bottom of the card.


I used the ornament die cut rather than the stamps and die cuts together. I wanted the ornaments to have a solid look with the gold glitter circle.

I used a lot of the little images in the set to give the card that true retro look! I chose an unexpected color combo, but one that is truly 60s inspired!

I added one of the foliage clusters from the older Lanterns stamp set to give the card some added detail. I glued a few sequins to the centers of the star/snowflake images for sparkle. I also added some glitter to the ornaments and the image! Don't forget to hop along to the other participating designers' blogs to see what they've created! Thanks for fluttering by! 


Reverse Confetti

Candice Fisher

Kelly Lunceford

Dilay Nacar

Audrey Tokach

Amy Rohl

Ali Farmer

Ashley Ebben

Becky Roberts

Tricia Barber

Lisa Henke

Cheiron Brandon

Lien Leysen

Amy Kolling

Olga Moss

Heather Ruwe

Andrea Shell

Jenny Colacicco

Kellianne Wilson

Susan Wymer

Dana Kirby

Rachel Alvarado

Amy Tsuruta

Tiffany Pryce Russom

Stefanie Loh

Jeanne Jachna