
Hello friends! Today is the day you've all been waiting for...it's release day for the Christmas Time collection at The Greetery!! I couldn't resist creating a bonus card to share with you today! I have so many leftover bits and pieces that are just begging to be used on projects! I approached this release a little bit differently than I normally do. Rather than just selectively using different pieces from stamp/die sets, I decided to die cut and stamp EVERYTHING! This gave me the opportunity to really get a feel for each stamp/die set and it gave me a ton of options to choose from as I was creating! Now, the fun part will be to just use up all of those pieces on tags, cards, treat boxes, and more!

The collection will go live in The Greetery Shop at 10 AM ET!

For today's bonus card, I chose to use some leftover bits and pieces from the Winterberry Bouquet stamp set. The main bouquet is quite large and I ended up using both of the two that I stenciled, stamped and cut on my release projects, so that left me with all of these cute sprigs and sprays that ended up being PERFECT for this card. I also thought that the middle die from the Hourglass Frame die set didn't get enough love during the release, so I wanted to show you how nicely it works for a card like this.

To begin this card, I die cut the Hourglass Frame three times; once from gold specialty cardstock and twice from Kraft cardstock. I glued them together using liquid glue and set them aside to dry. I die cut the center portion of the Hourglass Frame and then added some Speckled Egg Distress Oxide ink around the edges. I temporarily came up with an arrangement for how I liked the berries and foliage and decided to use one of the banner sentiments from the Christmas Time Sentiments stamp set.
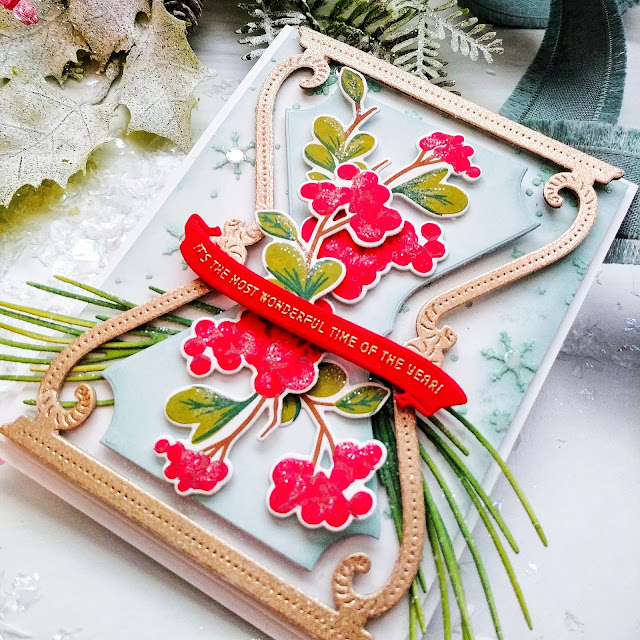
I wanted this card to have a light and airy feel, so I opted to keep the background light, but added some detail by using the previously released Frosty Flakes Stencil with some ink and Nuvo Moonstone Glimmer Paste. I love the dimension and snowy sparkle it adds to the background! I set that aside to dry and cleaned up the stencil and my putty knife. Once it was dry, I was able to assemble the card. I went back and forth on whether or not to add the Pine Wisps to the sides. While I love the holiday touches it adds, I wondered if it made the card too heavy. Either way, I can simply pull them out if I change my mind. I added a lot of glitter to the berries and leaves. I added some Moonshine Sequins to the centers of a few of the stenciled snowflakes for added sparkle and shine!

This card was an absolute joy to create and I could really see this being a design that you could use as "THE" Christmas card for the year! It's easy, yet beautiful and unique! I also stamped the "Christmas Time" sentiment on the inside with another one of the banner sentiments accented with a trio of snowflakes from the same set. I like to add something extra to the inside of my Christmas cards so that they seem a little bit more "finished" and I also don't have to write as much! LOL! You know how crazy life is! Sometimes I'm happy just to get them out the door! ha ha! Thanks for fluttering by!
7 comments:
“ I'm doing
My Christmas dreaming
A little early this year
No sign of snow around
And yet I go around
Hearing jingle bells
Ringing in my ear...”
This release has sure kicked up my “Christmas Dreaming” and Spirit for sure!! I think I love this bonus project most of all! I love your product day release posts so much! I hope you’ve had as much fun as we have in visiting your beautiful blog this week!! Thanks!
BEAUTIFUL WORK, Kelly! You make these products SHINE! LOVE the shimmer on the berries also! JUST BEAUTIFUL!! ;)<3
Gorgeous!
Hi Kelly, your card is gorgeous! You must have been very busy, stamping & diecutting everything. Btw, I don’t think it’s too heavy, it’s beautiful as is. ( just my opinion). I had a quick question. Was there a specific way you cut the corners of the hourglass insert? It’s so ingenious. I hope you have a great weekend coming up! It’s been so good to “see” you again! 😊💖
You’re so sweet, Stephanie! This is the way the die cuts it. The Hourglass Frame Insert cuts it to look more like an hourglass like I used on my Bethlehem shaker. I don’t think anyone actually used this portion during the release reveals so I wanted to show how beautiful it is.
I guess I should clarify, this card uses just the hourglass Frame die. The Bethlehem card I shared the other day, uses the hourglass Frame insert die
Oh, I get it, I should have looked closer. 🙃 And you’re right, it is beautiful. Thank you Kelly- you’re always so kind and helpful. Have a great day! 😊
Post a Comment