Sunday, October 13, 2019

Ink To Paper October Release Countdown Day 3

Welcome to day 3 of the Ink to Paper October release countdown! How have you been enjoying the other 2 days! I hope you're liking all of the new products as much as I am! Today the festivities continue with some "frosty" products that are so much fun!

First up is the new Go-To Gift Card Holder: Snow Globe. I chose to use the smaller version on a card front rather than a gift card holder, but I'll be showing a gift card holder down below, so stay tuned. To begin this Winter Wonderland card, I dry embossed the On the Border: Splendid Snowflakes frame die using an embossing mat and my die cutting machine. I also die cut the snow globe pieces as well. the base is die cut 3 times and then glued together using liquid glue.

I used Faded Jeans and Tumbled Glass Distress Oxide ink to add some ink blending around the dry embossed panel as well as the snow glove. I added some white paint splatter on both pieces for that organic snowy look that I love so much.

The sentiment is stamped onto a piece that was die cut using the new stitched layers die collection and added to the top of the snow globe. I added some heat embossed snowflakes from the It's a Sign: Holiday sentiments stamp set. The centers each have a sparkling clear rhinestone for some sparkle and shine.

I almost stopped at that point, but decided to warm things up with some of the leftover bits from day 1. I added three different clusters of greenery and berries to add some extra detail!


The finishing touch is tinsel glitter sprinkled around the sentiment panel and all of the greenery and berries. It's perfect for this icy design!
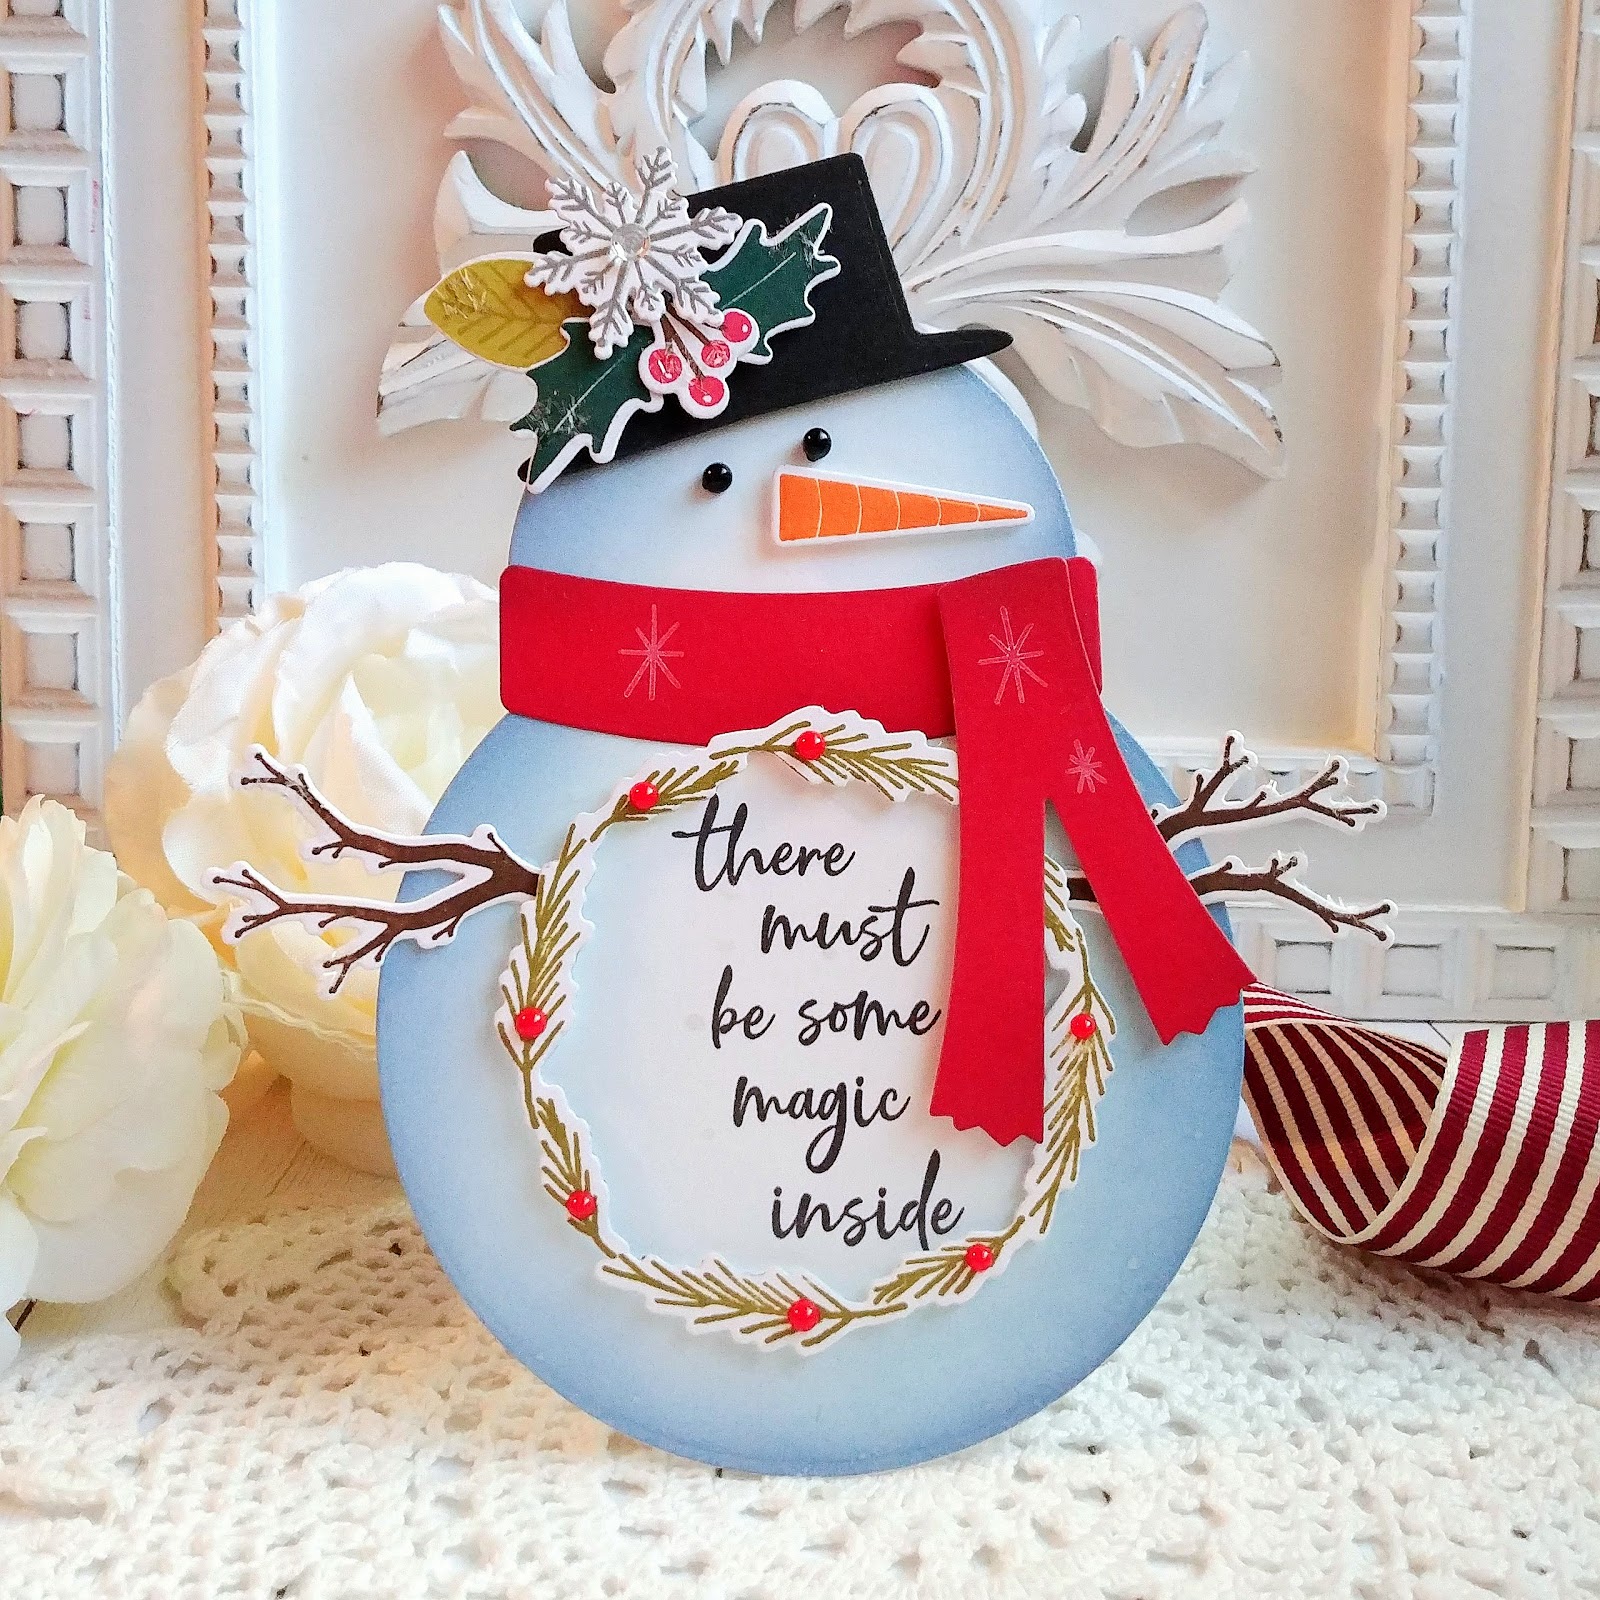
Next up are a few projects using the new Go-To Gift Card Holder: Snowman and the new Snowman Accessories stamp set. This looks like a card, but it really is a gift card holder. These are quite the ingenious little dies that will allow you to slide a gift card down the back. This uses the large snowman in the collection that you need for the gift card. It also has a smaller snowman for use on card fronts and such.

For these gift card holders, you will need to die cut two for each one. You can decorate the front as you like and then the back incorporates the "slit"and the gift card portion. I did some inkblending on the front using Faded Jeans and Tumbled Glass Distress Oxide ink.


You can see the gift card portion in this photo; it has the portion for you to easily slide a card into and tuck in the back. You will want to do the back part before you add the scarf because the scarf in front hides the thick top portion of the gift card holder.

Once the ink blending was done, I spritzed both snowmen with Frost Shimmer Spray. I also stamped the sentiment using black ink. The wreath is from the "Framing Florals: Christmas stamp set that was showcased yesterday. I had some bits and bobs left so I used them on these gift card holders.

I added some twig arms using the branch from the previously released Birdie stamp set and the coordinating Birdie Die Collection. I stamped the carrot nose and added it using foam squares. the eyes are Black Nuvo Drops, but the Snowman Accessories stamp set has two sizes of eyes and two smiles as well.

Next up is one of my favorite gifts to give during the winter months, especially for Christmas and this sentiment is a perfect companion to showcase this gift. I love making handmade handwarmers each year to give to friends and neighbors.

The Tent Style Packaging die is the perfect size to package up this set of handwarmers.

This is the smaller snowman and he fits perfectly on the front. I also added some snow using the In the Meadow Die Collection to give it some extra detail.

This little guy also got some twiggy arms but cut smaller since the snowman is smaller. I was actually able to get both the large and small snowman's twigs from two branches.


I had so much fun working on this fun little gift! 


I've been listening to Christmas music while I have been doing all of my projects this week and "Frosty the Snowman" happened to come on a few times. I thought it would be fun to just focus on "that old silk hat"! This sentiment is perfect to add to a tag and top it off with the hat.


I die cut the Tag Creations: Modern Gift Die using the Candy Cane Prints pattern paper and then added the die cut "bows" that are included in the die collection.

The hats are embellished with the same die collection for easy detail! I added some tinsel glitter to the holly and berries for a festive touch.

I'm loving these new snowflakes so I thought it would be a fun touch to add to the side of the tags as well as a few sparkling clear sequins. I added some Pure Poppy Baker's Twine to the holes of the tags. I had so much fun working on everything for today! I am so well stocked for Christmas and it's not even Halloween! LOL! Thanks for fluttering by!

Saturday, October 12, 2019

Ink to Paper October Release Day 2

Things are getting festive over here as we roll into Day 2 of the Ink to Paper October release Countdown! First up is a fun new set called Critter Carolers and a new sentiment set called Happy Happy Holidays! I've combined the two for a fun wintery scene!

To begin this design, I cut a piece of 4 by 5 1/4 inches and then added the ink blending using Tumbled Glass and Faded Jeans Distress Oxide ink! I stamped the sentiment using black ink as well as the trees.  I also added some white paint splatter for a snowy look, but I masked off the sentiment so that it wouldn't obscure any of the words! 

The snow at the bottom was die cut using the In the Meadow die collection and added to the bottom of the blended panel. I left the tree in my mini MISTI so that I could add the top of the snow for a seamless look. I also die cut the On the Border: Splendid Snowflakes twice and glued it together using liquid glue. I added some coarse glitter to the snow peaks and the snowflake border for some snowy sparkle!

I added some leftover greenery and berries from  yesterday's card to the top of the card with even more glitter! I stamped the caroler and all of his/her accessories and colored them with Copic markers. I die cut them using the Critter Carolers die collection and added them to the card. 
I added a few sparkling clear sequins to finish off this design!
My second card for today uses the new Framing Florals: Christmas which I am in love with! I love all of the sprigs, berries, holly, and branches! It is such a delight and the sentiments are beautiful, too!

I "may" have gone a little overboard with the berries and such, but it was so much fun to arrange them all on this card!

To begin, I got to work die cutting a lot of each piece so that I would have choices when I got to work arranging my card. I used my mini MISTI so that I could do it as quickly as possible. I heat embossed the diamond frame using white embossing powder and then die cut it using the coordinating die collection. I stamped the "Joy to the World" sentiment in black for a crisp look.

I layered the frame and the wreath onto an oval that was die cut using the Geometrix: Oval Die using foam squares. I got to work arranging all of the foliage using a combination of liquid glue and foam squares.

I used the On the Border: Splendid Snowflakes to dry emboss the Kraft panel using an embossing mat in my die cutting machine. I also added some paint splatter for added detail.

I added some gold nuvo drops to the center of the poinsettias. I also added some coarse glitter to the foliage using a 2 way glue pen. I hope you've enjoyed today's showcase! Join me again tomorrow for Day 3 of the release! Thanks for fluttering by!

Friday, October 11, 2019

SugarPea Designs Sweet 2 Repeat Instagram Hop {Merry Christmas}

Today the SugarPea Designs Pod Squad is hosting an Instagram Hop, but I wanted to share the details of my card in a blog post as well! There ARE prizes up for grabs with the Instagram Hop, so be sure to start at the @sugarpeadesigns page to hop along to be eligible to win!

I've used a few of my favorites from the new release, as well as a few of my older favorites! To begin this design, I did some inkblending using Tumbled Glass and Faded Jeans Distress Oxide ink to create a wintery sky! I used the Falling Snow Stencil and some Moonstone Glimmer Paste to create the sparkly snowflakes!

I die cut the Lantern twice out of red cardstock and glued them together using liquid glue. I die cut the metal portions using silver specialty paper for a realistic look. I also die cut the snowy hills using the Card Front Element Builder SugarCuts and added those using foam squares on the blended background.


I stamped the trees, sled, gnome and present in black; these cute images are from the Gnome For Christmas stamp set and is one of my unexpected favorites from the release! It's amazing how adding the color using Copic markers brings these images to life in the most delightful way!  {I think that is part of a Mary Poppins song! LOL} 

Once they were all colored, I die cut them using the Gnome For Christmas SugarCuts and added them to the snowy scene using foam squares. I also added a sprig of Holly to the top of the lantern using one of the pieces from the Pocket Tag Christmas Characters. It added just the festive touch I was looking for!

I heat embossed the "Merry Christmas" sentiment, which is from the Everyday Sentiments Stamp Set, and then die cut it using the Sentiment Strip SugarCuts. I added it to the bottom of the lantern using foam squares! I am so excited, my SU! demonstrator, who gets me all of my foam squares, told me about black ones that they are carrying for the holiday season! Of course I had to buy some! They are coming today, so I can't wait to try them! They would have come in super handy on this card! LOL!


I added a few sparkling clear sequins here and there for some extra sparkle and shine! Make sure to head to Instagram to be eligible to win a prize! Thanks for fluttering by!

Ink to Paper October Release Countdown Day 1

Hello and welcome! Today is day 1 of the Ink to Paper October release Countdown! I'm sharing a fun holiday card using some of my favorites from the release! Day 1 is chock full of new favorites in the "It's A Sign" series! My card uses the It's a Sign: Christmas Bough, It's a Sign: Holiday Sentiments, and the new stitched layers! There are so many fun options with all of the new sets; the sky is the limit! 

To begin this design, I die cut the square for the sign and then stamped it in Cocoa Bean. I also cut a black square to fit inside the frame since I was going for a chalkboard type look. The sentiment is heat embossed in white and then die cut using the new stitched layers die collection. I love the detail it adds! I also die cut and stamped the "hanging" portion and glued it to the back of the frame using liquid glue.

I die cut all of the greenery and berries from the It's a Sign: Christmas Bough and then used my mini MISTI to stamp them all assembly line style! I set those aside and got to work on the Pure Poppy and Aqua Mist cardstock panels.

The new It's a Sign: Holiday Sentiments set has some FABULOUS snowflake images, so I used those on the Aqua panel; they're a little hard to see in the bright photos, but in real life, they add just that extra amount of detail and depth that I'm always searching for.

I also used a paintbrush and white acrylic paint to add the white paint splatter that I love using this time of year! It adds an organic feeling of snow that is hard to replicate in any other way.

The red and Aqua layers are adhered together using foam squares, but before I did that, I added a black brad to be used as the "nail" so to speak, that the sign is hanging from. I layered all of this onto a top folding A2 card base using additional foam squares.

Once the frame was layered onto the card, I got to work arranging the clusters of greenery and berries. This is probably my favorite part! I stamped so many of each thing that I knew I could just tuck things here and there until I got the look I was going for! I still have a lot left over so you'll be seeing them pop up over the next few days on more projects! ha ha!

I used a 2 way glue pen here and there on the foliage and then sprinkled Martha Stewart Crafts Tinsel Glitter over the top for that icy like sparkle that is perfect for holiday cards! I also added a few small sparkling clear sequins here and there for additional detail and shine! I had so much fun working on this card! Join me again tomorrow for Day 2 of the countdown! Thanks for fluttering by!

Thursday, October 10, 2019

Inspired By...Gather {Thankful for all that you do}

Hello and welcome to this week's Inspired By Challenge! I've created something a little bit different than I normally do, but I love how it turned out; bright and bold! You can see the inspiration photo below and you'll be able to see how I ended up with this design!

I was inspired by, well, just about everything! LOL! The bricks, the Kraft colored leaves, the bold black and white patterns, the banner and the bold word! I knew immediately what stamps I wanted to use for this design! It's funny; if I have the "perfect" stamp(s) for a particular Inspired By Challenge,I tend to make something quite literal, but if I don't, I seem to look a little deeper into the photo to pick out smaller details that might be overlooked! I think it's pretty obvious which category this one fits into! ha ha!

To begin this bright design, I stamped the Rustic Brick Background using Weathervane Ink. I chose this ink because the shadows that the bricks cast in the photo look grey. I used my MISTI so that I could get a nice crisp impression.

I die cut the banner using the Garden Party die and then stamped all of the fun patterns using the images from the Garden Party Stamp Set

These leaves have been some of my favorites of the season; I have used them so much and they were perfect for today's design. I die cut them out using the Lovely Leaves Die collection; this particular leaf is a solid die so it is necessary to die cut it first. Once that was done, I used the Lovely Leaves Stamp Set to ink them up. The stems and veins are stamped in black and then I used a combination of Fine Linen Ink and Honey Nut ink blended around the edges for dimension.

I was thrilled to find that I had the "thankful" sentiment already to go; it was leftover from another project and is the perfect choice for this card. I die cut the word using the Thankful Thoughts die collection and then stamped the sentiment from the Thankful Thoughts stamp set using Versamark ink. I heat embossed it using white powder.

The "FOR ALL YOU DO" sentiment is also heat embossed and is from the same set. Once I had all of these elements done, it was time to get the card put together!

 
The brick panel is adhered to an A2 top folding cardbase using foam squares. I added the "for all that you do" sentiment using Tombow adhesive. I layered the "thankful" word using foam squares at an angle slightly overlapping the black sentiment strip. The banner is also added using foam squares and then it was time to add the leaves. A few sparkling rhinestones finish off this modern fall design! I hope you'll join us this week! Thanks for fluttering by!

Wednesday, October 9, 2019

SugarPea Designs Mix it Up #60 {Warmest Wishes}

It's my turn to use this month's SugarPea Designs Mix it Up Challenge and boy is it a fun one! It is just perfect for this time of year, even if you are like me and in denial that it is actually fall! LOL! As much as I've been talking about decorating for fall, I still haven't! Ugh! It is SO not like me! Anyway, I've been dying to use more of the Pocket Tag Christmas Characters so I incorporated the cute Reindeer into the challenge!


I used the colors and the pie as my inspiration; I couldn't use the sketch challenge since I made these cute tag/gift card holders.


To begin these tag/gift card holders, I die cut 3 of the Floral Pocket Tag out of Kraft cardsock. I added some Vintage Photo Distress Ink around the edges to give some definition.  I also die cut the rest of the reindeer pieces, but I made the nose black, rather than red, like the product photos show. I also added a scarf, which is not part of the reindeer, but I felt like the design needed it for color and balance.

I used liquid glue and Tombow Adhesive to put these together. The eyes have a clear coat of Crystal Glaze for realism and shine.

I used the Cutie Pie SugarCuts to create the pies for the reindeer tags. I used my Color Spritzing Took to give the whipped cream the cinnamon sprinkled look of the inspiration photo.

The sentiment is stamped in black using the Everyday Sentiments stamp set and then die cut using the Sentiment Strips SugarCuts. I added these directly underneath the pie using foam squares.These were so much fun to make! I hope you get a chance to join us this month! I hope to see your creation in the gallery! Thanks for fluttering by!

Tuesday, October 8, 2019

Reverse Confetti Blog Hop {Fall is in the air}

No photo description available.
Hello! Welcome to this month's Reverse Confetti Blog Hop! This month we are just creating from the heart and I'm sure the team will not disappoint! Make sure you head to each of their blogs to see what fabulous inspiration they have come up with!
This little bear has been feeling a little neglected, so I decided to create a fun autumn card using this little cutie as the main focus paired with the new With a Thankful Heart stamp set.
I made two cards for today's hop; I get in this habit of just stamping multiples and that makes it easy to make more than one design! I stamped the bear and mug from the Big Bear stamp set and the pumpkins and flowers from the With a Thankful Heart stamp set . I colored both of the pumpkins that I stamped, but only ended up liking the white one. I just don't have the right orange markers to make a pumpkin of this size look good! The white one on the other hand, is super easy! LOL!

Once I had everything colored, I used the Big Bear Confetti Cuts and the With a Thankful Heart Confetti Cuts to die cut everything. I set those aside and got to work on the rest of the design elements that I included in my cards!

The background is inkblended using Tumbled Glass and Faded Jeans Distress Oxide Ink....which seems to my go-to combo lately. I also cut two panels of the green pattern paper which is from the new This & That 6 by 6 pattern paper pad to adhere across the center of the blended panels. I love the way the blue and green look together! I also added some white polka dots using a white gel pen for some added whimsy.

I used the Stitched Notes Frames Confetti Cuts to create the frame on the pumpkin card and the note and frame portion on the other card. I also added the "fall is in the air" sentiment, which is from the Fall Foliage stamp set, stamped in black for contrast.


I used foam squares to add all of the die cut pieces for dimension! I also added a few sparkling clear sequins here and there for some shine. I also added some Crystal Glaze to the mugs and bears' noses AFTER I photographed these! I don't know how I forgot I wanted to do that! It just adds a fun, extra touch to the design! Thanks for fluttering by!