Sunday, October 18, 2020

Revisiting old favorites for children's birthday cards!

Happy Sunday, friends! I've been having so much fun this year making birthday cards for each of the sweet kiddos at church! I wasn't planning on posting these but I finally finished making them for the rest of the year, so I figured I may as well share the rest of the bunch! I've been collecting these stamps/dies for years so some may be retired, but I'll do my best to link up the products that I've used!

Up first are these birthday hat cards made using the Party Hat Die and coordinating Party Hat Trims Dies. These dies are made to create an actual hat, but I found that by trimming off just a bit, I was able to get the hat to fit onto the front of the card AND keep its 3D shape! This is definitely NOT mailable, but I've been doing doorstep drop offs, so these were so fun and perfect for that!

I made one boy hat and one girl hat sporting the number 8! I've LOVED having these By the Numbers dies since they were released forever ago! They come in so handy when making a special birthday card. I've used them on a few other designs as well included in this post, so stay tuned.

I got to work die cutting all of the pieces I would need for both cards and then got to work putting them together. 

I added some Crystal Glaze over the top of both of the number 8 dies, but added some coarse crystal glitter to this one on the girl card for some added sparkle. 


The Bitty Big Pattern Paper worked perfectly to mix and match colors and patterns for these playful designs. I love mixing stripes and polka dots for a festive look!

I used to use the Stylish Sentiments: Birthday stamp set on every birthday card I would make, but somehow got out of the habit. I pulled it out again to use at the bottom of these two cards. 

My next set of cards I made was this design. I actually ended up by making a few with the number 3 and then this one with the number 4. I used the retired Little Hot Rod set ( you can still by the dies HERE) for this design and another set further down in the post. I shamefully have only used this set a handful of times. I bought it specifically for THIS project and have only used it once since! I was so happy to pull it out for these fun birthday cards!

I used a SUPER old Cuttlebug embossing folder for these cards and a few others that you will see today. I just love it and think it is timeless. We're just really taking a walk down memory lane today, aren't we? ha ha!

I embossed the background and then added in the Swirling Clouds using foam squares. I die cut a focal circle using some old Spellbinders circle dies and the By the Numbers Patterned Paper. I love that the paper has the same style of numbers as the dies...a perfect match!

I heat embossed the sentiment onto a strip of red cardstock for a crisp look. I added the plane and cars to the card using foam squares. I dressed up the inside with one more car and one of the sentiments from the same set I used on the first card. I used the one that talks about "enjoy the ride", which I felt worked so well with this design!

This next set of cards uses the same design details, but just different images. This little chugging train is just the cutest thing ever and I love the little puffs of steam coming up from the boiler!

The only sentiment that is specifically made for the train is the "Choo Choo".  I felt it was too small to be the main focus so I used the "Zooming by" sentiment (which doesn't really fit) but added the "Choo Choo" at the bottom to pull in the train aspect.

As you can see, I made one with a 3 and one with a 2 to fit the ages of the sweet birthday boys! One of these is headed to its recipient today....I hope he likes it! He'll probably like the treat I'm taking with it better, but I had fun making these! ha ha!

I kept the numbers white but added some Crystal Glaze over the top and some glitter. A few sequins give it just a little added detail to help balance the design.

As you can see, I really gave this embossing folder a good workout! I actually copied myself with this design...it is one I made for my son a few years ago for his birthday. I really like the Boy Basics: Game On Mini stamp set for birthday cards! I love all of the cute sentiments with the play on gaming!

This particular stamp set doesn't have a coordinating die set, so it is fun to use the images to create a pattern or background.

My final two cards to share with you today are these fun little monkey cards. I showed them to my youngest son (his birthday was upcoming) and he informed me that he wanted one of these! I thought for sure he would pick one of the video game cards, but he wanted the monkey! I used the adorable Huggables: Monkey Mini stamp set and die with the coordinating Tag Sale: Huggable die. Some blush and glittery bananas add some extra detail to these little monkeys! This is the last of the cards, but I DID end up by making 2 more of THESE cards! If you are interested in seeing a few more of my recent birthday cards for kids (which happen to mostly be boy themed) you can see those HERE. I had so much fun working on these, but I am definitely doing things differently with this upcoming year! LOL! Thanks for fluttering by!


Friday, October 16, 2020

Pinkfresh Studio October 2020 Slimline Stamp, Die, and Stencil Release Blog Hop


Welcome friends, to the Pinkfresh Studio October 2020 Slimline Stamp, Die, and Stencil release blog hop! Try saying that five times fast! ha ha! I'm sharing two projects with you today using a handful of the new products. I'll also be sharing the link with the other designers on the hop at the bottom of this post. You'll definitely want to hop along to see all of the fabulous inspiration that they have to share! 
Lots of business today, so bear with me....but it's FUN business! As always, Pinkfresh Studio will be giving away the ENTIRE release on their Instagram Page, Facebook page, and You Tube to one lucky commenter! Leave a comment on my blog for a chance to win a $25 gift certificate to the Pinkfresh Shop. Check the GIVEAWAY PAGE on Ocotber 23rd for a list of the winners. You MUST claim your prize within two weeks or it will be forfeit. Also, the Memory MISTI comes in handy when using these larger stamps, so My Sweet Petunia is offering the Memory MISTI at a 20 percent discount using the code PINK.


My first card for today uses the new You are My Favorite stamp set, You are My Favorite Die and the coordinating You are My Favorite Stencil set. I die cut the large floral image first and then lined up the stamp in my memory MISTI inside the negative space for perfect alignment.(because of the large size of these stamps they can become "floppy" and so it is helpful to line in up in the MISTI around the die cut negative). Once it was aligned correctly, I placed the die cut into the MISTI and stamped it in black ink.

Once you have the image stamped, the stencils come in to play. Please note, these stencils create a whimsical looking image, so they won't line up "perfectly" inside the black lines, so don't stress yourself out! LOL! You can use the colored reference sheet on the back of the stamp/stencil/die packaging to see how it is supposed to look when it is finished.
Once I had completed each of the steps with the stencils, I had some fun putting this card together. I really wanted to use this large sentiment and thought it would be fun to place almost in the middle and then frame it with the flower image. 

I decided to cut it and place it how I like around the sentiment. This really gives you some variety AND you could use it like this on a standard A2 card as well. The finishing touch of this card is the Diamond Plaid Layering Stencil inked up with Sweet Mustard ink. I only inked up the edges since you can't see the middle. I layered the focal point on top using foam squares for dimension. I added some glitter AND Jewels for maximum shine! I finished the design off with just a hint of pink ink splatter for added detail!


My next card uses the new Incredibly Grateful stamp setIncredibly Grateful die and Incredibly Grateful Stencils to create a Christmas design! I think it's always fun to explore different possibilities with our floral sets to stretch their use! I had so much fun putting this holiday design together using a few of the different background stencils and this rectangle floral wreath.

Once again, I die cut the outer portion FIRST, placed the stamp in to the negative space to get it lined up just right. THEN, I added the die cut in the MISTI and did the stamping and stenciling. Once that was all done, I die cut the inner portion to create the frame. This step is optional and you don't HAVE to die cut the center if you don't want to. 

I used TWO of the new stencils together to really bring some added pattern and detail to this card. I used the Diagonal Stripe Stencil on the outer Slim Ornate Banner Die and the new Diamond Motif Stencil on the middle panel. I love the hint of detail it adds beneath the die cut and ink blended letters. I added some glitter to the tops of the letters for some snowy detail and shine!

I always love adding a heat embossed sentiment over the top of the words I create on my cards. For this card, I used one of the sentiments from the fabulous new Our Home to Yours stamp set embossed in silver.

I used the AMAZING new Layered Snowflakes Dies stacked together in three groupings for some added detail. I just love how they look stacked together. To achieve this look It was important for me to keep some of the center portions in tact to reduce visual distraction. I used foam squares on the back to keep the larger center pieces in tact. Of course, the snowflakes got a sprinkling of glitter and jewels as well. The frame has a hint of glitter and a few jewels to finish this design off! Don't forget to hop along to the other designers' blogs to see what they have to share! Thanks for fluttering by!


You are invited to the Inlinkz link party!

Click here to enter

Thursday, October 15, 2020

Ink to Paper October Release Day

It's the 15th and that means the Ink to Paper October Release will be available for purchase starting at 10 PM ET! There are so many fun products to help you make your holidays magical! I wanted to make a few more projects using one of my favorites from the release that I didn't get a chance to use that much. I used it on the tags for THIS project, but I wanted to use it again! It is called Ornament Greetings and I just love it!

I used a handful of other new products as well because they are just so much fun! I used the new Corner It: Holly and the new Home Door Decor as well! To begin these little packages, I die cut the Scallop Top Gift Bag twice for each box. One is made with Spring Moss cardstock and the other one is Simply Chartreuse. Just a note....you CANNOT get two cut from one piece of cardstock, so you'll want to make sure you have enough of each color before you start die cutting.

I stamped the Corner It: Holly vine image in the corner using Simply Chartreuse Ink for this box and with Ripe Avocado ink for the other box. I die cut the holly and berries and got them stamped as well. I wanted to have a lot of options so I stamped quite a few! I also stamped the "Wishing You a Joyous Christmas" sentiment, which is from the Corner It: Holly stamp set, in black. 

The ornaments and labels are die cut using the Ornament Greetings die set and then stamped using the coordinating stamp set. There are two sentiments and two different labels so I cut one of each so that I could use both of them! These tags are not actually attached to the ribbon, but just adhered below the bow using foam squares. I actually left the bottom of these boxes open (just lightly taped for photography purposes) so I can just fill them up through the bottom and the bows are all ready to go!

I tied them up with a ribbon and added the "faux" tag just below it with a foam square. I couldn't resist adding some glitter to the leaves and bows for some sparkle and shine! These will be perfect for small gifts or treats! I love having things like this on hand for Christmas gift giving!
I hope you've enjoyed the October release countdown! It's such a fun release! Thanks for fluttering by!


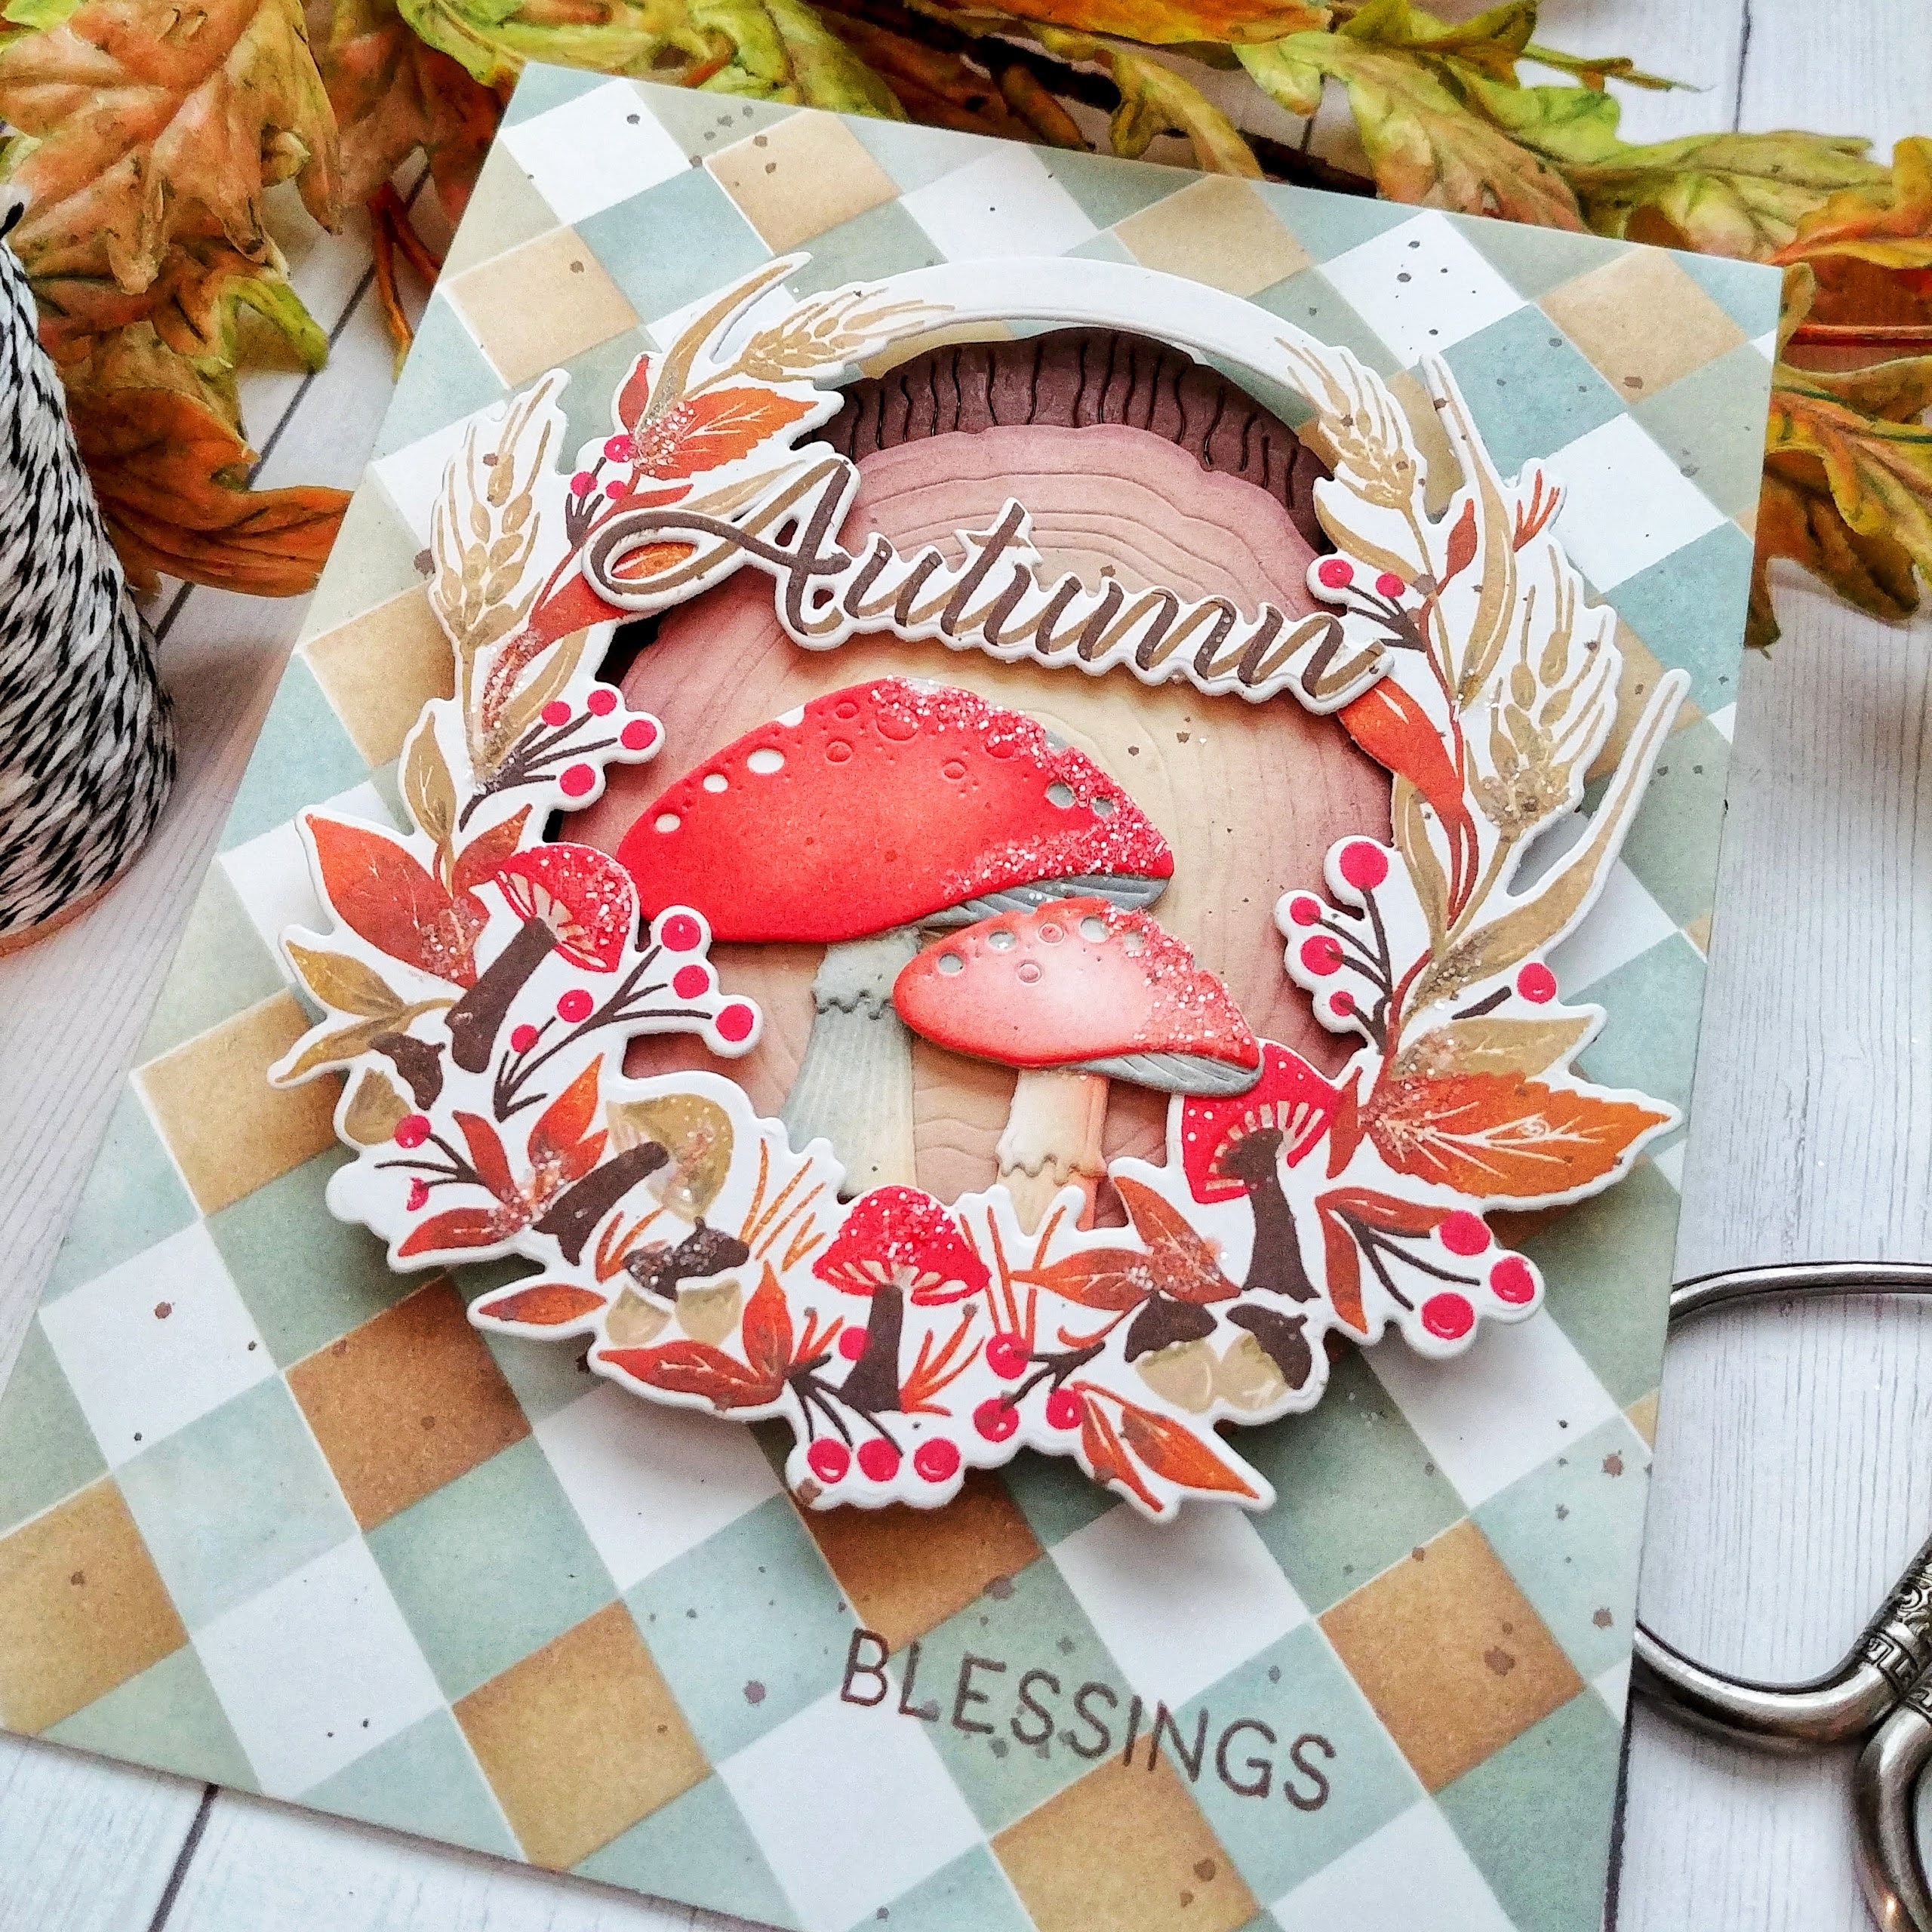
The Greetery {Autumn Blessings}


I snuck a little time yesterday morning to do some autumn crafting! I just haven't gotten my fill and there are stamps sets and dies that have been calling my name! I turned on a Nat King Cole album, got comfy and had so much fun putting this card together!  Autumn is one of my favorite seasons and I haven't done nearly enough seasonal crafting!
I had an extra Wood Slice left over from the latest release and I really wanted to try using the BotaniCuts Toadstool Garden with it! I have also really been wanting to combine the toadstools with the Bountiful Wreath stamp set so it all just worked out so well! I was able to combine three things on my "to-make list" onto one card! 
To begin, I die cut the outer portion of the Bountiful Wreath using the Bountiful Wreath die. I did all of the stamping using an assortment of Distress Oxide inks in warm, autumn tones. Once the stamping was done, I die cut the inner portion of the wreath. I added a few extra details using colored pencils to a few of the different stamped images.

I layered it onto the Wood Slice using foam squares. The toadstools were leftovers from THIS card, so all I had to to was tuck them a little bit behind the bottom of the wreath and adhere them with foam squares. I added some Martha Stewart Crafts coarse crystal glitter to both the wreath and the toadstools.

die cut the "Autumn" word, which is from the Bittersweet Bouquet stamp set, and then stamped it using Distress Oxide inks. I added it above the toadstools using mini foam squares. 

I used the Square Dance Stencils on an A2 panel of white cardstock. I fell in love with this particular color combination that Betsy used when these stencils were released, so I wanted to recreate it for today's card. I accidentally turned the Stencil C upside down, so this isn't perfect (don't look too close) ha ha! This was my second attempt so I just went with it! I stamped the "blessings" portion of the sentiment at the bottom and then added the entire wood slice portion directly to the panel using a tape runner. I finished it off with just a touch of ink splatter for some added detail! This was such a fun card to create and I'm glad I snuck a little "me" time to put it together! Have your Merry Makings orders arrived yet? I'd love to hear what you're working on! Thanks for fluttering by!


Wednesday, October 14, 2020

Ink to Paper October Release Countdown Day 4

Well friends, today is the 4th and final day of the Ink to Paper October release countdown! I've got two projects to share with you today using some awesome new stamps/dies! Up first is this first card using a combination of a few new products; Folky Holiday Stamps/dies, Merry Alphabet Dies, Feathered Friends 5 die, and the new Just Sentiments: He is Born stamp set! 

To begin this card, I die cut all of the pieces for the bird and then used an assortment of Distress Oxide inks to bring him to life! I glued all the pieces together using liquid glue with a precision tip for ease.

I die cut the J,O, and Y letters using the Merry Alphabet dies and adhered them to a panel that is die cut using the previously released Border Bling: Joy Frame Die. This particular die pairs so nicely with the Folky Holiday images that I used to embellish the letter O. I perched the bird directly in the middle using foam squares. I absolutely adore these little birds and have so much fun adding them to my cards!

The sentiment is heat embossed in silver onto a strip of vellum and wrapped around the focal panel and secured in the back with tape. I added a few jewels to the centers of the snowflakes and one off to the side to create a triangle. The entire focal panel is layered onto a Weathervane card base using foam squares.

And now....a return to our regularly scheduled season! ha ha! I haven't made a fall card in forever, so it was so nice to sit down and ink up these beautiful leaves from the new Leaves in Fall stamp set. I used Distress Oxide Ink for both the leaves and the background. I've really been enjoying the changing leaves right outside my bedroom window and the blue sky with the orange leaves was my inspiration!

This card is VERY simple, but I think it's perfect for a masculine design. I added the branch using liquid glue and then adhered the leaves here and there using foam squares.

The sentiment, which is from the new Feathered Friends 5, is stamped using Walnut Stain Distress Oxide ink to keep it cohesive. I also added some Walnut Stain ink splatter for some added detail to this simple design. I added a trio of sparkling clear sequins for some sparkle and shine! All of these new products will go on sale tomorrow at 10 PM ET! Thanks for fluttering by!