Tuesday, July 17, 2018

Tuesday Ideas {Celebrate your day!}

I'm over on the Precious Remembrance Shop Blog today sharing this bright, citrus inspired card! This color combination just screams summer to me!

I've got all of the details over on the other blog, but I'll take a little bit of time to let you know which stamp sets I used, etc. The polka dot stripes and LOL are from the Little Things stamp set.

The jar and the remainder of the sentiments are from the Oh So Fun stamp set and it is one of my favorites!

I also added some Nuvo drops to the little splatter images which are from the Fall Colors stamp set and half of a Mini Yellow Doilie for some added detail! Thanks for fluttering by!

Monday, July 16, 2018

Reverse Confetti Stock Your Stash {Little Baby-Big Love}


 Hello, friends! I'm sharing some sweet baby cards today for the Reverse Confetti Stock Your Stash Challenge! Have you had a chance to play along this month? If you are need of some baby cards, this would be a perfect time to join us! Also, the winner will receive a $20 Reverse Confetti Gift Certificate! Honestly, I don't think I have a single baby card in my stash, so this is timely for me as well! I couldn't resist making two card for this challenge; one boy, one girl! I enjoyed creating these two different cards, but using some of the same stamps and sentiment.
I absolutely love this particular sentiment from the Lots To Say sentiment set. I thought it would be super cute paired with the sweet little whale from the Seaside stamp set. This is one of my favorite stamp sets of all time and the whale has been so versatile! I think it look so cute stamped in both the Piggy Bank ink as well as the Mist. I did add a dot of black ink in the whites of the whale's eye using a fine tip black marker. You can see this detail a little bit better on the close ups of each individual card.

I used a few of the new release goodies on this particular design! I'm in LOVE with the new Geo Panel Confetti Cuts. I die cut it 3 times and glued them together with liquid glue. I love how it looks stacked up like this;it reminds me of intricate wall molding. I layered that onto a rectangle of white cardstock and then mounted that onto a cute, neutral piece of pattern paper from the Pattern Play 6 by 6 pad. I did some zig zag machine stitching down the right side for some added detail. I usually always give handmade sewn gifts, so it is fun to include that into my cards as well. The sentiment for this card is heat embossed in silver onto a strip of vellum and secured to the back of the pattern paper using scotch tape.

I layered that onto an A2 cardbase using Piggy Bank cardstock. I almost kept this entire card neutral, but I just love the hint of pink around the edges and of course, that sweet pink whale!


You can see the shine of the embossed sentiment in this photo. I also wanted to add just a hint of femininity, so I stamped one of the floral images from the new Elegant Florals stamp set. I didn't use this particular image during the release, so I was excited to use it on this card. I stamped it in Stone Ink to match the pattern paper. I love how soft and sweet it looks added to the card.

The boy card was equally fun to make. It is simpler in design and details, but I think it is just perfect for a sweet baby boy. To begin, I used the Stitched Rays coverplate on a piece of Mist Cardstock. It gives is just a hint of detail around the edges that I just love. I used it on THIS card, too! I added a piece of pattern paper from the Warm Hearts 6 by 6 paper pad. I just love this particular pattern and thought it would work nicely for a baby card.

I used the Dashed Line Tag as the backdrop for the whale. I also added a few Nuvo drops for added detail. The tag is tied up with some hemp cord. I like the extra nautical detail it gives this design. It actually looks like rope when you see it close up.


The sentiment for this card is heat embossed in silver as well, but this time I used a piece of white cardstock. I adhered it to a slightly larger piece as well and then added some machine stitching. I mentioned on the girl card that I like to make handmade sewn gifts, so that extra detail always ties in nicely. I'm so excited to have 2 new cards for my stash! I hope you'll join us! Thanks for fluttering by!

Saturday, July 14, 2018

Papertrey Ink July Release Day 5

Hello and welcome to Day 5 of the Papertrey Ink July Release! I'm so excited to be here sharing some of the AMAZING new stamps and dies for this month's release! I'm giddy, if you must actually know, because these are ALL products that I know I will be using AGAIN and AGAIN and I know you will fall in love with them, too! Today I am showcasing one new stamp set and a new set of scallop dies. I have also worked in a few other new goodies that I will talk about in my post as well.

Let's dive right in so that I can tell you all about the amazing new  "Scallop Stackers"! Now, the name should have tipped me off that these dies could be cut apart, but if you'll notice in the new release teaser video, I hadn't cut them apart! Thank heavens Dawn clued me in {LOL!} so that I could properly showcase them for you today! These dies come in a set of two, but when cut apart, they make a set of 4....a larger set and a smaller, more intricate set. I love the look of both and I will show you the smaller set further down.

To begin, I die cut the two pieces of the larger scallop set using Fresh Snow Linen Cardstock. If you haven't used this cardstock yet, I beg of you to run and purchase some now! It is beautiful and amazing! It gives just a whisper of detail that really steps up a design like this! Of course it is hard to tell in these photos, but in real life it gives it that sophisticated elegance that we all hope to add to our designs! I also used the new Pierced Feature Frames in ALL of my samples today because they work SO WELL paired with the Scallop Stackers.

I stamped the flowers from the Orchid Expressions stamp set that was featured yesterday. I love that you can use the flowers alone, or with that amazing pot. For this card, I just chose to use the flowers.  This particular image is a 3 step image and I stamped it in Winter Wisteria InkPlum Pudding Ink, and Royal Velvet Ink. The stem is stamped in brown.

I also used the new Shape Shifters: Square 2 as the mat for the flowers and the sentiment, which is from one of today's featured stamps "Botanical Bounty Sentiments". I was thrilled when I saw that there would be a sentiment set to highlight the style of the flowers in the Botanical Bounty sets. I also LOVE that they have coordinating dies. I like adding sentiments OVER my focal images and I get sick of sentiment strips, so the die cuts are a big game changer for me and make the set WAY more desirable! I thought the font accented the orchids nicely as well. 

For this pair of cards, I used the Botanical Bounty II stamp set so that you could see just how nicely the sentiments complement the flowers! Of course, I'm also showing you BOTH sets of the new Scallop Stackers in this set of cards. I just love them!

Once again, I used the Fresh Snow Linen Cardstock, but you can see how nicely it looks with the yellow ink blended around the scallops. This really lets that subtle pattern shine! You can also see why I love having the coordinating die cuts for the sentiments. I couldn't achieve this type of a look without the die cuts. Each one is embossed in gold and then added using foam squares.


In this photo, you can see how well the  Pierced Feature Frames work with the Scallop Stackers. I also added a few sequins here and there!

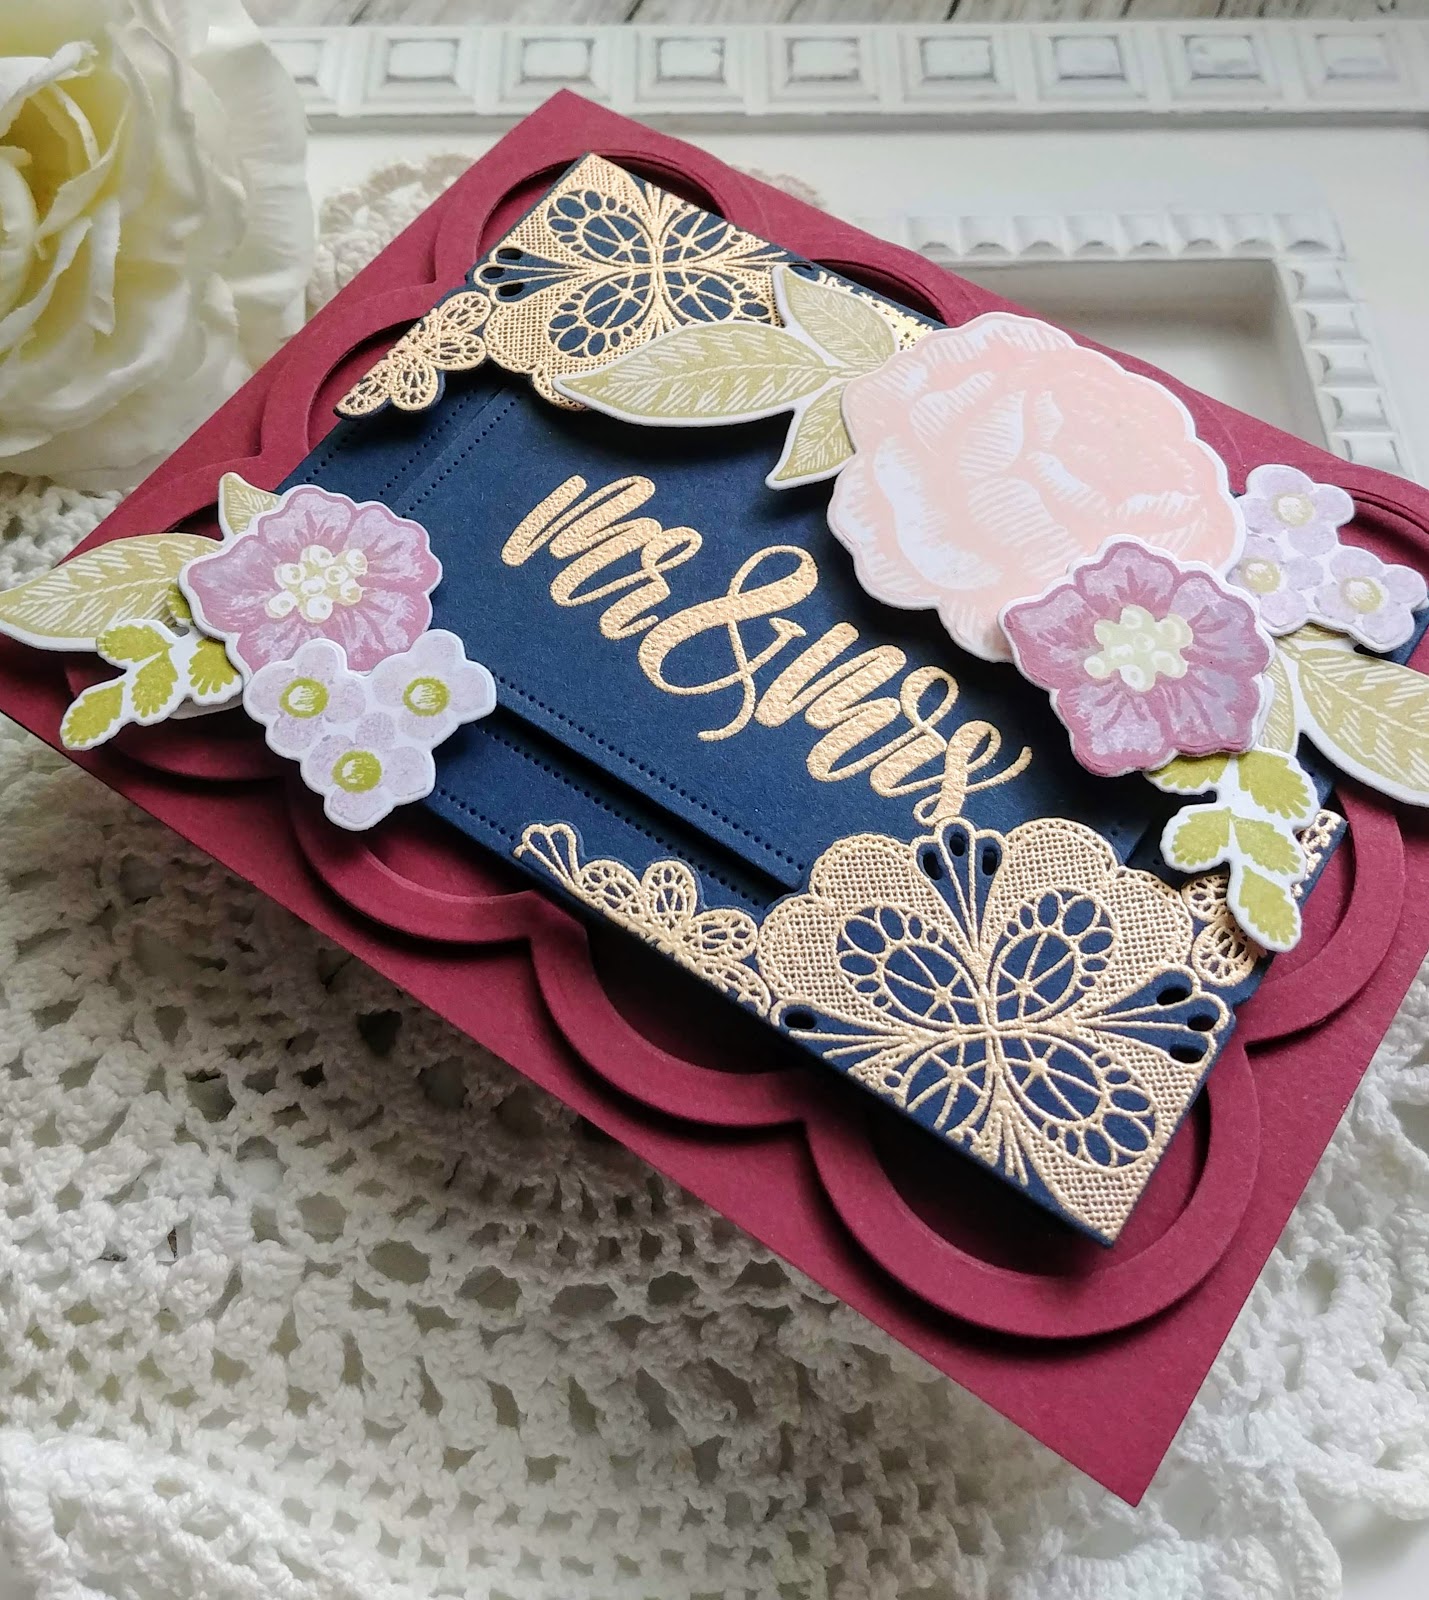
Okay friends, I saved my favorite for the very end. Last month, MY favorite didn't seem to be everyone else's favorite, but that's just how things go, right? Well...this particular card was inspired by all of the MANY Navy and Burgundy wedding photos that keep popping up in my Pinterest feed. They are PURE EYE CANDY and I was so happy to incorporate that inspiration into this design. That BEAUTIFUL Mr & Mrs stamp, which is from the "Botanical Bounty Sentiments" set really made my heart go pitter patter. Who needs an entire wedding set when you have something as bold and gorgeous as this?....and heat embossed in Rose Gold embossing powder? forget about it! LOL! I just adore how it looks against the Dark Indigo Cardstock

My heart just about skipped a beat when I saw how AMAZING the new Corner Adorner for July looks embossed as well! I love, love, LOVE how it looks paired with the "Mr & Mrs". As I mentioned before, I used the Pierced Feature Frames....again! LOL!  You can really see how nicely the "Scallop Stackers" look tone on tone. I used Scarlet Jewel cardstock for the base as well as the scallops. 

I loved the colors that were in the bouquets for the Navy and Burgundy weddings, so I tried my best to recreate the look. The flowers are from the Stitching Garden stamp set and I stamped them and then used the coordinating Stitching Garden Dies.


I had so much fun arranging the flowers. I just love how nicely they look with the lacy Corner Adorner! I had so much fun on all of these projects! Everything will be available for purchase on the 15th!  Thanks for fluttering by!


Friday, July 13, 2018

SugarPea Designs Sweet 2 Repeat Blog Hop


I always love the SugarPea Designs Sweet2Repeat Blog Hop because it means I get to use lots of the newly released products that I have fallen in love with! I felt like I haven't given this sweet Llama Just Say stamp set enough love, so I chose to use it on 2 cards today! Also, don't forget to see what fabulous inspiration the rest of the team is sharing!

Not gonna lie....my mojo is missing....like gone, gone, gone! I hope it returns soon because I have a lot of things I need to get done! LOL!  I often find that when I take a vacation it is REALLY hard for me to get back in the creative groove. I need constant creative time or my mind turns to mush! That being said, the "desert" card is an idea that I had when I made my card for last month's Mix it Up Challenge that you can see HERE. I loved how that card turned out, but my original idea was to have it be a scene with cacti and perhaps a llama as well.

I think I mentioned during the release that this Llama set reminds me of paper dolls because there are so many fun accessories for these cuties. I chose to use the stack of birthday gifts and the pot of cacti for this particular card.

To begin, I die cut all of the rainbow rectangles using the Zig Zag Stitched Rectangles, starting with blue and working my way towards the center with red. I thought this would be a fun backdrop to showcase the llama. The images are stamped in black and then colored using Copic markers and then die cut using the Llama just Say sugarcuts. They are added to the card using foam squares. The sentiment, which is included in the llama set, is heat embossed in white onto a black sentiment strip. I added some gold Nuvo drops to each of the "bells" around the llama's neck for some added detail. I also used a white gel pen to add some additional details to the cacti.

For this next card, I had originally only planned on having the cacti here and there, but it seemed empty. I cut and colored this little "lady" llama and got her all ready to perch in the sand. I quickly googled "can you find llamas in the desert?" to which I found a big fat NO....No...they are not found in the desert! Did that stop me? Nope! She can do what she darn well pleases! Am I right? LOL! So....here she sits perched just as pleased as can be!

The sand dunes were created by using the Card Front Element Builder and then blended using Linen Distress Oxide ink. I also added some Vintage Photo Distress ink to the tops of the dunes for some variation. The cacti are from the Stuck on You set and are stamped in two green inks and then die cut using the coordinating Stuck on You SugarCuts. I also made a blazing hot sun using the Zig Zag Stitched Circles blended with Wild Honey Distress Oxide ink. The background was spritzed with water and shimmer spray before I added the stamped pieces. The sentiment that says "Ill never desert you" is also from the Stuck on You stamp set and was the inspiration for the entire design. It is heat embossed in gold onto an Aqua sentiment strip. I hope you get a chance to hop along to the rest of the stops and thanks for fluttering by!


Sunday, July 8, 2018

Traveler's Journal:Passport {Happy Memories}

***If you're here for the Reverse Confetti Blog Hop, please scroll down****
I'm so excited to be back today sharing my newest project with 
the Papertrey Ink Traveler's Journal team! Heather has outdone herself once again with this AMAZING new Passport size Traveler's Journal cover and coordinating page inserts! This month the team is focusing on adding ephemra to our journals and this size is the perfect fit for the things I wanted to include in my booklet! 

The cover die also comes with so MANY amazing word and embellishments dies that you will just fall right in love with! I had so much fun using them to create my journal! I used the "happy" and "memories" words that are included on my front cover! I don't think it's any surprise that I created this to document our recent trip to Disneyland!
I chose to use the small dot print from the Soft Stone Bitty Big Pattern paper as the backdrop for all of the fun embellishments. To begin, I die cut the word "happy" four times out of Aqua Mist cardstock. I glued them together and then added crystal glaze and chunky glitter to the top. For the "memories" word, I actually die cut it, but left it in the positive space and secured it on the back with scotch tape. The "right Now" image is from the Currently stamp set as well as the fun little typed words on the white strip. The Mickey silhouette is just circle punches and then I stamped the word remember on it using Fresh Snow ink. The silver diagonal striped image that I embossed in silver is from the Adventure stamp set.


I also wanted to create some paperclip embellishments to use in my journal. Minnie's red polka dot bow is iconic and the vintage Mickey images always have buttons on his pants, so I thought these would be great details to add to the clips. I used Pure Poppy Swiss Dot ribbonPure Poppy Stitched ribbon, and Aqua Mist stitched ribbon. I used True Black and Pure Poppy Buttons. Everything is just simply hot glued to the two sizes of clips.

As I mentioned earlier, this month is all about adding and preserving ephemra in our journals this month. I just love adding ephemra because it can help you with your color combinations, it can add graphic details, and can also include important information pertaining to the event, like dates and times!

I was thrilled to find that I had kept a crumpled receipt {which adds to the charm} from the Disneyland Tiki Bar where I purchased two of the famous Dole Whips! Don't you just love a Dole Whip? They are amazing! Anyway, it turned out to be such a cute detail for my journal...it has the "Disney" script, the date, the location, the price and what I bought. The "LOVE" and "This", and hearts and arrow are all included in the Passport journal cover die set as well. 

It's such a silly little thing, but such a cute detail to add in this particular journal! I also added  one of the bow clips to the side and some more of the words from the "Currently" set.

I also had to sneak in a sweet picture of my three youngest kiddos. I printed all of the pictures for this journal in the wallet size so they would fit nicely!

I was BEYOND happy that my husband had saved all of the park hopper passes! They are perfect pieces of ephemra to decorate this journal! I used more of the awesome dies included in the new die set. I used the front of my park hopper with Mickey, Goofy, and Mickey and then used the back of my oldest son's ticket to show some extra detail!

I took all of my color cues from the photos I took as well as these tickets. I eliminated a lot of yellow and added in the Aqua for a fresh and unexpected look.

Thanks for joining me today! I had so much fun getting started on this journal of such a special trip! There's nothing as magical as Disney! Thanks for fluttering by!

Reverse Confetti New Release Blog Hop

Hello friends! Today is the new release Blog Hop for Reverse Confetti! All of the amazing new products are now available!!! There's lots of fun stops along the way, so you definitely will want to visit each blog!

Reverse Confetti blog

Amy Kolling

Ali Farmer

Melissa Phillips

Amy Sheffer

Tricia Barber 

Kelly Lunceford

Lisa Henke

Amy Rohl

Laurie Schmidlin

Heather Hoffman


I fell in love with all of the sentiments from the new set called The Most Beauty and decided that it would be fun to create a set of tags using each one of the sentiments. I'm utilizing tags more and more lately as I need to package up quick gifts or treats! I also used lots of patterns from the new Cue the Confetti paper pad! I just love how bright and cheery they are!


I heat embossed all of the sentiments onto squares of Midnight Cardstock using gold powder. I just love how the metallic sheen looks against the dark cardstock! I normally don't make tags on the diagonal, so these are kindof fun and out of the norm for me!

I stamped and die cut a bunch of the flowers from the new Elegant Florals stamp set and used them to frame the sentiments. I actually made all of these when I made my two cards for the first day of the new release sneak peeks because it was just so much fun to see how all of the sentiments looked stamped out. This is definitely one of those must-have sets!


I also added a few gems here and there for some added sparkle! Super quick and easy, but these will definitely come in handy to dress up cute packages! Thanks for fluttering by!