Friday, June 15, 2018

SugarPea Designs Summer Release Day 5: You've been missed!

Well...it's Day 5 of the SugarPea Designs Summer Release! Are you as excited as I am about all of the new products? My card for today was so much fun to make, but before I get into that, don't forget to head over to the SugarPea Designs Blog to check out the other designer's creations! Also, the new  Welcome SugarCut will be part of the Sweet Incentive Program for this release. I have used it further down on my post.

Place an order* of $60 or more (excluding discounts and shipping) and you will receive SugarCut - Welcome die, FREE WHILE SUPPLIES LAST!!
*This Sweet Incentive promotion begins Friday, June 15th at 6 PM EST. This promotion will not be applied to any orders placed prior to and only while supplies last. It is not necessary to add the Sweet Incentive promotional item to your cart or enter a coupon code, it will be automatically included on all qualifying orders! Click HERE for more details.


I had my design in my head and hoped that it would translate onto paper. I used the Around Town SugarCuts to cut out each house/building in a rainbow of colors. The roofs were all cut out of grey cardstock for continuity. 


I die cut six Zig Zag Stitched Circles and added the houses using foam squares. Before I attached the blue building, I added the "You've been missed" sentiment that is from the Warm Welcome stamp set. It was the only one that didn't absolutely require the word "welcome" to go with it. I wanted to save that for the inside. It is heat embossed in white onto a strip of black cardstock. Once that was done, I could add the blue building.


I die cut the trees and trunks and added them to the card. I made the tops of the smaller trees into bushes here and there as well. I made red Nuvo Drop apples because I just couldn't help myself! LOL! I used the Card Front Element Builders AGAIN ! LOL! I just can't get enough! I just really like the added detail they give to my designs. It can take a simple card and bring it up a notch.


Here is the "welcome" die that is the Sweet Incentive for this release! I just love how it looks paired with the sentiment on the inside.You can begin shopping tonight at 6! Yipee! Thanks for fluttering by!

Thursday, June 14, 2018

Introducing Bold Borders: Waves & Sentiment Staples: Sending You

Hello Friends, new and old! Welcome! It's so good to have you stop by! I'm so happy to be here today sharing some designs using some of the fabulous NEW products for the June Papertrey Ink release! It has been so fun putting my thinking cap on and trying to show you some versatile ways to use the new products that I will be sharing today! Remember, you can read about and see all of the details about each product on the Papertrey Ink Blog. The best way to find this is to find today's post on their blog, find the wording in blue that says "click here for further product details". I will provide links to any products that I have used today that are not part of the new release that I have included in my designs. They will all be highlighted in red. Also, all new release products will be available for purchase starting June 15 @ 10 pm EST.

I wanted to save this card for last because it's one of my favorites, but then I just couldn't resist showing it first because it is so bright and cheery! This is one of those designs that I had rolling around in my head and I couldn't wait to set it free on paper! That being said, this was attempt number 2 because sometimes my mind's eye doesn't take every little detail into consideration! LOL! I will share those little foibles here and there as I share my design process with you! To begin, I knew that I wanted to try splitting the new Bold Borders: Waves die cut into two pieces on a diagonal like this. I was lucky to find that I did indeed only need ONE frame. However, I did layer it 3 times for a nice sturdy piece. I did a lot of ink blending and I wanted to make sure it would withstand all of that motion and I also just love how it looks stacked up!


The inspiration for this card came two fold; I love how the "waves" on this border also look like rainbows. I also love the "sending you sunshine" sentiment that is included in the new Sentiment Staples: Sending You.  I knew that these two ideas could create something fun and colorful. I used a sponge to blend in all of the colors; Pure PoppyOrange ZestHarvest GoldGreen ParakeetHawaiian Shores and whatever was left on my blue sponge! LOL! There is a darker shade of a Navy of some kind!  Ha Ha! Once all of the blending was done, I spritzed it with some water and some shimmer spray.

Next, I got to work laying out the card elements. My MISTI was a must-have tool for this design! The first step was to decide which angle to place the blue/purple portion of the frame. Once I had it at the angle that I liked, I put it into my MISTI so that I could get the sun stamped in just the right place. This particular sun is from one of my ALL-TIME favorite kits; Make It Market: Shakers and Sprinkles. This is one of those kits that I hit refresh about a bajillion times so I could get it! LOL~! I haven't used it nearly enough, but the sun was the absolute perfect image in every way shape and form for this card! Once it was placed in the MISTI, I stamped it multiple times to get a nicely saturated image. When you're on your second attempt, you can afford to make any mistakes! LOL!


At this point, I glued down the frame using liquid glue. I like using liquid glue for projects like this because I have a little "wiggle" room, so to speak! (pun intended) If the angle isn't just right, you can adjust it before it dries! At this point, I was able to center the "sending you" portion of the sentiment onto the card. Once again, I used my MISTI for proper alignment and a crisp image. This is where I went wrong on my first attempt. I just stamped the sentiment without realizing where the 2nd frame would be going and then it just looked really off. The second portion of the frame was askew and I just needed to start over. I made sure to leave enough room to add the black sentiment strip with the word 'sunshine" embossed in gold.


I repeated the same process for the second portion of the frame, making sure to line it up exactly with the first one. Yay! It worked! I repeated the same steps for the second part as I did with the first. If I made this card for a third time (LOL!) I might take into consideration the placement of the colors. I did them in rainbow order starting at the bottom and working my way up, not realizing how it would turn out when it was cut. I REALLY like how it turned out, so I'm not sure it would enhance or detract!

Once everything was in place, I added a little bit of sparkle with some rainbow gems scattered here and there. 

For my second design using the Bold Borders: Waves, I wanted something soft and feminine and that also included the word "celebrate" that is also included in the Border set of dies. I wanted to use it in a more special way, which I will share with you later on in the post. I also paired it with the Botanical Bounty II set that was featured on the BLOG yesterday. You can see the card that I made for yesterday's post HERE

To get started, I die cut a few of the borders and glued them together (surprise, surprise) and then adhered them to an A2 Stamper's Select White Cardstock base.

Once that was done, I got to work stamping all of the blooms and leaves. My color palette for today is Harvest GoldHibiscus BurstRaspberry Fizz and Pale Peony. The leaves are stamped in Ripe Avacodo and LImeade Ice


I also did some gold embossing for a few of the centers of the flowers for some extra texture and shine! I always have so much fun arranging flowers on my cards!

For the word "celebrate", I die cut it 3 times and then glued it together with liquid glue. Once that was dry, I pressed it into a Versamark inkpad and sprinkled it with gold powder and heat set it. I repeated this process a few times til it was smooth and melted with some nice dimension. It was easy to add it to the card by attaching it to the leaves with liquid glue. It didn't require any foam squares! Yay! I really like how adding the gold embossing powder to the die cut makes it feel a little more special and elegant! I added some black flecks here and there with my color spritzing tool for some added detail and interest. A trio of sequins finish off this design.

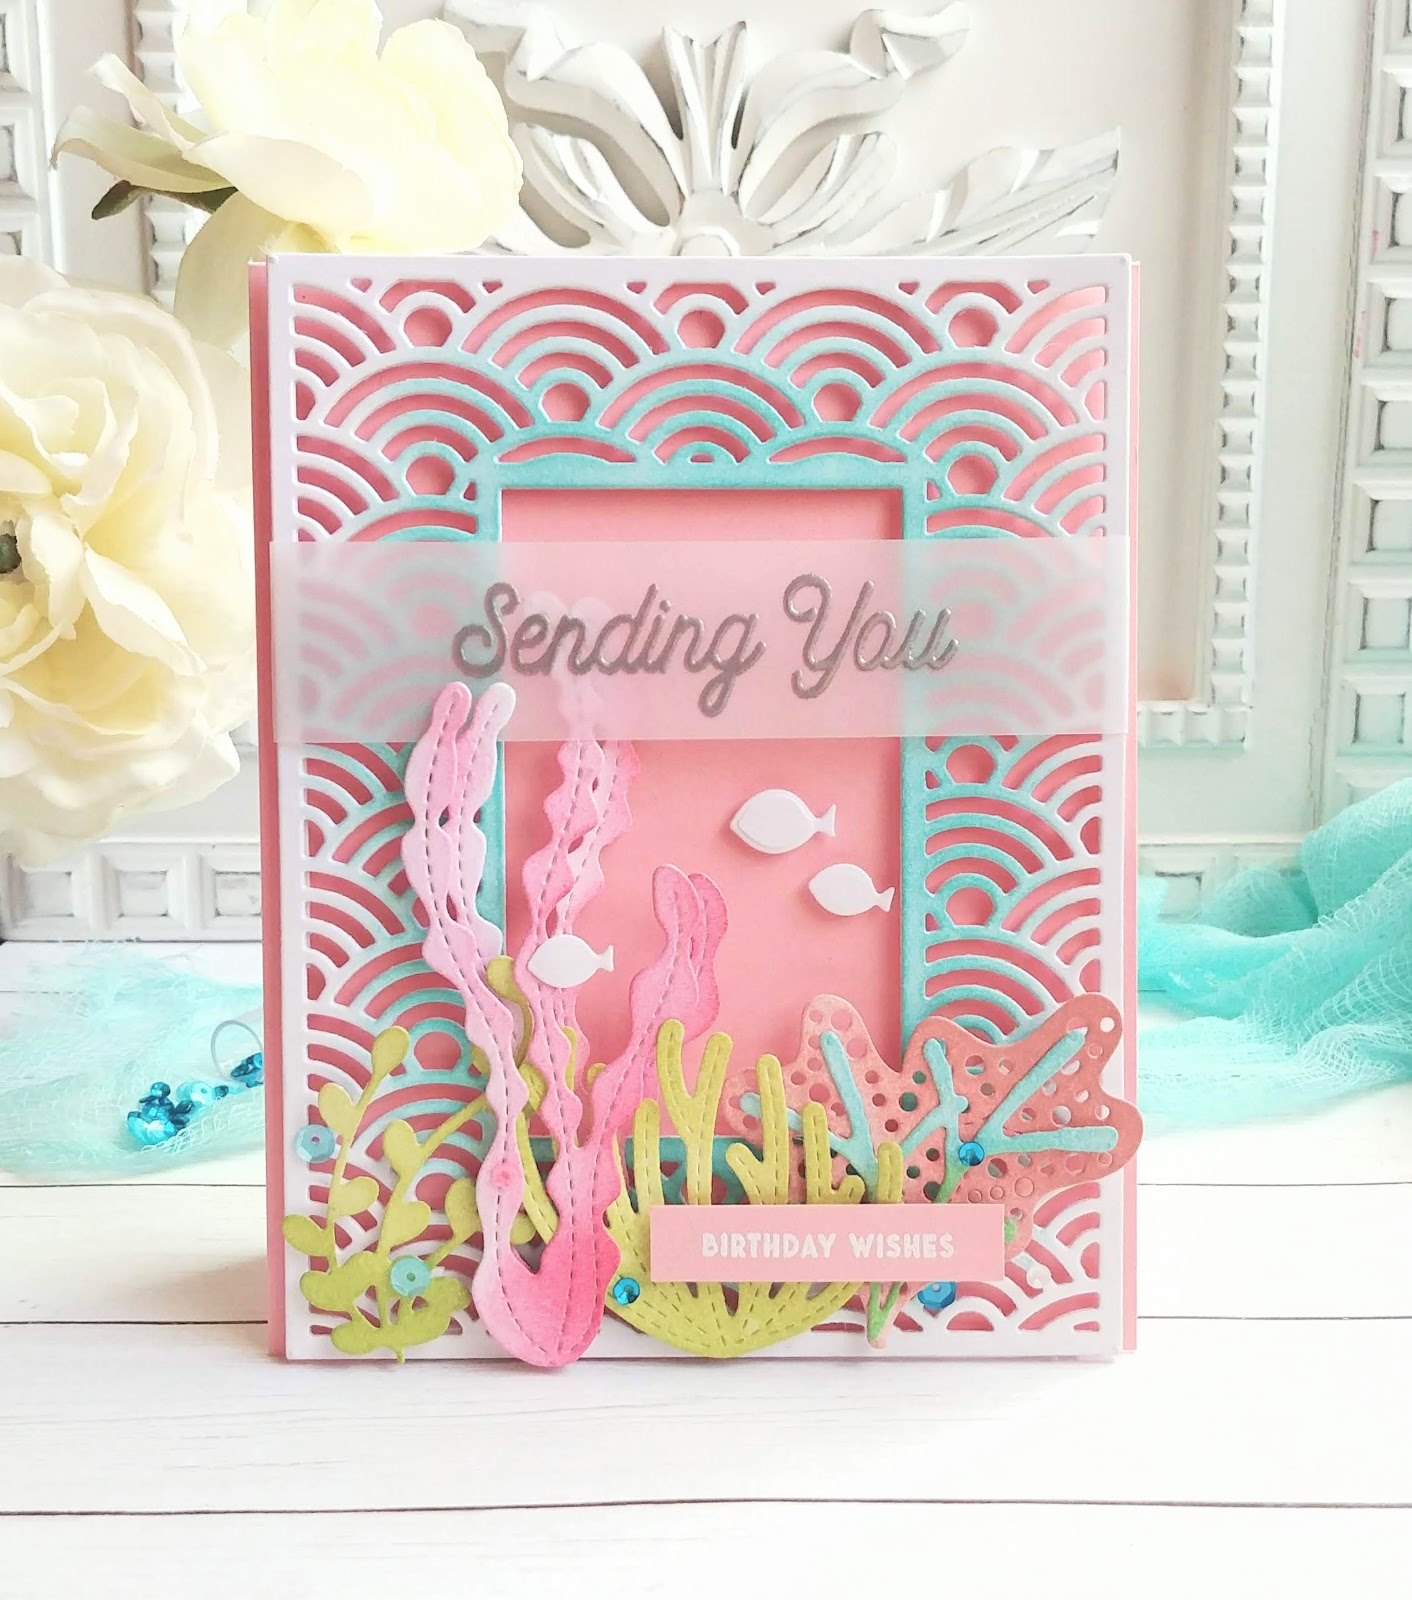
For my last design, I'm showcasing some of the amazing new die cuts that were featured on Day 2 of the June Release. I shared THIS card using them as well. The new Reef Builder Dies are a natural fit for this new Bold Borders: Wave die! You also probably saw a little sneak of this project on the sneak peek video and Instagram post! It was SO MUCH FUN to make!

To begin, I did some ink blending around the center of the frame using Hawaiian Shores ink. I also die cut all of the pieces from the Reef Builder Dies and got to work sponging some ink onto them. I just love how easy it is to customize all of the pieces by adding ink in various shades!


Surprisingly enough, I kept the trio of fish white. I really like how stark they look against all of the colorful Flora! I toyed around with different colors, but in the end, white won out! Who woulda thunk? I also heat embossed the "Birthday wishes" sentiment in white onto a piece of Sweet Blush cardstock

I had so much fun arranging the seaweed and coral here and there. I also added a few different sprinkles from the Make It Market: Shakers and Sprinkles kit . It just gives that extra bit of ocean charm. It probably didn't help that my 3 youngest boys keep watching a you tube video of  the crab from Moana singing "I'm so SHINY!" LOL! 


I heat embossed the "sending you" sentiment onto a strip of vellum and attached it around the back of the border. This is also from the Sentiment Staples: Sending You". I can tell this one will get a lot of use! Once that was done, I was able to attach the frame using thin strips of foam tape to an A2 Sweet Blush card base! 
That concludes today's post, but I hope you'll stop by after the release where I will be sharing lots of inspiration using even more of the new goodies! Thanks for fluttering by!


SugarPea Designs Summer Release Day 4: Believe in your Dreams!

It's Day 4 of the SugarPea Designs Summer Release and I'm so excited to share what I have been up to! I don't think I can pick a favorite, but this card is up there! I had SO MUCH fun making it! The team is showcasing two new stamp sets and dies today, so make sure you head to the SugarPea Designs blog to see what they have created. These products are so versatile and you will see that in the way that each designer chose to showcase them.


For my card, I wanted something soft and dreamy (no pun intended)...well, maybe it was! LOL!  To begin, I blended some soft Distress Oxide inks onto a 41/4 by 5 1/2 inch piece of cardstock. Once that was done, I spritzed it with water and some Shimmer Spray. I set it aside to dry and got to work on the other elements I used in this design. I die cut the word "dreams" 4 times out of white cardstock using the new Dreams SugarCut. I glued it together and then smooshed it into my Versamark ink pad for full coverage. I covered it with gold embossing powder and heat set it until it was smooth and melted. I LOVE how it turned out.

The feathers are stamped and heat set using gold powder onto some vellum cardstock for durability. I die cute them using the Feathers SugarCut.  They are bundled together using foam squares and then tied with twine. I was inspired by the dream catcher image from the new Dare To Dream set and thought it would be fun to create my own using some of the other new products. I dry embossed the new Geometric Floral Coverplate onto a white circle that had been die cut using the Zig Zag Stitched Circles.  I told you I would be using the new coverplate alot! LOL!

I blended the circle using the same colors that I used on the background for a seamless look. I didn't actually know which direction this design was headed in when I started, but it was easy to recreate the blending onto the circle. I attached the bundled feathers using foam squares for some dimension.

I didn't use the Diagonal Striped Coverplate when it was released, but I have been using it quite a bit lately to make up for lost time! Ha Ha! I die cut it out of vellum cardstock and added it over the top of the blended panel. I noticed that it looks like grey paper in the photos, but it is much more ethereal looking in real life.

I attached the word dreams to the faux dream catcher as well as the gold embossed sentiment that says "believe in your" which is from the Dare to Dream stamp set. I love how nicely these all work together. The finishing touch is a few rhinestone gems here and there for some sparkle. I love how they look when they pick up the light from the colors used in the card! Thanks for fluttering by!

Wednesday, June 13, 2018

Papertrey Ink June Release: Day 4


Hello! Welcome to Day 4 of the Papertrey Ink June release! Today the team is showcasing the new set called Botanical Bounty II. This is a second edition to the previously released Botanical Bounty stamp set. I wanted to showcase the Shape Shifters: Oval 2 die cut that I shared with you on Monday. I think it is so versatile and complements these flowers so perfectly.

I have a color board on Pinterest with all sorts of color combinations. I have never used it before, but thought it would be fun to try something out of my norm for today's card. I like how it turned out. I did add in the Aqua Mist pattern paper which is from the Chicken Scratch Gingham paper. I haven't used it in a while, but I thought it looked nice and added an extra element of interest to my design.

I used quite an assortment of inks on my card and I love how they look with all of the different textures of the leaves. The sentiment is from the new How are you today? stamp set! I love the font and know I'll be using this one a lot! It is heat embossed in white onto the Prairie Grass oval. I didn't use the center piece on the oval so that I would have a solid place to arrange all of the flowers.


I used the coordinating Botanical Bounty II die cuts and got to work arranging them here and there! This is one of those classic, to the point cards, but I felt like it showcased these new products nicely. Thanks for fluttering by!


SugarPea Designs Summer Release Day 3: Good Vibes Only

Welcome back, friends! I hope you're as excited about this new release from SugarPea Designs as I am! Which set is your favorite so far? I don't think I can pick! If you stopped by yesterday, then you KNOW how much I am loving the new Stuck On You set! If you missed it, you can scroll down! I got a little carried away! LOL! As promised, I used it AGAIN today! I just couldn't resist pairing it with today's featured die cut! Don't forget to stop by the SugarPea Designs Blog to see what the other designers have come up with!

I was so thrilled when I saw the new Message Letter Board SugarCut! Isn't is so cute and clever? These boards are ALL THE RAGE and I am so happy to be able to make different' projects using these. You probably know why I had to use the cacti, too! I swear you don't see a picture of a message board without it having a cactus nearby! LOL!

I was unsure how the die cut would work on felt, but it was PERFECT and I was so thrilled with the result. I decided to go with a gray felt and a brown frame. As you can see, I matted it against the Geometric Floral Coverplate, which has been die cut using black paper. I used it twice yesterday embossed, but I wanted to show you how it looks die cut....not that very much is showing! LOL! I just loved the subtle modern detail it gave the card. 

The letters were die cut using the included letter dies. I made sure I got the spacing right before I glued them down with liquid glue. I was worried that they wouldn't look very good if I didn't glue a few on top of each other, but I was very impressed with the single layer. 

The cacti and succulents were added foam squares. Everything is matted onto a white card base. I also wanted to show you another super fun set that is being showcased today. I made a card with it, but have decided not to share it because I don't feel like my coloring does it justice. I will leave that mind-blowing coloring to the experts. However, I do want to share the images and links  for you. 
This sweet little set is called Hedge Hugs and will be available for release on Friday. It has a coordinating set of dies called Hedge Hug SugarCuts
Thanks for fluttering by, friends!