Saturday, August 26, 2023

Papertrey Ink August Release Countdown Day 2

Hello and welcome to day 2 of the Papertrey Ink August release countdown! My first card for today features the cutest new leaf set called Leave It To Me; it's a whimsical/mod stamp set that is so much fun! I've used it on the second card I'm featuring today and another card tomorrow! I also used the new Love to Layer: Leaves dies; these are perfect building blocks for a card like I'm sharing here, OR they can be used by themselves. They would be great for a sentiment, since they don't have any embossed or line details.

To begin this card, I die cut ALL of the leaves from the Leave It To Me die set twice and then stamped them using complimentary colors on the color wheel; purples and yellow tones with touches of brown for contrast. I also die cut the three sizes of the Love to Layer: Leaves and colored them with ink and a blender brush using the same ink colors as the stamped leaves.

I mentioned yesterday that I am smitten with the new Exquisite Leaf Frame Hot Foil Plate that was featured yesterday. I couldn't resist using it again today on this card. I used gold foil on Lilac Grace cardstock for that complimentary look again.

I'm sneaking a peek at the new Give Thanks sentiment set being showcased on day 4; I just couldn't resist using it for this autumn card. I stamped it in black onto a die cut oval from the It's A Sign: Hanging Frames Stitched dies and layered it over the leaves. You can also see how beautiful the foil looks glimmering at the top!

I layered the Lilac Grace panel onto a top-folding A2 Autumn Rose using liquid glue. 


My second card for today features the new Psalm Reflections: August stamp set. It does have a coordinating die set which die cuts a finial image that I didn't end up using. I'm sure the other designers may have used it, so you can see what it looks like! I paired it with the new Border Bling: Falling Leaves die. 

To begin my card, I die cut the frame twice and glued it together using liquid glue. I used my old SU! markers to color the individual leaves. I wanted to keep the remaining portion of the frame white, so I chose markers since they give me the control I was needing.

I die cut a rectangle from the Love to Layer: Rectangles die collection and stamped the Psalm verse in black.

I layered the Psalm panel and the frame on a 4 by 5 1/ 4 inch piece of Stormy Sea cardstock using foam squares. I also tucked some of the leftover leaves from my first card here and there for a fun addition.

I layered it onto a top-folding A2 Honey Nut cardbase using foam squares. I added some glitter to the leaves on the frame for some sparkle and shine! Join me tomorrow for some more autumn/Halloween inspiration! Thanks for fluttering by!


Friday, August 25, 2023

Papertrey Ink August Countdown Day 1

Welcome to day 1 of the Papertrey Ink August release countdown! Summer is winding down and hints of fall are in the air! I was lucky that we got a nice, rainy day with a bit of a chill in the air; my daughter put on Anne of Green Gables and I got busy working on my projects for today! It's easier to work on autumn projects when it actually feels like autumn! ha ha!

I have three cards to share with you today using the new Fresh Florals stamp/die set and the beautiful new Exquisite Leaf Frame Hot Foil Plate! I found that if I set my foil machine to the hottest setting and let it heat for 25 seconds, I got the best results. This particular frame reminds me a bit of a fancy book cover; I love the effect that it gives!

The new Fresh Florals are perfect to use year-round, but I love this particular sentiment that is included so I chose a muted autumn palette for this card. I stamped the sentiment on the circle die cut from the Love to Layer: Alluring Brackets dies and then layered over the medium die as well for a bigger impact! 

I clustered the leaves around the bottom and then arched over the top. The hotfoiling was done on a Spring Moss panel and then the entire thing is layered on an Olive Twist card base. I added some glitter here and there for some sparkle and shine.

For my second card using the Fresh Florals set, I chose to create a small cluster paired with the largest of the included sentiments to use as the focal point. I used the largest die from the Alluring Brackets (linked above) for the sentiment and floral cluster.

I don't think I will ever grow tired of the Border Bling: Scalloped Frame die; It accents these beautiful florals so nicely. I also added a hint of pattern by adding some Bitty Big: Spring Moss patterned paper behind the focal panel.

I layered everything on a top folding A2 white card base using liquid glue and foam squares.

The fun thing about the Fresh Florals stamp/die set is that there are quite a few little pieces so you can have fun making all kinds of different arrangements.

My final card using this set features the third sentiment; I was glad there is a sympathy sentiment included...I unfortunately need two sympathy cards this week, so this was made for someone in particular.

You can see the pretty shine of the hot foil in the upper right corner of this card....I think I will be reaching for this often! I always find that a card with hot foiling just looks so elegant, don't you think?

I love the gold on the Harvest Gold cardstock for a warm feeling....just what you need on a sympathy card.

I used quite a few of the sprigs and florals on this card, tucking things here and there until I was happy with the arrangement.

My final project for the day features the cutest new Frightful Frames dies and the new Spooky Treats Labels stamp/die set. I'm a sucker for easy treat ideas for Halloween and these are just the ticket! As soon as I saw the apothecary stamp I thought it would be fun to use these plastic tubes!

I can't wait for the Halloween candy to start hitting the shelves (or is it there and I don't know? ha ha) to fill up the tubes!

To begin, I die cut the two frames from black cardstock (there are four included in the collection) and then layered them onto the largest die cut from the Love to Layer: Alluring Brackets dies. I chose Winter Wisteria and Royal Velvet cardstock. I actually die cut two of each color; one for the front and one for the back. I layered them with both "right" sides up because you can see the one in back from the front and I wanted it to look good! ha ha!

I heat embossed the Spooky Treats Labels using silver embossing powder and then die cut them using the Spooky Treats labels dies.

I used a brad to secure the two pieces together as shown in this picture. It creates a sleeve that you can slide the tube down inside OR you can add the brad to one side, and then put the tub in between the two layers and then add the brad to the other side.

This was such a fun project and perfect for mass-producing! I bought these tubes a few years ago to put hot-cocoa in with the Build-a-Santa stamp set (some of you may remember) but I've had them waiting for another project!

Join me again tomorrow for day 2! Lot more fall and Halloween inspiration coming your way! Thanks for fluttering by!


Friday, August 11, 2023

The Greetery {Sew Grateful For You}


Hello friends! I'm happy to be here today sharing a fun card using products from the Handiwork Collection rom The Greetery! I’m currently obsessed with the Rose Tapestry Stencil so that was the starting point for today’s card. I’ve mentioned it before, but there is something so magical about watching a background come to life with layering stencils! I have a tendency to just stare at them mesmerized and tempted to just leave them as is! That being said, I don’t think Betsy would be very impressed if I just shared a stenciled panel! LOL!
I’m particularly smitten with the rose that’s almost in the center, so I chose to frame that particular rose using the Hoopla Round Die. I die cut the hoop from white and then colored it using a few brown Distress Oxide inks. The silver ‘hanger’ at the top is also die cut once from white cardstock and then one more time from silver cardstock for realism. I simply glued the two together for a sturdier piece and then glued it to the top of the hoop.
 I die cut the ‘sew’ word using the new Stitched Sentiments Die using black cardstock for contrast. I strategically glued it to the hoop using liquid glue and then added the hoop to the background using foam squares for dimension. I chose to accent the ‘sew’ word using the ‘grateful for you’ portion of the sentiment found in the Stitched Sentiments stamp set. I heat embossed it in white onto a black strip of cardstock for contrast.
I die cut and stamped flowers and leaves from the Floral Sampler stamp/die set using Distress Oxide inks.  I arranged them around the hoop and sentiment until I was happy with the arrangement.  I did use the French knot dies from the Embroidered Blooms Die to add to the centers of two of the flowers; it just gives it some variation and added detail. That’s what’s so great about this collection…. you can mix and match things to your heart’s content!
For those of you that saw my Rose Tapestry card for the release, I used the Aida Cloth Texture Plate over the top of the stenciled panel and I absolutely LOVED the texture and feel that it gave that card, but for today, I chose to leave it ‘as-is’ for something a little bit different.
I had so much fun creating this card to add to my thank you card stash; it is currently depleted after a round of thanking a few friends who helped me a few months ago. I love how unique this particular card is with all of its ‘sewing’ charm! I like having all different types of cards in my stash to have on hand for just the perfect time! Thanks for fluttering by!

Thursday, July 27, 2023

The Greetery Handiwork Collection Day #2

Hello and welcome back for day 2 of full reveals for the Handiwork Collection from The Greetery! I'm glad you're all loving this new release as much as I am...thank you for your sweet comments yesterday! The official "meet and greet" for today's featured products is HERE; you'll be able to see all of the details for each new product. Also, make sure to leave a comment here and on all of the designers' blogs for a chance to win one of two $50 gift certificates to the shop!
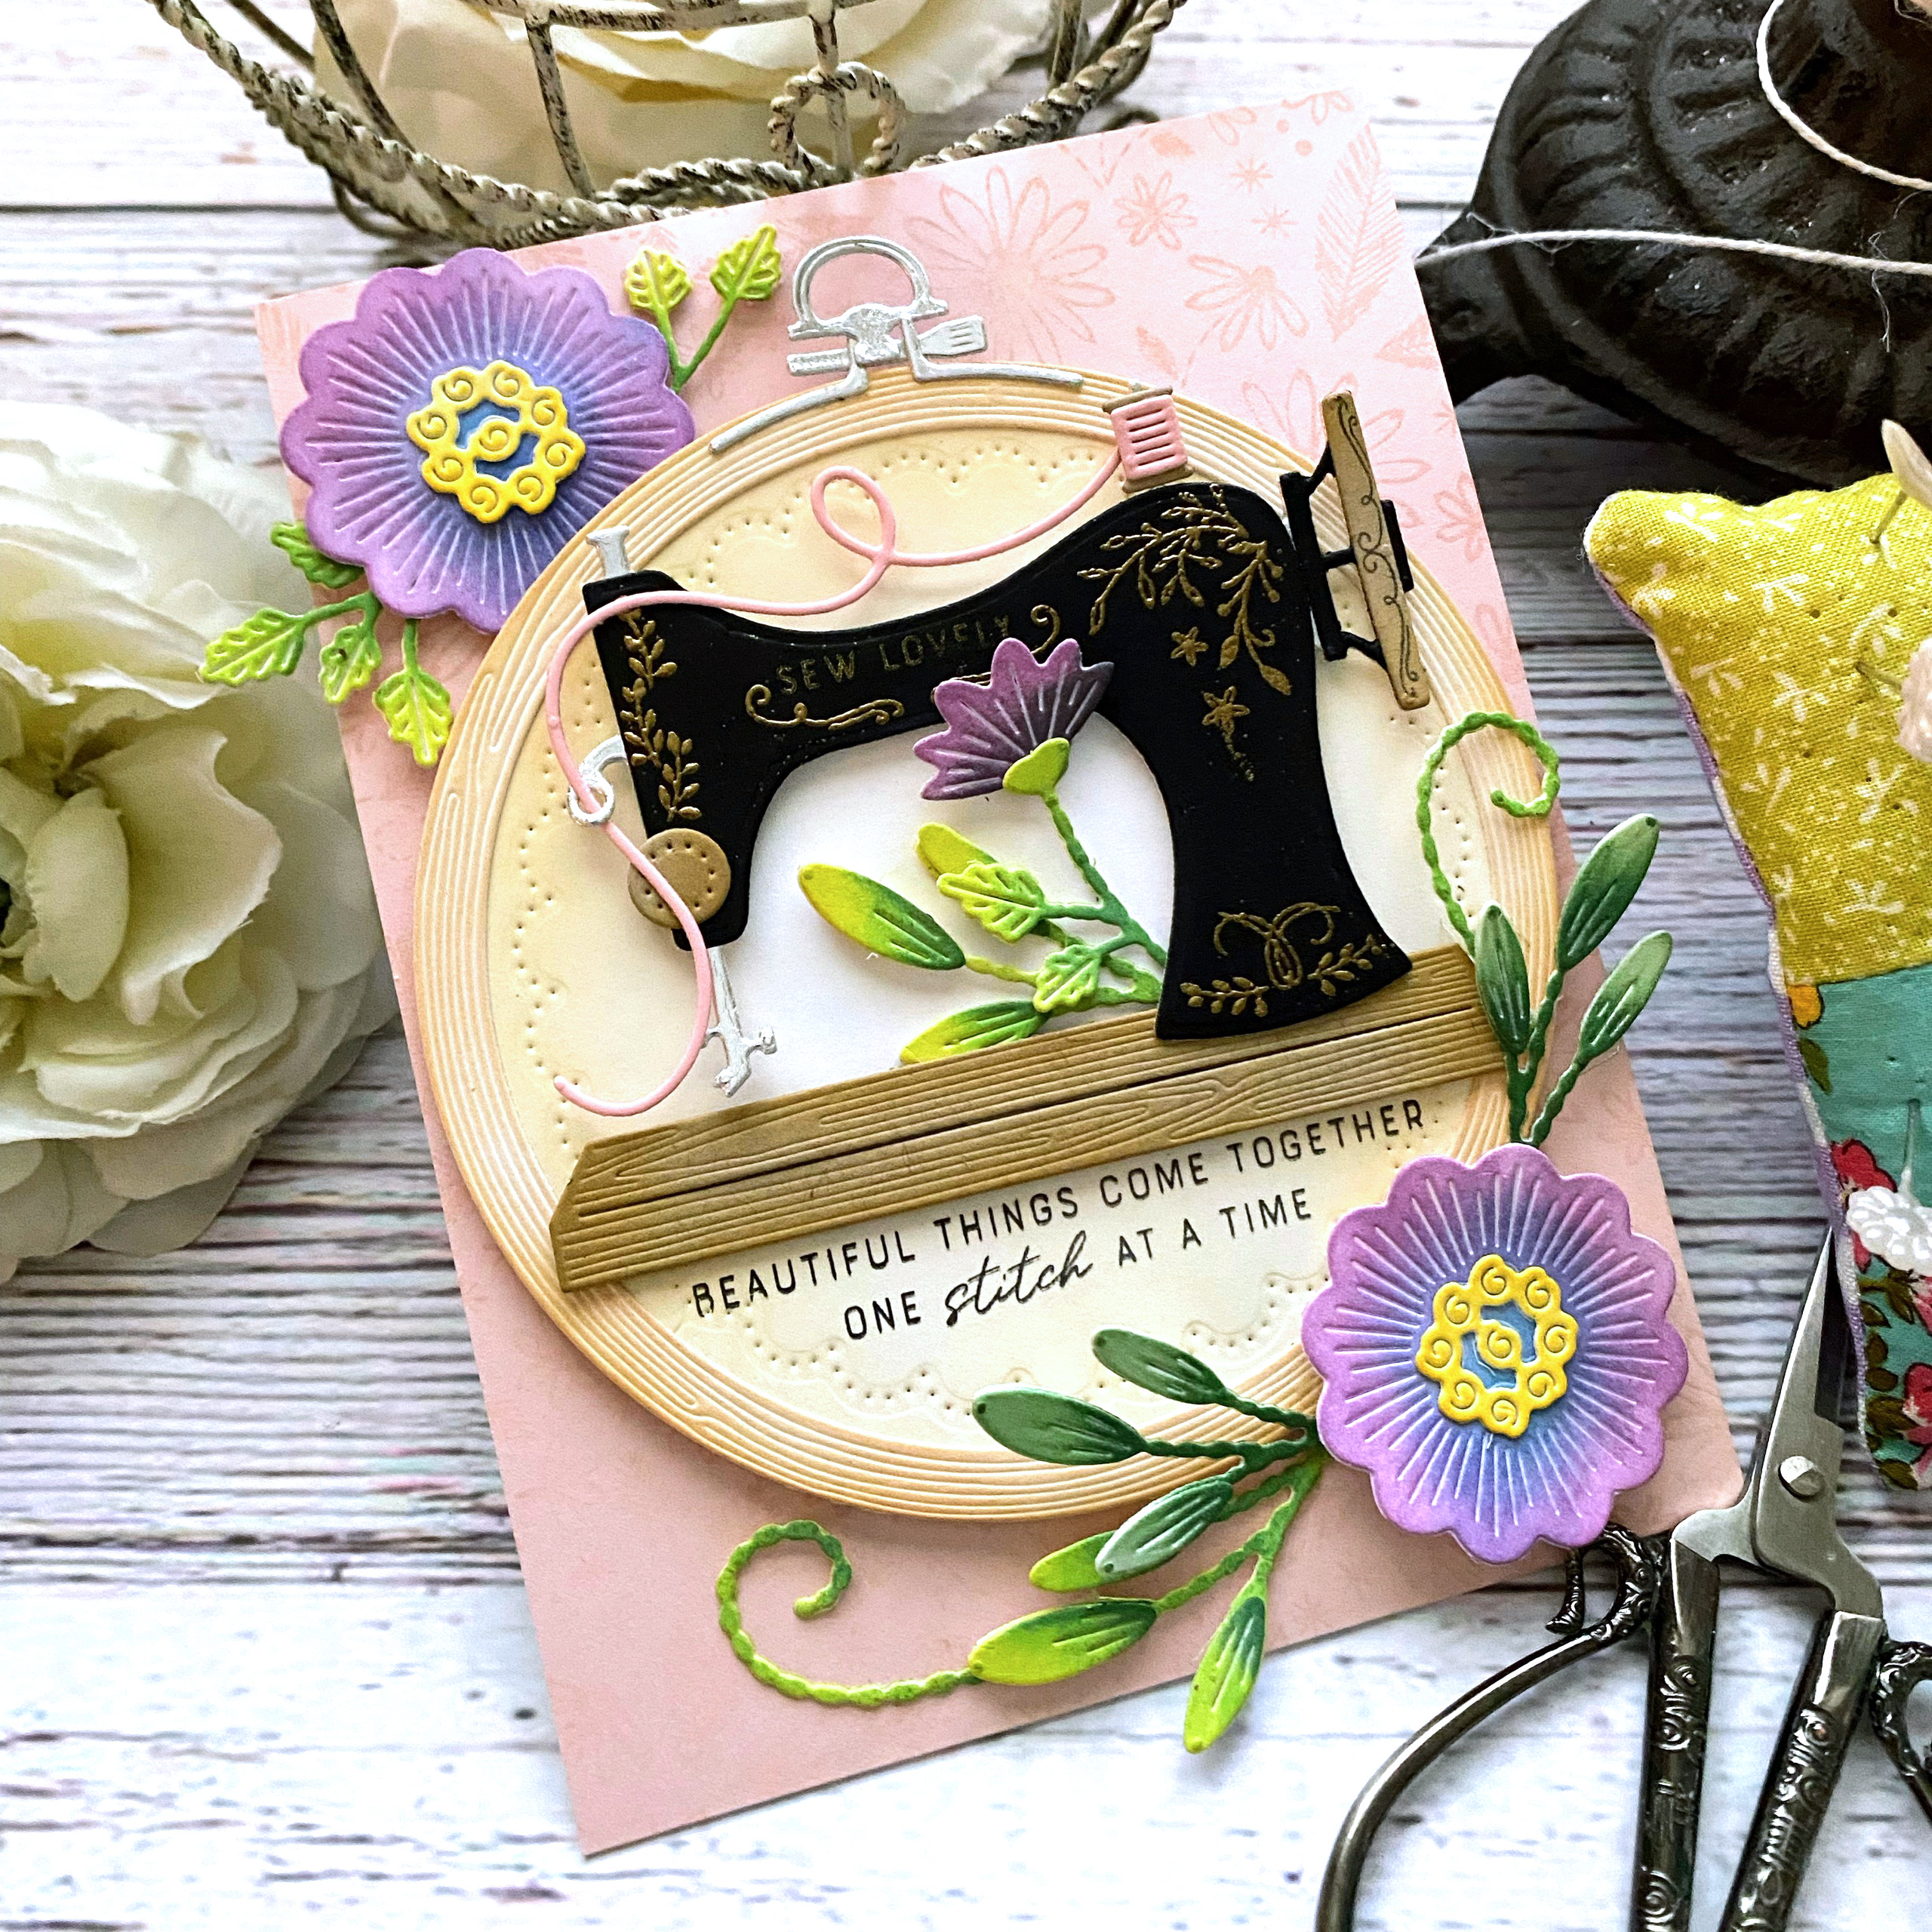
My first card for today uses the precious new "Sew Vintage" stamp/die set. I am absolutely smitten with it. It is easy to assemble and 'sew' much fun! 

It comes with a handy guide to ensure you will get great results. I was a little worried thinking I would have to stamp a bunch of these tiny filigree details on the machine, but it is all one stamp and then you can add the little word sentiments on the top. I chose the darling 'sew lovely' sentiment, but there are a few others for variety.

For this card, I used the Hoopla Round die and the Hoopla Round Inserts die. This provides that sweet stitched detail around the edge, just perfect for this card. 

The beautiful sentiment underneath the  machine is also from the 'Sew Vintage' stamp set.

I couldn't resist adding a few more of the Embroidered Blooms that were showcased yesterday; they give the perfect touch for this card.

I did a tone-on-tone effect with the Embroidered Background stamp; Sweet Blush cardstock and Tattered Rose Distress Oxide ink. You can see it a little bit better on the top right corner.

Eep! My second card for today uses the CUTEST new Notionable die....it is the cutest thing EVER!!! The scissors, the tomato pin cushion, the thimble and thread....EVERYTHING!!! I used a brad so the scissors are hinged and actually work! They are stuck down, but still....right????

I thought it would be fun to create a 'sewing box' type card using the beloved Curio: Cover Die and the Curio: Divider and Details die. For those of you who don't know, I also have a (much neglected) sewing blog called Thimbles and Thread and this whole release is calling me to get back to it! ha ha!

I used all of the elements included in the Notionable Die collection....you will find a set of four pins with toppers you can customize, a thimble, thread spools, thread, tomato pincushion, scissors, and a nedle. Everything is perfectly designed so that they almost look real, especially the adorable scissors!!!
 The sentiments are both from the Sew Vintage stamp set and I just love how they work so perfectly with all of these sweet dies. I also tucked a Hoopla Mini in the right hand corner; the heart one, of course, to tie in the "love" theme.


I used the Embroidered Background stamp for the base of the sewing box to give it some added detail and "sewing" charm.
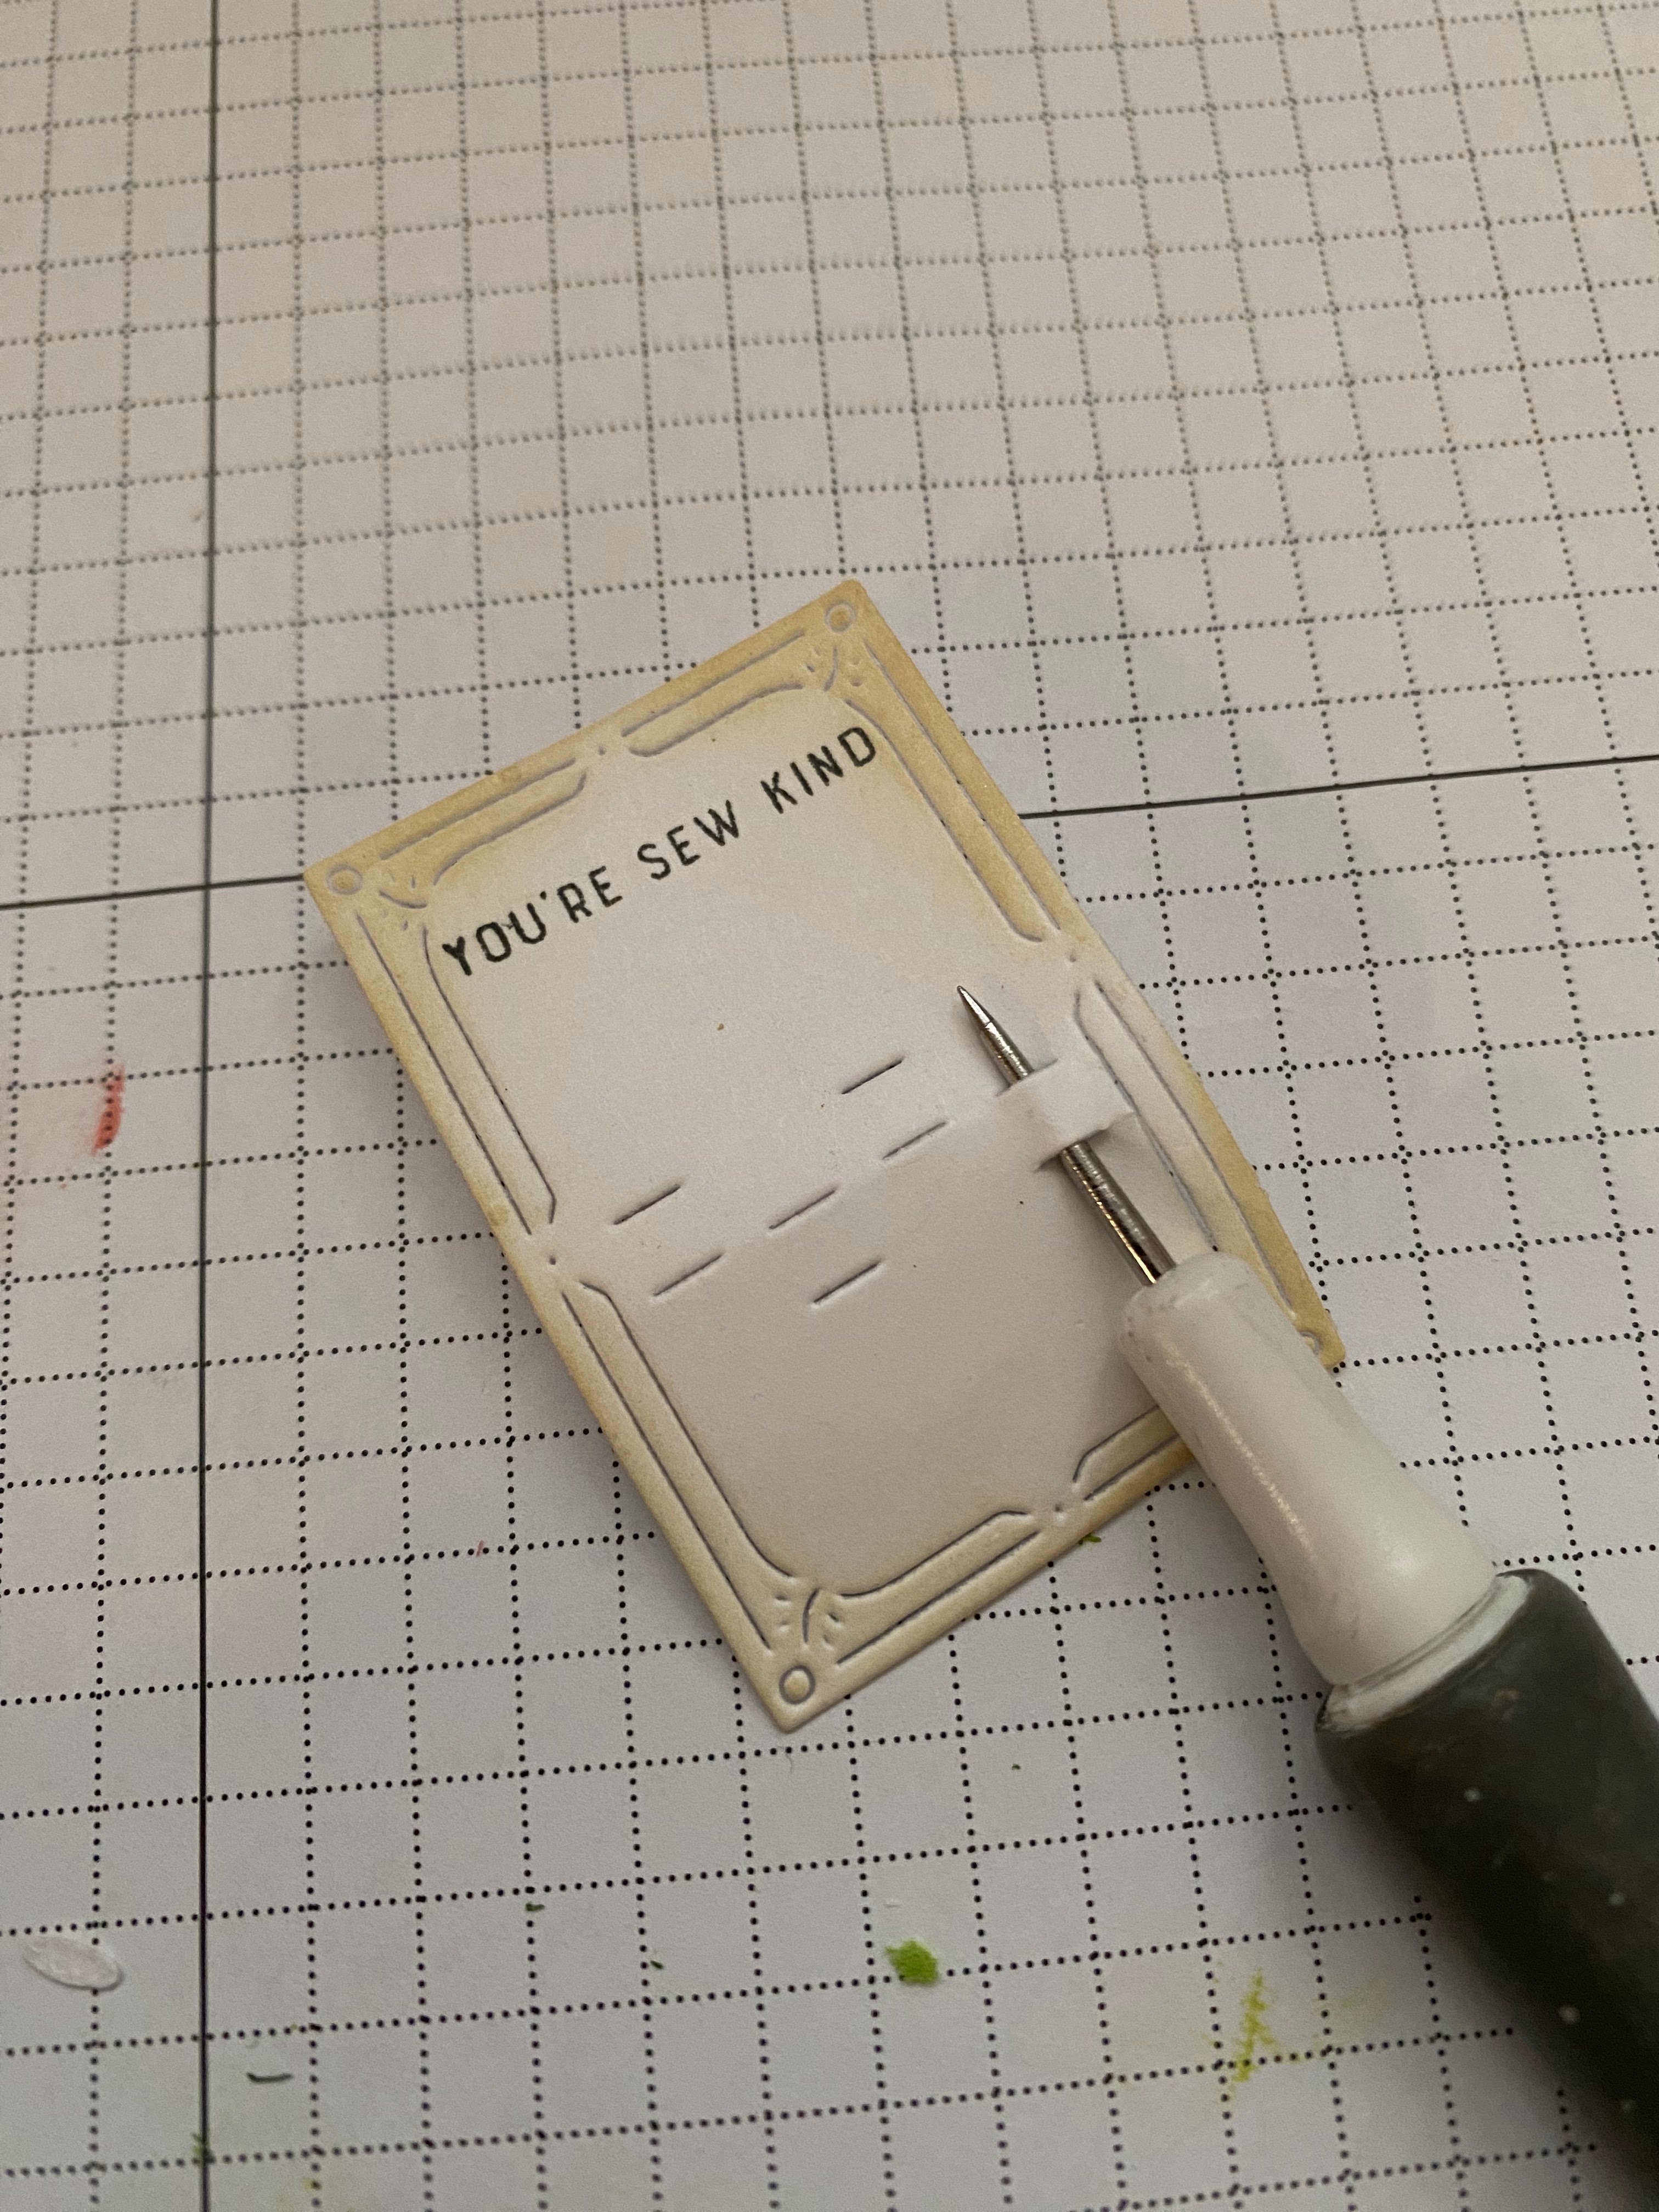
Here's a little peek at the process I used to allow me to get the pins on the pin card. Since they are actually paper, it was a little tricky to get them down the slits. I used my paper piercer to open the slits up a bit and then I put the pins in. I secured them in the back of the pin card using scotch tape. This is the same technique I used to get the needle into the spool of thread.


My final card for today uses the AMAZING new Rose Tapestry Stencil collection...I stenciled everything in blues and greens and then used the Aida Cloth texture plate over the top.  I was scared to try it for fear I would ruin the beautiful tapestry background, but I love the result.

For this card I wanted to create an 'in-progress' type look. I chose to use the scissors, thread, and thimble as focal points and then the sentiment to reinforce the theme. 

I also used another Embroidered Bloom on the corner over the hoop for added detail.


The sentiment is heat embossed in silver to accent the metallic paper used for the scissors, needle, and thimble.

I chose to use Vintage Cream cardstock to use with the Tapestry Stencils....I felt it would give it a nice vintage look.

I'm sure the other designers will showcase how these amazing stencils look without the Aida Cloth Texture Plate, but I just love the detail it give the card!

This release is so much fun....everything will be available for purchase starting tomorrow at 10 am ET. Thanks for fluttering by!


Kelly (you are here)