Friday, March 18, 2022

The Greetery's Inspiration Friday {TGIF} He is Risen!


Hello and welcome! It’s my turn for this week’s TGIF feature! I feel lucky to be here so soon after the new release! There’s so much to love about this beautiful new spring release, don’t you think? I felt like the previously released Cathedral Die and Cathedral Stencil was begging to be included in showcasing the new products, so that is where my card began!


When the Cathedral Die was first released, I opted to create a yellow glow emitting from the panes rather than use the stencils to create a stain glass window. For this card, it only seemed right to create a pastel toned window! I used the 4 different stencils and 4 pastel ink colors to create the window, adding just a spritz or two of Shimmer Spray for a glass-like shine.  I die cut the stenciled panel using the solid portion of the die, but then taped the dies back together with Washi tape to die cut the frame portion. I actually die cut it twice to give the frame some depth to look like the real thing. I simply glued them together using liquid glue and then glued the frame over the stenciled piece.


Once the window was done, I die cut the “Amen” sentiment using the new Amen dies. I fiddled a bit with placement so that the words could be read easily without getting lost in the frame of the window. It worked out perfectly that the line on the A and the line on the N lined up perfectly with the solid pieces of the window frame so I had somewhere to glue them for a sturdy piece.


The background was created by stamping the beautiful foliage using the Fond of Foliage background stamp for a tone-on-tone look. I adhered the window in the middle of the background panel using foam squares for dimension. The nest and blossom are from the new Curio: Spring Findings die collection. I like to die cut all of the pieces from white cardstock and then color them using finger daubers and ink.


The cute little robin tending her nest is from the Robin and Wren stamp set. I tend to shy away from mixing stamped images with die cut and then colored images (think BotaniCuts), but in this case, I think this bird looks great perched on the window frame! The finishing touch is a companion sentiment from the Amen and Alleluia stamp set. I die cut it using the Sentiment Suite Basics die set to give it that finished look. I also added a trio of sparkling clear sequins for some sparkle and shine! Thanks for fluttering by!

Thursday, March 17, 2022

The Greetery Breath of Spring Release Day

The time has come....it's release day for the Breath of Spring collection at The Greetery! Everything will be available for purchase today at 10 am ET. Today i'm sharing 3 new projects with you for even more inspiration with the beautiful new products! To be perfectly honest, I think I could create Spring Mix panels all day! ha ha!
If you know me, you know that I LOVE creating 3D projects! I decided to experiment with the new Spring Mix stamp/die/stencil collection to create this cute little basket/box. It's my go-to design for quick little containers, but with the addition of the stenciled/stamped panels, it really takes the whole thing up a notch.

To begin the basket/box, I stenciled 2 identical panels and then stamped the detail portions using my mini MISTI. I used the coordinating die to cut out both panels. Originally I planned on using the panels to make one card and the basket, but once I saw the depth and dimension the basket had with two panels on each side, I just HAD to go with it! I will give you a bird's eye view in a bit so you can see exactly what I am talking about. 3D projects are always so tough to photograph for me!


I also die cut a few of the stand-alone blooms and simply added some ink blending and the detail stamping to each of the flowers. I added them here and there using foam squares for dimension. I only added extra flowers to the front panel and left the one in the back of the box as-is.
The basket box is created using Sweet Blush card stock with simple scoring and cutting for a quick project. The front and back measure 4 1/4 (the width of the stenciled/stamped panel) and the sides and bottom measure 1 inch. The height is 2 1/2 inches, but you could tailor it to fit your needs. I wanted the airiness of the die cut panel to be shown, so I  kept it on the shorter side. I cut the back panel so that the same amount is showing at the top, but there's just a little bit below the top of the basket where I secured it with ScorTape. Unfortunately, the back of the box is not very attractive because it's simply the backside of the die cut panel, so I opted to trim as much off as possible so you could still see the box below. Hopefully that makes sense! As I was playing around with the placement of the panels and I decided on using both, I realized that I would need a moveable handle so that it could swing back and forth so the recipient could access the treats and gifts inside. I decided on using a small brad to secure both sides of the handle as you can see in the photo above.

You could eliminate the need for the hinged handle by omitting the back panel, but as I mentioned earlier, it just looked so darn cute I had to keep it! I had a few pieces left over from my hourglass Springtime cards I shared on day 1, so this cute little bunny sporting an umbrella got tucked into this sweet scene. Of course I had to pick this particular sentiment from the Springtime stamp set to finish it off!

This gives you another view of how the two panels look together. It just really feels like you're in a field of flowers! I picked up some seed packets and Ghirardelli squares to tuck inside and I will look for other fitting gifts as the season progresses.

My next project was inspired because of a question from one of my sweetest and kindest blog readers, Becky Green!!! She asked on day 1 of the reveals if the bunny would work with the Jumbo Jar Die (at least I hope that's what you meant :)) and so off I went to find out! ha ha!

As you can see, it's a perfect fit and how fun it is!!! I had so much fun creating this shaped card  sporting the cutest pink bunny! I realized that my lid die has up and gone missing, which is seriously bugging me. I guess some housekeeping is in order to find the escapee! Anyway, I really wanted to have the lid on the jar, but opted to add the BOW instead! 

Even though the snail is not to scale, I couldn't resist adding him to this sweet springtime scene! Did you know that snails leave a little sparkle wherever they go? Maybe everyone knows this, but I just figured it out last summer. We have a fire-pit with concrete work around the entire thing in our backyard. One summer morning I went outside to water the flowers and the sun was glinting off the cement that was positively shimmering with little sparky lines going every which way. I had no clue what had made those sparkling lines, but put my bet on spiders of some sort. Fast forward sometime later; I was out walking and I was on a freshly tarred road and saw the exact same trails...EVERYWHERE!!! Needless to say, a few steps forward I found a snail plugging along leaving that sparkling trail! Mystery solved! Even though snails are not good to have leaving trails around your yard, I absolutely love that they leave that sparkle wherever they go! Slow and steady wins the race...and leave a little sparkle wherever you go!
My last project for today uses that elusive 6th stenciled/stamped panel I talked about in my post from DAY 1. I was planning on sharing on day 1, but decided I'd better save it just in case I didn't get any time to create anything new! I should have known better since all I want to do is make more projects with this release! Oh well....just another one to share today!

As you can see, it's EXACTLY the same as the notecard set, but I switched things up by adding the die cut Alleluia word and stamped the "He is Risen" sentiment in the corner.

I also added another one of the sentiments to the flap of the envelope to really set the theme!

I just want to thank you for all of your sweet support! You really know how to make a girl's day! I don't know if I mentioned it or not, but between being sick in February and then hurting my back, I've been in a funk, so all of this creative time has buoyed my spirits! All of your sweet comments and love really make a difference! Thank you! Thanks for fluttering by!


Wednesday, March 16, 2022

The Greetery Breath of Spring Reveal Day 2

I'm back again today for day 2 of  reveals for the Breath of Spring collection from The Greetery! Thank you so much for all of your sweet comments on yesterday's post! I'm thrilled that you love the new release as much as I do and there's even more to fall in love with today! Today the team is showcasing 2 new BotaniCuts and the latest addition in the Curio collection! If you'd like a closer look at each of the new products in today's line-up, then make sure to head to The Greetery Blog for the official "meet and greet"! You'll also want to leave a comment here and on each designers' blog to be eligible for a chance to win one of two $50 gift certificates.

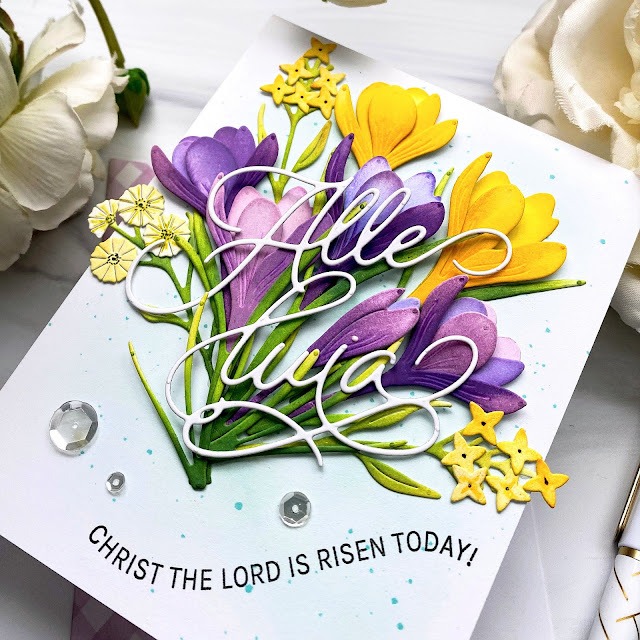
My first card for today uses the new BotaniCuts Crocus die collection! I absolutely adore Crocuses; the colors, the first flower of the season, etc. These paper versions look so realistic and they are so much fun to make! I simply die cut all of the pieces from white cardstock and then colored them with an assortment of Distress Oxide inks and finger daubers. I also snuck a few bunches of flowers created using the BotaniCuts Wildflower Mix dies using the same coloring technique. Each of the crocuses and flower bunches also has some colored pencil details to really bring them to life.

I prepped the card base by adding some Aqua Mist ink blending in the center with some Hawaiian Shores ink splatter for a speckled egg look; my favorite! Once that was done, I arranged the flowers and extra bits of foliage on the panel. I placed the "Christ the Lord is Risen Today" stamp where I wanted it and then used the "press n' seal" technique to remove the flower bunch while keeping the sentiment stamp in place. Once the flowers were removed, I placed the panel in my MISTI and stamped the sentiment in black.

I added glue to the back of the flowers and then added them back onto the panel, carefully removing the press n' seal wrap. The "alleluia" word is die cut using the new word dies. It comes with a shadow, but I really like the light and airy feeling that just the thin sentiment adds. I lost the dot for the "i", so I just used a small drop of Nuvo drops to remedy that! ha ha!

I added a trio of sparkling clear sequins to finish off this floral card!

My second card for today uses the new BotaniCuts Pussy willow dies! I actually die cut each piece twice so that I would have a lot of options when it came to arranging them. I die cut them from Soft Stone cardstock so that I would have that built-in grey color. The branch portions are easily covered using Distress Oxide ink despite the grey color. I added some Hickory Smoke and Copic details to the buds to give them a realistic look. I wracked my brain for a way to make them fuzzy; I even googled grey velvet cardstock. I also wished I had some grey flocking, but I don't! Maybe Betsy has something cooked up over on her blog?!? LOL! I wouldn't doubt it, honestly!

I didn't really have a clear idea in my mind when I set out creating the pussy willows, but I thought the leftover crocus buds and flower bunches looked nice with the branches so that is the direction I headed in. I stamped a few birds using the Robin and Wren stamp set to accent this spring design!

The sentiment, which I absolutely love, is part of the Springtime stamp set that was showcased yesterday.


I really do love how this card came together!

Last, but definitely not least, is this card using the new Curio: Spring Findings die collection. I had such a fun time inking up all of these cute pieces to create my curio box. I opted to use the Curio Divider Details II die for my box. I love that it has the option to die cut the pierced detail rectangles in the background. I found some Brenda Walton K & C0. pattern papers in my stash (hoard) that are just perfect for this project!

I decided to give the wood divider a "white washed" feel by adding some Fresh Snow ink brushed over the top. I also splattered the entire thing with some white acrylic paint for even more shabby goodness.

My favorites include: the snail, the nest and eggs, the blooming branch, Lily of the Valley, and the feathers

The entire "box" portion is added to a Kraft card base with some Fresh Snow ink brushed around the edges.

Thanks so much for joining me today! I hope you've enjoyed everything as much as I do! This really is such a sweet and special spring release! Everything will be available for purchase tomorrow at 10 am ET. Don't forget to head to the other designers' blogs to see how they've brought these new products to life! Leave a comment here and on their blogs for a chance to win one of the $50 gift certificates. Thanks for fluttering by!


Tuesday, March 15, 2022

The Greetery Breath of Spring Reveal Day 1

I'm so excited to be here today for day 1 of reveals for the Breath of Spring collection from The Greetery! I hope you love everything as much as I do! As always, you'll want to head to The Greetery Blog for the official "meet and greet" for each of the new products. Make sure to leave a comment here and on each designers' blogs for a chance to win one of 2 $50 gift certificates.
My first project for today is a set of notecards and Stationery Box using the fabulous new Print Shop: Spring Mix stamp set and stencil set! If you've used any of the products in the Print Shop Collection, then you know how much fun they can be!

The Print Shop: Spring Mix stamp set includes 4 different sentiments; Happy Birthday, For You, Hello, and Thanks. I couldn't decide which sentiment to use so I thought it would be perfect to create a set of notecards using each of the different sentiments. To begin, I stenciled and stamped 6 panels using the Spring Mix stencil set and stamps. This project only uses 5; one for each of the 4 note cards, and one for the outside of the box. That leaves one extra that I will be sharing on a project later this week.

I made certain to be VERY careful while stenciling because I wanted to use the coordinating Spring Mix die. I knew that any misaligned portions could lead to sloppy panels. ha ha! I was thrilled that all 6 panels cut perfectly and my precision paid off! I love that the stencils from The Greetery have guide lines and are numbered so you can stencil the right steps in order.

I also stamped quite a few of the stand-alone blooms so I could add them to the panels as I desired. Each panel is adhered to an A2 size card base with a bit of inkblending and splatter near the top. I also stamped the 4 different sentiments in the right corner using Weathervane ink.

I created 4 coordinating envelopes using the Flappable Stencil Collection. To create the gingham flap, you simply flip the stencil over once you've created the first set of stripes to create the gingham. I'm positively smitten with this Lilac Grace gingham! The box is die cut from Lilac Grace cardstock and assembled using ScorTape. I used the Disc Magnets so the box will stay shut. Something I didn't realize the past few times I've used these is that there is either a positive or negative sticker on the adhesive backing of each magnet. You will want one of each so that they will close properly.

Up next is the newest addition to the hourglass "time" collection. I couldn't decide between the bunny holding the bouquet of flowers or holding the umbrella, so I used both! ha ha! That little bunny is just the sweetest thing EVER, don't you think? I die cut the Hourglass from Soft Stone cardstock and then added some Hickory Smoke Distress Oxide ink around the edges for some contrast.

I die cut all of the pieces I would need to create the two cards and then had fun stamping to my heart's content! I opted out of the shaker card idea because I struggle with shaker cards! ha ha!  That being said, with the Hourglass Insert die they really are very easy to do! There is a really cute new sequin-y glitter mix coming out as well that will look super cute inside one of these spring hourglasses. I'm sure a few of the other DT members will share a shaker or two!

I absolutely adore the sentiments, which fit perfectly inside the banner that coordinates with this set. 

I had quite a few of the blooms left over from my Spring Mix project so I added one to each of the two hourglass cards. That concludes my projects for today, but don't forget to head back here tomorrow for day 2 of full reveals! There is so much more you're going to fall in love with! Don't forget to head to the other designers' blogs to see how they've used these new products! Make sure to leave a comment here and on every stop to be eligible to win one of 2 $50 gift certificates. Winners names will be drawn from the comments. Thanks for fluttering by!


Wednesday, March 9, 2022

Papertrey Ink {The Great Cover-Up}

It's my turn to help out with the Papertrey Ink The Great Cover-Up feature! These cards will also be over on the Papertrey Ink Blog, but I wanted to share them here as well.
 I've been itching to pair the new Vase Collection 7 Mini Stamp Set with the beautiful flowers from the Wreath Favor Box Sentiments Stamp Set. I love the style of the flowers and leaves and felt like they would work perfectly with this cute tin flower container. 
I also needed a baby card, so I chose to create a non-traditional design since I don't have any newer baby sets to create with.

To begin, I die cut two of the flower buckets using the Vase Collection 7 Die and then stamped one using Soft Stone and Weathervane ink and the other one using Aqua Mist ink. I have two Aqua Mist ink pads; one is from the original release back in 2008 I believe and I recently purchased a new pad and they are slightly different. I like using the two together for multi-step stamping. The handles are stamped using Fine Linen and Classic Kraft ink and the fasteners at the top are stamped in Weathervane ink.

I die cut a bunch of flowers and leaves and had fun stamping them in all of my favorite spring colors! I think they look SUPER cute tucked in the flower buckets! I'm very particular about the style of flowers that I like and these definitely fit in my "LOVE" category. 

The pattern papers that I chose to use for both cards are from the Share Your HeArt: Basket of Blossoms pattern paper pack. For this card I used the adorable purple floral print with a strip of watercolor plaid paper at the bottom. The other card uses the yellow paper for the background with a strip of purple. Mixing patterns is one of my favorite things to do, but you have to be careful to find the right scale of prints to mix so your project doesn't become too heavy or messy.

Each card features the middle size of the Border Bling: Skinny Postage Frames die cut from white cardstock. For this card, I stamped the sentiment within the frame using Weathervane ink and for the baby card I heat embossed the "Oh Baby" sentiment onto a strip of vellum. I felt like the sentiment would get lost in the sea of white flowers so I chose the vellum. In hindsight, I would have embossed it on a smaller shaped piece of vellum, but hindsight is always 20/20! ha ha!

I had fun arranging the flowers and leaves for each bucket, I didn't add too many because I didn't  want the shape or details on the bucket to get lost.

Each card features a trio of sparkling clear sequins and a bit of glitter on the flowers and leaves. I mounted the pattern paper panels to a top folding A2 card base using foam squares for dimension. Thanks for fluttering by!


Tuesday, March 8, 2022

Papertrey Ink Flash Sale {Sincerest Thanks}

It's the beginning of the week and that means there is a new Papertrey Ink Flash Sale! I used the pretty Enchanting Roses stamp set for today's card! One of the reasons why I like this particular stamp set is the ease of use! You have a cluster of three different sized roses with multiple colors in a snap! The leaves come in two sizes that allow you to create realistic looking floral clusters.


I die cut the cluster and a bunch of leaves so that I would have enough to tuck here and there until I liked the arrangement. In the end, I used 3 small leaves and 4 large leaves.

These roses lend themselves well to a vintage design, so I chose to add some Berry Sorbet ink around the edges of a panel of Bitty Big: Pale Peony pattern paper. I added the Border Bling: Skinny Postage Frame over the top of the pattern paper for contrast and to enhance the vintage feeling.

I stamped the sentiment, which is from the Just Sentiments: Appreciation stamp set, directly onto the striped panel using black ink.

I layered the flower cluster and leaves over the top of the middle size of the Delicate Doilies. I positioned the flowers so that just a little bit of the doily would poke out for a hint of detail.

I added some glitter and sequins for some sparkle and then some white paint splatter as well. My paint brush had some residual purple paint from a previous project (woops), but it made a really pretty color paint so I went with it and I really like how it turned out! Thanks for fluttering by!