Monday, February 21, 2022

Papertrey Ink Flash Sale {Happy Easter}

Hello and welcome! I'm happy to be here today! I've been MIA for a while now because I was sick, so it's good to be here and back to creating! As February ticks on, spring will be here before we know it! I adore making Easter cards so I chose the Best Bunnies stamp set for this week's Flash Sale! It's never too early to get started on seasonal projects because we all know that time flies!

To begin this card, I die cut a bunch of the bunnies in both sizes, eggs, bows, and cracked shells using the Best Bunnies Die collection. I stamped them in my favorite springtime colors; Aqua Mist, Harvest Gold, Lilac Grace, and Pale Peony. Once all of the stamping was complete, I got to work on the background.

I used the On the Border: Floral Bliss die to cut a piece of white cardstock. I used Mint Julep ink and a blender brush to color all of the leaf portions and then used the same ink colors as my stamping to color the flowers. I adhered it to an A2 card base using liquid glue.

I die cut a Pale Peony frame using the Border Bling: Skinny Stitched frame dies and adhered it to a piece of white cardstock. I stamped the "Happy Easter" sentiment in black, which is from the Just Sentiments: Easter stamp set. Once that was done, I framed the sentiment with a few of the flowers and leaves from the Tiny Blooms stamp set.

I added the framed panel to the background using foam squares and then added the cute stamped images. I also added the bows to the bunnies ears, which are included in the Best Bunnies die set. They are one of my favorite things about this set! I added some sugary glitter and a few sequins to finish it off. I also added a few more sentiments to the inside using the same sentiment set as the front. Oh, and I also added the brown eyes and noses using a fine tip brown marker. Thanks for fluttering by!


Thursday, February 10, 2022

Papertrey Ink Flash Sale {Let's Celebrate You}

Hello and welcome! I’m here today to share my card for the Papertrey Ink Flash Sale! I tried really hard to pick colors that I don't normally use to give you some fresh cardstock and ink choices on the sale! I think I mentioned in a previous post that I needed to do some re-inking of my inkpads. I sat down last week and got that done, but it made me realize how many colors of ink I don't use very often.
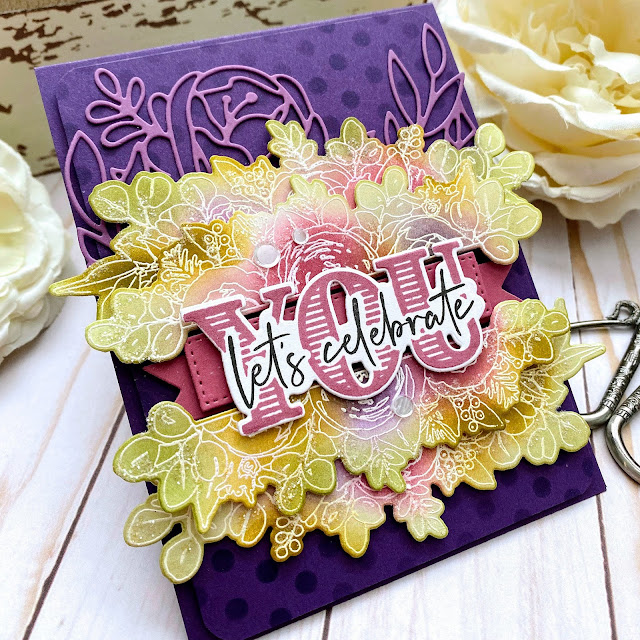
It was easy to bring in a lot of color for this card since I chose to use the beautiful Framed in Florals Stamp Set. To begin, I die cut two of each of the floral bunches using the Framed in Florals Die and then stamped them using Versamark ink. I heat embossed the images using white detail embossing powder and let them cool.

I used mini blender brushes to add all of the different colors of ink: Ripe Avocado, Olive Twist, Lavender Moon, Plum Pudding, Saffron Spice, and Autumn Rose. I love the emboss/resist technique and I love how it turned out on these floral bunches.
Next, I cut a 4 by 5 1/4 inch panel of Royal Velvet cardstock and added the polka-dots using Royal Velvet ink and the Stencil Basics: Dots stencil collection. I rounded the corners using a corner rounder punch for a soft edge.

I used the On the Border: Floral Bliss Die to die cut the Plum Pudding border piece at the top. I glued it near the top and then layered the floral bunches using foam squares.

I used the Mash-Up Birthday die to die cut the sentiment portion and then used my mini MISTI to stamp the sentiments; the YOU using Autumn Rose ink and the "let's celebrate" portion in black.

I also die cut a banner using the Banner Builder Basics from Autumn Rose cardstock and nested it between the two floral bunches. I added the sentiment over the top using foam squares. I added some glitter and sequins to finish it off and then added it to a top folding A2 Royal Velvet card base. Thanks for fluttering by!


Wednesday, February 9, 2022

Happy Valentine's Day {A twist on an old favorite}

Valentine's Day is less than a week away....are you finished with your creating? THIS is one of my very favorite Valentine's Day cards that I've ever made. I shared it again last year on Instagram, but rather than sharing the same card again, I decided to try a fresh take on some of the things that I love most about that particular card.

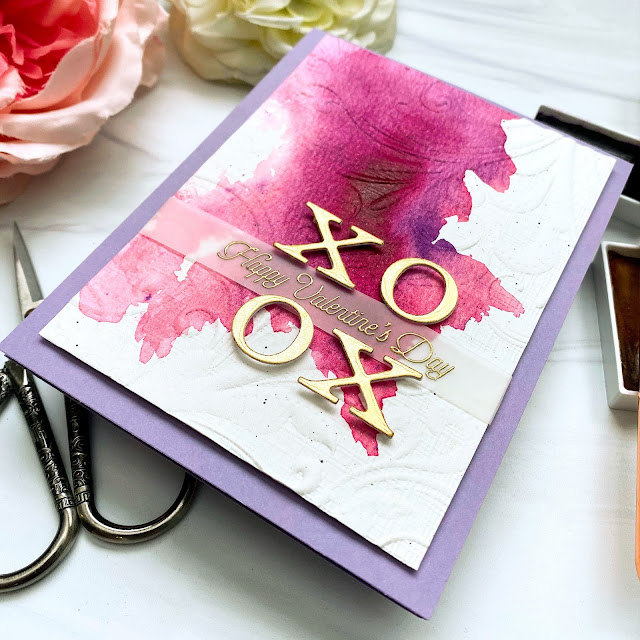
I don't pull out my watercolors nearly enough and after I do, I realize I need to do it more often. Rather than creating a watercolor panel that is completely saturated in color, I decided to go for a more organic look and just let the paint, paper, and water do the work. I spritzed a panel of watercolor paper and then added in red and purple watercolor paint and pushed them around until I was happy with the results. I sped up the drying process by heating it up with my heat tool. I set it aside to continue to dry while I got to work on the letters.

 I used the Bookprint Alphabet Upper dies to die cut two of each letter; two each from gold specialty paper and two each of regular white cardstock. I glued them together for a more sturdy piece since I knew I would be popping them up with tiny pieces of foam squares. I set those aside to dry as well.

The sentiment, which is one of my favorites, is from the since-retired Be Mine, Valentine stamp set from Papertrey Ink. You could use any sentiment that you like for this step. I heat embossed it in gold powder onto a strip of vellum.

Once the panel was dry, I dry embossed it using the Regency Swirls embossing folder that was included in my Gemini Jr bundle that I got for Christmas in 2020. It is still included in the bundle, but I'm not sure if it is sold separately. It is the same embossing folder that I used on THIS card. Once that was done, I adhered the letters using tiny bits of foam squares. The heat embossed sentiment is tucked between the two rows of letters and wrapped around the panel and secured with clear tape in the back. I did spritz it with a few good sprays of Shimmer Spray as well. The entire panel is added to a top folding A2 Winter Wisteria card base using additional foam squares. I had so much fun making this new version of an old favorite! Thanks for fluttering by!


Tuesday, February 8, 2022

Valentine's Day Heart Boxes

Hello friends! I'm popping in quickly today to share some Valentine's Day heart boxes that are just perfect for chocolates and sweet treats! I absolutely adore the new Happy Heart Box Dies from Concord and 9th! These are one of those "must-have" items for me and as soon as I saw them I scooped up a set for myself! Of course, they are perfect for Valentine's Day, but I plan on using these year-round because they are fabulous for so many other occasions! There is a fabulous video that shows how easy these are to assemble that you can watch at the link I share above (it is below the picture of the item). 

I assembled two boxes and then had fun decorating them with a few left-over bits and pieces I've had hanging around from previous projects. This particular box uses one of my favorite flowers and leaves from the Into the Blooms II die. I've had this flower and leaf cluster all inked up since these beautiful dies were released last year. I was thrilled to be able to use it to decorate this cute box.

This box uses one of the left-over roses from THIS card that I had so much fun creating! That card has already made its way to a new home. I made some buttermilk blueberry banana bread last week and delivered it around the neighborhood with cards to say "thinking of you" to some of the widows and such. 

The "happy valentine's day" sentiment is from the older Be Mine, Valentine stamp set from Papertrey Ink. I love it and like to use it each year on different projects. The circle seal image is from another older, but favorite set called With all my Heart.

I had so much fun putting these two boxes together! I plan on making a few more using different supplies to change the look and feel of the boxes, but I wanted to share these two today! I'll post any others that I make as well! Thanks for fluttering by!


Saturday, February 5, 2022

Hello, Baby!

I spent the better part of the morning the other day working on a fresh stack of baby cards to add to my stash. I've decided that I'm quite picky when it comes to baby stamps/dies and many companies don't come out with new designs very often, so that means that I use my favorites over and over again, which I don't mind! I love getting a lot of mileage from those tried and true sets!
I actually NEEDED a boy card, but ended up making 3 boy cards and one girl card using the retired "Baby Mine" stamp set paired with the A Bit More: Baby Mine Mini stamp set. I love the large sentiment that really grabs your attention! I decided to use this cute set because the elephant looks like the one on the baby gift bag I was wanting to use for the gift I was giving. In the end, I realized that the bag looked more feminine so I made a matching girl card and I'll save the bag for a girl gift. I ran to the store and bought a new bag that fit the color scheme of the boy version! ha ha! 

I die cut all of the pieces for each of the cards using the Baby Mine Die and then used my MISTI to do all of the stamping. I mentioned that this particular set is retired, but honestly, you could just use the dies and cut the clouds, and elephant from pattern paper and add the eyes with a marker. You could stamp a sentiment from another set inside the word bubble to customize your design.
I thought it would be fun to use the Wrap it Up Die to create the gift box as the backdrop for this cute little elephant scene. I used different patterns from the Bitty Big: Pink Posey Color Collection to give the gift some interest. The tiny sentiment is from the Sentiment Suite: Love stamp set and it fits perfectly inside the cute tag. Normally I would have die cut the tag out of white cardstock, but I was in hurry and it was already cut in the patterned paper! ha ha!

I looped a length of crochet thread through the tag and knotted it at the top. All of the stamped pieces are attached using foam squares and liquid glue. I added a dot of Nuvo Crystal Glaze over the top of the eye and let it dry. Once it was FULLY dry, I added a white dot using a white gel pen for added detail. I also covered the heart die with the glaze and sprinkled glitter over the top for some sparkle and shine. A few sparkling clear sequins and the "congratulations" sentiment finish off this baby girl card.

The boy version uses the same stamped pieces, but I switched up the background. I love how this background looks like a quilt! It's actually die cut using the Mix and Mat: Confetti die and I just love how it accents this baby boy card. I die cut it from Stormy Sea cardstock and then layered it onto a 3 3/4 by 5 inch panel of white cardstock to let some light shine through. I added the stamped pieces and the heat embossed "congratulations" sentiment over the top. I mentioned earlier that this large sentiment is from the A Bit More: Baby Mine mini stamp set. I heat embossed it in my absolute FAVORITE embossing powder which is the Super Fine Detail White embossing powder. I accidentally grabbed the wrong jar the other day and couldn't figure out what went wrong until I realized it wasn't the detail powder that I LOVE! This has such tiny particles that it holds to all of those really small stamped images for better coverage.

I added some glitter to the clouds and the elephant for some sparkle. I used the same technique on the heart coming out of the trunk on this card, but this time I did some quick coloring with a sponge dauber before adding the glaze and glitter. The entire focal panel is layered onto a Soft Stone card base. I did use one of the sentiments on the inside to finish it up!  The gift and card have now been delivered to the new mama and sweet little bundle! Thanks for fluttering by!


Thursday, February 3, 2022

Heartfelt Sympathy

****this post was written prior to the recent PTI release that included a BUNCH of Sympathy cards 🤣***My sympathy stash has dwindled to a few non-mailable cards that I'll save for times when I deliver a basket or a dinner, or something. I needed one desperately, so I sat down and created this CAS card; just what I was hoping for. I dug around in my "new product" basket that I mentioned in a previous post to find these beautiful crocus dies that were part of the Simon Says Stamp "Stamptember" event. I die cut then from white cardstock and then colored them using finger daubers and Distres Oxide ink.


I used foam squares and liquid glue to adhere them together. I've found that foam squares don't like to stick to die cuts that are colored with this particular ink, so I've found that adding a dot of liquid glue to the foam square fixes that problem.

I used the embossing folder that was included with my Gemini Jr. when I received it for Christmas in 2020. It still shows that it is included with the purchase of the machine. This is the first time I have used it and I absolutely LOVE it! I cut a panel of Soft Stone cardstock measuring 3 3/4 by 5 inches and ran it through my machine in the folder.

The sentiment, which is one of my favorites, is from the Feathered Friends 4 mini stamp set and is heat embossed in gold onto a strip of vellum. I added the crocuses to the embossed panel using foam squares and then wrapped the vellum strip around the panel and secured it with adhesive on the back.

Once that was done, I added it to a top folding A2 Soft Stone card base using liquid glue. I resisted and didn't add glitter or sequins because it felt too flashy or something on this sympathy design. Thanks for fluttering by!


Tuesday, February 1, 2022

Papertrey Ink Flash Sale Happy Valentine's Day

Happy  Monday! I hope you all had a great weekend...I know many of you who are either freezing or buried in snow, and some are probably experiencing BOTH!! Hugs to you all and stay warm! I didn't get any creative time, so I'm happy to be here today with this week's project for my Papertrey Ink Flash Sale! I had so much fun using bits and pieces from a few different stamp sets to bring this card to life! 
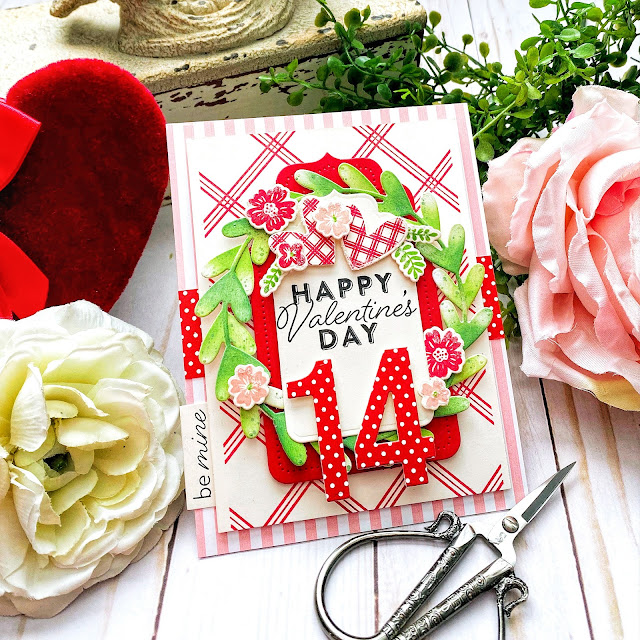
To begin, I die cut the largest and medium tags using the Charming Tags 1 die; one from Pure Poppy cardstock and one using Vintage Cream cardstock. I stamped the "Happy Valentine's Day" sentiment onto the cream one using True Black ink. 
Next, I die cut the numbers out of Bitty Big: Pure Poppy pattern paper using the Numbers Die. I also die cut one set out of cream cardstock to glue them together to make them more sturdy.  Then I used the XO Heart Frames Die to cut two of the largest heart circle frames. I used Bundled Sage, Mowed Lawn, and Rustic Wilderness Distress Oxide ink and finger daubers to bring them to life. 

I glued them together using liquid glue and then added some additional ink splatter using Rustic Wilderness ink and a paint brush. I just love the extra detail and dimension it gives the frame. 
Next I stamped a 3 3/4 by 5 inch panel of Vintage Cream cardstock with Pure Poppy ink using the Nifty Plaid background stamp. I love the added vintage charm it gives the card. This is one of those designs that just put itself together and I was just the hands doing it! ha ha!

Once I had all of those design elements ready, I felt like it needed a few added touches like the hearts and the flowers so I die cut them and stamped them using Pure Poppy for the hearts, Pale Peony and Pure Poppy for the flowers, and New Leaf for the leaves. I layered everything up on the Nifty Plaid background using foam squares. I also added the little tab in the bottom left corner that says "be mine". I used to add little tabs like this to the majority of my cards back in the mid-2000s and I miss it! 

I cut a piece of Bitty Big: Pale Peony cardstock and added it to a top folding A2 cardbase with a strip of the same paper I used for the die cut numbers across the middle. I then added the entire focal panel to that using  foam squares for dimension.
I had a few leaves and a flower left over so I added it to the top of this cute sentiment that is from the Inside Greetings: Valentine Mini stamp set to finish off this card! Thanks for fluttering by!