Saturday, January 22, 2022

Papertrey Ink January Release Countdown Day 1


Welcome to day 1 of the Papertrey Ink January release countdown! It is such a fun release and I have SO much to share with you today! Up first is a trio of cards using the fabulous new Into the Blooms: Roses die! They are so beautiful and easy to use to create amazing life-like blooms! I die cut all of the pieces using white cardstock and then colored them using an assortment of Distress Oxide inks and finger daubers.

This card also features the new Just Sentiments: With Sympathy stamp set; actually ALL of my cards I'm sharing today use different sentiments from that set. My sympathy card stash is lacking so I didn't mind creating a fresh stack to add to my collection. 

I learned a couple of tricks while assembling so many of these roses for this release. I will share them with you throughout today's post! As I mentioned earlier, all of the petals and leaves are die cut from white cardstock. One of the things that works really well is to alternate between light and dark layers, starting with your light layer as the base and work your way to the center.

Another trick that I found is to use liquid glue in the center of the first two layers and then add the 3rd layer using foam squares. that extra bit of dimension right there really allows the rose to look realistic. From there, I simply used liquid glue to adhere the last top piece.

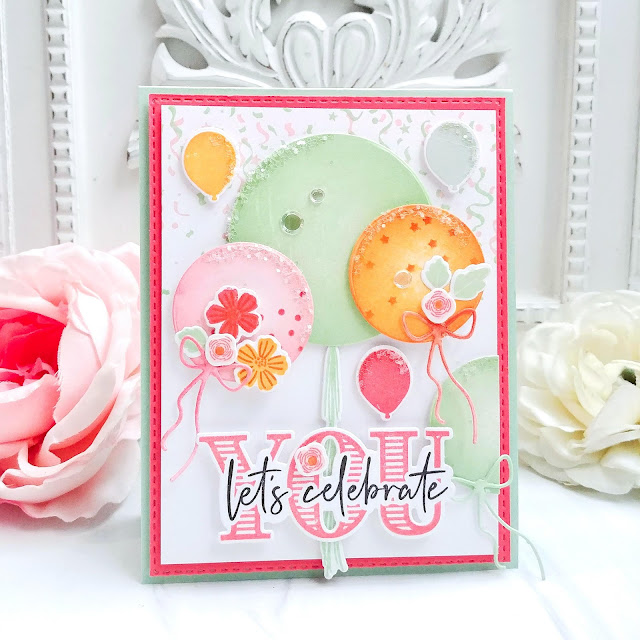
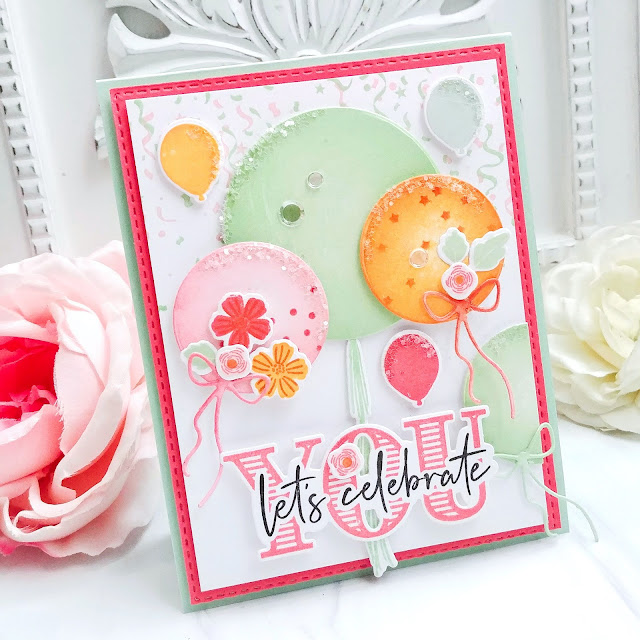
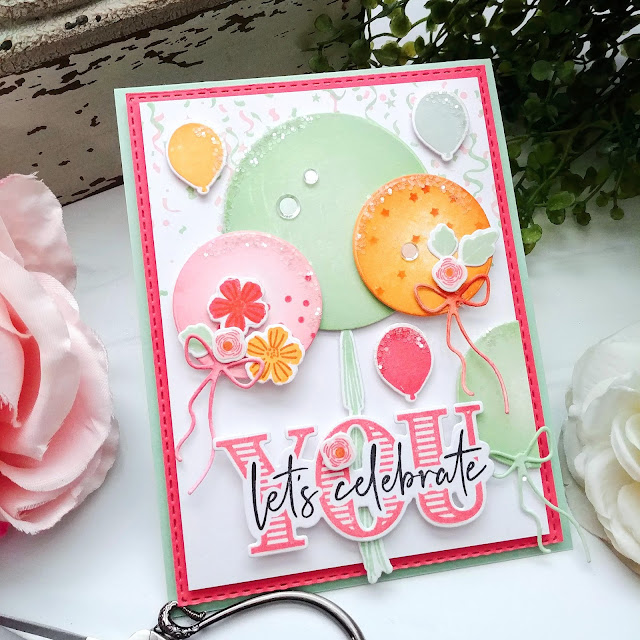
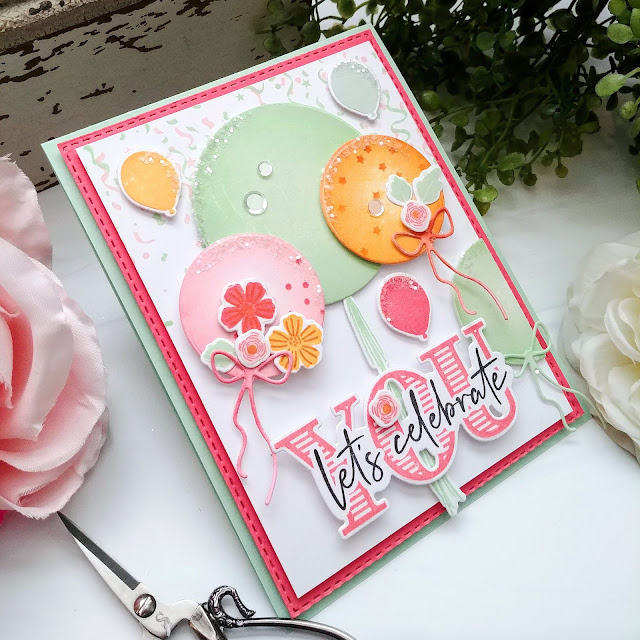
My sister gave me a beautiful set of nesting bowls for Christmas and this card was inspired by the set. The background is die cut using the Border Bling: Tin Stitch die on a A2 sized panel of Berry Sorbet cardstock. I die cut the Spring Rain layer using the Scallop Stackers: Large die and adhered it to the top of the Berry Sorbet panel using foam squares. I also die cut a white panel using the Nesting Basics: Rectangles dies and the Nesting Basics: Pierced Rectangles dies. I stamped the sentiment in black and then added the flowers and leaves using foam squares.

The new rose dies have beautiful leaves, but I also wanted to add some additional detail and interest, so I used one of the leaf dies from the Into the Blooms: Dahlia die collection. If I must admit it, almost every single card I've made so far has used this leaf! ha ha! 

I added some glitter to the edges of the leaves and each of the roses for some sparkle and shine.


My second card using the new Into the Blooms: Roses die collection uses the same leaves as I mentioned earlier, but I decided to mix things up and make them in shades of blue and turquoise. I was inspired by a piece of embroidery that I saw and I couldn't wait to incorporate some blue leaves!


If you saw my sneak peek that  I shared on Instagram, then you would have seen all of the roses I created in all kinds of different colors. This card features two of the largest yellow roses and the smaller sized pink rose.


I had a lot of fun creating the background, but when it was all said and done, I covered most of it up! LOL! I used the same tin stitch background panel like I did on the first card and then layered a stack of two of the die cuts using the Cover Plate: Elegance die.


The final layer of the background is the medium sized frame from the Pierced Feature Frames: oval. I layered the flowers and leaves here and there. The sentiment is heat embossed in gold onto a strip of white cardstock and then tucked into the pink rose.

My third card using the roses dies features two of my favorites; the lavender roses! I love how these two turned out, which is surprising because as I was inking them up, I had my reservations!

I created another tone-on-tone background by layering the On the Border: Floral Bliss Die onto an A2 sized panel of Aqua Mist cardstock. I defined the edges by adding some of the ink that I used on the leaves using a blender brush.

I clustered the roses in a triangle shape and then added the leaves here and there to frame the roses. The sentiment, which is from the Just Sentiments: With Sympathy, is stamped in black onto a white banner that is die cut from the Banner Builder Basics die collection.

I tried to use 2-3 colors of ink on each layer of the rose, making certain to bring in at least one of the colors I used on the previous layers for continuity and realism.

As I mentioned at the beginning of this post, I used the sympathy sentiment set for all of today's cards, but you could easily switch them up for any occasion.

My final card for today features the new Feathered Friends 19 die and the new Border Bling: Blooming Hearts die. I die cut all of the pieces for the bird, branch, and berries out of white cardstock and then inked them up with Distress Oxide inks.

There are quite a few small pieces and in the end I realized that I didn't put a piece on correctly! woops! Oh well! Anyway, I just carefully inked up each piece and glued them together using liquid glue and a foam square or two on the front wing.

I die cut the background using Stormy Sea cardstock and then blended some of the blue ink from the bird around the edges.

I forgot to mention that I added some additional shading and detail to the birds' wings using blue colored pencil.

My inspiration for this bird came from a picture of a completely different kind of bird, but I loved the colors so I gave it a try! In the end, I really like how he turned out! That wraps up day 1 and I'll be back tomorrow for day 2! Thanks for fluttering by!


Thursday, January 20, 2022

The Greetery Confections Collection Day 2

Welcome to day 2 of full reveals for the Confections Collection from The Greetery! This is the last day until the collection will be available for purchase on Friday! Make sure to head to The Greetery Blog for the full "meet and greet"! Don't forget to leave a comment on today's post to be eligible to win a gift certificate to the shop!
My first card for today is probably my favorite of the release and uses the incredible new Curio: Confections dies! It's no secret how much I love this particular series, but the addition of these new confections just takes it a whole new level!

I had the best time die cutting, inking, and assembling these cute confections. I simply die cut the pieces from white cardstock and then colored to my heart's content! The paper liner cups are die cut using vellum to give them a realistic look. The chocolates that I like to buy locally come in brown liners, but I don't have brown vellum. I think I like the airiness of the regular vellum better anyway!

When I showed Betsy THIS card, she sneaked and told me that she was working on creating a confection set to go along with the curio collection! I couldn't be more pleased with the result!

Although this would make a super cute Valentine's Day card, I opted to make it a birthday card by adding the BOW with the happy birthday sentiment stamped on the tail. 

The chocolate-dipped strawberries are part of the new BotaniCuts Strawberries die collection (featured in my next card) with the addition of the new Strawberry Dippers Dies. Some of the chocolates also feature the new Strawberry Sprinkles that are just the cutest thing EVER!

I'm a sucker for anything strawberry themed so these new BotaniCuts Strawberry Dies are right up my alley! I die cut all of the pieces and then used an assortment of Distress Oxide inks and finger daubers to bring them to life. I used liquid glue to adhere the berries to the stems and set them aside to dry. The leaves are attached using foam squares for added dimension.

The background was created by using the Tartan Builder Diagonal Stencil and the same ink I used for the berries, minus Abandoned Coral. I simply used the same pink for the first two series of stencils and then added in the red for the skinny stripe.

This card gives me all of the Strawberry Shortcake Doll vibes from my childhood! I mentioned yesterday that I would be using the Frosted Frames for all of my cards but one, and here it is used again! I die cut both the frame and the swirls using Berry Sorbet cardstock and adhered it to the stenciled background.

I also created the "happy birthday" sentiment using the new All Kinds of Happy stamp/die set. I die cut the letters and the shadow using the die set and then shaded the letters using the same combination of inks as the berries in an ombre fashion. I glued them to the shadow and then added some Nuvo Crystal Glaze for a juicy look.

While that was drying, I adhered the berry cluster to the card base using foam squares for dimension. The flowers are added using both liquid glue and foam squares. They are die cut from white cardstock and then I added the yellow centers with a colored pencil. 

I added a generous amount of glitter to the berries and leaves making certain to not get it on the sentiment. I didn't want stray bits of glitter to adhere to the shiny letters. The "birthday" portion of the sentiment is from the "All Kinds of Happy" stamp set, and is die cut using the Sentiment Suite Basics die for a finished look. Make sure to head to the other designers' blogs to see how they've used these new products! Thanks for fluttering by!

Kelly Lunceford (you are here)


Wednesday, January 19, 2022

The Greetery Confections Collection Day 1


Hello and welcome to day 1 of full reveals for the Confections collection from The Greetery!! Everything is so super sweet; just perfect for all of your Valentine's Day projects and MORE!!  I have two projects to share with you today and then join me again tomorrow for day 2 of full reveals for even more sweetness! I know you're going to fall in love!
As always, Betsy will have a fabulous "meet and greet" of all the new products over on The Greetery Blog! Don't forget to leave a comment on today's post to be eligible to win one of the gift certificates to the shop!

My first card features the new "Sweet Tooth" stamp/die set that will be available for purchase on Friday when the new release is live. I die cut each of the "sweets" twice using white paper and then had fun stamping them all using the coordinating Sweet Tooth stamp set. I loved the colors that are included in the stamping guide, so that is what I used. I just stamped them exactly as they are shown. I'm sure the rest of the design team will show them in sorts of fun combinations.

I used the "Chocolate Crumble Mix" to make these sweets and treats look good enough to eat! I simply used a bit of 2-way glue and then sprinkled them on. Please note: In hindsight, I really should have added each of the different sprinkles separately before I added them to the card. The "chocolate" varieties have really small pieces that stuck to the white space of my card. I used a paint brush to remove them, but it would have been better to do it before! wink!

The background was created by die cutting the new Frosted Frames out of both Mint Julep and Pale Peony cardstock. I adhered the Mint portion to a top-folding white A2 card base using foam squares. The pink swirly portion is glued down using a fine tip 2-way glue pen.

I also die cut the new Piped Sweet word using Pink and white cardstock. I adhered it to the center of the card base using foam squares. The Valentine Wishes portion of the sentiment is included in the "Sweet Tooth" stamp set and is heat embossed in white onto a strip of brown cardstock. From there, I added all of the different sweets using foam squares. I added glitter to the top of the "sweet" word and the confections as needed!

If you fell in love with the Bake it Merry stamp set that was part of the holiday release, then you're sure to love the new Love and Cookies stamp/die set that I've used for this card. I kept it simple so that you could really get that cute "baking" vibe; showing off the cute baking sheet, mitts, and spatula. I die cut the "LOVE" cookie from Kraft cardstock and then gave it some cooked edges by sponging some darker brown ink over the top, The detail pieces are die cut from white cardstock and then colored using ink and finger daubers. I added some of the new Heart Sprinkles to a few of the cookies using liquid glue.

The background was created by die cutting a piece of pink paper using the Square Dance die and then stenciling the darker color over the top with the Square Dance Stencil. This is layered onto a white card base using liquid glue. I have used the Frosted Frames on all of my projects but one for this release! ha ha! I added the pink frame over the top of the stenciled gingham using foam squares. The cute little details in the corner are die cuts that are included with the Frosted Frames die. I think they are supposed to be pressed cookies or maybe piped icing. I used them in the corners to give this card some fun details.

I added the cookie sheet and all of the fun stamped/die cut details to bring this card to life! The "on valentine's day" sentiment, which is included in the Love and Cookies stamp set, is heat embossed in white onto a strip of red cardstock. Of course these cookies needed a sprinkling of glitter! Make sure to head to the other designers' blogs to see what sweetne4ss they have to share! Thanks for fluttering by!
Kelly Lunceford (you are here)


Tuesday, January 18, 2022

Papertrey Ink Flash Sale {Let's Celebrate You}

I've been MIA lately, but I'm back today sharing a fun birthday card for this week's Papertrey Ink Flash Sale! I've used the cute Big Balloon stamp set as the starting point for this festive card. I pulled in a couple of other stamp sets to pull it all together!
I'm slightly obsessed with balloon stamps, dies, and stencils, but I'd don't think you'd ever know since I seem to collect them and then not use them! Ha ha! I was excited to pull this set out today to create today's card!

To begin, I die cut quite a few balloons in the three different sizes from white cardstock using the Big Balloon Die. I stamped the largest balloon in Mint Julep ink and then added some Vintage Jadeite ink around the edges using a blender brush. the two middle size balloons are stamped in Sweet Blush, Summer Sunrise, and Mint Julep. The smallest balloons are stamped using Summer Sunrise, Aqua Mist, and Berry Sorbet ink. The medium sized Summer Sunrise balloon has Canyon Clay ink blended around the edges and then I used the Big Balloon Stencil Collection: Stars to add the stars using Canyon Clay ink.

For the Sweet Blush balloon, I did the same thing, but used Berry Sorbet ink around the edges and for the stenciling, but used the Big Balloon Stencil Collection: Dots. I set the balloons aside and got to work on the background and sentiment.

I cut a panel of white cardstock measuring 3 3/4 by 5 inches and stamped the images at the top using both stamps from the Confetti and Streamers stamp set; one in Sweet Blush and the other using Mint Julep. I die cut the sentiment piece using the Mash-Up Birthday Die and then used my mini MISTI to stamp the "Let's Celebrate YOU" sentiment using the Mash-Up Birthday stamp set. This set was released when I was on summer break, so I was thrilled to use it on today's card. I stamped the YOU portion using Berry Sorbet ink and then stamped the rest using True Black.

I layered the biggest balloon centered at the top and then added the fringe tassel using foam squares. I then layered the medium sized balloons using additional foam squares. I centered the sentiment at the bottom over the top of the tassel. From there, I added in the smallest balloons and the strings and flowers/leaves. I added the chunky glitter here and there using a 2-way glue pen. Once that was done, I layered it onto a panel that is die cut using the Border Bling: Stitched Die using foam squares. The entire focal panel is adhered to a top folding A2 card base using additional foam squares. I added a few Moonshine sequins for even more detail and shine! Thanks for fluttering by!


Saturday, January 8, 2022

Reverse Confetti January Release Blog Hop

Hello and welcome to the Reverse Confetti January release blog hop! This entire release is so fun and full of amazing products! I'm sharing two cards with you today using a few of the new products paired with some older favorites! 

I'm in love with the whimsical style of the new Poppies stamp set. I chose to go with the traditional red poppy, but I can't wait to try stamping them in all sorts of different colors!  

To begin, I stamped four of the outline image from the Poppies stamp set in black and then added the color using the 5 steps to bring the se cute flowers to life. I used my mini MISTI so getting them all stamped was a breeze! I used the coordinating Poppies Confetti Cuts to die cut the flowers and set them aside. I knew for sure I wanted to use this particular sentiment from the new Big Heart Sentiments stamp set, so I die cut the outline shape and then used my mini MISTI to line up the image and then stamped it in black.


I die cut the Oh My Heart Cover Panel using white cardstock and then adhered it to a top folding A2 card base using liquid glue. I added a strip of red pattern paper that is from the This and That 6 by 6 Paper Pad to give the background some detail and interest. Once that was done, I adhered the center portion of the Stitched Note Frames Confetti Cuts using foam squares. I really wanted a place to "ground" the heart, which is from the new Postal Cover Panel Confetti Cuts, and this little stitched note is always a perfect choice.


The "I keep you in my heart" sentiment fits perfectly over the heart and I adhered it using foam squares. I heat embossed the "you are a gift to me" portion of the sentiment, which is one of the sentiments included in the Poppies stamp set, in white onto a strip of black cardstock. I arranged the Poppies around the focal images and then added the embossed sentiment.

I saved a few of the white hearts that were cut from the Cover Panel. I added them back into three of the empty spaces using foam squares and then coated them with Nuvo Crystal Glaze and glitter.  I also added a bit of glitter to the flowers and leaves for even more sparkle and shine!

My second card for today uses one of my all-time favorite stamp sets called Big Bear! I rarely make critter cards anymore, so pulling out this cutie was such a treat! I stamped him in black and then colored him with an assortment of Copic markers. I also stamped the mug, letter, and heart and colored those as well. 

I layered a piece of red striped paper from the Sweet Stripes 6 by 6 paper pad onto a top-folding A2 card base using liquid glue. I also layered the Postal Cover Panel over the top of that using foam squares. Please note: I cut an 1/8 inch off of each side so that you would be able to see more of the striped paper peeking out. I also layered the pale pink polka-dot paper from the Darling Dots 6 by 6 paper pad in the center of the postal panel.

I die cut the larger heart from the same striped paper as the background and then die cut the smaller heart using a cute pink pattern from the Pattern Play 6 by 6 paper pad. I layered both of the hearts onto the same heart that was die cut from white to give them more stability. I knew I would be popping them up with foam squares and I didn't want any wavy edges.

The "be mine" sentiment is from the same stamp set as my first card: Big Heart Sentiments. I added the accent sentiment, which is heat embossed in white and is from the previously released So Very Lovely stamp set

I stuffed Mr. Bear's arms with all of his accessories using foam squares. I added everything to the card base using either foam squares or liquid glue.

A trio of sparkling clear sequins finish off this fun Valentine's Day card! Don't forget to hop along to the other designers' blogs to see all that they have to share using this fun new release! Thanks for fluttering by!

Cheiron Brandon

Audrey Tokach

Becky Roberts

Maria Russell

Amy Rohl

Lisa Henke

Kelly Lunceford

Dilay Nacar

Amy Kolling

Michelle Short

Kellianne Wilson

Tiffany Pryce Russom

Andrea Shell

Rachel Alvarado

Dana Kirby

Candice Fisher

Susan Wymer

Amy Tsuruta

Tricia Barber

Melissa Phillips

Jenny Colacicco

Olga Moss

Jeanne Jachna