Saturday, May 18, 2019

Saturday Showcase {You mean so much to me}

Welcome to the FIRST Ink To Paper Saturday Showcase! Today a few of us are using the new Rustic Brick Background Stamp Set in a variety of different ways! During the countdown week, I used it on a masculine design, so I was happy to use it again in a different way! Following and implementing home decor trends can be just as much fun on paper as it can be in your home! I used the Rustic Brick stamp set paired with modern calligraphy and simple greens to create a card inspired by the current trends! It's definitely easier on the wallet and doesn't require months of renovation! LOL!
To begin today's design, I heat embossed the brick image in white onto a piece of Soft Stone cardstock. I wanted to get that light brick look that is so trendy right now. I layered it onto a piece of Kraft cardstock that measures 4 by 5 1/4 inches. The brick background is slightly smaller than an A2 card base so it gives you the opportunity to do some additional layering if you like.


I die cut the tag twice  from the Tag Creations: Blooming Indulgence die collection in black. I knew I would be heat embossing the sentiment so I doubled it to prevent any warping. The sentiment is from the new Many Anemones stamp set and is one of my favorites! I have quite a few home decor pieces like this in my home, with either white calligraphy on black or black calligraphy on white. 

The tag is attached to the brick piece using foam squares for dimension. The leaves are die cut in Ripe Avocado cardstock and Spring Moss cardstock. They are also from the Tag Creations: Blooming Indulgence die collection as well. I used a small blending brush on the Spring Moss leaves and pounced some Ripe Avocado ink on the edges.

 I added them around the perimeter of the tag using liquid glue. I only added glue to the leaves that would actually be touching the tag.  Once that was done, I used a post-it note to cover up the sentiment and added some black paint splatters for interest. I tied a bow of True Black Baker's Twine to the top of the tag.
I also created a few of the smallest flowers from the die collection as well to bring in an additional design element to provide extra detail. The "my dear friend" sentiment is from the Frame It Out: Wishes stamp set but is die cut using one of the included banner dies from the Tag Creations: Blooming Indulgence. As you can see, I pulled a lot of my favorite things from here and there to create today's card! I hope you enjoy today's "showcase"! Thanks for fluttering by!

Thursday, May 16, 2019

Papertrey Ink Throwback Thursday {You are so SWEET!} and Inspired by...Pillows

I'm so happy to be here today sharing a card for both the Papertrey Ink Throwback Thursday AND the new Inspired By Challenge! The stamp set that I chose to "throwback" to is one of my all-time favorites; Strawberry Patch! This is one of those classic sets that I turn to again and again, especially this time of year! It has been the star of MANY teacher gifts, thank you cards, etc. 

I wouldn't have normally added the yellow plaid with this card if it wasn't for today's challenge, but I really love the summer-y softness that it adds to my card! I used the Bitty Big: Harvest Gold pattern paper on the large side to bring this element into the design.


One of the things that I love most about this particular set is that it comes with both solid images and line art images. For today's card, I used the line art images because I wanted to color them with Copic markers. I die cut all of the pieces that I needed using the coordinating Strawberry Patch Die collection. Once that was done, I used my mini MISTI to stamp them quickly. I used an assortment of Copic markers to color them.


I used the Mix and Mat: Pinked Edge die to create the backdrop for the stamped images. I love all of the detail that it adds to this design.  I liked the pierced detail so much that I decided to bring in additional pierced details by using Nesting Basics: Pierced Rectangles on both the white edge and the yellow piece.

I used my MISTI to stamp the sentiment underneath the strawberries. I like my sentiments to be crisp and the MISTI allows me to do that! I also added some white nuvo drops to the centers of the strawberry blossoms as well as the seeds. I really like the dimension that it adds to the berries. I hope you get a chance to join us this week at Inspired By! Thanks for fluttering by!


Reverse Confetti Stock Your Stash {hooray for today}

This month's Reverse Confetti Stock Your Stash Challenge theme is Birthday! As card makers, this is probably the most needed variety along with thank you and sympathy! My birthday card stash has grown considerably recently, which lets me know I haven't been great about sending them out! It also helped that the new Reverse Confetti release had a ton of awesome birthday sets! The one image that I DIDN'T get around to using, is this amazing birthday cake from the new Cake and Champagne stamp set. I was so excited to let it take center stage on today's design!
No photo description available.


I searched online for images of "ruffle cakes" which yielded some beautiful results! I decided to use a pink ombre ruffle cake as the inspiration for the cake on today's card! I stamped the cake, the flowers and the banner topper in black ink and then colored them using Copic markers. One they were colored, I die cut them with the coordinating Cake and Champagne Confetti Cuts and set them aside to work on the other elements of the card.

I decided to use the new On The Curve Cover Panel over a piece of Darling Dots pattern paper, but turned upside down. I guess there really isn't any "right" way to use this, but I used it the other way during the release as I think everyone else! LOL! I really  liked it turned this way because it helped reinforce the look and feel of the banner cake topper that is so cute!

 Since you all know how much I love the Stitched Note Frames, I just didn't want to let anyone down! LOL! I added it over the edges of the Cover Panel using foam squares for dimension. I also used the center "note" portion as the grounding layer for the cake. I was hoping to use one of the included sentiments, but because of the layout I chose, it just wasn't possible. Instead, I opted for a sweet sentiment from the So Many Sentiments stamp set. I did, however, use one of the included sentiments on the inside of the card, which you can see at the bottom of this post.
 I arranged the flower clusters on the cake just as I would if I were decorating a real cake, the banner piece is glued behind the top of the cake using liquid glue. I added a few sparkling clear sequins and A LOT of Shimmer Spray! Normally I add it AFTER I take my photos, but since all of the colors are so light on the card, I knew it wouldn't cause a problem when I photographed it.
This design could easily be turned into a shaker card if you wanted. I created a shaker card using this Cover Panel during the release and it turned out wonderfully. The reason why I liked it so much is because the sequins were able to be confined in each "cell" so to speak. Sometimes shaker cards aren't as fun when everything just falls to the bottom.

Here you can see the sentiment stamped on the inside. I always stamp more flowers than I end by using on the front, so I took the opportunity to add them to the sentiment. I hope you all get a chance to join us this month! Thanks for fluttering by!

Tuesday, May 14, 2019

Ink to Paper Countdown Day 4


Hello and welcome to the 4th and final day of the Ink To Paper countdown! All of the new products will be available for purchase on the 15th starting at 10 PM ET. What do you have on your list so far? If it were me, this new Tag Creations: Blooming Indulgence and the coordinating sentiment set would definitely be at the top! I actually made two projects using this new die collection and sentiment set, so make sure you scroll down. We're also showcasing another new floral set called Many Anemones and a background called "Loosely Woven" that is my final project for the release!
To begin this card, I did  A LOT of die cutting! LOL! Actually, what I did first was arrange all of the pieces that go with each flower. I just laid them in a line on my desk. This made the die cutting AND assembly process SO much smoother. Once you know how each bloom is arranged, it is very easy to assemble. The banner is actually an assembled piece as well. It coordinates with this large "For You" sentiment and then there is a smaller banner die for each of the smaller sentiments. I used that one in my next project.

The circle that I used on this card is actually the tag that comes with the die set, I just covered up the hole portion with flowers. You will be able to see that in my next project as well. 


 I used a lot of gold accents on this card for an unexpected design. The centers of the small flowers are all die cut using gold specialty paper as well as the veins on the leaves. The detail portion of the larger blooms are gold as well.
 I heat embossed the large sentiment in gold and then stamped the smaller sentiment in Raspberry Fizz.
This next design uses  a lot less blooms, but I think it still has a great impact! You can see the tag shape a little bit better on this one as well, since I intended it to be a tag all tied up with twine!

 To be honest, these flowers were my "practice" ones, but I really like how they turned out! They are really fun to put together. I used different colors of cardstock for each of the different pieces, but you could totally die cut them all in white and then use Copic markers to color them in different shades. I still want to try that! You can see the smaller banner piece on this card as well with the "hello beautiful" sentiment.

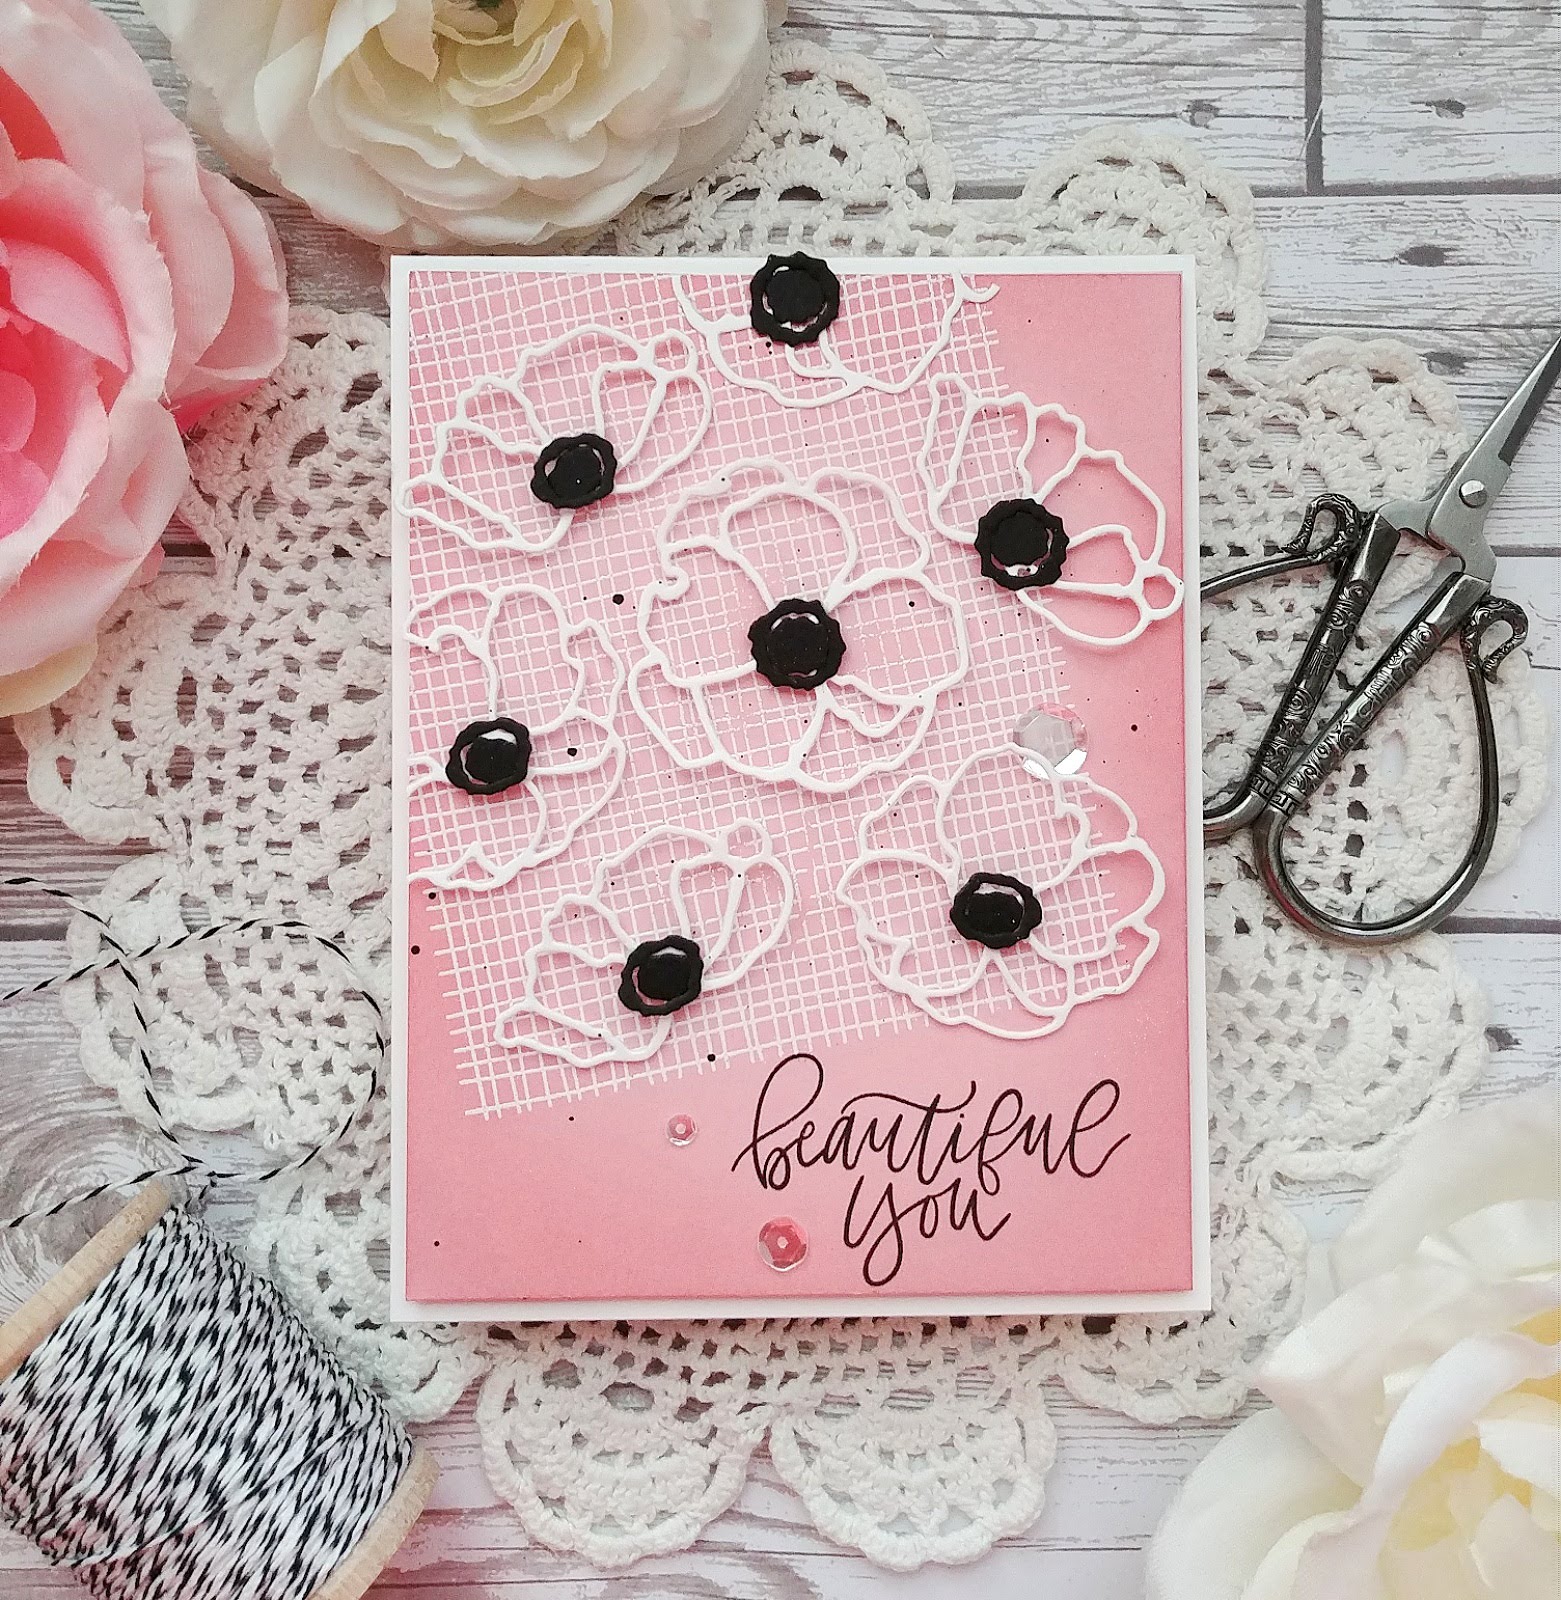
This last card uses the new Many Anemones set paired with the Loosely Woven background stamp. I heat embossed it in white and then added some ink sponging around the edges for some contrast.

I love the fonts and sentiments that are included in this set. I stamped the "beautiful you" sentiment in black at the bottom.

There are quite a few combinations of ways to create the Anemones in this set. I tried just using the outline portion and the centers for an unexpected look. Once it was done, it really kindof reminded me of lace.

I used some foam squares right in the center of the flowers to pop them up. The black centers of added using liquid glue.

I took a post-it note and covered up the sentiment and then added some black paint flecks. I did my laundry today and noticed that the shirt I was wearing while creating this also has black paint flecks! LOL! I guess I should wear a smock! 

I added a few sparkling clear sequins here and there for some shine. Thanks for fluttering by!

Monday, May 13, 2019

Ink to Paper Countdown Day 3

Welcome to day 3 of the Ink To Paper Countdown! Today I'm sharing two projects; the first one using the new sentiment set called "World's Best Dad". This particular set has lots of different names for "dad" which is always helpful depending on who will be getting the card, and even who will be GIVING the card. We're also using a new background stamp called "Rustic Brick".

Because this set doesn't have any "images", just sentiments, I created the focal point by using a layered tag. This particular one is a favorite of mine and does have a masculine feel. It is the Tag Sale #7 die and I love using it for all types of projects. 

I also created the banner at the top which gave me the opportunity to show a few more of the smaller sentiments. The banner was created by die cutting some blue paper using the Banner Builder die set.

All of the sentiments are embossed in gold to help them stand out. 

The background was created by stamping the Rustic Brick stamp using Distress Oxide ink and then adding some ink blending around the edges. 

The next card I'm sharing today uses the new Simply Sweet: You stamp set. I pinned a wedding type picture a year or so ago and it reminded me so much of these cute images. I paired it with the super old, but awesome, Road Trip pattern paper . I stamped the mountain images and then fussy cut the map paper and added it using liquid glue.

 The sun is stamped in orange with a drop of Nuvo Crystal Glaze in the center. I stamped the "YOU" in black at the top of the striped paper using my MISTI to line it up properly. I also stamped the "will move mountain" in black. 
I lucked out and had some rust colored thread that was in my sewing machine from mending holes in the knees of pants (story of my life with boys) and it worked perfectly for this card. I stamped the heart at the bottom for a quick and easy graduation card. Thanks for fluttering by!


Sunday, May 12, 2019

Ink To Paper Countdown Day 2

Welcome to day 2 of the Ink To Paper countdown! Today I'm sharing a card made using the new Celebrating You stamp set. I also have two other projects below, so make sure you scroll down to  see those! Before I begin, you'll want to head to the Ink To Paper Blog as well to see some other awesome inspiration!This new set has lots of different balloons, strings, confetti and bows! As much as I wanted to add EVERYTHING onto today's card, I tried to edit my enthusiasm! Ha ha!

To begin this design, I added some Hawaiian Shores ink around the edges of the card to create a soft look. I kept it lighter in the center to provide contrast. The "happy birthday" sentiment, which is included in the Celebrating You stamp set is stamped in black. I like to use a stamp positioning tool to get the image nice and crisp. 


I stamped a whole bunch of balloons in different colors and shapes to create some visual interest. I also stamped and die cut different strings, bows, and tassels for some interest as well. I die cut an oval using the Nesting Basics Pierced Oval die cuts and layered that onto the blended panel. I also added the sentiment using foam squares. Once that was done, I simply arranged the balloons and added some confetti using the included circle image. A few sparkling clear sequins finish off this bright birthday design!


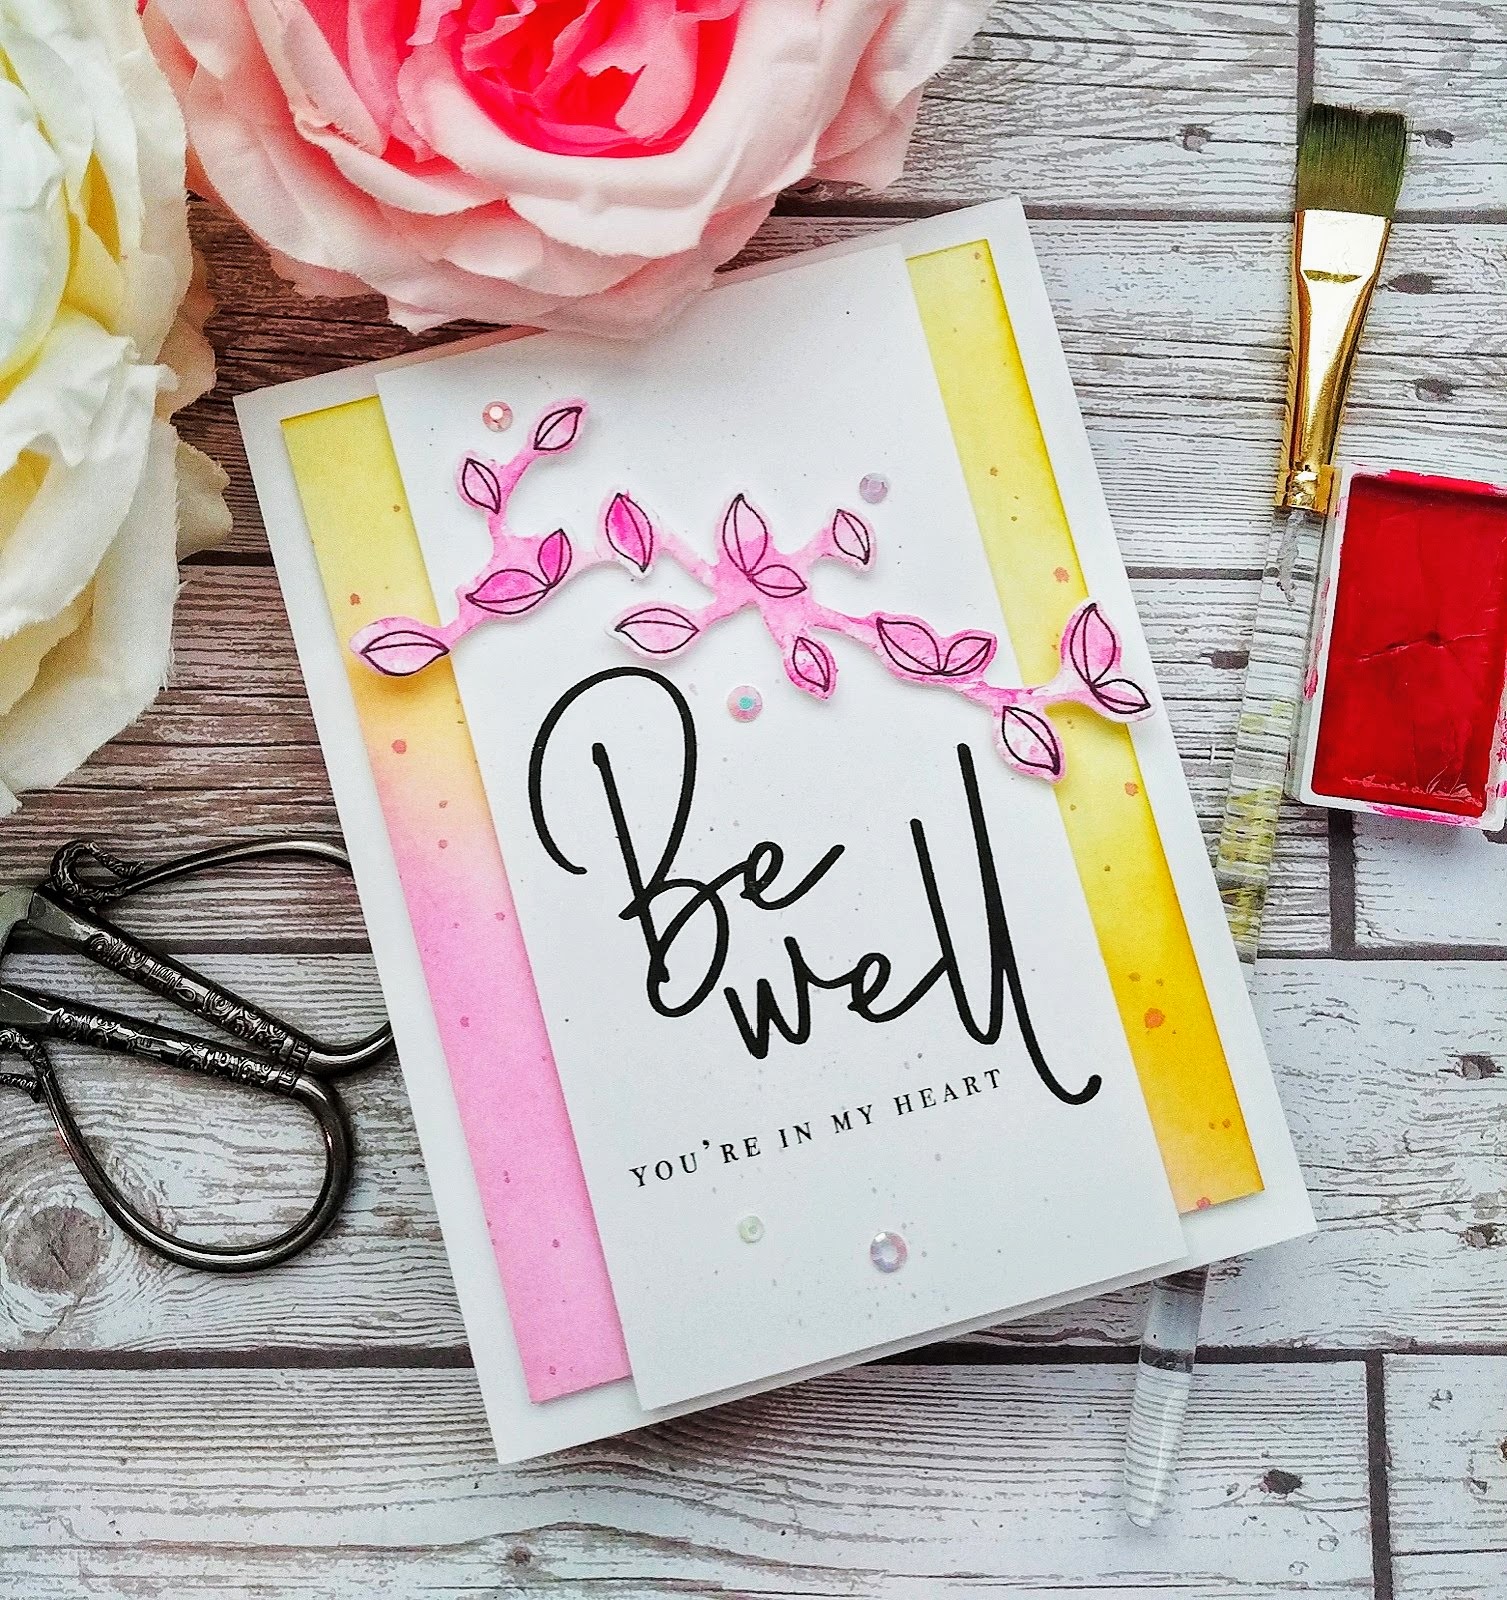
My next project uses the new Frame It Out: Wishes stamp set. Once I finished this card, it reminded me of packaging for a perfume or something! LOL! I didn't think I would like a simple design so much! To begin, I did some ink blending in pink and yellow. I also added some ink splatters in the same pink. I set it aside to dry and got to work on the sentiment panel.

I had accidentally gotten some splatters on this piece of white that was sitting on my desk, but rather than throwing it away, I decided to embrace more splatters and used it as the focal point for the design. I simply stamped the sentiments in black and added it to the blended panel.

 I stamped the leaf image in black and then die cut it using the coordinating dies. I did some quick, messy watercoloring and adhered it above the sentiments using foam squares.
 You can see how everything is popped up in this picture. I really like adding a lot of dimension when I create CAS designs. I added a few sparkling gems here and there for some sparkle and shine!

My last project of the day uses the new Be Happy stamp set and coordinating dies! These daisies were just begging to be stamped in shades of yellow and red for a "Happy" design! I don't normally create in these colors so it was fun to stretch myself!

I got to work stamping lots of daisies in different yellows and the red. I also stamped the pot in a few different shades to get a realistic looking terracotta pot. Once I had everything stamped, I die cut them using the coordinating Be Happy dies. I also added some tiny black dots to the center of the flowers using a black marker.

I stamped all of the sentiments in black and then die cut the word "happy" using the included dies. I glued those directly onto the stamped portion using a 2 Way glue pen. Once that was done, I added some Crystal Glaze over the top. I used a piece of Bitty Big: Green Parakeet pattern paper as the background for today's design. I thought it made the flowers pop and reminded me of something from my childhood!

I hope you've enjoyed today's projects! I'll be back tomorrow for Day 3 of the release, so stay tuned! Thanks for fluttering by!