Wednesday, February 14, 2018

SugarPea Designs February release day 3

Happy Valentine's Day! I hope you have a wonderful day filled with love! Welcome back for Day 3 of the SugarPea Designs release! As you can see, this new Otterly Adorable set is, well, utterly Adorable! LOL! I had so much fun coloring these cuties! My brown Copic marker selection is dismal, to say the least, so I was thinking I would need to go buy a whole bunch of new ones to color these otters! I was thrilled to discover, after a google image search of otters, that there is a gray variety! I really liked how they looked while they were wet, so that is where I got my inspiration! The team is also showcasing the new Large Striped Coverplate, which is so versatile for so many cards! You'll want to see what the other designers came up with as well! I'm the only one that went with pink, but I couldn't resist since I knew this card would fall on Valentine's Day! I also gave it a "love" theme, but on the inside it has one of the birthday sentiments!
Guests:


For my card, I sponged a piece of Bristol paper using Worn Lipstick Distress Oxide ink. I also spritzed it with Shimmer spray for some shine and some blotchy water marks. I added the new coverplate die cut over the top and spritzed it with more shimmer spray. The otters are colored using Copic Markers. I added a layer of Wink of Stella and Nuvo glaze over the top to enhance the "slick" look of the otters. I also used a white gel pen to make whisker pores, pads on their feet, and a glimmer in their eyes. I just love how you can add extra detail with a white gel pen. I added some clear Nuvo drops here and there to represent bubbles as well as a few sequins. I added a birthday sentiment to the inside and gave it to my sister a few days ago for her birthday! I told her it was TOP SECRET! LOL!Thanks for fluttering by!

Tuesday, February 13, 2018

SugarPea Designs February Release Day 2

Hello and welcome to Day 2 of the SugarPea Designs winter release! Wasn't Day 1 AMAZING? I just love the new products being released and today is no exception!
 

Today the team is showcasing another GORGEOUS new set called Heartfelt Sympathy and coordinating Sympathy SugarCut. I just love how nicely it pairs with the Pretty Peonies set that was showcased yesterday. I know that these will be my new go-to Sympathy supplies for any needed cards. I was just mentioning recently that I hate needing Sympathy cards, but now I have one on hand. You can see what the rest of the designers have created here: 
Guests:

 I wanted to keep my color palette soft, but cheering. I like to strike a balance between cheerfulness and respect and I think this blush and grey combination achieves that. To begin, I used the Card Front Element Builder SugarCuts that were showcased yesterday as well. I used them in a different way to show how versatile they can be. The possibilities are endless with these and I have only scraped the surface of what I plan to do with these! I can't wait! I stamped the peonies in black ink at each corner as well as the sentiment on the bottom. I really like how all of the sentiments work so well together! I normally wouldn't use two sentiments on a card front, but with this new set, it worked seamlessly! The addition of the die cut really made it possible to add in an extra sentiment to strike a balance between the bold and the narrow.


The ran the die cut 5 times through my Cuttlebug. I embossed the tips of the letters like I did on yesterday's card. I also added an additional layer with some Nuvo Glaze for some shine. The "with deepest" sentiment is heat embossed in gold as well to bring in a touch of warmth. The sequins finish off this design. Thanks for fluttering by!

Monday, February 12, 2018

Merry Monday #277-Do you wanna build a snowman?


Happy Monday! If you're looking for my SugarPea Designs release post, please scroll down! Whew! It has been a whirlwind of creating, cleaning, and catching up! I am so glad that I kept up on things design-wise before I got sick or I would have really been in trouble. That being said, I almost completely forgot to make my card for today's Merry Monday Challenge, but as you can see, I got it done! I din't want to miss out on this one, because it is super fun!
Deanne has challenged us to use a stencil on our cards this week and I have so many fun ones, it was hard to pick. In the end, I decided on this polka dot stencil from American Crafts. I got it on clearance at Target quite a few years ago, but I just love using it. I used it in a similar way back in the summer on a few of my mermaid cards that you can see HERE and HERE. For today's card, I just taped it over a piece of Aqua Mist cardstock and blended on some Broken China Distress Oxide ink. While the stencil was still in place, I spritzed some Frost Shimmer Spray over the top. I quickly removed the stencil at that point so that I could clean it.


While that was drying, I needed to decide what direction my card would be headed in! LOL! 99.9 percent of the time, my mind's eye has already created a plan of where I am headed, but not this time. I rummaged around through my die cuts and thought that THIS die cut would look nice to frame something...LOL! So, I die cut it from gray cardstock. I really liked how these two cool colors looked together, so I decided to go down a snowy path. I know that I JUST used In the Meadow, but it is so cute, I thought it would work perfectly for today's card as well. I used the coordinating DIES and then heat embossed the snowman using Wow Puff embossing powder. I just love the effect that it gives the snowman!
I wanted to create a piece for the center to anchor the snowman onto, but I didn't want to hide any of the stencil work I did. I decided that a vellum tag from Papertrey Ink would be perfect! It is just the right size and fits the scale of the card nicely. It is called Tag Sale #5. I have used it so much for many of my cards and of course to make tags for the holidays! I stamped a trio of snowflakes that are included in the In the Meadow set using Fresh Snow ink.

I also added some white Nuvo drops all over the die cut frame for some added detail and dimension. The sentiment is heat embossed in silver to keep with the cool, snowy feel, but I like the warmth that the Simply Chartreuse cardstock gives the card. I would most generally think of this combination for spring or summer, but I really like how it looks for this card! It reminded me of another Merry Monday Challenge from last year when I made THIS card! It ended up by being one of my favorites! The sentiment strip is just a strip of cardstock that I trimmed from a piece of cardstock that I had made for a project that I didn't end up by using, but I created it by using the Mix and Mat Scallops die. I toyed around with leaving the hole of the tag bare, which I actually really liked, but in the end decided on a double bow of silver cord. I adhered it with a mini glue dot for security! Thanks for fluttering by!

SugarPea Designs February Release Day 1

Welcome, Friends! I have been so excited to share the new release from SugarPea Designs! This entire week will be jam packed with all kinds of amazing new stamps and dies! I had so much fun creating all of my designs for this release!
 Today, the team is showcasing the new set called Pretty Peonies as well as a fabulous new set of SugarCuts  Card Front Element Builder 
The "hello" SugarCut is the free incentive for this release as well! Isn't it fabulous? I think I've said fabulous already about 1,000 times already in this post! LOL! You can see what the rest of the designers have come up with HERE! You will want to stop by each and every one of their blogs, I promise! Everyone did such a wonderful job with these new products!!!

For my card, I wanted to incorporate as many of the new products as I could without it seeming cluttered. To begin, I used the new card front element builders to create the rounded edge of the white paper. I stamped the flowers in black around the edge and then colored them with Copic Markers. I did the same cutting with a piece of Spots and Stripes Pattern Paper Pastles so that I could layer them nicely.


The "hello" is die cut 4 times out of black cardstock and glued together, I then used a Versamarker to ink up just the tops of the letters and then heat embossed them using gold powder. I just love the way it turned out. The black base has the outer die cut as well as the inner scalloped die cut included in the new SugarCuts set. I layered them on top of each other and then heat embossed the "thinking of you" sentiment, which is included in the Pretty Peonies set, using gold powder. It felt like a breath of spring, even though we really haven't had a winter. Thanks for fluttering by!

Friday, February 9, 2018

Valentines in a Flash!


The countdown to Valentine's Day is ON, which means I will be sharing quite a few projects over the next week, including the SugarPea Designs release! I am SO excited!!! I asked my cute daughter if she wanted to take some Valentines to her dance classes. She said she was too old for that and it made me sad! She does have 5 classes so it would be a LOT of Valentines, but I was willing to do it. Needless to say, she decided on something for JUST her Jazz class. THIS is what I USED to make, so these were DEFINITELY scaled back. I quickly got to work because it was totally last minute and I didn't have a lot of time. I had purchased some Bath and Body Works sanitizers earlier and were waiting to be used.

To begin, I grabbed 5 pieces of assorted card stock. I cut them in half and ran them through my Cuttlebug using the Pillow Box Die, which is one of my favorite, go-to dies for quick gift giving! I used them recently on THIS project. I really like the idea of using just one sheet of an assortment of papers so it minimizes costs and you can use what you have on hand, rather than going to the store to buy more of one color, or using your precious stash of a favorite color! LOL!

Once they were all cut, which didn't take long at all, I placed one of the heart images from With all my heart into my MISTI so that I could quickly stamp the boxes with accuracy! It was so easy just to quickly swap them out. It also made it easy to stamp them again if I didn't get a perfect impression the first time. I used Fresh Snow ink, which in the end, turned out better on some colors than others, but I didn't want to switch inks for my fast project!


After the white hearts were stamped, I grabbed the coordinating "4 ever" image to stamp in the left corner. I used Palette Noir ink for this. I also used the "with all my heart" image stamped in Pure Poppy ink on all of them, except the red cardstock.

I assembled the boxes using scor tape on the edge. The sanitizer fits in the pillow boxes perfectly!

It was really hard for me to not add any die cuts, ribbon, bows, or any embellishments of any kind. HOWEVER, by layering the stamps, it gives the illusion of dimension without all of the work! This is a PERFECT  last minute idea, OR for mass producing a lot!

Here they are, all ready to go in my basket...but guess what? She decided she didn't want to take them before I had even finished! LOL! She said that she would be the ONLY one bringing something! They will be heading to my PTA meeting with me this morning! LOL! 

Thursday, February 8, 2018

With all my Heart!

Hey friends...it's seems like I've been gone forever, but really it's only been a few days. I've been sick since Sunday night and it's really drained me. You know when you wonder if you'll ever feel like yourself again or even want to do anything ever again? Yeah...that's how I've been. B Valentine's Day is getting closer and it is going to come whether I am sick or not! Before I begin, I have an exciting announcement that many of you probably already saw on my Instagram account @kellylunceford. I'm joining the Papertrey Ink Traveler's Journal team this year and I am beyond excited! I will be sharing projects once or twice a month, so stay tuned! 
I decided to pull a few little gifties together for my boys' teachers. My 1st grader has two teachers and my 2nd grader has his regular teacher, plus his special ed teacher, so...that means I get to make 4 of everything for every holiday. I really don't mind since they are AMAZING in every way and I feel so blessed to have them in my children's lives!

I liked how THIS project came together, so I chose to use many of the same elements with the addition of the With all my Heart stamp set for a Valentine's Day spin! I love how the top of the TAGsays "With Love" and I knew it would be a great layering piece to create the focal point for these little Valentine basket/buckets. I have made these in the past, which you can see HERE and another one HERE. All of the stamps and dies are from Papertrey Ink

This particular design has LOTS of die cuts! To begin, I stamped the heart image and added the flowers, leaves and "be mine" sentiment on the banner. The Limitless Layers: Hearts dies were out of stock when I got this set, but I see they are back in stock and already in my cart! LOL! P.S. This is an older set, but I just recently purchased it. It hasn't been YEARS since I saw they were out of stock! LOL! So, because I didn't have the dies, I just fussy cut around the hearts, leaving a little bit of the white border. I also stamped and die cut an army of flowers and leaves from the Farmer's Market Floral stamp set and coordinating dies.

The tags were die cut and stamped using the dies and Made with Love set. I layered the tag onto a die cut piece of cardstock using the Mix and Mat Scallops die cut (see, I told you there were a lot of die cuts) The tag is threaded with ribbon and lace with a Sweet Blush button hot glued on the knot.

The circle seal image is also from the "With all my Heart" set and is heat embossed in silver onto a piece of Pure Poppy cardstock. I just love how it looks heat embossed and popped up onto the heart. I scattered the flowers and leaves here and there for a pleasing arrangement. 

I was just planning on making the boxes/buckets but as I was cleaning up,I realized that I could make some cards really quickly by just layering stamps and not so many die cuts. The cards are 3 1/2 inches square, with a scalloped nestabilities die stamped with all of the images. The only extra detail is the seal, which is easily punched with a circle punch. I really like having a little spot to write down a quick note of thanks to them!

I still have a few projects I would like to get done between now and the 14th so stay tuned! Also, next week is SugarPea Designs RELEASE WEEK! I am so excited! It is a fabulous release! Thanks for fluttering by!

Tuesday, February 6, 2018

Tuesday Ideas (Thinking of You)

Hello friends! I'm over on the Precious Remembrance Shop blog today sharing my second installment of Tuesday Ideas. I wanted to share a card using buttons because the Shop just introduced a whole new assortment of beautiful buttons! I thought it would be fun to use a piece of acetate stamped with the darling jar image from the Oh So Fun set using StazOn ink. I grabbed an assortment of Buttons and used glue dots to adhere them behind the acetate. The acetate is secured to the card using a zig zag stitch. I also added a few of the triangle banner pieces at the top to mimic the pattern of the stitching and add another pop of color! The sentiments are from the newly released Daily Thoughts and I thought they paired nicely with the jar. I added a strip of floral pattern paper to finish it off. 
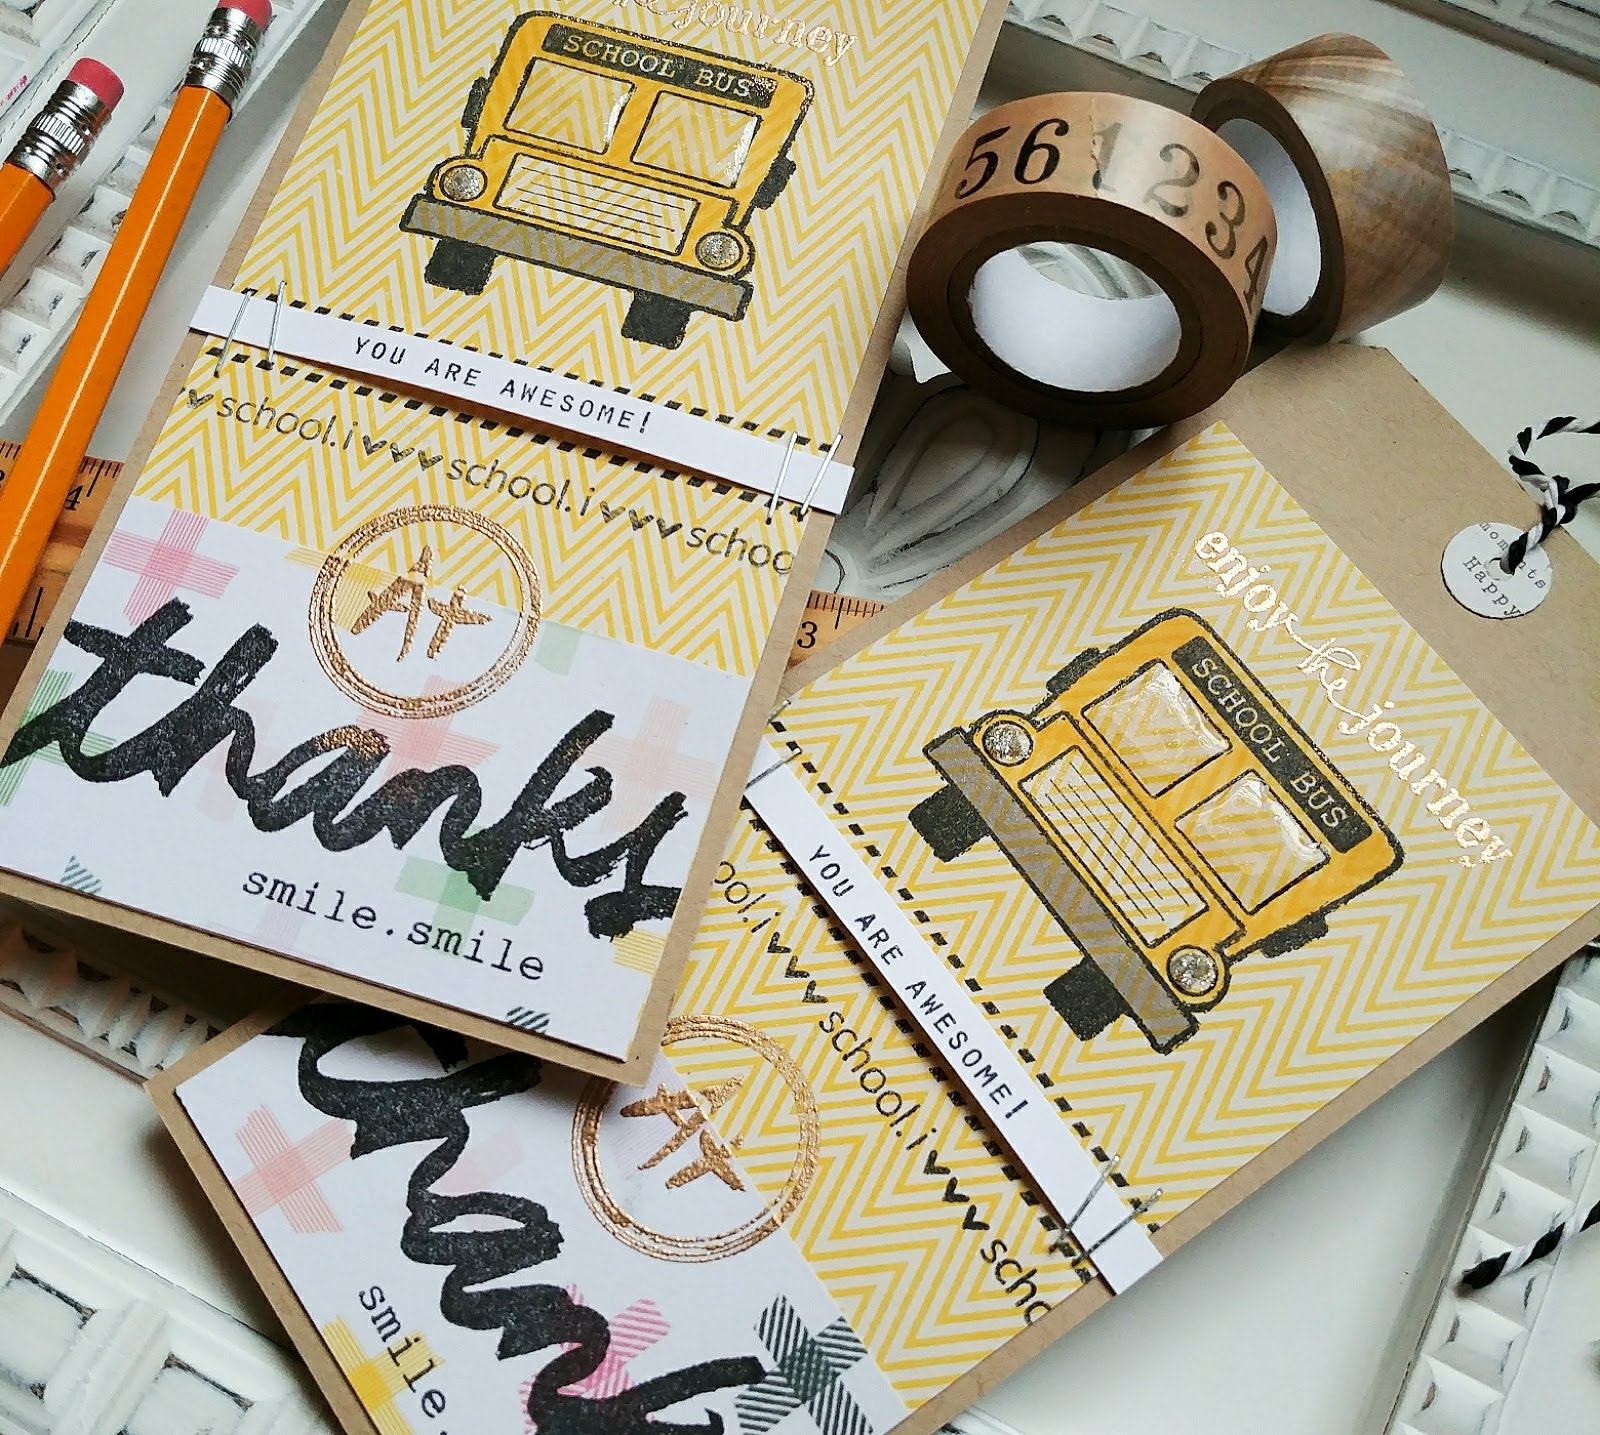
I also wanted to share a fun, quick project that I made last week for my boys' teachers. I shared it on Instagram but wanted to wait to share it here because I had a lot of posts last week. We had Parent/Teacher conferences and I wanted to give their teachers a few replenishment supplies for their classrooms as well as a little goodie! 
 I created these tags to add to the packages.
I paired up the School Days set with the Journey stamp set. I thought they worked well together. 

I colored the bus using copic markers. I added a mix of heat embossing as well for some shine. These were so fun to create! Thanks for fluttering by!