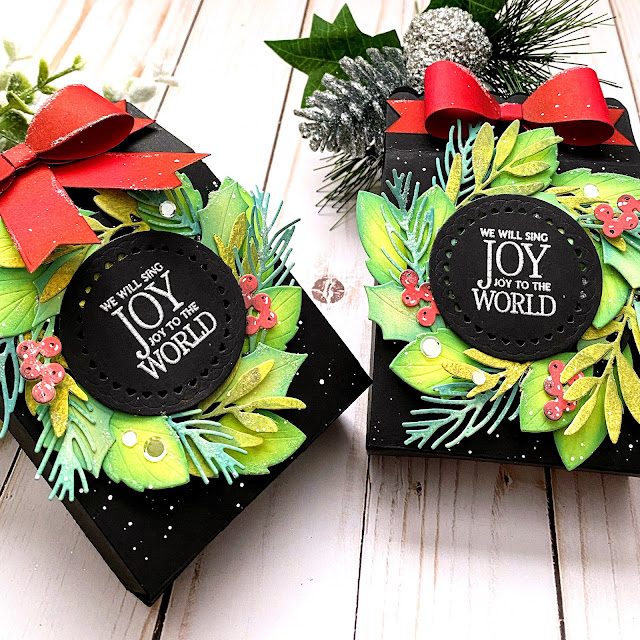
It's December! Wow! The last month of the year...where has it gone? It's my turn for "The Great Cover-Up" feature on the Papertrey Ink Blog. Since we're all hustling and bustling to get all of our packages wrapped and under the tree, which really is "the great cover-up", I thought it would be fun to create some cute packages for treats or small gifts! I used a mix of old and new for these fun and festive boxes! Please note: as I am typing this, the PTI website is down so I won't be able to link a few of the items. I will try and come back and link when I can.
To begin, I die cut a BUNCH of leaves and greenery to create the wreaths for the focal point of each box. The regular looking leaves, both the large and small, are from the newly released Into the Blooms: Peonies die collection. I inked these up with Twisted Citron, Mowed Lawn, and Pine Needles Distress Oxide ink using a blender brush. Next, I die cut the pine branches using the Tag Creations: Modern Gift die (actually, the rest of the foliage and berries are from this collection as well) and colored them using Evergreen Bough and Pine Needles Distress Oxide ink.
The leaves that look like sage, both the large and small sprigs, are colored using Crushed Olive and Forest Moss Distress Oxide ink. The holly leaves are colored using Bundled Sage and Pine Needles Distress Oxide ink. The berry branches are just colored using residual ink from my blending brush, and the berries are colored using Festive Berries, Aged Mahogany, and Black Soot inks.
The funny part about these wreaths is that it looks like I went a little crazy with the saturation tool on my editing software, but in reality, this is just how they look in real life. I almost felt like I needed to set the saturation down so they wouldn't look "fake", but this is really how colorful they are! ha ha!
The funny part about these wreaths is that it looks like I went a little crazy with the saturation tool on my editing software, but in reality, this is just how they look in real life. I almost felt like I needed to set the saturation down so they wouldn't look "fake", but this is really how colorful they are! ha ha!
Once I had all of the foliage ready, I die cut an "O" shape from black cardstock using two circle dies nested together. I was planning on using the wreaths with the center hollow (I hadn't planned the sentiment) so that is why I did it that way. In hind-sight, you can't even tell that they are in fact, paper wreaths! ha ha! Oh well! Anyway, I chose black cardstock since my boxes are black and I didn't want the wreath frame to show. I had fun adding all of the different leaves, berries, and pine sprigs to create each wreath. I didn't have three berry clusters for both wreaths, so I decided to give the bow on that box the extra ribbon "tails".
The boxes are die cut using the Scallop Top Gift Bag Die from True Black cardstock. I layered each wreath in the center of the box, making sure that the leaves weren't going to hang below the box so that they could stand up. Also, I used black Stampin' Dimensionals from SU! for this entire box so that everything was hidden against the black cardstock. Once the wreaths were placed, I added the bows that are die cut using the new Small Dimensional Bow Dies. I opted to hot glue these to the top and secure the box shut using adhesive Velcro dots that were cut in half. This way the recipient doesn't have to "undo" any bows; it stays pretty!
I added white paint splatter at this point and then added the sentiment, which is from the Just Sentiments: Heaven and Nature Sing stamp set. It is heat embossed in silver and die cut using the smallest circle in the Love to Layer: Scalloped Circle die collection. At this point I realized that you couldn't actually tell that it was a paper wreath, but I like how it turned out. Another design option that I toyed around with, was a sentiment stamped on a banner and placed in the middle of the wreath. I might try that, but for a card using this same idea. The finishing touches are some glitter (of course) and a trio of Moonshine sequins. I'm thrilled with how these turned out and can't wait to fill these up with gifts for friends and family! Thanks for fluttering by!


3 comments:
BEAUTIFUL WORK, Kelly! I saw this on my PTI e-mail, & KNEW it was YOU! LOL I LIKE the bright color of Twisted Citron! No adjustments needed for me! LOVE the bright & colorful colors, REALLY EVERYTHING you've done with this! A SUPER JOB & I DO LOVE the black too! STRIKING!!!! ALWAYS AMAZING!!!! ;)<3
Wow! You’re always so sweet! Thank you so much!❤️❤️❤️
Thank you so much!❤️
Post a Comment