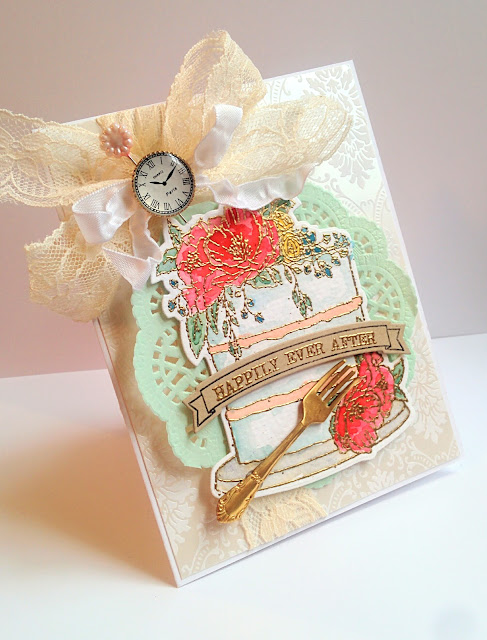
I'm back today putting some of my Mother's Day goodies to good use! I have a wedding reception to go to on Friday so they came just in the nick of time. I've had the Happy Day stamp set for a while now and love using it, but I didn't realize it had a coordinating die set as well. I FINALLY decided it was time to order it since I was getting some other things as well.
The die set includes this sweet banner for all of the coordinating sentiments. This is one of the main reasons I wanted the die set. LOL! It just adds the perfect detail to the cake. I had previously been stamping the sentiments directly onto the cake, which is fine, but this looks more realistic.
I die cut the cake image from 140 lb watercolor paper and then heat embossed the image using gold powder. After that was done, I got to work with the watercoloring. There is something very gratifying about watercoloring a heat embossed image. I really like the way the pigment and water pool up in each section of the image.
The bow is made from thick vintage-looking lace around the card base. I also added a taffeta bow using hot glue. The bow was tied first and then I "crinkled" it using my heat tool for an aged look. It is one of my favorite techniques for giving an authentic vintage feel. I always enjoy adding fun little details to my wedding designs; the little clock is always a favorite. I just ordered a ton of fun stuff from Star Lit Studio which is where the clocks are from. I've had these for years, but she still carries them and I am anxiously awaiting more fun things!
I believe she carries the tiny silverware also. I didn't buy these there, but they are so cute!I thought it was an unexpected, but fitting detail. There's a tiny pink pushpin inserted into the bow details as well. I made sure to tuck the point behind the cake image. I always clip the point with wire cutters if it will be exposed, but in this case, I didn't need to.
The sentiment was heat embossed as well. They don't come curved like this, but it is easy to manipulate them to match the curve of the die. I simply used the black outline image that comes on the actual stamp set to bend it to the correct angle.
I thought the mint colored doily was a perfect backdrop for the cake image...something straight from the bakery! Thanks for fluttering by!


5 comments:
Your detail is unbelievable! Love this.
Kelly this card is such a happy one - love it and love that fork! I too, hide the points of pins used in card fronts behind something :) Thank you for the link!! xoxo
Thank you! This was really fun to watercolor!
Thanks! You're sweet! You're welcome! I'm sending readers your way tomorrow, too!😉
Thanks! You're sweet! You're welcome! I'm sending readers your way tomorrow, too!😉
Post a Comment