Monday, January 7, 2019

Countdown to Confetti Day 3

Welcome! I hope you've enjoyed the last couple of days of the Reverse Confetti Countdown to Confetti! I can't wait to share today's project with you, but first, I want to make sure you get a  list of the rest of the Confetti Crew's blogs so you can check out what they have created as well.

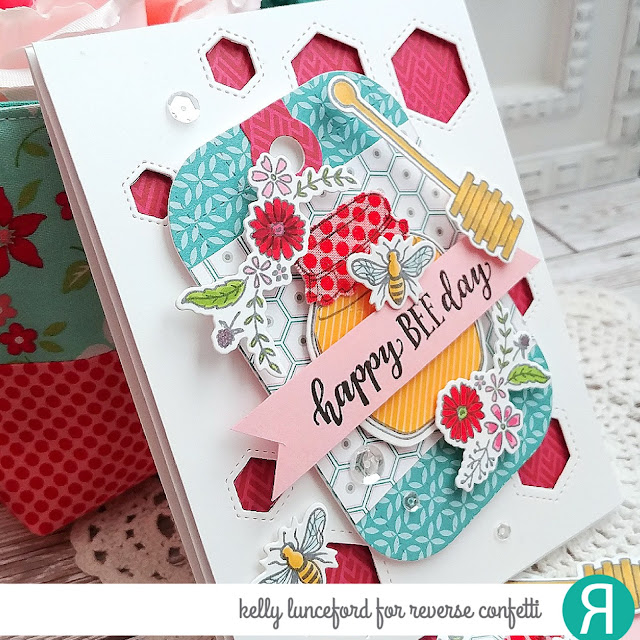
I'm a sucker for anything "bee" related so when I saw this new "Happy  Bee Day" set, I fell in love! It is so beautiful and amazing...definitely a "must have" if I do say so! For today's project, I was inspired by  the fabric that I used on the Flutterby Basket that you can see in the background. These are fun little sewn baskets that I like to make to package up gifts and treats.

I had so much fun stamping and coloring all of the sweet images from this new set and then got to work die cutting them and assembling my card. 


The background uses the new Hex Coverpanel which I just love! I used some previously released  pattern paper to peek-a-boo through the hexagons. I fussy cut the "honey" out of some pattern paper and then glued it onto the jar. Once that was done, I added a layer of crystal glaze over the top to give it a realistic shine. The lid portion was stamped directly onto a scrap of fabric that I used for the fabric basket. I ironed the heavy weight Pellon onto the back and then stamped the image on the fabric. Because of the stabilizer, it was easy to die cut using my Cuttlebug.

I made a coordinating tag to attach to the outside of the basket or to whatever gift I add inside the basket. I just wasn't ready to stop playing with this set! LOL!

I had so much fun working on today's projects! This is the last of the sneak peeks, but be sure to join us tomorrow for the big Blog Hop where the team will share additional inspiration! Thanks for fluttering by!

Sunday, January 6, 2019

Countdown to Confetti Day 2

 Why, hello there! I'm so glad you've popped by today for Day 2 of the Reverse Confetti Countdown to Confetti! I hope you enjoyed everything that I shared yesterday! Aren't the new stamp sets SO cute? I know I will be using them again and again and today's products are no different! I've had such a fun time working on all of these Valentine's Day projects! Don't forget to head to the rest of the Confetti Crew's blogs to see what they've come up with as well!

My first project for today uses the new "Heart Pals" stamp set which is SO adorable and so easy and fun to color! There are quite a few super cute critters, which I will be sharing ALL of them later on in the week, so stay tuned! For this card, I chose to use this sweet little bear holding a heart.


I did some simple coloring but added some glitter to the heart and some Nuvo glaze to his nose for some extra detail. The sentiment is heat embossed in white to really make it pop! I used the coordinating "Heart Pals" confetti cuts to die cut the image.


For the "hello" portion, I die cut the "hello lovely" confetti cut 4 times out of white cardstock and once using the blue paper which is from the Warm Heart 6 by 6 paper pad. I glued them all together and then added some glaze over the top to  give them that "store bought" look. I actually did the word "lovely" as well, but will need to use that on another project since it didn't quite work for this one. I used a few of the new paper from the "From Cupid" paper pad.


My next project uses the new "Big Bear" stamp set which is so fabulous for so many different occasions. I was still in "valentines" mode, so I put together some hot cooca/gift card holders using the Scalloped Bags and Tags creator. I thought the bear looked so cute with his mug and the cute "warm hugs" sentiment. I stamped the "a little something just for you" sentiment on a strip for the inside to go with the gift card. I bought some from a local drink/cookie shop. 

I love sets like this because they remind me of my paper dolls that I loved growing up. The "Big Bear" set has so many cute accessories for the bear to hold/pull, etc. The coordinating "Big Bear Confetti Cuts" actually die cut a slit so the bear can actually hold the objects. I opted to use a foam square for dimension, so I didn't use the slit.


I also used the new "Love you Most" set that was showcased yesterday. I thought the sentiments looked so cute clipped to the top....and yes...more gold clips! LOL!


These will be so fun to give out to friends and family this Valentine's Day! Some say Valentine's Day is a made-up Hallmark holiday, but to me any excuse to tell someone how much they mean to you is a good day! Thanks for fluttering by!

Saturday, January 5, 2019

Countdown to Confetti Day 1

Yep...it's that time again and I couldn't be happier! Today is Day 1 of the Reverse Confetti Countdown to Confetti! There are so many fun new products coming out that you are sure to love! The team will be sharing all of our projects over the next three days with a fun Blog Hop on the 8th! Before I dive into the details of the new stamps/dies/paper and all of my projects, here is the list of the rest of the designers so make sure to stop by their blogs as well!


I have lots to share with you today, so there are A LOT of photos! My first project, which consists of these three gift/treat boxes, uses the new "Patterned Hearts" set. If you fell in love with Triangle Trees like I did, then you're definitely going to want to add this one to your list! I had SO much fun using these hearts on so many projects and I can't wait to use them again! These will definitely be one of those sets that I reach for again and again.


These boxes also use the coordinating "patterned hearts" Confetti Cuts as well a fabulous new Coverpanel called "Diagonal Stitches". This one will be used again and again and maybe my poor Stitched Rays Coverpanel can get a rest! LOL! This one is equally fabulous! I paired these hearts with the Elegant Florals stamp set for a fresh and fun valentine vibe! I made THESE projects for the last release, but I will be giving them at the same time as these boxes, so I wanted them to feel cohesive!


I was having so much fun and Valentine's Day just isn't Valentine's Day without cards, so I made three coordinating cards as well. The one in the center has the addition of the gold clip for some extra detail. I'm still deciding if I will add them to the other cards. I went a little crazy with them on this release which you will see! LOL! I used the new "From Cupid" 6 by 6 pattern paper pad on both the cards and boxes. I think this might rival my love for Winter Solstice, but don't say anything...I don't want to make it feel bad! LOL! I think I  have used it on every project I made for the release so you will get a good idea of each pattern!!


These boxes are the perfect size to add some candy and treats. I bought some of the jumbo marshmallow hearts to go inside. These boxes measure about 4 by 4 inches.
I heat embossed the sentiments in gold for some shine and spritzed everything with some Shimmer spray. The bow doesn't actual secure the box so it won't require anyone to untie it. I always hate messing up the presentation!


My next project uses another new set called "Love you Most". I used the previously released Scallop Bag and Tags Creator to die cut the images and tags. As soon as I saw the "hey, hot stuff" sentiment I knew I wanted to use something cinnamon, which is a common thing to find at Valentine's Day, thank goodness. For this project, I just used some sticks of Big Red chewing gum.
These were such a cinch to whip up. I also used the new "Patterned Hearts" and coordinating Confetti Cuts. I decided to do some heat embossing in gold to get some different looks than my first projects. I used lots of the new "From Cupid" paper on these, which I just love! 

I used the Stitched Tag confetti cut for the base and then simply glued the gum down using glue dots. I wrapped ribbon around 2 and added the hearts to the other two. They all got a gold clip for some additional detail. I hope you've enjoyed Day 1 and all of the fun new products! Join me again tomorrow for Day 2~ Thanks for fluttering by!


Thursday, January 3, 2019

Inspired by #53 {Mr. Snowman}

 
Hello friends! I want to wish you all a very happy  New Year!  I've got some fun news to share with you today! I've been asked {and happily accepted} to be a part of the Inspired by Challenge team! It's been a while since I've been part of a "challenge" team so I was so happy to have been asked! This week's theme is "Mr. Snowman",which you can see in the inspiration photo. As much as I was hoping to get a little creative with this one, I just couldn't resist using the Fence Line: Winter stamp set . I've been itching to get him inky and this was the perfect excuse!
 I love the color combination of the sweet inspiration snowman so I tried to use them in my little scene, but not necessarily in the same places. For instance, I knew that the berries and birds would need to be red, so I chose to give my snowman a blue hat. I got a mini MISTI for Christmas so I put it to good use on today's card!
To begin, I die cut all of the pieces that I knew I would need. I used the coordinating Fence Line: Winter dies and the snow drifts are from the In the Meadow die collection. Once I had everything cut, I got to work getting them all stamped. 

I set up a little mock scene to see where everything would fit and then got to work on a blended background for the sky. I wanted some white to show through for some contrast and realism. I love how it turned out. I spritzed it with Shimmer spray and let it dry before I stamped the sentiment. I just HAD to use this one from the In the Meadow stamp set that says "in the meadow we can build a snowman". 


 Once the scene was set using adhesive and foam squares, I decided that the sky needed a few flurries, so I added the smallest snowflake image from the "In the Meadow".
As I mentioned earlier, this isn't the most "creative" card, but it sure was fun to make! I was happy to have gotten this set inky because it is a fun one!

I hope that you'll join us this week and play along. This is a challenge that I have been participating in recently and it is a lot of fun! I hope I see your card in the gallery this week! Thanks for fluttering by!