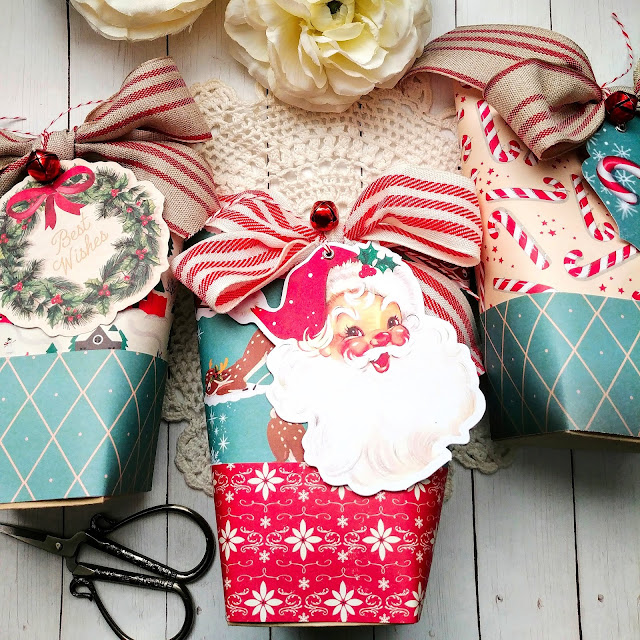
Hello and welcome to February's Keeping Christmas Blog Hop! Things are usually quiet around here at the end of the month, and even more so since I have stepped away from a few Design Teams, but I always love this time of the month when I can revisit the magic and joy of Christmas! For today's hop, I've created 6 of these treat containers using a pad of paper that my sister gave me this last Christmas. It is a vintage paper pad with all kinds of fun prints and patterns! Before I get started, here is the list of the other fabulous designers and their blogs so you can see the fun Christmas inspiration that they have for us!
Kelly Lunceford (Creator)
I've been making these treat containers since my old SU! days; the pattern is not mine and I don't remember who the original designer was. I'm sure I got it off of Splitcoast Stampers back in the day. They are so easy to make and I love them because you can show off those fun pattern papers that we have either hoarded or never use! LOL!
As I mentioned earlier, I made 6 of these in total. You can get two containers from one 12 by 12 piece of pattern paper. I also added the 2 inch border of coordinating paper to the bottom for extra detail and interest.
I used 3 sheets of 12 by 12 paper for the main pattern and then cut the 2 inch strips at the bottom from 2 different coordinating papers for a fun eclectic vintage feel. My love affair with Vintage Santa continues as well! LOL!
As I was flipping through the paper pad to decide which patterns I wanted to use, I found a page of perforated tags that coordinate with the papers. Yay! This project actually doesn't use a single stamp or die!
Each one uses a 6 by 12 inch piece of paper with ScorTape running the length of the bottom and then up the right side. I created a 2.5 inch square box to wrap the pattern paper around for the base.
Once the paper is wrapped around the base box, I punch holes for the ribbon and tags. I decided to put the bows and tags on all 6 even though Christmas isn't for months. These are the treat containers that I use for my homemade caramels and I realized that I can still add them to the small gaps on the sides so I don't need to worry about them being tied and tagged! LOL!
As you can see, I did add an eyelet through the tags because a) I have a million eyelets that need to be used b) I thought I would be putting the ribbon through the tag rather than the twine and c) it makes the project look a little more professional.
Each tag also got the addition of a red jingle bell for added Christmas detail and charm! Each of these pre-printed tags inspired me to create some similar ones using stamps and dies, so I may try that coming up! That is why I love stamps so much; you can make as many as you want and never run out! Thanks for fluttering by!


9 comments:
Kelly, once again your project is over the top!!! SO, so beautiful!!! Your amazing!!!
I just love the vintage feel of these! A whole lot of fun in a package!
I Love these Kelly, especially the vintage feel. I promised myself that this would be the year, I start making my Christmas cards & tags early! Alas, lots of birthdays & 2 new babies in the family, Christmas is again on the back burner. I’ve always enjoyed Keeping Christmas and you keep me inspired, to keep my promise. Thx for the blog hop! 😊
HOW PRETTY & FESTIVE! These little containers are BEAUTIFUL, Kelly! I too LOVE Vintage! AND Vintage Santa! I also LOVE the addition of the little Jingle Bells! ;)<3
Kelly, I can't begin to tell you how much I LOVE these treat holders. I love vintage Santa's, so that one is my favorite. You are so clever to make these early in the year. Then you are ready to go in Dec. You always amaze me, Kelly! XXX
Oh wow, Kelly! These are so fun! You ALWAYS have such gorgeous and wonderful creations. It always inspires me! XX
LOVE the container and the papers you used!!!
Wow, love the treat boxes and the vintage look of both the box and the tags! All of it showcased beautifully in your photos!
These are adorable Kelly, I love the vintage look.
Post a Comment