Tuesday, January 19, 2021

The Greetery Nature Lover Release Countdown Day 2


Welcome friends! As promised, day 2 of the Nature Lover release countdown for  The Greetery is overflowing with flowers and foliage to your heart's content...oh, and speaking of hearts, there's a few of those, too! You'll want to head to The Greetery Blog for all of the formal product introductions!

My first collection of projects includes a trio of cards using the new Lovely Blossoms stamp/die set paired with the new Heart Leaf Jumbo Posy Pocket Die. I plan on sticking a gift card down into the posy pocket and deliver these as Valentine's Day cards.

There's also just a whisper of the new Botanicuts Forget-Me-Nots on each card, but I'll be sharing another card featuring these super sweet flowers!

I'm OBSESSED with this sentiment included in the Lovely Blossoms stamp set. It has some smaller sentiments as well that accent the "Sent with Love" sentiment. I chose to JUST use this part so that they will work well for Valentine's Day. You could also just keep something like this on hand for a "just because" card or go in later to stamp the specific accent sentiment that you're in need of.

The subtle background was creating by using a light hand and the Berry Branch Stencil. I wanted to continue the "nature" feel of my cards today, but in a more fresh and lively feeling! Yesterday was more "woodsy" and today is more "meadow"!

I had fun playing around with different color combinations for the flowers! I chose Slumber, Blue Jay, and Stargazer for this card.

I added some postal details that I always love to incorporate, especially to highlight and accentuate the "sent with love" sentiment.

This color combination is a less dramatic with a softer feel. 

Each card is mounted onto a fresh, vibrant green card base to make them pop! I always like playing around with different design possibilities before I commit to certain elements. I'm glad I gave this green a chance! I loved the Kraft background that I used on THESE cards and almost went in that direction, but like I said, I really like this shock of green!
My second card for today, and my last card for the release, uses the new Heart Leaf Posy Pocket Die again paired with the new Botanicuts: Forget-Me-Not dies. These are just as sweet as can be and are so fun to put together.


One thing that makes assembly easier for these sweet flowers is to group them together by  bloom as you punch them out of the cardstock once you've die cut them. The are clustered right next to each other on the sheet of dies so there isn't any guess work. I just kept my dies connected and didn't clip anything apart to keep them grouped together.


When I ran them through my die cut machine, I was lucky that they stayed together and nothing fell out of the negative spaces. I carefully punched them out and put them in little individual piles so that each piece would be with the correct flower. I love that Betsy designed these so they look like they're at different angles on the stem. She always thinks of everything!

I always like to die cut everything from white cardstock and then color them using the medium of choice for the day/project. In this case, I chose to use my Pinkfresh Studio inks for the flowers and an old SU! pad for the yellow centers. I used liquid glue with a precision tip to assemble all of the intricate pieces. The stems have a circle piece that the blooms get attached to for perfect placement and to help create a sturdy bouquet. You can also use them individually or in clusters like I did on my first collection of cards. I used bits and pieces from previously released products to bring this design to life. The stamp/postmark images are from the Pretty Postmarks stamp set and I love using these all year long! The scalloped backer piece is from the Addressed Die and I love using it in a variety of ways!

 The "Be Mine, Valentine" sentiment is from the Signed and Sealed With a Kiss stamp set. I love that it has a coordinating die so that you can add the sentiment wherever it looks good. I've tucked it under the flower clusters with foam squares for dimension! Now...the key will be to find cute gift cards that will coordinate with these posy pocket cards! A Bath and Body Works gingham card would look great in this one and maybe the floral Target one for the other three cards I shared at the top of today's post! Wish me luck! ha ha!  I've had so much fun creating with this new release! Everything will be available for purchase on the 20th at 10 a.m ET! Don't forget to head to the other designers' blogs for even more inspiration! Thanks for fluttering by!

Ink to Paper January Release Countdown Day 4

Happy Tuesday, friends! Today is the 4th and final day of the Ink to Paper January release countdown! It's certainly been a whirlwind and I can't believe we've come to the end! My last set of cards uses the new Feathered Friends 7 dies and the new Feathered Friends 7 mini stamp set.  Up first is this colorful design using the Feathered Friends 7 dies paired with the beautiful Into the Blooms Dies. I particularly like using them with the Feathered Friends die series because they are both just die cuts and no stamping. It helps keep the style of the card cohesive. That being said, I did combine the Feathered Friends 7 mini stamp set with the same flowers for my second card.

To begin this card, I die cut the bird from white cardstock. Actually, I die cut EVERYTHING for this card from white cardstock and then used Distress Oxide Inks to color both the bird and the flowers. I really like using these particular inks for the birds because it allows me to get a really nice blend to create a more realistic looking piece.

The background is created by layering the Ornate Cover Plate on top of a white cardbase using liquid glue. I then added the frame around the perimeter using 1/8 inch ScorTape. This saved me because I put it on crooked TWICE and I was still able to carefully lift it to put it on straight. Had I been using 1/4 inch ScorTape, it would have been impossible! I guess I'm glad I ran out of the 1/4 inch! ha ha!

I had so much fun creating the blooms in different shades of pink/purple/blue to create some contrast between the blues/greens of the bird. I feel like I've been on a "heat embossed vellum sentiment strip" kick and I needed to switch things up! I decided to stamp the "happy birthday to you" sentiment directly onto the large leaf for something fresh! 

I added a white dot to the center of the bird's eye using a white gel pen and then added a tiny amount of Nuvo Crystal Glaze over the top for a more realistic look.  The flower centers got a tiny sprinkling of the Terra Texture that I showed on some cards yesterday. I also added some glitter and sequins to finish off this bright, birthday design!

My second card for today, and the last of the release uses the new Feathered Friends 7 mini stamp set. I used Distress Oxide inks again on this one to create this blue hummingbird. I had an extra bloom left over from my first card, so I chose to ink it up in bright pink and red. I gave it a black center with some black ink splatter for a coneflower look. I'm not sure if  hummingbirds are attracted to coneflowers, but today they are! ha ha!

We have quite a few bushes/vines that attract both butterflies and hummingbirds and I enjoy sitting on my porch watching them flutter their wings so rapidly! It's amazing to me!

I stamped the sentiment that is included in the Feathered Friends 7 mini stamp set onto the middle size from the Delicate Doilies die collection. I chose to leave the eyelet detail in place rather than punching them out. I didn't want the edges to look to busy against the Postage Frame. 

I layered all of that onto a panel of Spring Rain cardstock that is stamped using the Nifty Plaid background stamp and Blueberry Sky ink. I then added that to a top folding A2 Blueberry Sky card base using foam squares.

I added some glitter to the flowers, leaves and the bird for some celebratory sparkle! A few sparkling clear sequins finish off this birthday design! This release is full of all kinds of fun products to kick your birthday designs into high gear! My stash has grown quite substantially over the last few days and it feels great! Now, to work on some "get well" cards! boo! They seem to be in high demand lately! Thanks for fluttering by!


Monday, January 18, 2021

The Greetery Nature Lover Release Countdown Day 1

"It's the beauty within us that makes it possible for us to recognize the beauty around us. The question is not what you look at, but what you see." 
-Henry David Thoreau

Hello and welcome, friends! It's day 1 of the Nature Lover collection release countdown from The Greetery! There are so many beautiful products that pair perfectly with other items in your collection to yield endless different design possibilities! My projects for day 1 are quite different from what I might normally create, as I really wanted to embrace the natural elements of these new products.
There are full introductions to all of today's new products over on The Greetery Blog. 

"The voice of nature is always encouraging."-Henry David Thoreau

My first card uses the GORGEOUS new Boxwood Heart Base die and Boxwood Heart Details die. I also used the super sweet new Wood Slice Hearts to add to the center to use as a backdrop for these sweet {love} birds. 

I die cut both the Boxwood Heart Base and the Boxwood Heart Details from white cardstock and then used Distress Oxide inks in Mowed Lawn and Pineneedles to add the color. I used finger sponge daubers to add the different shades until I got the results I was hoping for.

I also added some Terra Texture around the heart using liquid glue and then I just sprinkled it over the top. It adds the perfect woodsy feeling that I was hoping to achieve!

"Heaven is under our feet as well as over our heads."
-Henry David Thoreau

I promised myself that I WOULD NOT make another shiplap background, but here I am again breaking my promises! ha ha! I created something soft and subtle by die cutting the planks using the Shiplap Builder Dies out of Rustic Cream cardstock and then adding some Vintage Linen Distress Oxide ink lightly around some of the edgges. I glued them to a panel and then added that to a top folding Kraft card base.

I die cut the focal panel using the Nordic Frames die and then added the sweet "happy valentine's day" sentiment, which is from the new Mini Boxwood Heart stamp/cut combo, to the bottom using black ink. This is such a sweet mini stamp set and I've used it a few other places in today's post.
"I took a walk in the woods and came out taller than the trees."      -Henry David Thoreau

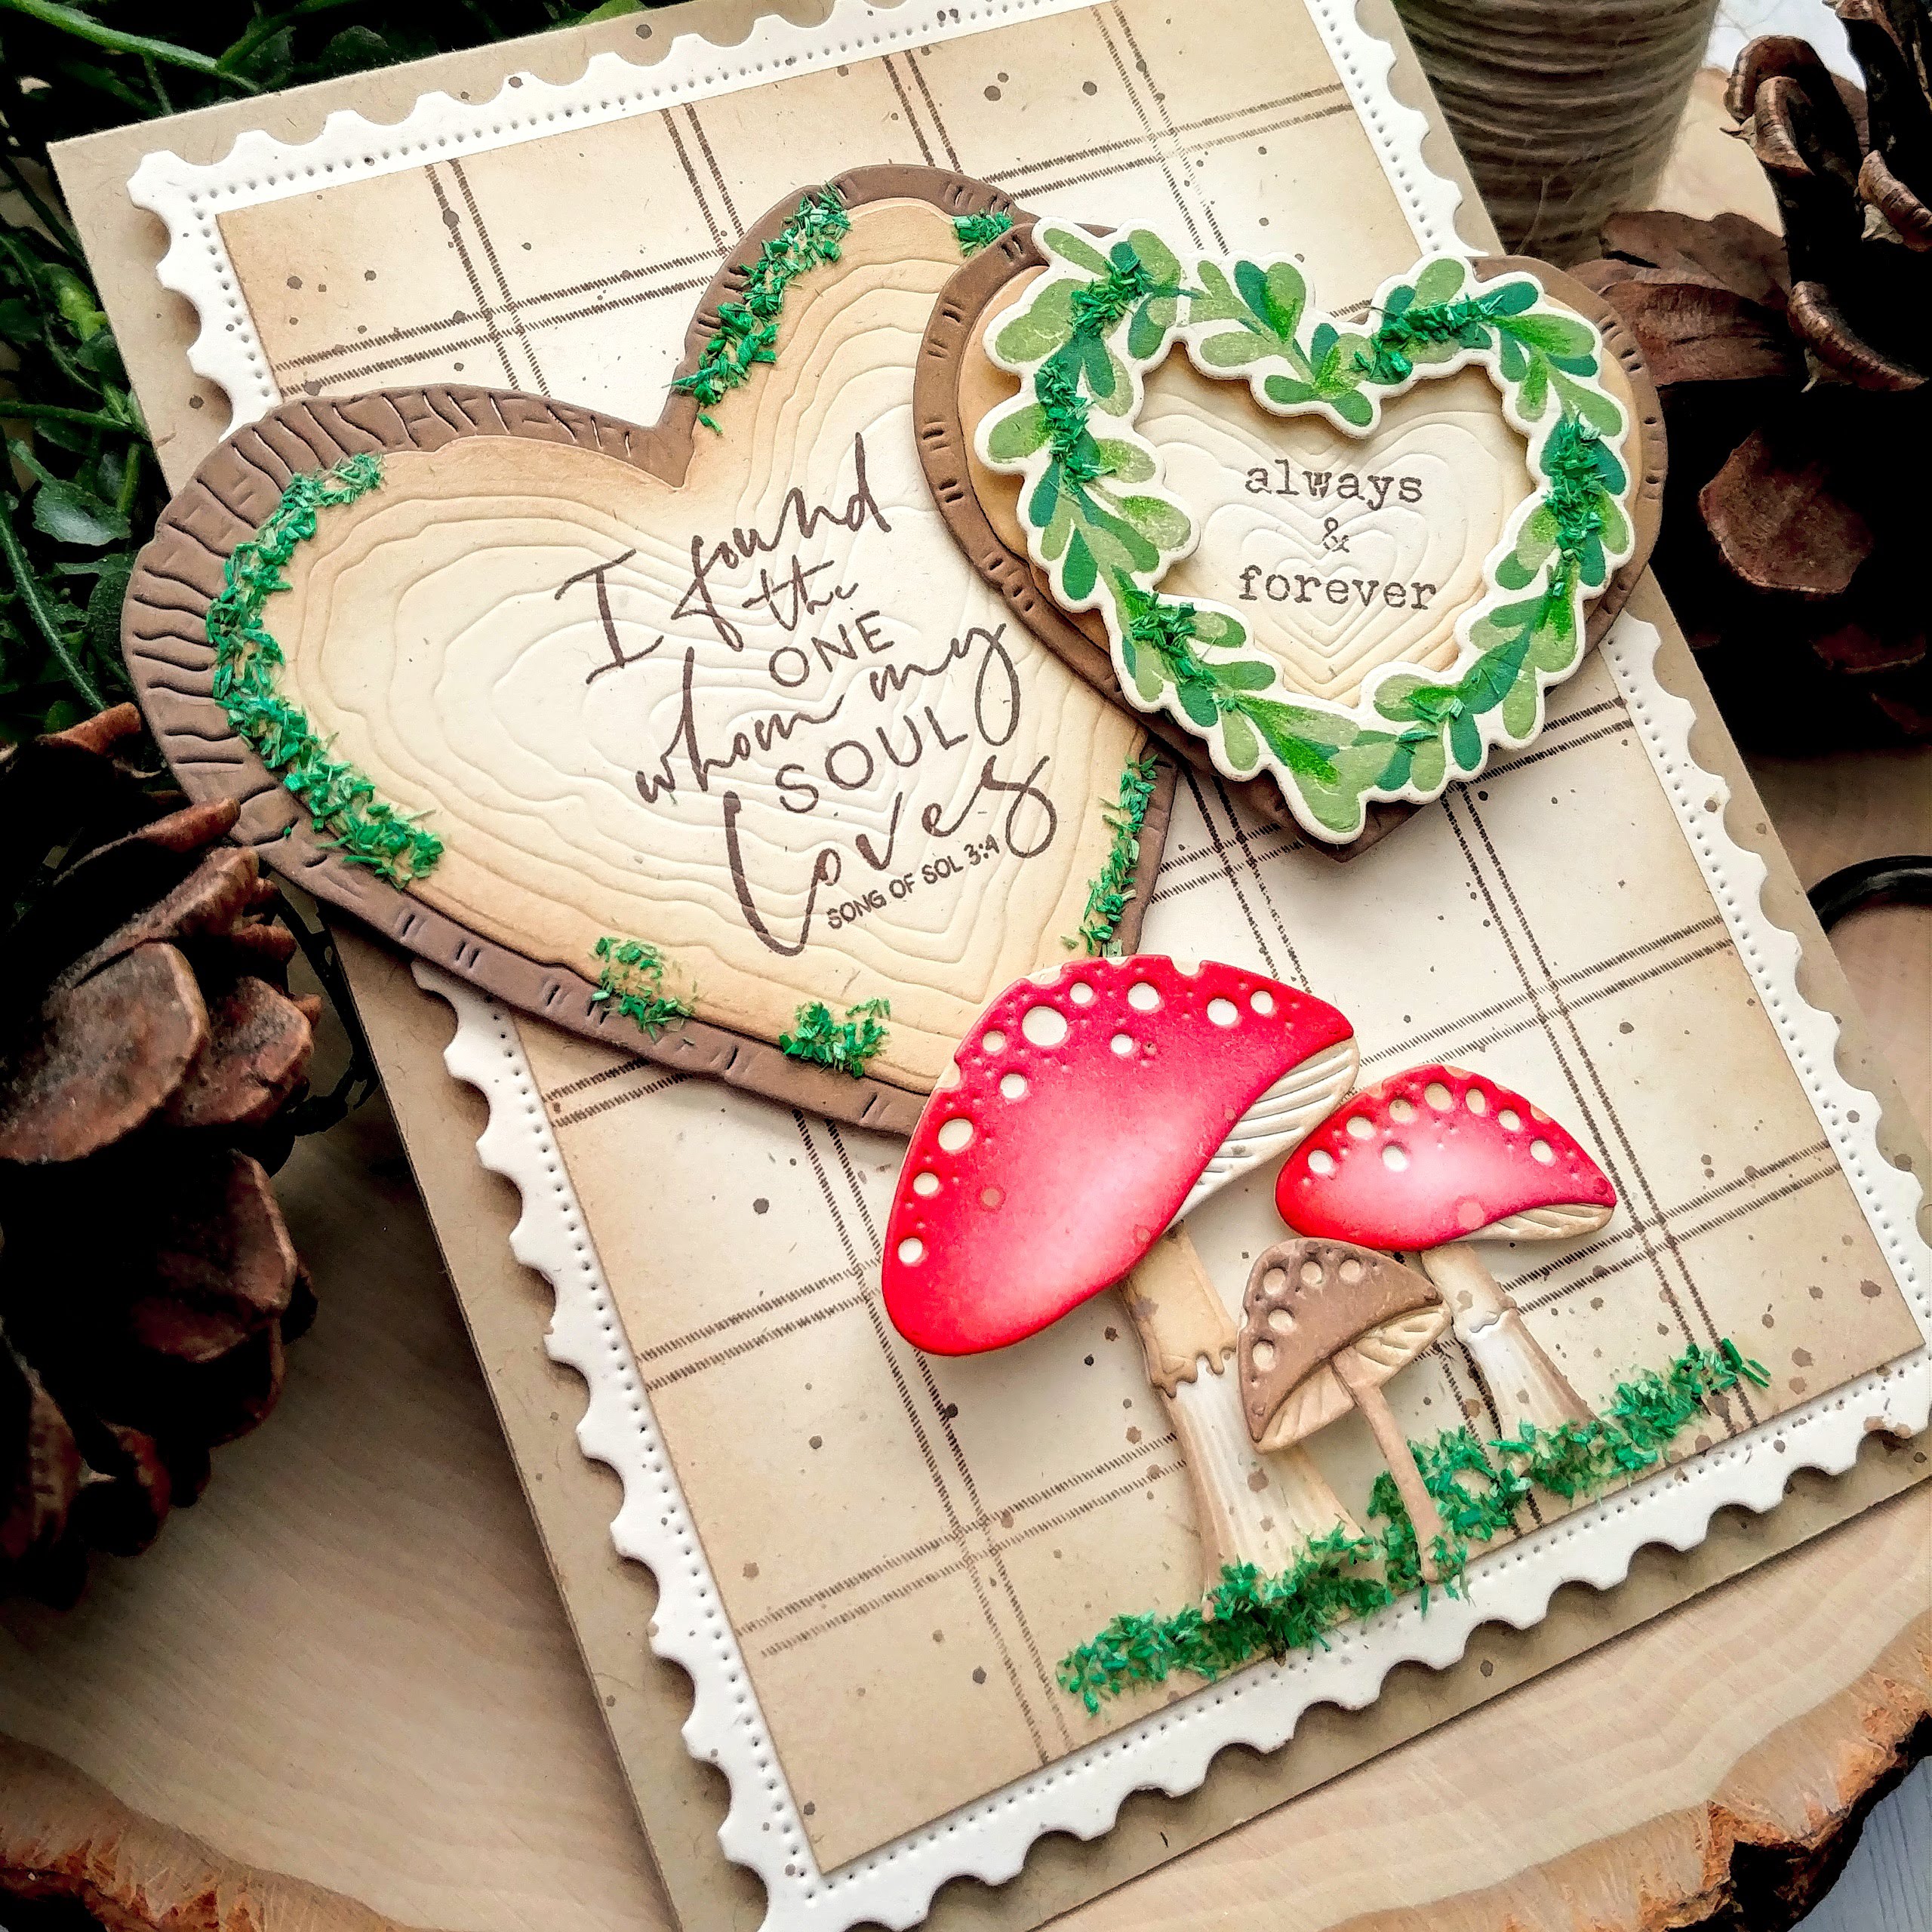
My next two cards use both the Mini Boxwood Heart Frame stamp/cut combo AND the Heart Wood Slices. These were actually the first two cards I made for this release and this set the mood for all of my projects for day 1. As I mentioned earlier, these are different than what I normally make and definitely different for Valentine's Day! That being said, they are PERFECT for those outdoorsy men in our life that deserve a valentine that isn't dripping with red roses and gold fonts, am I right? ha ha!


I used the gorgeous new Love Song Sentiments stamp set for the main heart. It is stamped to look like it's been burned into the wood slice. I added Terra Texture around the wood slice. They say that moss only grows on the north side of trees, but in this case, it grows ALL over! ha ha! That's why they're called "creative liberties"! ha ha! I used another Mini Boxwood heart and one of the included sentiments. It layers so nicely over the top of the small Heart Wood Slice.
I wanted to add a red detail, but wanted something found in nature, so I was thrilled to remember the Botanicuts: Toadstool Garden. I was actually looking for the Botanicuts Pineboughs, but when I saw these sitting there, I knew they would be the perfect unexpected natural touch I was searching for!


"All good things are wild and free."-Henry David Thoreau

I added a bit more Terra Texture to the bottom of the toadstools to "ground" them and to give the card visual balance. My husband is NOT outdoorsy, but this is his valentine! ha ha!


I was having so much fun with the toadstools I decided to quickly create another valentine design. I used both sizes of the Heart Wood Slices and added another Mini Boxwood Heart.

Can I just mention that this post doesn't include a single sequin or pinch of glitter? I used the Terra Texture in their place! 

"I went to the woods because I wished to live deliberately, to front only the essential facts of life, and see if I could not learn what it had to teach, and not, when I came to die, discover that I had not lived."-Henry David Thoreau

My final card for today uses the new Love Is stamp set, which I LOVE! I chose to create something woodsy, yet dramatic for a bold card! This could be used for more than just Valentine's Day, but that is what I plan on using it for.
The Love Is stamp set coordinates with the Boxwood Heart Base die and the new Let's Have a Word Love die.

"I go to nature to be soothed and healed, and to have my senses put in order."-John Burroughs

I created the traditional Buffalo Check background by die cutting the Square Dance die from Scarlet Jewel cardstock and then used the Square Dance Stencil over the top using Black Soot Distress Oxide ink. I then layered it over the top of a red piece of cardstock and added the Nordic Frame.

I die cut the LOVE word three times from black cardstock and glued them together using liquid glue for a sturdy piece. I knew I would be stretching it across the Boxwood heart that is included in the Love Is stamp set, securing it strategically with additional liquid glue.

The Love Is stamp set has many of the different sentiments like, Love is patient, Love is kind, etc. I LOVE  this and know I will be using it often! I need the Love is patient reminder on the daily! ha ha! Ultimately I chose "Love never fails." because I know this is true! Sometimes in our humanity we feel that it isn't true, but as we turn to our divine nature, God will let us know that it is true! Keep going, keep trying, keep loving...it never fails! 

Well friends, this concludes my projects for day 1 of the Nature Lover release countdown! If you're feeling "gypped" that you didn't see any flowers today (LOL), don't fret because tomorrow you will get your fill! Thanks for fluttering by!
Here are the links to the other designers' blogs! Enjoy!


Ink to Paper January Release Countdown Day 3


Welcome to day 3 of the Ink to Paper January release countdown! We're continuing on with the celebration as you can see! I'm using a few products from yesterday paired with some new ones being showcased today! I've got a special son's birthday this week, so I've used the new Number dies to personalize it!

I heat embossed the "th" portion, which is from the new Just Sentiments: Milestones, directly to the banner. I also heat embossed the "birthday" sentiment onto vellum which is also from the same set.

The "Celebrate" sentiment up on the balloon is from the Big Balloon sentiments set that was showcased yesterday! I used Dark Indigo cardstock for the banner, Green Parakeet for the Big Balloon Coverplate and Bitty Big Aqua Mist pattern paper for the balloons. The yellow background paper is from the older By the Numbers paper pad and works so well for birthdays!

I added Nuvo Crystal Glaze over the top of the three lower balloons and then added some chunky glitter to the tops and sides. I just added a little pinch carefully to the portions I wanted glitter.

The numbers are die cut using silver glitter cardstock and then added carefully to the banner using small foam squares for dimension.

I added a few sparkling clear sequins for some additional sparkle.

Up next is a fun collection of products. I created an anniversary card using the new Just Sentiments: Established stamp set and the coordinating Inside Greetings Established stamp set. I don't actually have a photo of the inside of the card, though! woops!

I wanted to create a graphic card to look like storefront signage. I started by adding the boards that were die cut using the Woodwork Die. They are cut from Rustic White cardstock and adhered to a Rustic White card base using a tape runner. Once that was done, I added the black frame using 1/8 inch ScorTape.

I stamped the ESTABLISHED 1998 and beautiful years together directly onto the woodwork using Black Soot Distress Oxide ink. I wanted it to have a painted look and this ink gave me the best results. 

The wreath is from the previously released Wreath Favor Box Sentiments. It is the perfect backdrop for the 23, which is die cut from Weathervane cardstock using the new numbers dies.

I added some additional Black Soot ink around the card for some added depth and detail.
This concludes my post for day 3! Join me tomorrow for the 4th and final day of the release! Thanks for fluttering by!

Sunday, January 17, 2021

Ink to Paper January Release Countdown Day 2


 Welcome to Day 2 of the Ink to Paper January release countdown! I'm sharing two cards today for even more festive inspiration! Up first is a floral birthday card using the new Vintage Flair and Vintage Flair print stamp sets!

I wanted to embrace the vintage feel of both of these new sets so I chose soft, muted colors to evoke a sense of nostalgia and of days gone by! Can't you just smell your grandmother's perfume or maybe hear her laugh or sing from a distance? I loved listening to my grandma hum as she worked in the kitchen cooking all of her delicious dishes!

Anyway...back to the card, ha ha! I heat embossed the Vintage Flair Print background using white powder onto a white panel. I used Aqua Mist and Hawaiian Shores ink to add some color over the top of the panel. I also used some Hawaiian Shores ink splatter for added detail. I set that aside to work on the terrarium and flowers.
The terrarium is made up of 3 parts...the main large piece, the bottom or "floor" of the terrarium and the thin edge at the back to create the dimensional look. I heat embossed all of the pieces using gold powder. I glued everything together, but didn't glue the top of the "floor" to the main terrarium piece. I knew I would be using the vase inside and wanted to be able to tuck it in the right spot without having it glued down. I stamped the flowers, leaves, vase, and finials. Once all of that was done, I was ready to put my card together. I added the terrarium carefully using strategically place foam squares for dimension. I carefully tucked the vase inside and secured it with additional foam squares.
I had fun adding the flowers, leaves and finials here and there to add extra visual detail. The finishing touch is some Gold Drip Drops ( I gave you fair warning yesterday LOL!). I might have gone a little bit overboard with them, but sometimes vintage style included a little bit of gaudiness, am I right? ha ha! The entire panel is added to a Hawaiian Shores top folding A2 card base using foam squares, but before I did that, I added the gilded edges. This is such an easy way to add some vintage charm to your cards. I simply ran my Versamark ink pad over some of the edges of the card base, sprinkled gold embossing powder and then heat set it. It adds just the right finishing touch.
My second card is more playful and traditional. It uses the new Big Balloons/Big Balloons Sentiments/Big Balloons Coverplate and coordinating stencils! Whew, that's a mouthfull!
I die cut the Big Balloons Coverplate from Hawaiian Shores cardstock and then added the balloons from the Big Balloon stamp set over the top. I used some of the fun accessories, like the bows and flowers to accent the design.
The balloons are created by die cutting the two balloon circles and then adding ink blending around the edges. The largest blue balloon uses one of the stencil sets to create the dots. I also used the "Celebrate" sentiment from the Big Balloon stamp set to stamp directly onto the big balloon.
I added more drip drops AND some glitter for some festive shine! The sentiment at the bottom is from the Blossoming Branches stamp set. Thanks for fluttering by!