It's SNOWING! My older kids were just saying yesterday that it didn't feel like Christmas because the snow had melted. It totally feels like Christmas to me, but the snow is ALWAYS a welcome addition. Everyone has been delivered to school and it's just me and the little one enjoying a cozy morning at home. I thought I'd share a few more tags I've been working on this week.
I found these darling towels at Walmart for 88 cents and I got the soaps from Bath and Body Works for a steal! Cute and inexpensive gifting!
The only thing missing is a cute tag, right? I got to work creating something fitting and festive! The tag was diecut using a PTI tag die out of candy cane striped pattern paper from Hobby Lobby. The focal image was stamped using the cute bird from PTI's "Tremendous Treats: Christmas". It's one of my go-to holiday sets, especially when I am in the mood for some coloring. After everything was colored, I added some stardust Stickles to the white portion of the hat and the bird's wing. Each circle was diecut using a nest abilities die. I added a mini clothespin tied up with red Baker's twine. I stamped the sentiment using white ink and then heat embossed it with some Hologram Highlights embossing powder from SU!.
Once they were all made it is time for packaging! I sent my husband to buy the soap and he forgot to ask for cellophane bags. They will give them to you for free with your purchase and they are bigger than anything you can buy in a regular store. I made do with a smaller bag. I added a red jingle bell into the bow as I tied them up. This is a perfect gift for anyone who has lent you a helping hand during the year.Oh....gotta go....the doorbell rang and it's the postman with a box of crafting goodness but thanks for fluttering by and stay tuned to see what projects I'll be creating with my new supplies! Follow me on Instagram @kellylunceford!
Paper creations made by me! I love making cards, 3-D projects and more! I love sharing my passion for creativity!
Wednesday, December 14, 2016
Monday, December 12, 2016
{Let it Snow} holiday gift tags
Thank you so much for your positive response to my Holiday Handwarmers I shared yesterday. I have created a tutorial for you HERE that I hope will answer the questions you asked. They are super fun to make and in no time at all, you will have whipped up a whole bunch! I wanted to share with you how I have spent my "crafternoon"! Ha Ha!
Each year as I package up my homemade holiday goodies, I attach a tag to the bag of cookies and these are this year's design! They were so fast and easy and I just LOVE how they came together! Don't you? I made them assembly line style, which is always best when mass producing.
I first diecut the Kraft cardstock bases using a PTI tag die that I use all the time. If you haven't invested in a few tag die cuts, I highly recommend it. After they were all cut, I stamped the 3 sizes of snowflakes from the "Two Feet Deep" stamp set from PTI. The sentiment is also from that set and I just LOVE it.
Once that was done, I wrapped the "evergreen" pipe cleaners around a bottle of liquid glue to achieve the perfect round wreath. I cut the ends with wire cutters. I was able to get two "wreaths" from one stem. I picked them up at Hobby Lobby this year and they are part of their "Make it Christmas" line. The "Let It Snow" sentiment was stamped using white ink onto Pure Poppy cardstock. I hot glued the jingle bell, which I bought at Dollar Tree this year, to the top of the wreath. After all of the pieces were ready, it was ready to assemble and it was all attached with hot glue. The finishing touch was a piece of red baker's twine for a festive touch, especially for baked goods. Thanks for fluttering by and I hope you will join me again for some more handmade holiday projects!
Each year as I package up my homemade holiday goodies, I attach a tag to the bag of cookies and these are this year's design! They were so fast and easy and I just LOVE how they came together! Don't you? I made them assembly line style, which is always best when mass producing.
I first diecut the Kraft cardstock bases using a PTI tag die that I use all the time. If you haven't invested in a few tag die cuts, I highly recommend it. After they were all cut, I stamped the 3 sizes of snowflakes from the "Two Feet Deep" stamp set from PTI. The sentiment is also from that set and I just LOVE it.
Once that was done, I wrapped the "evergreen" pipe cleaners around a bottle of liquid glue to achieve the perfect round wreath. I cut the ends with wire cutters. I was able to get two "wreaths" from one stem. I picked them up at Hobby Lobby this year and they are part of their "Make it Christmas" line. The "Let It Snow" sentiment was stamped using white ink onto Pure Poppy cardstock. I hot glued the jingle bell, which I bought at Dollar Tree this year, to the top of the wreath. After all of the pieces were ready, it was ready to assemble and it was all attached with hot glue. The finishing touch was a piece of red baker's twine for a festive touch, especially for baked goods. Thanks for fluttering by and I hope you will join me again for some more handmade holiday projects!
Sunday, December 11, 2016
Holiday Handwarmers
ETA: I've posted a tutorial for the handwarmers HERE. A few years ago I stitched up a generous amount of hand warmers to give to family and friends. This year I'm back at it and ready to gift them again. I thought I would show you a few of them sewn up and ready to be packaged up in some papercraft-y goodness. I will be sharing that in a day or two. These are the perfect size to slip in your coat pocket as you head outside to enjoy your Winter Wonderland! Thanks for fluttering by and join me again as I continue my holiday crafting P.S. follow me on Instagram @kellylunceford
Tuesday, November 22, 2016
A tisket, a tasket....
A tisket, a tasket, simple gifts in my basket. I wanted to pop in today to share a simple Thanksgiving treat I'm giving my kids' teachers today. I like to give them something for each holiday and when I saw these cute single serving caramel cups, I knew I could come up with something festive.
I chose to use an oldie but goodie stamp set from SU! called "Simple Thanks". I love it and I especially loved coloring the buckets of apples. I colored them with Copic and Prismacolor markers. I added some Glossy Accents to the single green apple outside of the bucket for some extra detail.
I packaged one apple and caramel cup in a cello bag. The tags were diecut using one of the tag dies from PTI. I just recently purchased 2 different styles and I don't know how I lived without them. I hope you all have a wonderful Thanksgiving! Thanks for fluttering by!
I chose to use an oldie but goodie stamp set from SU! called "Simple Thanks". I love it and I especially loved coloring the buckets of apples. I colored them with Copic and Prismacolor markers. I added some Glossy Accents to the single green apple outside of the bucket for some extra detail.
I packaged one apple and caramel cup in a cello bag. The tags were diecut using one of the tag dies from PTI. I just recently purchased 2 different styles and I don't know how I lived without them. I hope you all have a wonderful Thanksgiving! Thanks for fluttering by!
Sunday, November 20, 2016
"Frozen Fever" inspired gifts
My son was invited to a "Paw Patrol" birthday party for a little girl in the neighborhood. He was VERY upset that I didn't buy her a "Paw Patrol" gift, but bought "Frozen Fever" Anna and Elsa dolls instead. I explained to him that we don't ALWAYS have to buy a gift directly related to the party's theme, and especially in this case, because I REALLY wanted to do something girly. He was so funny and was REFUSING to sign the card because it was girly and NOT "Paw Patrol"! LOL! It was really cute, even though he was being a stinker. I always like to include something handmade with my gifts so I decided to make a few things for her hair.
I've made hair ties like this in the past, which you can see HERE . You will need to scroll down a bit to see them. If you are interested in a tutorial, let me know. I took pictures along the way so I could put one together in a snap. I used ribbon I had on hand, but I thought it coordinated nicely with the colors from the dolls. I created a cute little card to package it up on for a boutique-y feel, which I love. I diecut the kraft paper using a spellbinders die and then gold embossed the border using gold powder. It was stamped using a PTI border stamp, which I can't recall the name of. It's quite old, but is so timeless and is a definite go-to set. I then added some white snowflakes from the "Two Feet Deep" stamp set from PTI as well. It is one of my all-time favorites and will be making a big appearance in this year's Christmas crafting.
Of course I needed to create a few felt covered clips for her as well. I've made quite a few of these in the past and I love how fast they work up. I thought that this color combination would be very versatile for a little girl and would be sweet paired with pink or purple. I wanted to make teal clips with yellow flowers, but I didn't know if they would match anything she had.
The sunflower image from "Rosie Posie" and "Rosie Posie II" was the perfect focal point for the card. I love having the coordinating dies for this set, but there isn't one for the sunflower. I chose to use a spellbinders scallop circle die, but it wasn't a "perfect" fit, but it worked out okay.
I stamped a snowflake image from the "Two feet deep" on the center of the flower, I thought it was such a fun "Frozen"ish addition. The background was created by stamping white snowflakes onto vellum. I layered the vellum over a teal piece of paper to soften it a bit.
The honeycomb image is also from "Rosie Posie" and I stamped tiny sunflower images into each center to continue the theme. A few crystal clear sequins finish it off. I had a lot of fun putting this ensemble together. When "Frozen Fever" first came out, I wanted to plan a party SO bad, but Emma was too old. I'm glad I got a chance to put something together to scratch a little bit of my itch. Ha ha! Thanks for fluttering by!
I've made hair ties like this in the past, which you can see HERE . You will need to scroll down a bit to see them. If you are interested in a tutorial, let me know. I took pictures along the way so I could put one together in a snap. I used ribbon I had on hand, but I thought it coordinated nicely with the colors from the dolls. I created a cute little card to package it up on for a boutique-y feel, which I love. I diecut the kraft paper using a spellbinders die and then gold embossed the border using gold powder. It was stamped using a PTI border stamp, which I can't recall the name of. It's quite old, but is so timeless and is a definite go-to set. I then added some white snowflakes from the "Two Feet Deep" stamp set from PTI as well. It is one of my all-time favorites and will be making a big appearance in this year's Christmas crafting.
Of course I needed to create a few felt covered clips for her as well. I've made quite a few of these in the past and I love how fast they work up. I thought that this color combination would be very versatile for a little girl and would be sweet paired with pink or purple. I wanted to make teal clips with yellow flowers, but I didn't know if they would match anything she had.
The sunflower image from "Rosie Posie" and "Rosie Posie II" was the perfect focal point for the card. I love having the coordinating dies for this set, but there isn't one for the sunflower. I chose to use a spellbinders scallop circle die, but it wasn't a "perfect" fit, but it worked out okay.
I stamped a snowflake image from the "Two feet deep" on the center of the flower, I thought it was such a fun "Frozen"ish addition. The background was created by stamping white snowflakes onto vellum. I layered the vellum over a teal piece of paper to soften it a bit.
The honeycomb image is also from "Rosie Posie" and I stamped tiny sunflower images into each center to continue the theme. A few crystal clear sequins finish it off. I had a lot of fun putting this ensemble together. When "Frozen Fever" first came out, I wanted to plan a party SO bad, but Emma was too old. I'm glad I got a chance to put something together to scratch a little bit of my itch. Ha ha! Thanks for fluttering by!
Friday, November 18, 2016
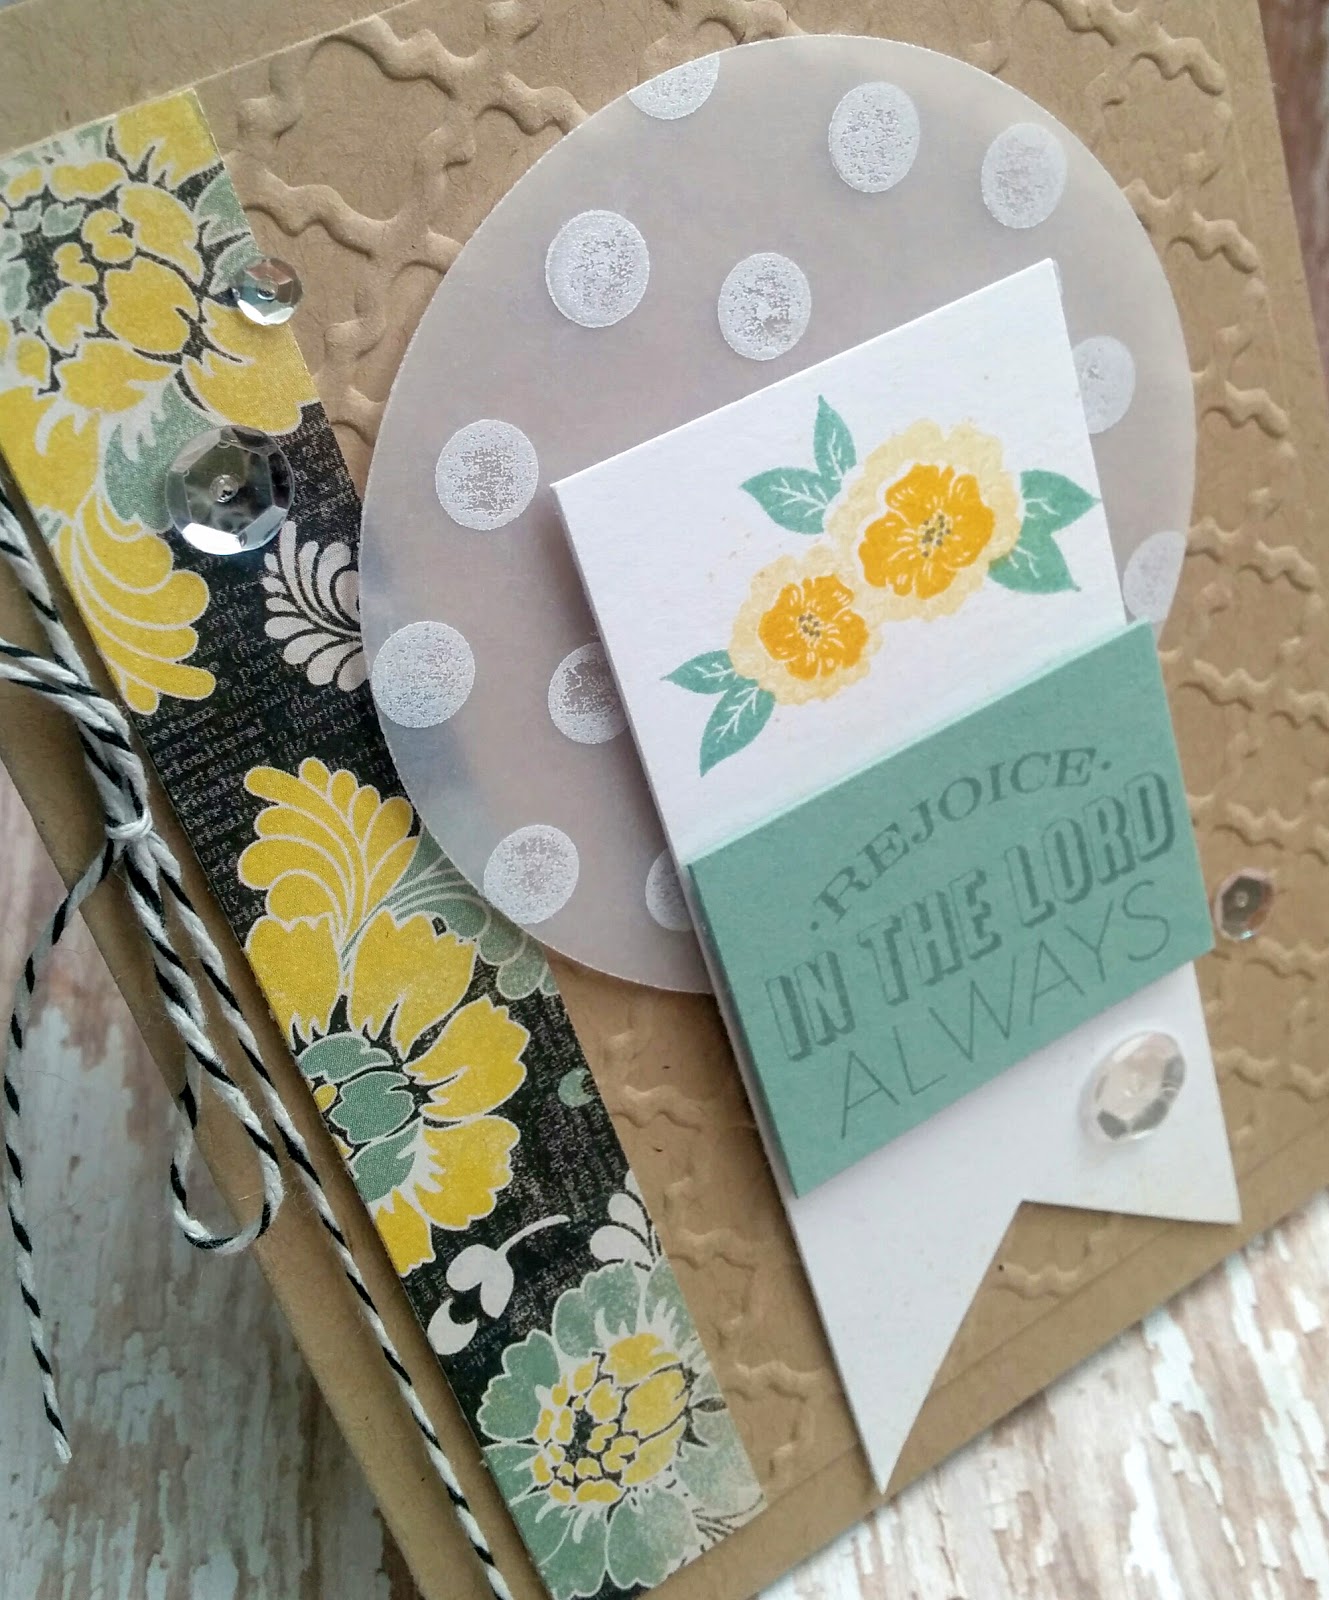
Rejoice in the Lord... Always
I thought I'd share a non-traditional Thanksgiving design I put together earlier in the month. I made 6 of the same design to send out to a few friends. I really love this "New Every Morning" set. It has some really great and inspiring quotes and scriptures that I can see myself using again and again. I also used a scripture for the inside about "giving thanks", which is perfect for a Thanksgiving card.
I stamped circle images using white ink onto vellum, which was the starting point for the entire design. I then chose the colors I wanted to use and was thrilled to find some cute pattern paper that coordinated perfectly. It's from Authentique, I believe.
The background was embossed using a folder from The Paper Studio that I picked up at Hobby Lobby a few years ago. A few crystal clear sequins finished the design off as well as a little bow of black baker's twine. These will be popped in the mail today to reach their recipients just in time for Thanksgiving! I'm hosting for the first time this year and I'm super excited! Happy Thanksgiving to you and thanks for fluttering by!
P.S. I spent yesterday evening cleaning and organizing my desk and studio so I can dive headfirst into my Christmas projects! I'm so excited! I love crafting for Christmas so stay tuned for some fun projects!
I stamped circle images using white ink onto vellum, which was the starting point for the entire design. I then chose the colors I wanted to use and was thrilled to find some cute pattern paper that coordinated perfectly. It's from Authentique, I believe.
The background was embossed using a folder from The Paper Studio that I picked up at Hobby Lobby a few years ago. A few crystal clear sequins finished the design off as well as a little bow of black baker's twine. These will be popped in the mail today to reach their recipients just in time for Thanksgiving! I'm hosting for the first time this year and I'm super excited! Happy Thanksgiving to you and thanks for fluttering by!
P.S. I spent yesterday evening cleaning and organizing my desk and studio so I can dive headfirst into my Christmas projects! I'm so excited! I love crafting for Christmas so stay tuned for some fun projects!
Sunday, September 18, 2016
BOO to you!
I'm finally ready to accept that Fall is really coming! It is one of my favorite seasons, yet I still have such a hard time saying goodbye to Summer. Making cute, Halloween-y projects always helps, too! One of my friends in the neighborhood asked me to make a card for her darling baby nephew who is dying from a tragic illness. They are hoping to celebrate a few holidays before he passes. My heart aches for this sweet family. I thought this "Spooky Smiles" set would be perfect for a fun Halloween card.
I've been on the "notify me" list forever, it seems, for the spooky tree and fence. They finally came, as well as a few tag diecuts that I couldn't live without. The fence and tag were the starting point for my design. I couldn't decide if I should have the jack-o-lantern peeking out from behind the fence or the cat. As you can see, the cat won and he's perfectly placed on his gate ready for a spooky night. I added a bowtie and witches hat, (which I am just realizing as I am typing) is kind of strange, but definitely cute! The bat is hanging around as well and it looks like a trick-or-treater might have dropped a piece of candy. Ha ha!
All of the images were stamped using Palette Noir ink and colored with Copic and Prismacolor markers.The sentiment was stamped using Fresh Snow ink onto black cardstock. The tag was tied with a bow of black baker's twine and a few sequins finish it off. I added the darling little Jack-o-lantern to the inside as well as a strip of pattern paper and another sentiment. Thanks for fluttering by!
I've been on the "notify me" list forever, it seems, for the spooky tree and fence. They finally came, as well as a few tag diecuts that I couldn't live without. The fence and tag were the starting point for my design. I couldn't decide if I should have the jack-o-lantern peeking out from behind the fence or the cat. As you can see, the cat won and he's perfectly placed on his gate ready for a spooky night. I added a bowtie and witches hat, (which I am just realizing as I am typing) is kind of strange, but definitely cute! The bat is hanging around as well and it looks like a trick-or-treater might have dropped a piece of candy. Ha ha!
All of the images were stamped using Palette Noir ink and colored with Copic and Prismacolor markers.The sentiment was stamped using Fresh Snow ink onto black cardstock. The tag was tied with a bow of black baker's twine and a few sequins finish it off. I added the darling little Jack-o-lantern to the inside as well as a strip of pattern paper and another sentiment. Thanks for fluttering by!
Subscribe to:
Posts (Atom)