Sunday, April 18, 2021

Pinkfresh Studio {sending you lots of love}

I can't believe the month is already halfway over! Have you had a chance to participate in the Pinkfresh Studio Monthly Challenge? This month's challenge theme is "gold goodness"! It's no secret that I LOVE creating with gold, so this was a fun one for me! That being said, I chose to use muted golds for today's card to create something with a "cooler" palette, rather than the warm gold that I usually use!


The only washi tape that I haven't had a chance to use yet, is this gorgeous Indigo Vines pattern. Now, the funny part is that this one is the ONLY one without gold accents, (go figure), BUT that allowed me to use these cooler tones to give this card a different feel than I originally thought I'd go with.

As I was looking closely at the different vine pieces, I noticed that a few of the leaves had an aqua color at the tips, so I decided to use that as my base color and then add in the muted golds.
To begin, I layered the entire panel of the Indigo Vines washi tape onto white cardstock. I used the coordinating Indigo Vines die to die cut the entire panel and set the different pieces aside.

Next, I die cut the gorgeous Fancy Oval Frame out of a brushed gold glitter cardstock that I found at Michael's. I attached it to a 4 by 5 1/4 inch panel of cardstock that has been die cut using the Stitches Die. I layered that panel onto another panel of the same cardstock measuring 5 1/2 by 4 1/4 inches. 

The "hi" portion of the sentiment is die cut using the fabulous Lea's Ornate Lowercase Die set out of another fun gold paper I found on my trip to Michael's. I love the mermaid scale texture that it has! I know I'm going to be having a lot of fun using this particular paper. I attached the letters into the frame using mini foam squares for dimension. I also heat embossed the sentiment, which is from the Simply Sentiments-Hello stamp set, using gold powder. I layered it underneath the "hi" sentiment for continuity in the greeting. From there I just had fun adding in the die cut Indigo Vine images using additional foam squares. A few sapphire gems finish off this design! I hope you get a chance to join us this month! Thanks for fluttering by!


Thursday, April 15, 2021

SMILE {I didn't forget your birthday}


 Hello friends! I'm over on the Pinkfresh Studio blog sharing a birthday card using one of my favorite techniques: Emboss Resist! I decided to give it a try paired with stencils and I have to say that I love the results! To begin this design, I used the Floral Focus cling stamp to heat emboss the image using white powder. Once that was done, I used the coordinating Floral Focus layering stencil set to add in all of the bright colors!

Once the panel was all finished, I die cut around the edges using the Essentials: Stitched rectangles dies. I also took a risk and cut that Circle in the lower right corner of the embossed panel to use as anchor point for the rest of the design elements. Thank heavens it turned out! ha ha!
I had so much fun embellishing the circle! First, I created the "smile" tag using the FABULOUS Mini Tags with Fillable Words using an inlaid die cut technique to get the glittery letters! Of course that also meant a glittery bow was needed! I love creating these bows from glitter cardstock because it is so forgiving!
I also added a bit of the same glitter cardstock to the edge of the tag. These tags are perfect to use with pattern paper as well because it has that cute fold-over detail!
The sentiment, which is from the Happy Birthday sentiments stamp set, is heat embossed in gold to accent the glitter pieces! The entire die cut panel is added to a top folding white card base using foam squares for additional dimension.
I had so much fun creating this card and I'm thrilled with how nicely the emboss/resist background turned out using the stencils! Thanks for fluttering by!

Wednesday, April 14, 2021

Ink to Paper April Release Countdown Day 4

Well friends, it's the 4th and final day of the Ink to Paper April release countdown! We're finishing things off with the latest in the Feathered Friends die collection! This little guy was spotted in my tree this morning perched among my budding blossoms and I couldn't wait to bring him to life with the new Feathered Friends 10 dies!

I'm not exactly sure what type of bird it was; too small to be a robin, but it had the sweetest coral head and brown body which completely camouflaged it among the brown branches and pink buds! I was thrilled that I caught that moment and it completely inspired today's design, all the way down to the flowers!

The sentiment is from the fabulous new "Mother and Father" stamp set that is chock full of amazing sentiments. I chose this particular one for today's card and decided to go for a chalkboard feel, without any smudging though! I wanted to keep it stark and crisp!

The tonal Berry Sorbet background was just the thing to accent both the sentiment and flowers! I used one of my favorites: Ornate Background with a frame die cut using the Border Bling: Skinny Dotted Frame layered over the top!

The bird is colored using Distress Oxide inks and then assembled using liquid glue and mini foam squares with just a touch of ink spritzing for interest.

My second and final card for today and the countdown uses the fabulous new Blooming Thoughts stamp set! I love the sentiments and the flowers are whimsical and easy to use! 

I feel like Limeade Ice is a neglected color in my life, so I was thrilled to use it for today's spring card! I die cut both the Border Bling: Postage Frames and the Border Bling: Joy Frame out of Limeade Ice cardstock and glued them together using liquid glue. I DID have to cut off a bit of the Joy frame to make certain that the postal edge would peek out. I layered it onto a top folding white card base using ScorTape and then added the flowers.

This particular set has three different sentiments that coordinate with the "You're in my" portion of the sentiment. I love these fun flowers so much and I can tell they'll be put to use quite a bit, especially with the different birds! They're just perfect to host those sweet little things! Thanks for fluttering by!
P.S. don't forget that the April release goes on sale tomorrow night at 10 PM ET.
 

Tuesday, April 13, 2021

Ink to Paper April Release Countdown Day 3

Welcome to day 3 of the Ink to Paper April release countdown! Today we're showcasing a fabulous collection of new products! Up first is a fun new set called "Where it Leads". I chose to go with a very CAS card today. I wanted something on the artistic side so I began with a 4 by 5 1/2 inch piece of Fresh Snow Linen cardstock.

I was really nervous to not use any of the coordinating dies because one wrong move would mean that the entire panel would be ruined! I took my time and carefully placed all of the images in my MISTI to get the proper alignment.

I'm especially excited about the beautiful sentiments that are included in this set and I can see myself using them on many different cards, not just ones with the step images. 

Once I was done with all of the stamping, I decided to add just a hint of Hawaiian Shores ink around the edges for a bit of sky. I also decided to add the pierced detail around the images to give it a bit of a "frame" or focus.

I added the entire focal panel to a Ripe Avocado card base using foam squares for dimension. After it was all said and done, I think I'd like to try this same look but with the dies for a "fuller" look, if that makes sense. I love CAS cards, but you all know how much I love my layers, too! ha ha!

Next up is a fun new Cover Plate called "Scenic Path". I think this is a fun one for many different occasions, but it goes perfectly with the new Just Sentiments: Steps stamp set AND the new Inside Greetings: Steps! I DO have one of the inside sentiments stamped on the inside, but do you think I remembered to take a picture? uh-oh!

I die cut the Scenic  Pathway out of Ripe Avocado cardstock and layered it over a panel of white cardstock with clouds stenciled over the top.

I wanted a hint of added detail and color back there so it worked perfectly.

I stamped the sentiment and in black ink onto white cardstock and then die cut it with the Love to Layer: Scalloped Circle die.

I'm thinking I'll use this as a graduation card this year. Stop by tomorrow for the 4th and final day of the countdown! Thanks for fluttering by!


Monday, April 12, 2021

Ink to Paper April Release Countdown Day 2

Thanks for joining me for Day 2 of the Ink to Paper April release countdown! Today is all about Dad! Not gonna lie...this was a hard one for me with the passing of my FIL last month! My Dad died when I was 18, so Father's Day has always been hard since then, but now with my FIL gone as well, it's definitely going to be hard! One of the saddest things is that I STILL have his Father's Day cards and treat holders, etc. from LAST year when we couldn't see him in his care facility! I had hoped to be able to give them to him this year, but that wasn't the plan! 

Needless to say, there are some super fun new products that you're sure to love to help us celebrate all of the Dads that we DO have, like my amazing husband who is great father to our kids! This card features the new The Mug die and the coordinating To Die For Sentiments: 24 X 7 Dad die!

I die cut the mug twice using Pinefeather cardstock. I used the To Die For Sentiments: 24 X 7 die on one of the mugs and glued the two together leaving all of the numbers and letters intact. I also die cut the numbers and letters once from Kraft cardstock and carefully glued them over the top with liquid glue to allow them to stand out from the mug. You could do the inlaid die cut technique as well and omit the third layer.

I carefully folded a $20 bill to slide down into the top of the mug. I layered it over a circle and a Kraft background that is stamped using the new Weaved Background. I added some Pierced details around the perimeter.

The "Happy Father's Day" sentiment, which is from another new set being showcased today (photos below), is heat embossed in silver and added to the bottom of the mug.

I layered it onto a Smokey Shadow card base with a frame around the edge. This is a simple design, but all of the added textural details make it feel a little more special...or maybe it's the $20 dollar bill sticking out! ha ha!

My second card for today uses a fun little mini stamp set called "Dad's Time". I thought it would be fun to use these little images to create two tiny scenes showcasing some of the things Dad might like to do with his time! My husband despises grilling and has never played golf, so I'm pretty sure this WON'T be HIS card! ha ha!
This card also features the new Inside Sentiments: Thanks Dad stamp set, which I chose to add to the bottom center to accent the two scenes.


I used the previously released Nifty Plaid background stamp for that golfing feel. I find that red cards are incredibly hard to photograph, but I think this photo shows it pretty well.

I hesitated to add the sequins, but I really felt the card needed some additional detail, so there you have it! ha ha! I also heat embossed the "Happy Father's Day" sentiment in white onto a stirp of black cardstock. I used the grass die from the Floral Breeze accessories set to help set these little scenes. Join me again tomorrow for day 3 of the release and thanks for fluttering by!


Sunday, April 11, 2021

Ink to Paper April Release Countdown Day 1

Hello and welcome, friends! It's day 1 of the Ink to Paper April release countdown! I have two projects to share with you today; first up is a card made using the new Seas of Life stamp set and the new Weaved Background! I really love all of the new sentiments included in the Seas of Life stamp set! This one was a particular favorite, so I chose to use it for the theme of my entire card.

To begin this card, I did a simple watercolor wash using a few different blue paints for some variation. I used my heat tool to dry it quickly so I could add the "wave" type image that is included in the Seas of Life stamp set. I inked it up heavily with Enchanted Evening ink and then just stamped it off for the 2nd and third image with the residual ink. I really like how it turned out. Once that was done, I die cut it using the previously released Love to Layer: Torn Edges Dies. I really like the effect it gives this watercolor panel.

I stamped the sentiment and the seagulls on the top using black ink for a stark contrast to the blue background. Did you know that the Seagull is Utah's State bird? We are very used to having many Seagulls all over, but it probably seems weird for others who visit our state to see them here when they are a coastal bird! The seagull is symbol of hope, miracles and prayers answered. If anyone is interested in hearing the story of the seagulls and why they are the State bird, I'd love to tell you! It is such a great story! 
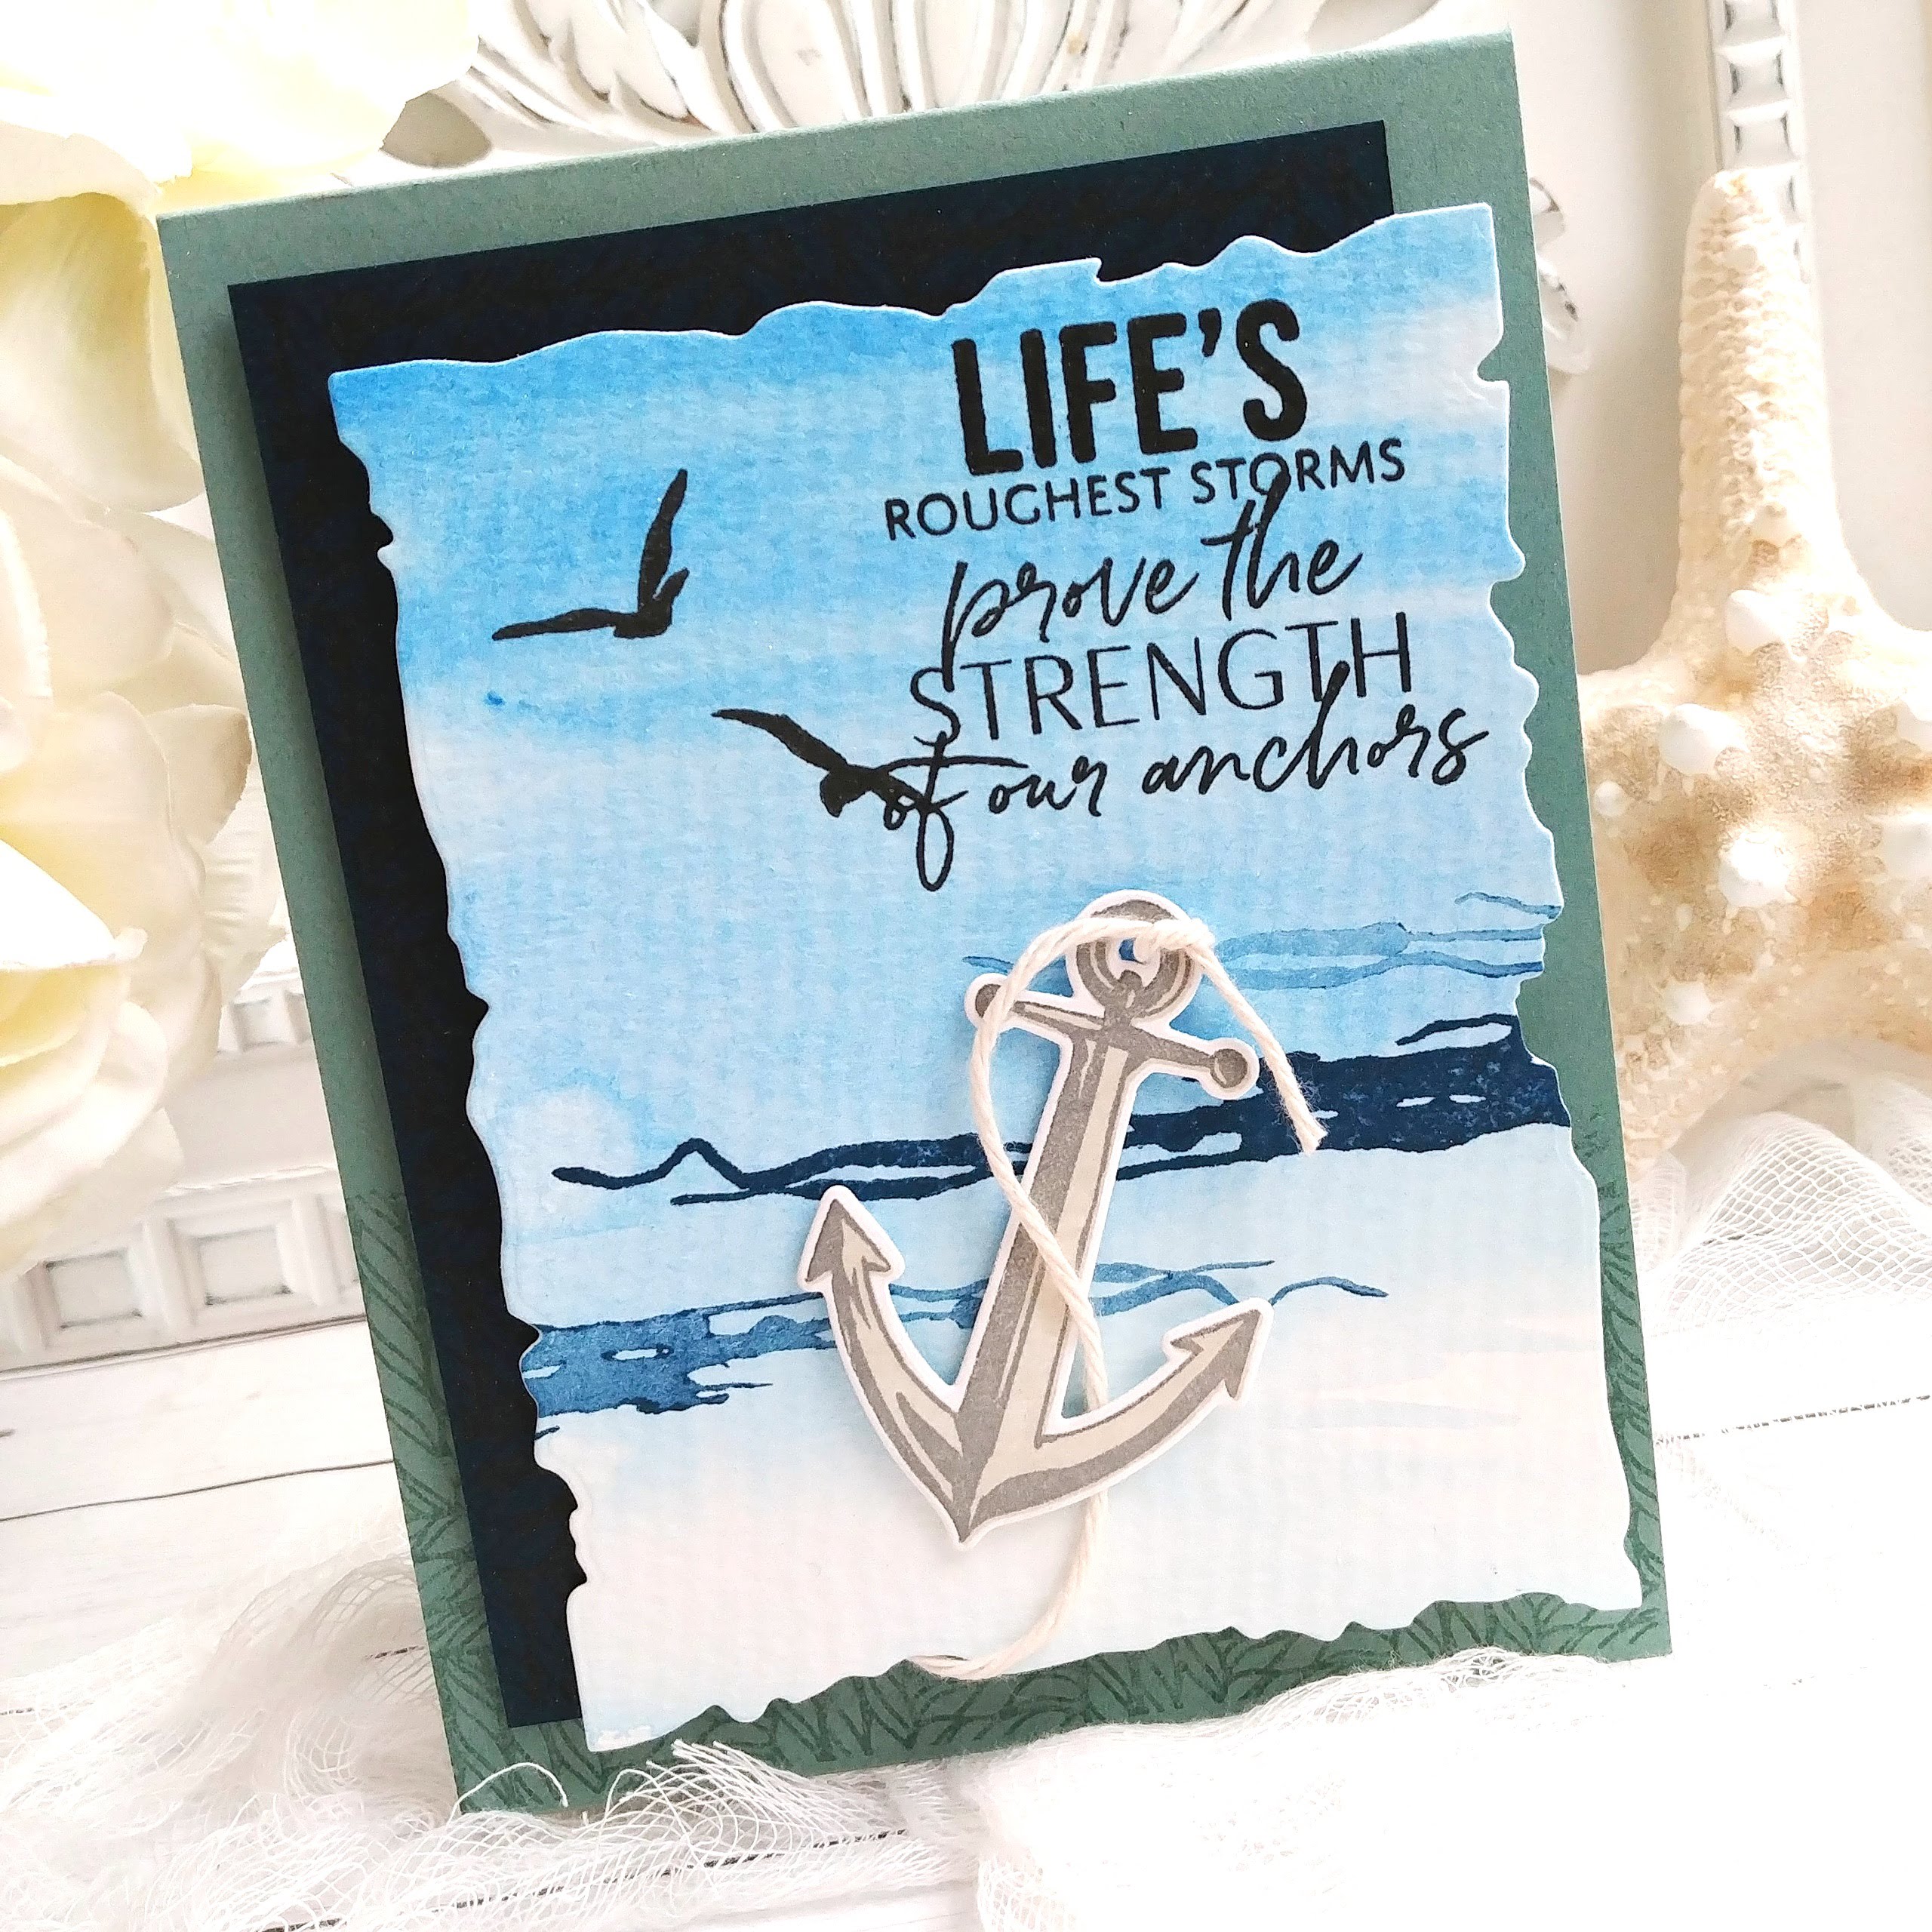

Anyway, back to the card! LOL! I seem to get sidetracked a lot! I die cut the anchor image and then stamped it with the two step images; the solid image is stamped in Soft Stone and the detail image is stamped in Weathervane ink. I tied a knot of Cream Cotton Baker's Twine and then wrapped it around the anchor and secured it to the back of the watercolor panel with a bit of washi tape.

It is hard to see in this photo, but the Dark Indigo panel is stamped with the new Weave background using the same Dark Indigo ink for a tone on tone look. I also used the same background image to stamp the bottom of the Ocean Tides card base.

I offset the blue panel with the watercolor panel for a bit of a whimsical feel. 

I mounted the layers onto the card base using foam squares for dimension. I spritzed the entire things with Shimmer Spray for some sparkle. I love the way sand glints in the sun, so hopefully the recipient will get that same vibe with this nautical card!

My second card is bright and tropical using the new Feathered Friends 10 mini stamp set and die. I really like the sentiment that is included in this set, so I chose to keep it front and center! To begin, I die cut the bird and stamped it in the colors that are used in the assembled example guide. 

I used the fabulous Flourishing Florals stamp set to highlight this sweet colorful bird! I stamped the sentiment directly onto to the Love to Layer: Scalloped Circle

It's no secret how much I love a tone on tone background, so I used the Cover Plate: Trellis Die to die cut a panel of Hawaiian Shores cardstock and glued it onto a 4 1/4 by 5 1/2 inch panel of the same cardstock. I also layered a piece of Bitty Big: True Black pattern paper over the top of the background and then added the circle using foam squares.

I stamped the flowers in Hibiscus Burst and Raspberry Fizz , and a few in Lilac Grace and Winter Wisteria. The leaves are stamped in Green Parakeet and New Leaf inks.

I arranged the flowers here and there and secured them with foam squares. I tucked the bird in the bottom corner as though he's perched among the colorful blooms!

Join me again tomorrow for day 2 of the countdown! Thanks for fluttering by!