Tuesday, August 25, 2020

Keeping Christmas {Holiday Pocket Journal}


Welcome to the August Keeping Christmas Blog Hop! I can't believe how quickly Christmas will be here! Eep! With that in mind, I chose to make 6 Christmas pocket journals/calendars to give as gifts to keep track of holiday planning! Even though I prepped 150 of THESE and thought I'd never want to see one again {LOL!}, I decided that they'd be super fun to make all dressed up in Christmas paper and charms! Before I dive into the details, here is the list of the other Keeping Christmas designers. I can't wait to see what they have created!

The paper collection that I used for the entire project is called Midnight Noel and I found it at Hobby Lobby in the Christmas sticker/embellishment section. I always love when July rolls around and the Christmas crafting section makes a come-back!

I bought the charms from Amazon and they came in a pack of about 100 or so for not much money. If you just search for "Christmas charms", a ton of options are available. I used lobster clasps to attach a spiral jump ring and then the charm which makes it a cinch to add to the elastic. 

I wanted to include a pocket planner in each of the journals. I bought these from Amazon as well and they are a two year journal so you can use it for next year as well! I can usually find things like this at the Dollar Tree, but I sent my husband and he came home with huge spiral bound student planners! LOL! I gave those to my kids to keep track of all of their remote learning things, like Zoom meeting codes, etc. Spring was a learning curve for all of that and now I feel a little more prepared!
But....back to the journals. I measured the planner size to decide how big to make the laminated journal covers. I was hoping to find something 6 inches or smaller so I could get two covers from one sheet of 12 by 12 paper, but these pocket planners were just slightly larger.

The pocket planners came with a floral cover, but were also inserted into a plastic protective sleeve. I decided to cut some coordinating pattern paper to slip inside to keep the journals cohesive and festive.

The other two sections are just like what are inside of THESE and I used coordinating paper for those as well.

I thought these might be fun hostess gifts to give at Thanksgiving, but most people start their holiday planning and shopping long before that. Maybe Halloween gifts? LOL! I'm not sure when I will gift these!

I was thrilled to find the perfect Candy Cane charm in the pack that I bought. It goes perfectly with this sweet pattern paper! The elastic that I use it also from Amazon and comes in a roll of 100 yards and is very economical. If you search for "Cord Elastic" you will find a lot of different choices!

Here's a few more of the pretty charms. I just love how nicely the snowflake looks on the journal on the left side...a perfect match!

I made one for myself, so I can't wait to put it to use organizing and planning all of my holiday purchases and dates to remember. I'm guessing there won't be nearly the amount of "places to go" this year, which is sad. I think navigating the holidays will be difficult for all of us this year! "I'll be home for Christmas....you can plan on me!" LOL!  I think it will help us all cherish our traditions and loved ones a little bit more! Thanks for fluttering by!


Monday, August 24, 2020

Flash Sale {You are AMAZING to the core!}


Welcome to this week's Papertrey Ink/Ink to Paper Flash Sale! As usual, the sale will run from 12 noon today until 12 noon on Wednesday, August 26th! I'm revisiting the darling Tag Creations: Delightful Bunch stamp set which is just perfect for this time of year! I chose to use some different colors for the apples to change things up!
This week's Flash Sale will include:


Dies: Tag Creations: Delightful Bunch this will be for pre-order. The other items in your order will be shipped out and then the dies will arrive in 2-3 weeks.

My kids are headed back to school tomorrow for 2 days each week and 3 days at home for remote learning. These tags will be the perfect addition to the teacher gifts that will be headed out the door. I made THESE a few week's ago for the Flash Sale and these tags will complement them beautifully! I just love the pink and lime apples! I think I'd really enjoy picking apples from an orchard filled with pink and green apples! 
Whenever I use this stamp/die collection, it reminds me of the Anne of Green Gables series with Megan Follows as the actress, when her and Katherine are out picking apples. It's right before she meets Gilbert on the bridge, which is always such a fun part! ha ha!


I couldn't resist adding some coarse crystal glitter to the apples and leaves for some added detail. The Nuvo drops help make the apples look crisp and juicy, don't you think? The sentiment on each of the labels are heat embossed in silver for a fun touch!
The kids were able to pop in for a socially distanced Open House last week, so they got to meet their new teachers. They seemed pleased, which is always nice! I hope the teachers like their Back-to-School gifts. I ended up getting some Apple soap from Bath and Body Works, gum, gourmet popcorn, EOS lip balm, a KIND bar, lotion and a gift card to Amazon so they can get a few things that they need. These tags will be attached to the bow that ties up the cellophane that the baskets will be wrapped in! I'm using the little baskets I bought for May Day which will be just the right size! Thanks for fluttering by!


Wednesday, August 19, 2020

Warmest Birthday Wishes

I thought I'd better pop in with these cards I made back in July before summer disappears! They are super simple, but they use the darling Summer Vibes stamp set that was a must-have for me! I got it when it was first released and there it sat, unused! Boo! I decided that I'd just do some simple ink blending and coloring to create some quick birthday cards!

I used the fabulous Cloud Mix-ables Stencil for the sky and some Scattered Straw Distress Oxide ink for the sand portion. I used my color spritzing tool (photo of this near the bottom of the post) to create some sandy specks at the bottom of the panel.

I die cut the panel using the Diagonal Stitched Rectangle dies to give this simple card some extra detail. After that was done, I stamped all of the images in black and then colored them with Copic markers. I don't do nearly as much coloring as I used to and I forget how therapeutic it is! I used the Sunny Vibes Die-Namics to die cut all of the colored images. I arranged them on the card here and there for a beach-y scene! This is my favorite of the two because it has a bit more depth to the scene.

This one is a little bit more plain, but I just adore that sweet little bunny working on her sandcastle! The shell and sun both have a coating of Nuvo Crystal Glaze over the top. After I had photographed the cards, I decided that the umbrellas need some glaze as well, so they are shiny now, too!  I added a trio of White Nuvo Drops to the centers of the palm trees as well as some sparkling clear sequins. The sentiment is stamped onto a strip of white cardstock and added to the panel using foam squares. 

For those of you who have asked about the color spritzing tool....this is it! It is from my SU! days and I still have all of the markers that fit with it. This is how I add a lot of the ink splatter to many of my designs.

This little kitty is just the cutest, don't you think? I added it to the inside of the card using foam squares. The sunglasses also have a layer of glaze for some realistic shine. I thought this SENTIMENT was the perfect touch to accent this bibliophile kitty! ha ha! I gave one of these cards to my son for his August birthday and the other will be heading to one of the kiddos from church in the next day or two! 
I'm glad I got these cuties inked up, but guess what? I still have MORE summer stamps that I haven't used at all! Those might have to wait until next year! So sad! Summer goes by way too fast! Anyway, thanks for fluttering by!
 

Monday, August 17, 2020

Flash Sale {Thank you for your love and kindness}


I hope you all had a wonderful weekend! I'm back again today for this week's Papertrey Ink/Ink to Paper Flash Sale! If you'd like a  sneak peek of each week's Flash Sale, make sure to check your email for the Papertrey Ink newsletter each Sunday evening! We're transitioning to autumn projects, so I've selected some fun colors and stamps for this week's Flash Sale! This sale will begin on Monday, August 17th at 12 Noon EDT and go until Wednesday August 19th at 12 Noon EDT.


If you read my blog last week, then you already know that I'm trying to remedy my neglect of Honey Nut and Saffron Spice! I decided to bring these two beauties to life on today's cards! I used both the ink and the cardstock for a cohesive look.


I used quite a mix of stamps to pull these two autumn designs together! I love mixing a bit of this and that when I create my cards. My first step was to get the focal images/sentiment stamped. I used the It's A Sign: Wood Frames stamp set and die collection for the circle portion. It is stamped in Weathervane ink and then the sentiment, which is from the It's A Sign: Love and Kindness stamp set, is stamped in black. 

From there, I got to work on the leaves. The oak leaves are stamped in Fine Linen and Saffron Spice ink and the other larger cluster of leaves are stamped in Fine Linen and Honey Nut ink. I used a small blender brush to tap the inks together where they meet for a two-toned, seamless look.

I also added a heat embossed sentiment from the Just Sentiments: Grateful Heart stamp set at the bottom to give the card some contrast and reinforce the salutation. 

I stamped the Rustic Brick Background in white onto a panel of Weathervane cardstock that measures 3 3/4 inches by 5 inches. I also added some extra white ink around the edges of the panel by simply  using the edge of the ink pad.  I cut and scored two card bases; one out of Saffron Spice cardstock and one out of Honey Nut. Each one got some sponged ink around the corners for added contrast. At this point, all of the elements were ready to layer together!

This is always the fun part when it's time to put everything together! I used foam squares to add everything onto the card bases. Once they were all assembled, I added some White Nuvo Drops around the leaves and a few sparkling clear sequins here and there for some sparkle and shine. These were a lot of fun to put together and will be perfect to add to my growing autumn stash! Thanks for fluttering by!


Sunday, August 16, 2020

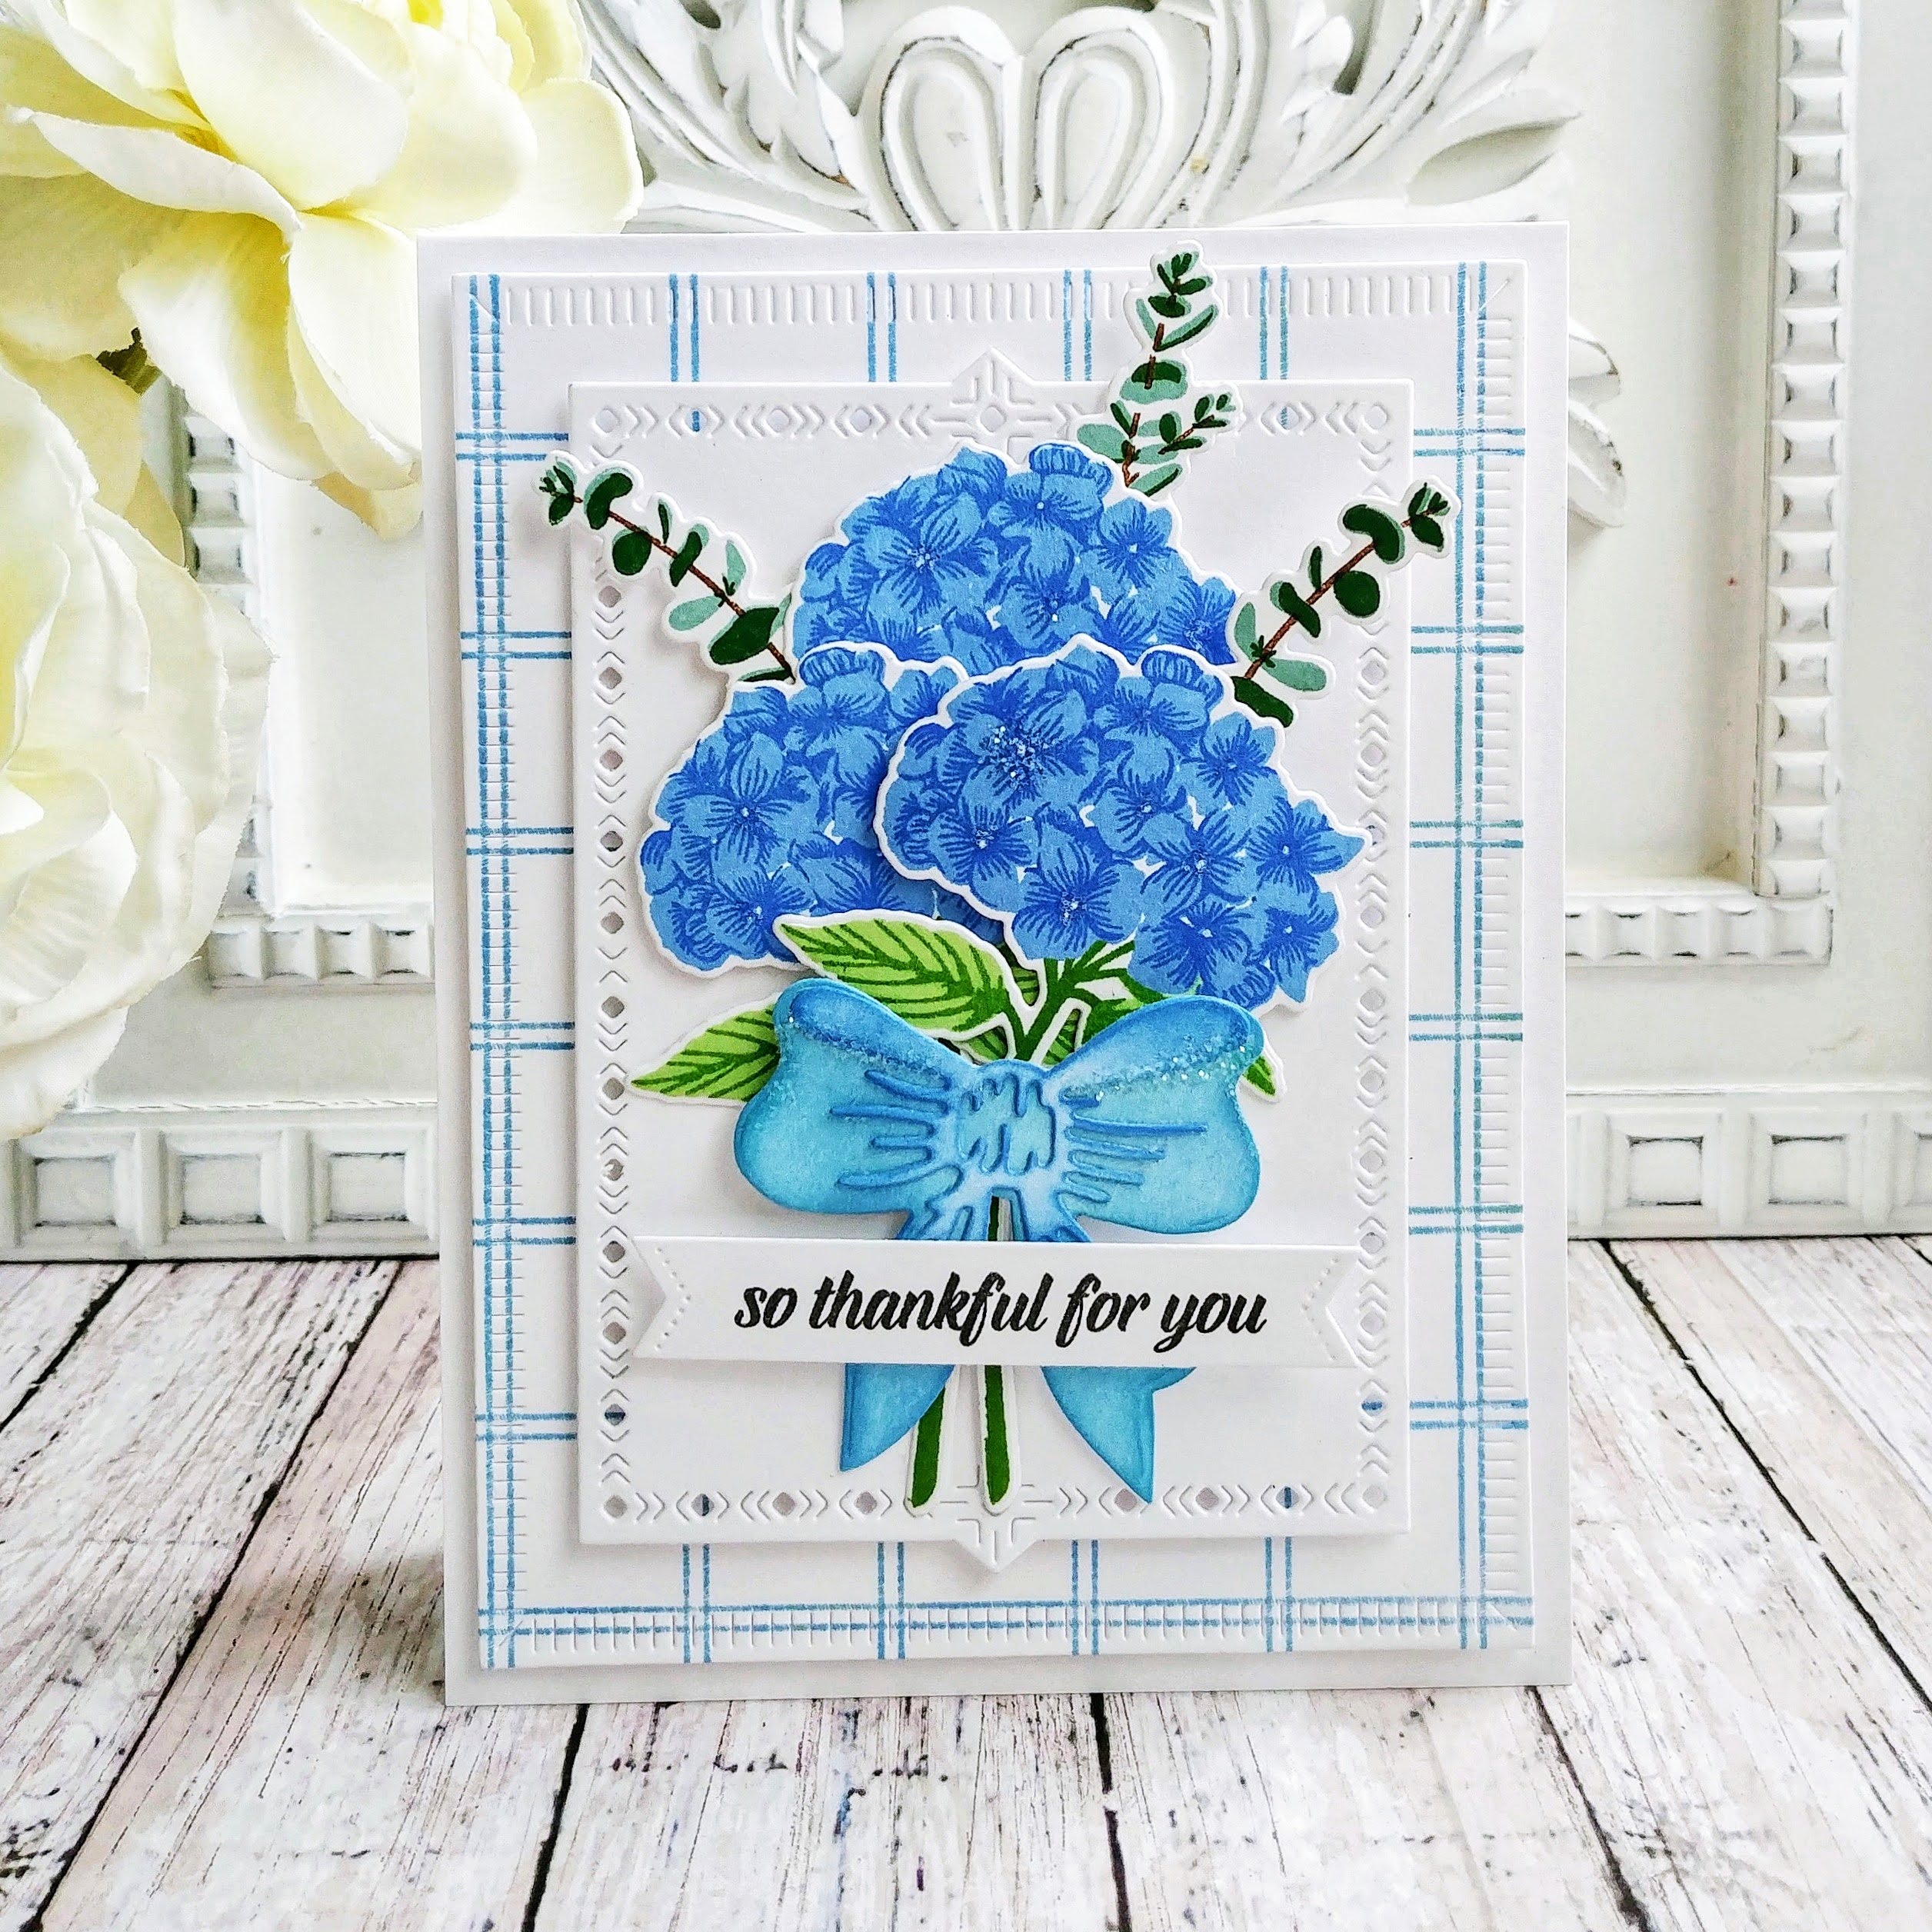
The Greetery {So Thankful for You}

I'm just popping in today with a few floral cards using the flowers from the latest release from The Greetery! I am in love with the Hydrangeas and can't seem to get enough of them, particularly stamped in blue! I didn't want to neglect the other flowers in the Budding Beauties Summer Stamp Set so I made up another bouquet using the Daisies and the Peonies as well!

I die cut each of the three Hydrangeas using the Budding Beauties die collection and then stamped them using my mini MISTI. This is such a fun and easy flower to stamp and line up for great results! I also stamped a few of the Petite Eucalyptus images to tuck inside this bouquet! I really love the extra contrast that it gives to the design!

The bow is die cut using the Fit to Be Tied Die out of white cardstock and then I added the color using an ink pad and a blender brush. I glued the two pieces together and then added some glitter to the bow as well as the three Hydrangeas.

My Nordic Frames dies have been a bit neglected so I decided to switch things up and use the medium size panel to adhere the bouquet to. I layered it up onto a panel that was die cut using the Crimped Frame Die and stamped using the Windowpane Plaid Background Stamp. I love the hint of color and pattern that it gives this simple design.

The sentiment, which is from the Sentiment Suite Thank You Stamp Set, is stamped in black for contrast. I added it to the bow using foam squares to make it pop! The entire focal panel is layered onto a top folding A2 card base using additional foam squares.

My next card uses some of the same elements to keep these two cards cohesive. I used the outer portion of the Nordic Frames for this card, and the crimped portion with the Windowpane design on the smaller panel. I also added a bit of ink blending to the center to give it a little bit more color.

The Peony is stamped in yellow inks and the daisies are stamped in pink. I added green colored pencil to the centers rather than using the stamp that is intended for the centers. I wanted to give them a bit more detail and shading, so I opted for the pencils.

I love the bold look of the Written in Ribbons Stamp Set and knew it would be the perfect thing to anchor the bouquet! I love that it has the smaller companion sentiments to finish off each phrase. I stamped the "birthday to you!" portion of the sentiment in black.

I gave this bouquet a sprinkling of glitter as well for some sparkle and shine. I just love how it looks when it catches the light! Everyone should have a little sparkle on their birthday, don't you think?

I'm sure this birthday design will be headed out the door any day now and the thank you card will get added to my stash for later! Thanks for fluttering by!
 

Saturday, August 15, 2020

Ink to Paper Release Day

It's the Ink to Paper August release day!!! There's so much to love about all of the fabulous new products to get your autumn crafting going! While I'm still clinging to summer, there is something special about welcoming the start of a new season! With the onset of fall, that means the holidays will be getting started in full swing! For me, "the holidays" include Halloween, Thanksgiving, Christmas, New Year's Eve, and New Year's Day! I'm sure these will all look a little bit different this year, and for me, that will mean that sending cards to loved ones will be even more important!  

All products will go on sale in the Ink to Paper Shop beginning at 10 PM EDT tonight, the 15th! Happy shopping and thanks for fluttering by!
 

Friday, August 14, 2020

Pinkfresh Studio August 2020 Stamp and Die Release Blog Hop


It's a busy day on the blog, but I'm thrilled to be here for the Pinkfresh Studio August 2020 Stamp and Die Release Blog Hop! There are so many new products that you're sure to fall in love with! I have quite a bit to share with you today and the list of the other designers participating in the hop will be at the bottom of today's post! Before I begin with the projects, there is a shipping promo going on which you can read about below.
As always Pinkfresh Studios will be giving away the ENTIRE release to one lucky winner on the Pinkfresh Blog, You Tube and Instagram! Also, simply leave a comment here and on each of the other designers' blogs for a chance to win a $25 dollar gift certificate to the Pinkfresh Studio shop!


Each of my projects today uses the new Essentials Shaker Tags Die Collection but each in a different way! I absolutely adore this large size because it works nicely for a card front, but is also so nice to accent a gift to really make a nice statement!

You can see it here on its own as a tag. The background was stamped using the new Sweet Blooms Background stamp with some added ink blended around the edges. Each of my projects also uses the previously released Artistic Bows dies which are the perfect accent to these large tags!

For the card, I did some emboss resist using the Sweet Blooms background stamp and then added the tag over the top. I used one of the included windows, which are really meant to create shakers, but work nicely otherwise as well! It was the perfect spot to add the heat embossed sentiment which is from the new Sending Love and Hugs stamp set. I rarely heat emboss with black powder, but I don't really know why not! I really love the crisp, saturated look it gives the sentiment!

The flowers on both cards are from the new Charming Floral Wreath stamp set. This set allows you to either color it with the medium of your choice, OR use the solid stamps. I chose to use both  for these two projects!

Up next is a card using the fabulous new Sweet Blooms Coordinating Stencils! This pairs with the Sweet Blooms background which I used on the previous two projects. For this one, I stamped the background in black and then used the 3 coordinating stencils to add the different colors; leaves, larger blooms, and smaller blooms!

For the final step, I added the Aquamarine ink and then Nuvo Moonstone Glimmer Paste. I set it aside to dry while I got to work on the other card elements. I used the tag dies again, but this time I used the smallest tag, arranged on its side for the sentiment.

I'm smitten with this new You're Every Good Thing sentiment, AND the entire set, for that matter! I only used the sentiment today, but rest assured I won't be able to resist the floral images for long!


I added some more of the flowers from the Charming Floral Wreath to frame the sentiment. A bow glued to the side finishes this off. I added it to a top folding A2 black card base using foam squares.

My last two projects of the hop are these two tags using even more of my new favorites! The background for each tag was created by stamping the Colorblock Gradiating Stripes Background in both yellow and purple. I chose to use just one shade of ink for each tag, but this stamp allows you to create multi colored backgrounds very easily.

The sentiment portions are die cuts that are included in the Essentials Shaker Tags die collection. I stamped them with two of the darling sentiments from the You Can Change the World stamp set. I just love the combination of fonts to create these fabulous sentiments!

This new floral image is going to be a fan favorite, I can tell! I love how large it is, which makes it fabulous for card fronts! It also works perfectly with these large tags!

You could wrap a gift quite simply and then just add one of these tags to do the rest of the work! If you're not a tag person, this design could easily be added to a card front for something like I showed earlier.

I love how easily it is to get bows that coordinate perfectly with the inks by simply die cutting them from white cardstock and then adding the ink with blender brush or sponge.

Make sure to leave a comment to be eligible for a chance to win AND don't forget to hop along to the other designers' blogs to see how they've used these amazing new products! Thanks for fluttering by!


You are invited to the Inlinkz link party!

Click here to enter