Friday, July 18, 2025

Papertrey Ink July Release Countdown Day 1

Hello and welcome to day 1 of the Papertrey Ink July release countdown! Today the team is introducing the ever-so-adorable Above Ground Stamp/Die set. I'll also be sharing another project using the new Into the Blooms: Above Ground Die. 

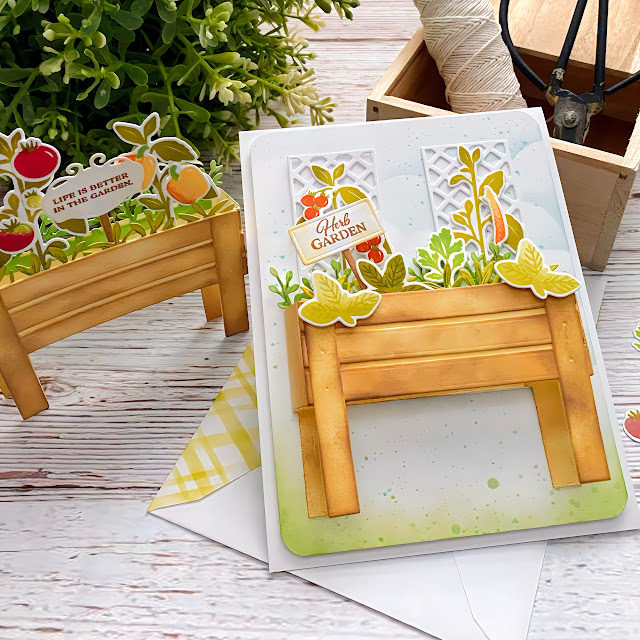
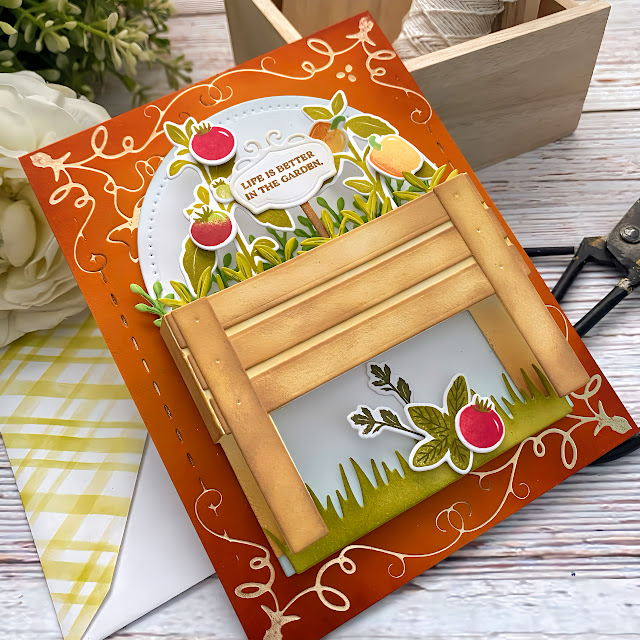
For my first card, I chose to create a vegetable garden; my next card features a herb garden (with a few other veggies). I had so much fun creating both cards and I can't wait to try this raised bed with a flower garden. The Above Ground stamp set includes some really cute sentiments that you can add on the garden signs or anywhere you choose. 

To begin, I die cut all of the pieces twice using the Above Ground Die. I wasn't sure how many of each image I would need, so I just got started with two. That gave me PLENTY so I was able to make two cards. You can tell on this photo that the raised garden container has some depth to it; you can press it to the side to place inside an envelope to give to the recipient or to mail, but it pops back up when it comes out of the envelope!

This particular die set comes with both dies for the stamped images, the raised bed, and some foliage that doesn't have stamps. I simply colored them with dye inks and a blender brush and then added some details using a freshly sharpened green color pencil. It doesn't take much time, but the result really adds to the realism.

The raised bed was die cut from white cardstock (everything is from white) and then I used finger daubers and distress oxide inks to color it The planks are glued on using liquid glue. 

I had fun arranging the garden and getting it all 'planted'! ha ha! Once that was done, I used the Fall Harvest Hot Foil Plate on a panel of Canyon Clay cardstock using champagne foil. I added some Terracotta Tile ink around the edges using a blender brush for added dimension. I used the Love to Layer: Arches Die to cut the largest arch, added some Aqua Mist ink around the corners and arc and then adhered it to the foiled panel using foam squares. The garden was attached using liquid glue and then I tucked some grass and extra foliage and veggies underneath for some added interest.
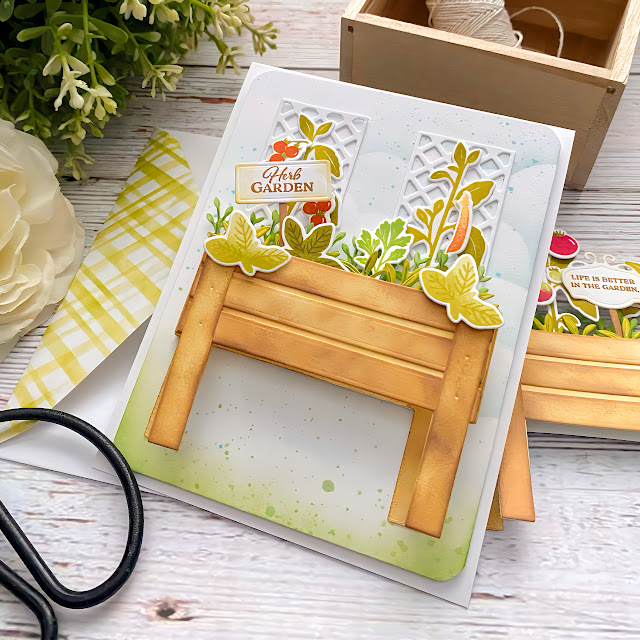
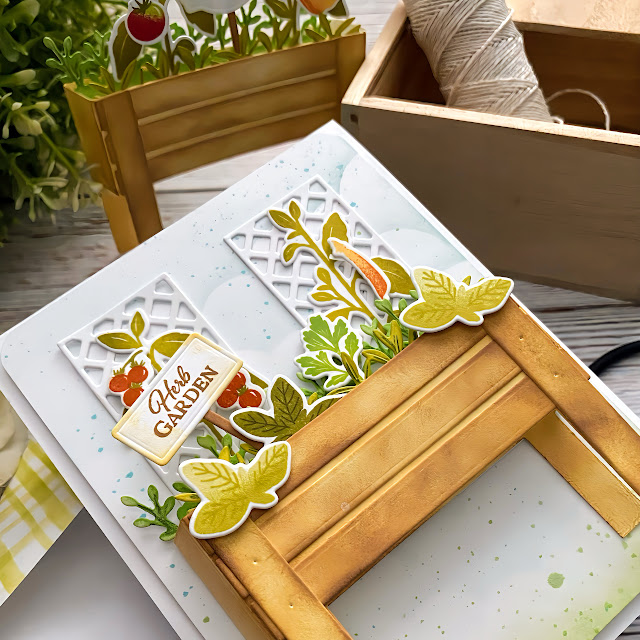
My second card, which is actually my first card (you can see the other veggie garden in the background), uses the herbs and a few of the veggies because they're just too cute!

This card also features the cute trellis die cuts; this is an option you can add to the front of the raised bed instead of the planks, but I thought it would be fun to use them behind the herbs.  Also, you can see the dimension of the other garden because it is standing up next to this card (left side)

The process for this card is the same as the other card, but the background was created by using a cloud stencil on a panel of white cardstock measuring 4 by 5 1/4. I also added a bit of green ink and splatter to the bottom. I used a corner rounder punch on the corners and then added it to a top-folding A2 card base.

There are three styles of garden signs that you can attach to a stake. All of the sentiments fit on each of the signs, so the choice is yours on what style you are after. 

I decorated the flap of an envelope using the Show Your Stripes Stencil Collection for added detail.

The backside of the legs of the raised bed need to be colored as well, along with the sides. 

I used an assortment of liquid glue and foam strips to really create the illusion of a dimensional garden.

I really can't get over how cute and well-designed this set is!
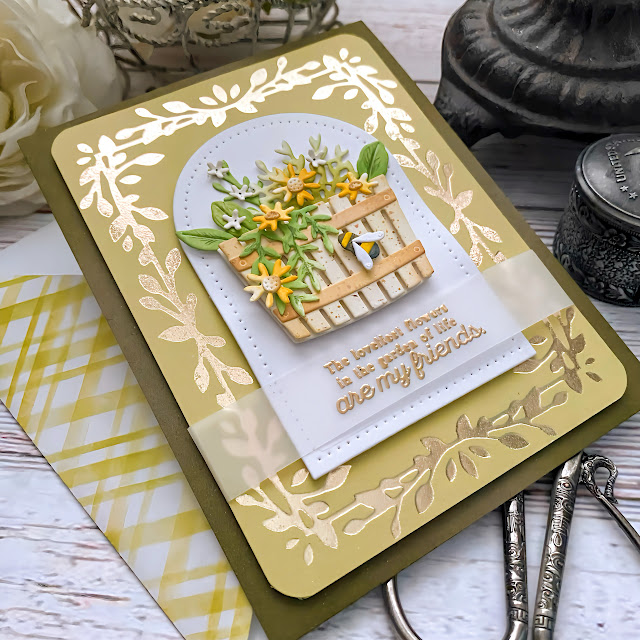
My third card for today features the new Into the Blooms: Above Ground Die. I feel like both sets being showcased today would work so nicely together. I know a lot of people like to grow their tomatoes in barrels like this. 

There are quite an assortment of different flowers you can add to the container, but I chose to create a daisy card using a few of the smaller flowers and bee from the previously released Into the Blooms: Wild Wood Die.

As I am typing this, I realized I was going to add one of the cute signs from the Above Ground Stamp/Die set (woops)! Wouldn't that have been cute? Looks like I need to go make another card! wink!

I die cut the barrel from Rustic Cream cardstock and then used Antique Linen and Gathered Twigs Distress Oxide ink to the bands around the barrels and then a bit of ink for dimension on the barrel and some brown ink splatter.

I die cut the flowers and foliage from white cardstock and colored them using blender brushes and dye ink. I set everything aside to get started on the background and sentiment.

I used the Exquisite Leaf Frame Hot Foil Plate with champagne foil on Spring Moss cardstock. I trimmed it down and rounded the corners. The sentiment, which is included in the Garden Blessings Stamp Set, is heat embossed in gold onto a strip of vellum. I wrapped it around the foiled panel, layering the arch ahead of time. I adhered it to an A2 panel of Olive Twist cardstock using foam squares.

I used foam squares to attach the barrel, arranged the foliage and flowers and then gave it a good spritz of shimmer spray. I glued it to a top-folding A2 card base using liquid glue. This is such a fun set and I know I will be reaching for it often! Thanks for fluttering by!




Monday, July 14, 2025

Happy Camper

Hello, friends! I hope your summer is going well so far! My son just got back from his first campout with the youth group at our church. Thanks are always in order for the daring leaders who take time out of their busy lives to help facilitate these types of activities! I'm using older (and mostly retired) products, so this is definitely more a "for me" post than anything else. I am one of those people that forgets what I have made unless I see a picture and then I get inspired all over again! ha ha!

I made three quick and easy CAS cards for the three leaders; they are all men, so I didn't need anything too fancy and even though I'm not usually a CAS type card maker, masculine cards usually turn out nicely with that style. I'm using a potpourri of products and companies to pull these three cards together.

All of the cards use the retired Summer Camp Stamp set from Papertrey Ink. I have held onto older stamp sets like this for this very reason. I always enjoy pulling out older sets to use in new and fresh ways.

I also used the darling lantern from SugarPea Designs, but the online store is currently unavailable so I can't link it. It is one of my favorites and I have used it on some of my cards that I personally like the best. 

Each of the three cards have gold foiled stars on white cardstock using the Cascading Stars Hot Foil Plate. For this card, I used the lantern die to cut out the center portion and then popped it in place using foam squares.

Each of the three cards also use the Scene It: Mountain View Die. For this one, I only used the trees to frame the lantern and then used one of the images from the Summer Camp Stamp Set and then punched it out using a circle punch.


This one uses all of the pieces to create the full scene. I added the gold embossed vellum strip over the top and secured it over the foiled panel with scotch tape. The bottom looked a little naked, so I added a strip of Summer Camp pattern paper  using liquid glue.

Cookies are in the oven as I type, so I thought it would be fun to decorate the bakery boxes the cookies will go in with ribbon and a tag. These are just quick and easy "Pinefeather" style tags. I did stamp a greeting on the inside using the Inside Greetings: Gratitude Mini Stamp Set. The timer is going off....better run! We don't want burnt cookies! Thanks for fluttering by!


Friday, July 11, 2025

The Greetery {Happy Mail}


Hello and welcome, friends! I'm over on The Greetery Blog today (and here, of course) sharing some tropical inspiration; having said good-bye to June, things are heating up and tropical cards are always fun to make this time of year! I had so much fun cutting and coloring the hibiscus flowers, I decided to make two cards to share with you today! Let’s get started with the flowers.

To begin, I die cut all of the pieces for the flowers and foliage using the BotaniCuts Hibiscus Die from white cardstock and then used dye inks and blender brushes to color all of the pieces. I added a spritz or two of shimmer spray to all of the pieces and set them aside to dry. For the postal-themed card, I used the Airmail Border Stencil on an A2 sized panel of white cardstock. I chose the same pink and yellow inks that I used on the flowers for cohesiveness.

 I added some of the orange ink around the edges to give it a worn look. Once that was done, I used the Postcard Details Pierce Plate over the top. I have used this particular die positioned both vertically and horizontally and I just love the different look you can achieve just by changing it up! For today’s card I chose the horizontal placement since I knew the floral arrangement would take up quite a bit of space.

Before I attached the flowers and leaves, I added all of the extra postal stamping and die cuts; these were all created using the Postal Modern Stamp Set and coordinating Postal Modern Die. Once all of those details were in place, I attached the flowers and leaves using foam squares for dimension. Once I had finished the second card, I decided this card needed some gold accents, so I used the Deco Notecard Die to create the cute corners in the bottom left and upper right corners. Once that was done, I attached the entire panel to an A2 card base using liquid glue.

For the second card, I used the Herringbone Parquet Die on an A2 panel of pale pink cardstock. I added just hint of kitsch flamingo distress oxide ink using a blender brush for a bit of dimension. Next, I cut the Antique Gold cardstock using the Deco Frames Die. I also used the A2 Arches Die in the middle of the gold piece to cut the opening. I attached it to the pink background and then arranged the hibiscus flowers until I was satisfied with the arrangement.

The sentiment, which is from the Scripted Sentiments Stamp Set, was cut using the Scripted Sentiments Die and then stamped in black ink. I added it using foam squares near the bottom of the floral cluster. The panel is attached to a top-folding A2 card base using liquid glue. I love the tropical warmth these cards exude and I’m really happy with how they turned out!

You may have noticed that neither of these cards are “occasion” specific, which was intentional on my part; sometimes you just need a generic card and these two will suit just fine! How about you? What are you working on this week? I need to get started on a “golden birthday” card for my darling daughter and a few “welcome to the neighborhood” cards.

I mentioned this last month, but I finally took some time to sort out my card stash and organize it. Oftentimes I’m in such a rush, I just place them in the organizational bins I use and they are not sorted correctly. Once I had everything organized, I could really see the places where I was lacking and of course, the places that are OVERFLOWING! Ha ha! I hope you get some creative time this week to work on the projects you’ve been hoping to make! Thanks for fluttering by!
Friday, July 4, 2025

The Greetery {Sweet Land of Liberty}

Happy Independence Day! I hope you all have a wonderful day today! I wasn't quite ready to put the red, white, and blue away, so I'm back with one last patriotic card! We're headed to the parade this morning, my son wants to go bowling, we'll have a barbecue, and then watch fireworks! I hope you all have some fun plans with those you love!

To begin this card, I cut an A2 panel of white cardstock and then used the Big Yay Stencil. I also added some blue and red ink splatter to make it appear even more festive! Next, I die cut it using the Sweetest Frames Die and then stamped the border using the Sweetest Frames Stamp Set

I stamped the sentiment using the Land of Liberty Stamp Set and then cut it using the Land of Liberty Die. I attached it in the center using foam squares for dimension. I also added a bow that is also included in the Sweetest Frames Stamp Set (linked above).

The background was created by stamping the Spring Meadow Background using Pacific Point ink from SU! on an A2 panel of Spring Rain cardstock. I layered the sentiment panel using foam squares.

I had a few flowers left over from the tags I made for THIS post and I thought they looked so cute tucked around the sentiment.

The finishing touch is a few stars that are die cut from silver glitter cardstock using the Star Struck Die. I added the larger ones with foam squares and the smaller ones are adhered with liquid glue. I gave the entire panel a spritz of shimmer spray and then glued it to a top-folding A2 card base using liquid glue. I'm feeling a little sad to be putting away the patriotic stamps/dies, but I've sure had fun with them this year. I was quite proud of myself for sending ALL of the patriotic cards I made over the last few years to friends this year. Thanks for fluttering by!


Saturday, June 28, 2025

All Things Red, White, and Blue

Independence Day is a little less than a week away so I decided I'd better get this post put together before the big day has come and gone! I've been having a ball creating all kinds of fun patriotic themed gifts and tags to give to a few ladies in the neighborhood! I made earrings, baskets, key wristlets, and tags! You can read more about the details of the sewn projects HERE

Up first are the tags that I created to add to the ribbon when I tie everything up! I'm putting the fabric baskets in larger cellophane bags and tying them up with ribbon, and a tag is always just the cherry on top!

I bought a bunch of things from Bath and Body Works included in their patriotic line this year and I just love the gingham, so that was the beginning point for these tags. The recipients will also be getting the cards I made for the Star Spangled Summer release from The Greetery. 


Here is another shot of my inspiration 

To begin these tags, I used the A2 Stitched Scallops Die and cut the smallest size from white cardstock. I added the gingham detailing by using the Scalloped Gingham Stencil; I love that it comes with stencils for all three sizes of the Die. Once that was done, I die cut the pieces I would need for the sentiment using the Land of Liberty Die from white cardstock. I did some gradient stamping with the Land of Liberty Stamp Set.

The flowers were made using the Bitty Botanicals Stamp + Stencil and then cut using the Bitty Botanicals Die. I added the dot to the flower centers using a journaling pen and then added details using colored pencils if applicable. This was the perfect floral addition to keep in theme with the cards. I just made a simple tag shape from Pure Poppy cardstock and then added the twine through the hole.

I had leftover fabric from the baskets, so I decided to make a few key wristlets using my updated tutorial.

I also got some new labels; as much as I love the P.S I Love You labels I have used in the past, they aren't always pertinent to the project. I loved them for Valentine's Day, but I wanted something a little bit different for these.

I made some patriotic earrings a few years ago and I wanted to make a few more to tuck in these baskets. I came here searching for the post with the old ones to remember the colors and faux leather I used, only to discover they were still on my camera roll from 2020! Woops! These are the new ones I made, but I will also be sharing the 2020 ones today, too! ha ha!

It looks like Taylored Expressions doesn't sell the Designer Dangles Dies anymore, but if you have them in your stash, that is what I used!


I bought all of my faux leather from an Etsy retailer called The Art of Fabric Folding. 

I bought the handmade labels forever ago at Hobby Lobby and I'm almost out; I'll have to see if they still make them.

These are the ones I made back in 2020.


I made 4 baskets in total, but only three key wristlets because one of my friends already got one from me and she also doesn't wear earrings. 

Here is a little peek at the basket all stuffed and ready to be wrapped along with THIS card that I just love! It is perfect for the baskets!

A quick shot of one of the baskets all tied up and ready to go! 


Here is what I put in each of the baskets, with the exception of the one I talked about earlier. 

I have a tutorial for these baskets that you can find HERE. I haven't made one in so long I actually need to follow my own tutorial! ha ha!

Well, that's all for today! I hope you all have a fun and safe Independence Day! Thanks for fluttering by!