"I will honor Christmas in my heart...and try to keep it all the year."-Charles Dickens
I love everything about Christmas! It's such a magical time of year with such a special feeling! I always have such a hard time putting my Christmas crafty things away. There never seems to be enough time to make everything I want to make, to create as much as I want to create! I decided on Christmas day to try and keep Christmas all year long! With that being said, I will be posting a Christmas design every month ALL YEAR LONG on the 25th of the month! If you'd like to join me, I would be thrilled. To play along, just leave a comment with a link to your blog or project in the comments section! If you're on Instagram, use the hashtag #keepingchristmas2017 and I can see them there. I'd love to see what you come up with.

Today's project was created yesterday, on the most delicious, snowy day! The world was a blanket of white...very inspiring and lovely! I was super excited to use "Deck the Halls", a set that I bought this last Christmas, but never actually used because I ran out of time. I was itching to get it inky.
I made 8 tags; 4 with the large spiraling bow and 4 with the cute, short bow. My color choices were directly inspired by the Christmases of my youth. I always had the most magical Christmases and just seeing vintage bags and tags evokes the most nostalgic feelings in me! The wreaths and bows were die cut using the coordinating "Deck the Halls" dies. I stamped the wreath using "Always Artichoke" ink and the berries were stamped using "Melon Mambo". The bows were stamped in "Spring Moss" ink for the perfect retro feel! I love how they turned out.
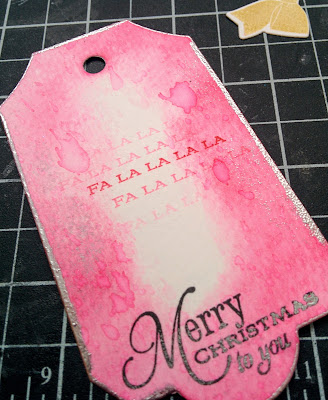
The tags were cut from 140 lb watercolor paper using one of the "Tag Sale" tag dies from PTI. Once they were cut, I blended "Melon Mambo" ink onto the edged of each tag. I spritzed some water onto the tags for a fun watercolor effect with minimal effort. I love how it looks. The sentiment was stamped in Palette black ink and I really love how it looks... like it was made to fit the shape of the tag perfectly. I then stamped the "fa la la la la" sentiment into the center of each tag in a random fashion, placing it where it would peek-a-boo through the center of the wreath.

After the tags were dry, I ran a versamarker along the edges of the tags and heat embossed silver powder along the edges. It gave it the perfect retro feel I was going for. I also added a 1/4 inch jingle bell from my stash to the center of each bow...squeal. I just love how they look. I also added some star dust stickles to the berries and bows. Every tag from my childhood always had a generous amount of sparkle. Each tag was tied with a length of black baker's twine to finish it off! I'm thinking these tags won't be going on gifts but used to fancy up a cellophane bag of treats of something. Thanks for fluttering by! Follow me on Instagram @kellylunceford #keepingchristmas2017
This is one of those times when I realized I have shared on Instagram and forgotten to create a post here! Sometimes I am just too excited and it's easy to post a quick pic on Instagram! I created this gift collection (which you can see in it's entirety HERE) for a dear friend who just had her precious baby boy! I created the collection in late December/early January.
The card was created using PTI's "Baby Button Bits" and I chose the colors based on the theme and feel of the gift collection. The new mama told me the nursery colors and general theme and then I got to work hoping that what I was creating would work for them. Thankfully she told me that it was perfect! Yay!
It's no secret that I love making felt baby booties for my collections and you can see how I have packaged them up. I like keeping the packaging cohesive with the card and other handstamped/papercrafted items.
All of these handmade goodies make me happy! I love creating and handcrafting things for babies!
Here is a closeup of the felt booties. These were created using "Vintage Cream" wool felt from PTI and tan DMC floss. If you want any tips and tricks for creating these booties, leave me a comment and I will share some of my secrets! While they are easy, sometimes a few "snags" get in the way, but I am learning by trial and error some things that help to remedy the snags. You can also see the rag quilt in the background. I never would have put these three flannels together unless I was working on this collection and I really like how it turned out! Thanks for fluttering by! Follow me on Instagram @kellylunceford
Watercolouring and gold embossing...just a few of my favorite things! I ordered this amazing stamp set from Concord and 9th a few weeks ago along with some other fun goodies, which I have been having a lot of fun with. I haven't ever ordered anything from them before and when the package came, I realized that Concord and 9th is literally a half an hour away from my home! How fun is that? I will definitely be ordering more from them in the future.
I stamped the floral piece onto 140lb. watercolour paper using Versamark ink and heat embossed it using gold powder. Once that was done, it was just me and the watercolours doing their job. I especially love watercoloring embossed images because of the way the color pools into each section of the raised image.
Once it was colored, I adhered it to a Kraft card base and added just a few embellishments and the "Hello" sentiment! When you have a focal image as gorgeous as this, it does all the work! Thanks for fluttering by! Follow me on Instagram @kellylunceford
I wanted to share my cute little Valentine's Day village before the day of love comes and goes. I worked on these a few weeks ago and they have been sitting out on my sofa table enhancing my decor. They are, however, filled with strawberries and cream Lindt balls and are headed out tomorrow to be given away! I just love all of the possibilities using the "Tiny Town" dies! I think my favorite is the sweet shoppe, like I have showcased here. Each little shop was adhered to a doily for something to "ground" it as well as a little valentine charm!
I have found that I like creating the houses and sweet shoppes out of a sturdy patterned paper, rather than just cardstock. I like the detail and flair it gives each piece. If you use double sided paper, like I have, it is fun for when the recipient opens it up. Each one is different, but I wanted to keep them all cohesive as well.
Here is a closeup of one of the Shoppes. You can see the sweet little shop sign with a heart stamped onto it. I used the "Heart Prints" set from PTI for the tiny heart as well as the sentiment. It will never go out of style and is one of my go-to sets for many different occasions. The flowers in the window boxes were colored using copic markers and I added a little startdust stickles to a few of each bunch of flowers for some shine. Thanks for fluttering by and have a fabulous Valentine's Day! Follow me on Instagram @kellylunceford
It's been quite a while since I have participated in any type of challenge, but I really love doing them! This week's Color Throwdown challenge popped up in my Instagram feed from a few of my designer friends so I decided to play along. The colors were not that enticing to me, but that's when I feel the most challenged! Ha ha! The colors are teal, orange and black and any neutrals that you want. I did sneak in a hint of green, but I think of green as a neutral anyway. The inspiration photo had a fabulous black and white rug and I was happy to incorporate the stripes into my design as well. I watched a few Tim Burton films over the weekend and I think it inspired me as well! LOL!

I dry embossed the black base panel with a floral embossing folder, but it's hard to see that in the photo. It adds just the right touch. All of the flowers were diecut and rolled using a quilling tool and adhered with hot glue. The orange was feeling too harsh on the card, so I added some white ink to the top edges which softened it just the right amount.
The sentiment is stamped using Cotton White StazOn ink onto a strip of vellum. I really like how it softens the starkness of the black and white striped paper. I added a few crystal clear sequins and a bow of black baker's twine to finish up the design. Thanks for futtering by! Follow me on Instagram @kelly lunceford
My house has been doused with a generous sprinkling of pink and red hearts and I have been having a lot of fun getting started on my Valentine's Day projects! Today's design is a watercolor piece that I worked on last night. I was in a creative mood, but my mind's eye wasn't cooperating with my hands. I almost scrapped the entire card, but decided just to leave it and revisit it in the morning. Sometimes time and a new perspective is all it takes for a design to grow on me....and it did in this case.
I started the design by generously sponging an assortment of pink tones of ink onto 140lb. watercolor paper. I added water using a watercolor brush and just had fun as I moved it where I liked it. I stamped the "I love you so much" sentiment with gold ink in a random, yet planned way across the watercolor panel where I knew I would be placing the heart piece.

The heart was punched out of watercolor paper about 6 times and layered using liquid glue. The top heart was heat embossed using gold ink and I intentionally left it scattered across the piece, rather than blowing it all off. I wanted a splattered gold look and I was happy with the result. This particular heart image is from PTI's "Heart Prints" set. I water colored the negative space using reinkers and a watercolor brush. I was very deliberate and careful with how I placed each color. Once I was happy with the result, I placed it on the watercolor paper using foam squares. The "I love you so much" panel was heat embossed as well and placed at the bottom of the heart.
I added a few gold sequins and layered the entire focal panel onto a kraft cardbase. The finishing touch was a loop of gold ribbon tied with some button twine for some extra texture and shine to keep the card cohesive. Thanks for fluttering by! Follow me on Instagram
@kellylunceford


