Wednesday, April 28, 2021

The Greetery Spring Market Release Day!


It's the day you've all been waiting for....release day for the Spring Market collection from The Greetery! All of the fabulous products that have been showcased over the last two days will be available for purchase starting at 10 AM ET TODAY! I'm sharing a bonus card with you today using some of the favorites from this new release! Before I dive into the details of the card, you'll be so pleased to hear about the anniversary sale beginning when the release becomes available at 10 AM ET until April 30th at 11:59 PM ET. You can read about it on the graphic below, but you can find the additional 15 % off items HERE! Who's excited????

My card for today uses the new Flower Market Bouquet paired with the new Market Basket die collection! These two are a match made in heaven, don't you think? There was a lot of chatter during the Instagram live yesterday about which flowers would work in these baskets. My answer it pretty much ANYTHING you have in your collection will work. These dies come in three sizes, this one being the largest. 

I didn't use the liner dies on my card I shared yesterday, but I chose to use them for today's card for two reasons. The first reason is because it's so stinking cute AND it allows you to hide the stems so they don't look too short or too long, depending on your cluster. This particular stamp set would be perfect either way!


To begin this card, I die cut the large bouquet AND the two single blooms and stamped them using my mini MISTI. I chose a bright, shock pink for the three tulips, and then added in the yellow and softer pink for variation. The smaller flowers are stamped in the same bright pink and Amethyst for some soft color.

I die cut the wire portion of the basket using gold metallic paper and the liner is cut from some soft pink pattern paper. It's hard to see in the photos, but it has a small damask pattern for some added interest. If you're detail oriented like me, make sure you align the die that goes over the top of the basket upside down from the main piece so it really does give the illusion that it has been folded over. If your pattern doesn't have any directional qualities, then it really doesn't matter. 
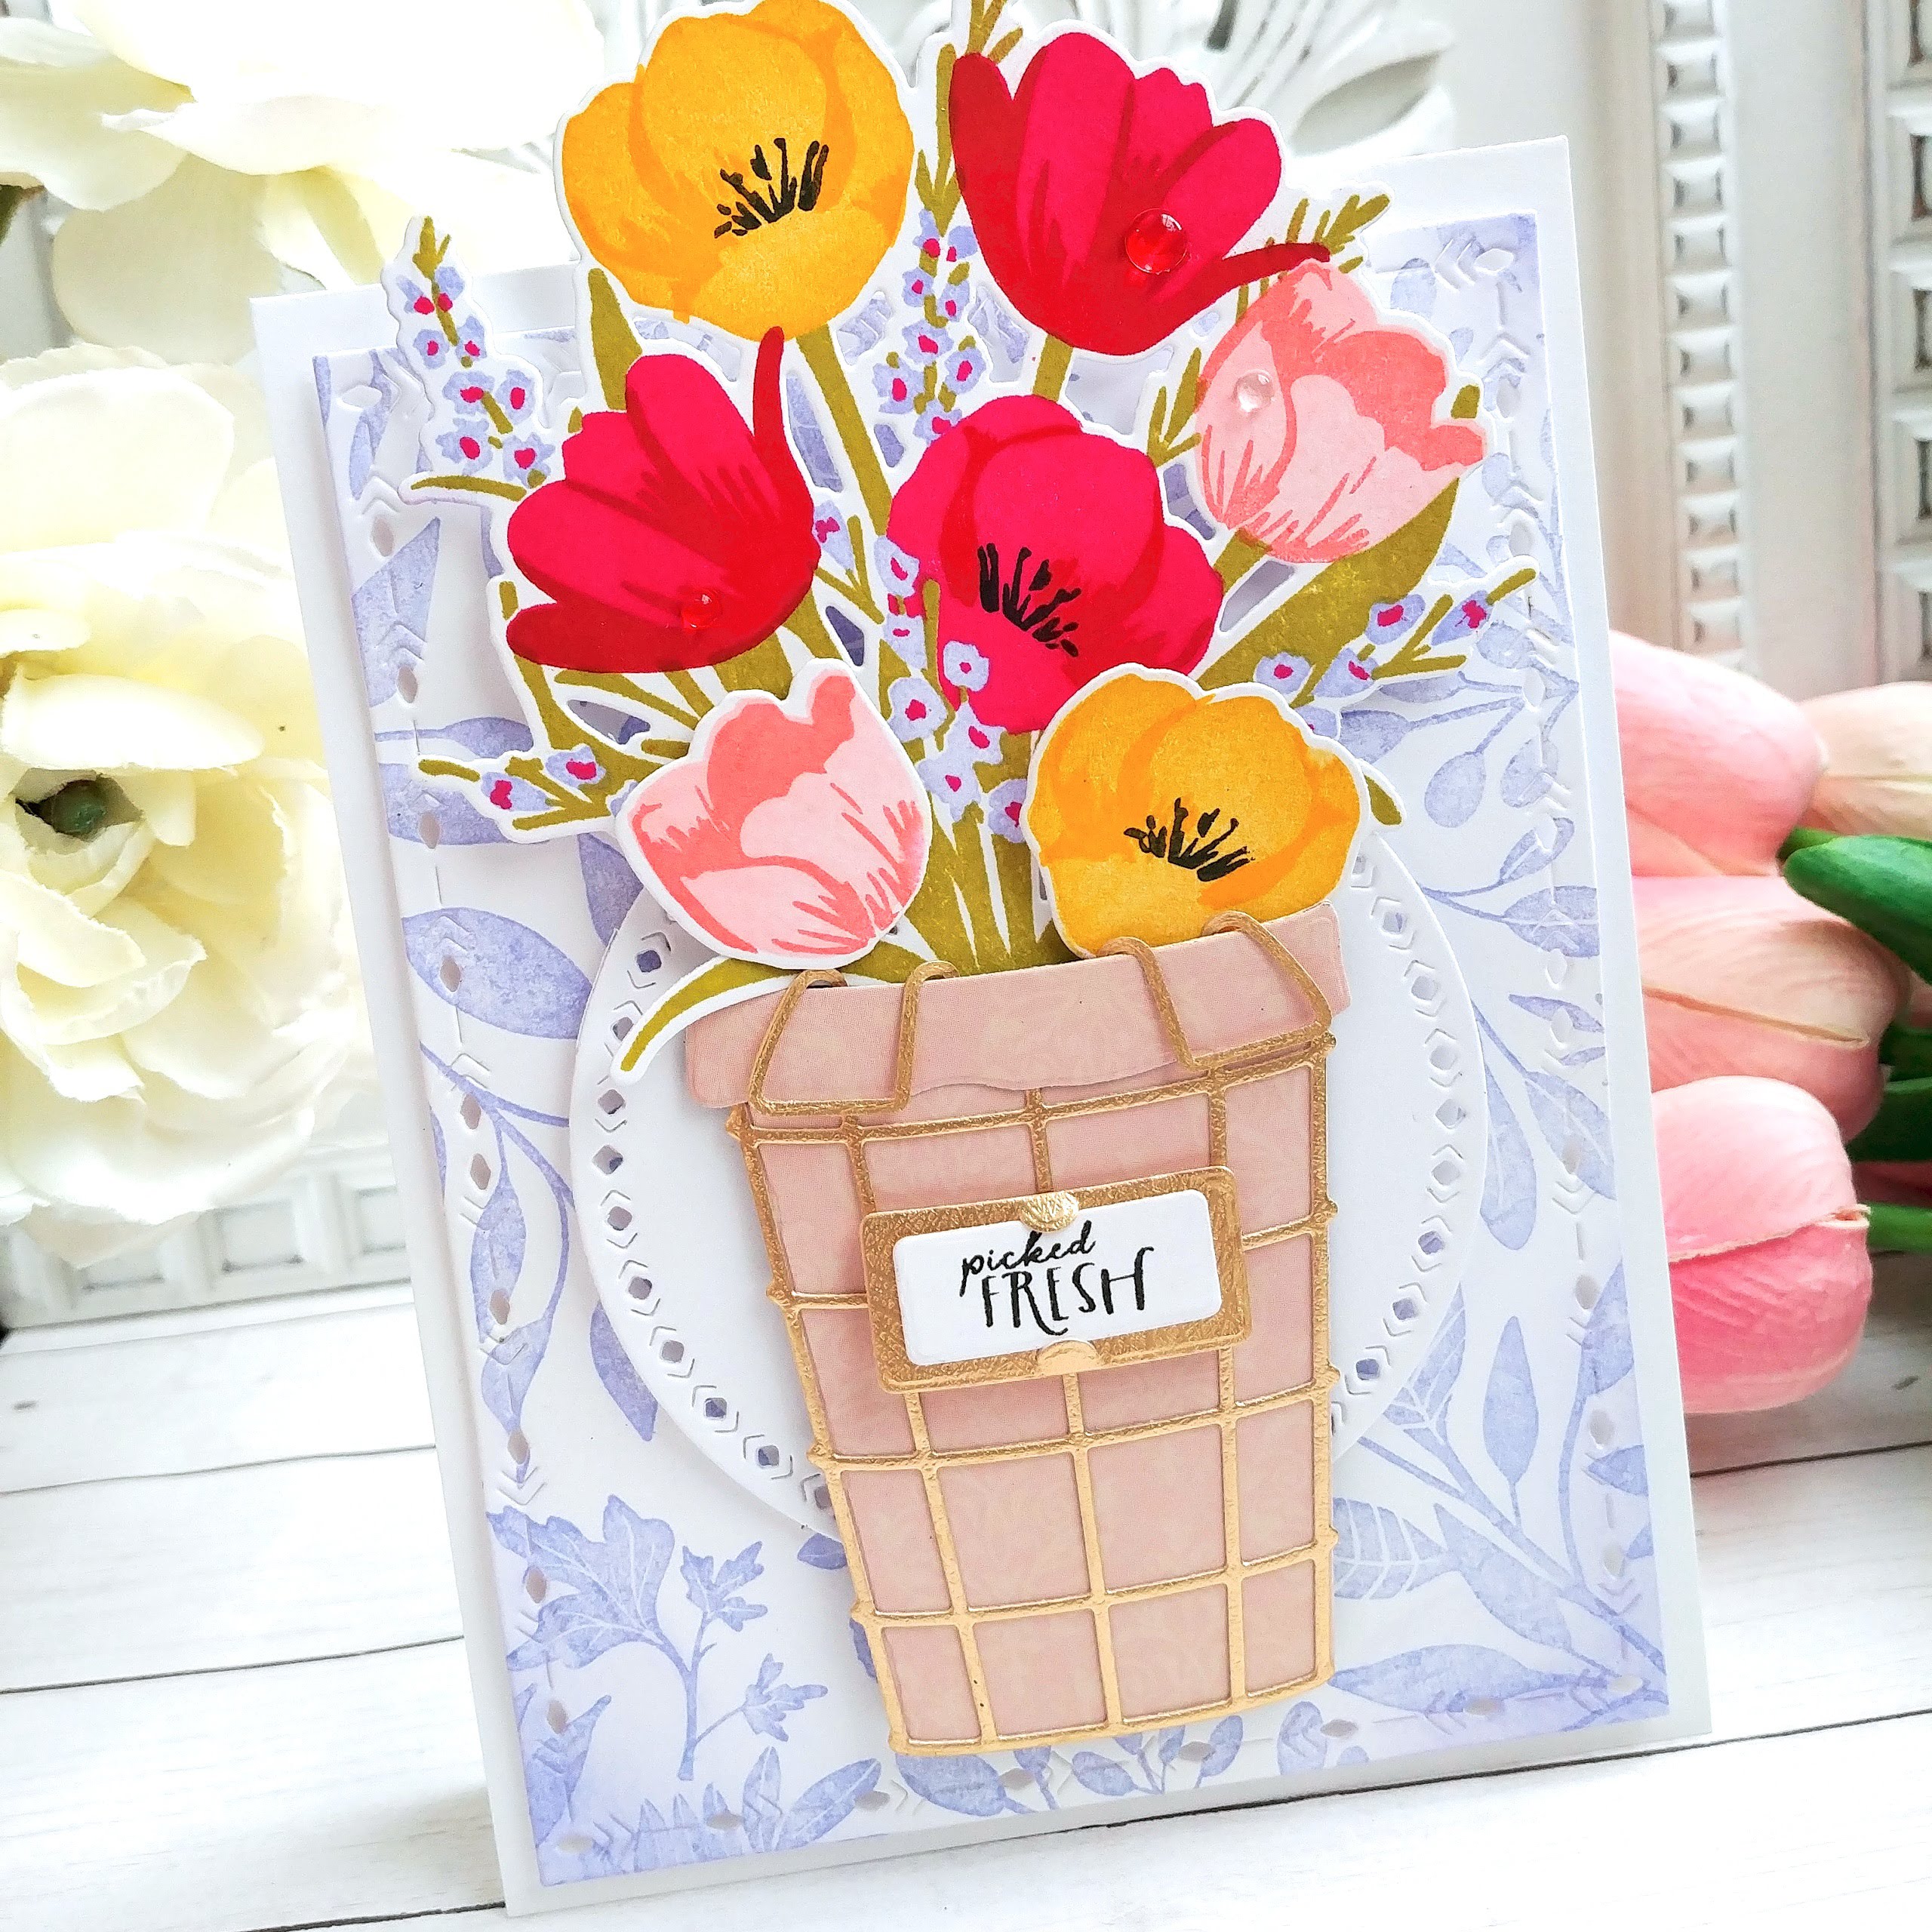
The sentiment is from the new Market Basket sentiments and is stamped on the label portion using black ink. The background is stamped using the new Fond of Foliage stamp set in the same Amethyst ink as the small flowers. I die cut the panel using the Nordic Frames dies for a hint of detail. I mounted the medium circle from the Nordic Circles dies to be used as an anchor for the basket. It helps create a visual barrier against the business of the background to create a more harmonious look. I added a few dew drops to the tulips for a springtime touch. The entire background panel is added to a top folding A2 card base using foam squares.
Thanks for joining me over the last few days and thanks for all of your sweet comments! They're always so much fun to read! Thanks for fluttering by!

Tuesday, April 27, 2021

The Greetery Spring Market Release Day 2


Hello and welcome to day 2 of The Greetery Spring Market full reveals! I'm sharing three projects with you today using even more fabulous new products that you're sure to love! You'll want to head to The Greetery Blog to see all of the images and details of each stamp/die set! Are you ready to see what today's giveaway prize package is? You can see the bundle in the photo below!


My first project for today uses the fabulous Holding Hands stamp/die set! I won't lie and say I wasn't a little intimidated by this set at first, but Betsy and my sweet teammates, helped me with some of my questions, which I will share with you so you will truly know what a fun set this is! When it was all said and done, this ended up being one of my favorite set to work with and I can't wait to use it again! Do you ever feel intimidated by a product or stamp set? Please tell me I'm not the only one! ha ha!

My biggest "question mark" so-t0-speak, was how to begin the hands. Should I use colored cardstock? Stamp directly to a white panel? Use the die cuts? Betsy told me she used white cardstock and ink to color the hands and then used the coordinating detail stamps! Whew! Yes! That makes sense! I guess I was having a "duh" moment! ha ha!
Anyway, I die cut the hands and inked them up using Tattered Rose Distress Oxide Ink and Tea Dye Distress Oxide Ink and a sponge dauber for the top hand. I then stamped the detail portion using Tea Dye as well. The bottom hand is inked up using Ground Espresso Distress Oxide Ink and then stamped using the same ink for the detail portion. I gave both hands Worn Lipstick nail polish, but in the end it didn't show up vibrantly enough on the bottom hand, so she got some beautiful red Nuvo crystal drop nail polish!

Once I had created these beautiful hands, my inhibitions left and I was able to just have fun adding their "bling". Both ladies got a gold bracelet with the heart charm, and the bottom hand got a gorgeous diamond ring using a gem for the "rock"! ha ha!

I added a heat embossed sentiment to accent the gold accessories on the hands and wrists. This particular sentiment is also included in the Holding Hands set.  The sleeves for both ladies were super fun to create. The top lady is wearing a chiffon blouse that was die cut from vellum and heat embossed with the detail image using White Embossing Powder. The bottom gal is wearing a simple white sweater with the cuff stamped in grey to show the detail.

The Holding Hands stamp set comes with a few fun things for the hands to hold, so for today's card, I gave the bottom lady a heart to hold and the top lady is giving a bouquet of flowers. These two are dear crafty friends and LOVE saying how much they care! The background was created by stamping the gorgeous new Fond of Foliage Background stamp. I stamped it on a larger panel of white cardstock using Speckled Egg Distress Ink and then die cut it using the Halfsies Diamond Die and added both halves to an A2 panel of white cardstock. I wrapped the sentiment strip around the panel and secured it with tape in the back. The entire panel is added to a top folding A2 card base using liquid glue.

I still had some pieces left over from the panel I created two cards with yesterday, so I used them to create another Shiplap border. It was the perfect frame for these gorgeous flowers from the new Flower Market Bouquet stamp/die set! These tulips are a breeze to stamp with amazing results! The thing I love the MOST about this particular set is that you have a nice, full bouquet ready to go with ONE die! Another thing that I love is that it comes with single stems as well so you can make the bouquet fuller, or use it in some of the other containers that The Greetery sells!

I stamped the flowers in pinks, purples, and yellow for that true Springtime feeling! I love that you can create "your perfect spring" with these stamps/dies!

I'd been dying to use this particular sentiment with a bunch of flowers and this seem likes the perfect opportunity!  I used the Put a Bow on It die to die cut the bow and then used the coordinating Put a Bow on It stamp set to stamp the details. I used Sweet Blush and Berry Sorbet inks for the bow and then used black for the sentiment.

I added some glitter to the flowers for some sparkle and shine and called this card done! So easy, so quick, but I love how it turned out!

And now...the moment you've all been waiting for! The new addition to the BotaniCuts family! Introducing, the AMAZING, BotaniCuts Tulips! Are you all just SO excited? Tulips are one of my FAVORITE flowers and I am so thrilled to have these new BotaniCuts!

Not to mention the ADORABLE new Market Baskets Dies! They come in three sizes with coordinating labels and liners (I didn't use the liner) and are SO MUCH FUN! These Market Baskets are the perfect thing to hold all of the gorgeous new flower stamps/dies that are offered in this release!

There is also a coordinating Flower Market sentiment stamp set that includes sentiments for every occasion you can think of! I'm smitten, if you can't tell! LOL!

My tulips and stems are all die cut from white cardstock and then colored using an assortment of Distress Oxide ink pads: Kitsch Flamingo, Picked Raspberry, Squeezed Lemonade, Wild Honey, Mowed Lawn, Rustic Wilderness. I added some colored pencil details here and there to enhance the details.

As you can see, I pulled in the Always in Bloom stamp/die set for this card to accent the fun tulips!

This background was created with the same stamps and ink as my Holding Hands card. I really love the blue against the vibrant tulips! This concludes the full reveals! Everything will be available for purchase starting at 10 AM ET tomorrow! Don't forget to head to the other designers' blogs to see their gorgeous creations! Thanks for fluttering by!


Monday, April 26, 2021

The Greetery Spring Market Release Day 1

I'm super excited to be here today for Day 1 of the Spring Market release from The Greetery! It's also The Greetery's SECOND birthday, which means it's time for a CELEBRATION! Head to The Greetery Blog to read all about today's new products! I know they will all be explained perfectly there! 


I have  A LOT to share with you today (more than normal) because I just couldn't stop creating and wanted to showcase each of the reveal products for today! Up first is a phenomenal new set called "Always in Bloom". This one showcases the stamps/dies which are perfect for all of your spring crafty projects!

To begin, I created the Shiplap Border and adhered it to an A2 panel of Smokey Shadow cardstock. I heat embossed the "It's your time to" portion of the sentiment using my favorite White embossing powder. I adhered the shiplap panels using liquid glue so I could make sure they were properly lined up and I like the literal "wiggle" room it allows! ha ha!

From there, I added the stamped flowers using foam squares for dimension. 

I'm so obsessed with the style of the "bloom" sentiment and want to use it EVERYWHERE! 

My second card for today uses the "Always In Bloom Quick Card Layering Stencils"! These are perfect for when you need to mass produce a design or you're in a hurry! They're so much fun to use and you can add in the detail portion using the "Always In Bloom" stamp set.

This card also features the new Bold Alphabet Dies and the coordinating "Alphabuds Bold Floral Details" stamp/die set. I jazzed up this simple design with one of the previously released Put a Bow on It, which gives it some added detail and dimension!

I also added some colored pencil detail to the small pink flowers in the bouquet and added some glitter to give it a little something extra as well.

I'm seriously in love with this new alphabet because of all of the details that are included in the dies. They're so classy and the coordinating Bold Alphabuds are so sweet!

The short and simple "hi" allows for the "thinking of you" addition on the bow to enhance this simple design as well.

The Crimped Frame detail matches perfectly with the details on the letters, which I just love!

My third project for today uses the fabulous new Bold Numbers Die for this graduation card! I also paired it with the new Digit Sentiments stamp set and the new Alphabuds Bold stamps/dies.

These awesome new letters and numbers work perfectly with all of the Slimline products that are now available! I just love how this graduation design turned out using the Nordic Slimline Dies.

I'm obsessed with all of the gorgeous detail that these dies add! I placed the Crimped Circle
in between the two Nordic frames for a fun accent.

The Congratulations portion of the sentiment was adapted from one of the Digit Sentiments by omitting the "on" portion of the sentiment.

Up next is another project using the "Always In Bloom Quick Card Stencils". I used some of the leftover panels from my first card to create a "planter box" accent for the simply stenciled flowers.

Just because you're using something labeled "quick" doesn't mean you have to skimp on sweet details to make your project shine!

I stamped the sentiments directly at the top of the panel and then added the "Bloom" die cut over the top of the flowers.

The Postal Frames Die adds just the right amount of extra detail to make this card go from simple to special!

I had a flower cluster leftover from my first card, so I added it to the bottom of the planter box to give it even more detail!

My FINAL card for today uses the new "Delightful Digits" die paired with the new Bold Numbers Die! This card is for my daughter who will be turning 18 this year, which is blowing my mind!

To begin this design, I die cut the "Delightful Digits" background piece from Berry Sorbet cardstock and then layered it over the top of a Sweet Blush panel using liquid glue. 

I die cut the Crimped Circle and stamped the "look who's turning" sentiment in black. I added the 18 and the Alphabuds Bold images on either side using mini foam squares. I sandwiched the grey banner pieces, which is from the Crimped Slimline Die, between the Nordic Circle. I didn't have nearly enough time to use all of these fabulous circles and slimline dies with the last release so I'm making up for lost time! ha ha!

I added a bow that was die cut using the Fit To Be Tied Die at the top for a festive birthday touch!

Whew! That was A LOT to share, but that concludes all of the projects for Day 1! I don't have nearly this much for tomorrow, but I LOVE everything in this release! Join me again for Day 2, but don't forget to head to the other designers' blogs to see their gorgeous creations! Thanks for fluttering by!