Thursday, July 24, 2025

With Sympathy

Hello and welcome! I hope your week has been amazing so far! I'm feeling confused as to how it is already Thursday, but here we are! ha ha! Back in May, when I made THESE cards, I mentioned I would use those for mailing and then if I was going to deliver a basket or something, I would make a card with more dimension and bulk. Well, here we are needing more sympathy cards. Well, technically only one, but since I was making one, it made just as much sense to make two!
For the background, I cut two A2 panels from Sea Glass Cardstock (this is the closest match I have found to Aqua Mist) and then used the beautiful Mandala Blooms 3D Embossing Folder. One one panel, I added Teal ink from SU! over the top of the raised portions for additional depth. I left the other one alone for two different looks.

I die cut all of the pieces for the flowers and leaves twice using the Into the Blooms: Anemone Die and then colored them with dye ink and blender brushes. I cut the centers from gold, because I just can't seem to stop with that, BUT, I have an idea for another card and the centers WON'T be gold! ha ha! The green leaves and stems are colored with Simply Chartreuse and Ripe Avocado ink, the bluish leaves are colored with Aqua Mist and Teal SU! ink, and the flowers are Lilac Grace and Plum SU! ink.

I glued the pieces for the flowers together using liquid glue and foam squares. The larger sentiment is from the Vintage Garden Stamp Set and is heat embossed in gold powder on a strip of vellum. I wrapped it around the center of the embossed panel and secured it to the back using tape. I arranged the flowers and leaves until I was happy with the arrangement. 

Fort this card, I arranged the flowers and then wrapped the sentiment strip around the top. This particular sentiment is from Feathered Friends 4 Mini Stamp Set. Both sentiments used for today's cards are my go-to for sympathy cards. I added pearls to the sprig piece and gems to the flower centers. Each panel is added to a top-folding A2 card base with the inside stamped with a greeting from the Inside Greetings: With Sympathy Stamp Set
Thanks for fluttering by!


Monday, July 21, 2025

Papertrey Ink July Release Countdown Day 4

I can't believe it, but it's the 4th and final day of the Papertrey Ink July release countdown! There are so many beautiful new products to love! My first card showcases the beautiful new Cover Plate: H0neycomb Die paired with one of the sentiments from the new In Full Bloom Stamp Set that was showcased yesterday.

I have a tendency of creating with a lot of pinks and purples, but I fell in love with the red./yellow combo I used on yesterday's Reflections card I couldn't resist using the same combo for this honeycomb/bee themed card. 

To begin, I die cut the honeycomb background using the Cover Plate: Honeycomb Die from Lemon Tart cardstock. I added some Harvest Gold ink around the edges and in all of the tiny connecting pieces on the honeycomb. Once that was done, I die cut the largest frame included in the Border Bling: Skinny Embossed Frame Die from Lemon Tart cardstock. I glued it over the top of the background and added some Harvest Gold ink to the corners. I added some black ink splatter for added detail and interest.

I die cut all of the flowers and foliage using the Into the Blooms: Wild Wood Die from white cardstock and then colored them using blender brushes and dye ink. I added them here and there using both liquid glue and foam squares until I was satisfied with the arrangement.,

One of my favorite things about the Wild Wood Die is the cute bees and of course they are just perfect for this Cover Plate: Honeycomb background.

As I mentioned earlier, the sentiment is from the new In Full Bloom Stamp Set that was showcased yesterday; I thought this particular sentiment was just perfect for this card just bursting with lovely blooms! I added the entire panel to a top-folding A2 card base using foam squares...I really wanted the  honeycomb to seem realistic. I gave it a good spritz of shimmer spray; I think I mentioned I'm back in my shimmer spray era and poor glitter has taken a backseat! Who would have ever guessed? ha ha! 
My second card for today features the new The Sweetest Bunch Stamp/Die set and is oh, so cute! I love all of the floral options that can be used for all kinds of other projects, but I just love that sweet little ice-cream cone! So super adorable!

To begin, I die cut ALL of the flowers and foliage pieces multiple times because I made a few cards and I wanted to maximize my time! (wink) I had fun stamping them in all kinds of beautiful summery colors!

The cone was stamped with distress oxide inks so that it would have the matte look of a real ice-cream cone. 

I cut an A2 panel of white cardstock and then used the Elegant Notes Stationery Kit Stencils with Spring Rain, Blueberry Sky, and Enchanted Evening ink. I added the Border Bling: Skinny Embossed Frame over the top for contrast.

I had fun arranging the flowers in the cone and then I added a few in the corner. I spritzed it with shimmer spray and then guess what? I used glitter! ha ha! This card was just begging for that extra sugary sweetness! The sentiment is placed over the top and then a trio of sparkling clear sequins finish it off! The entire panel is added to a top-folding A2 card base.
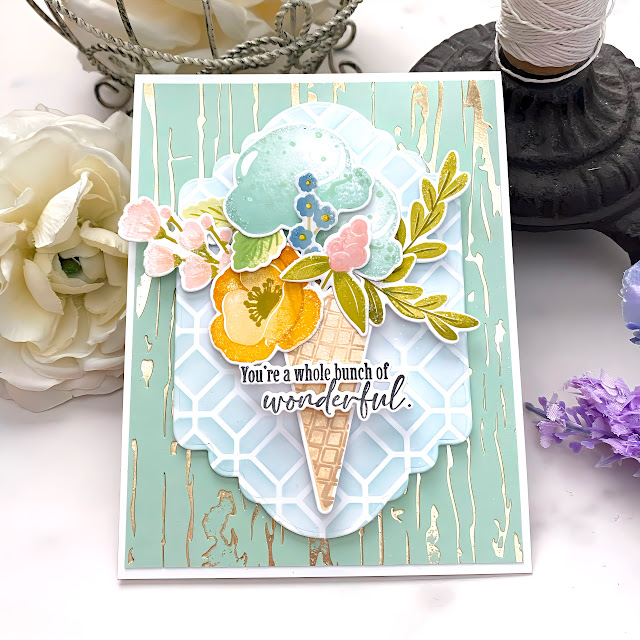
My next card combines ice-cream AND  flowers for a different variation! As I mentioned earlier, I cut all of the flowers and leaves to begin with so I already had them ready to go. The ice-cream is from the Frozen Delights Stamp Set. I used Aqua Mist and Mint Julep ink for the scoops; it reminds me of my favorite flavor at Baskin Robbins: Daquiri Ice! yum!

I used the beautiful new stencils and dies included in the Mat Stack: Thank You So Much. I cut it from white and then used Spring Rain ink with the stencil. I layered the cone along with the flowers and ice-cream scoops using foam squares.

I was unexpectedly delighted with how cute the Rustic Woodgrain Hot Foil Plate looked with the bouquet!

I used champagne foil on Mint Julep and I just love how this turned out!

There are two sentiments included in the set, but I chose to use the same one as my first card. 

I added glitter to the flowers and foliage. The entire panel is glued to a top-folding A2 card base using liquid glue.
My final card for today and for the release also uses the Sweetest Bunch Stamp set, but instead of an ice-cream cone, I used the ice-cream die cuts as a paper "wrap" for the bouquet. 

I used the Elegant Script Hot Foil Plate to create a "newsprint" type look by using pewter foil on white cardstock.

For the background, I used the Cover Plate: Honeycomb Die with Lemon Tart cardstock. I added some Harvest Gold ink around the edges and added some black ink splatter like I did on my first card for today. I die cut a frame and added some ink as well. The photo corners are from the retired Fairytale Christmas Die.

I die cut the largest option in the Love to Layer: Garnished Edges Die from white cardstock and then layered the bouquet in the middle. I added a bow from the Bows Galore Die cut from Aqua Mist cardstock. I used the second sentiment included in the set for this final card. Shimmer spray and sequins finish it off! Thanks for joining me for this beautiful release countdown and thanks for fluttering by!


Sunday, July 20, 2025

Papertrey Ink July Release Countdown Day 3


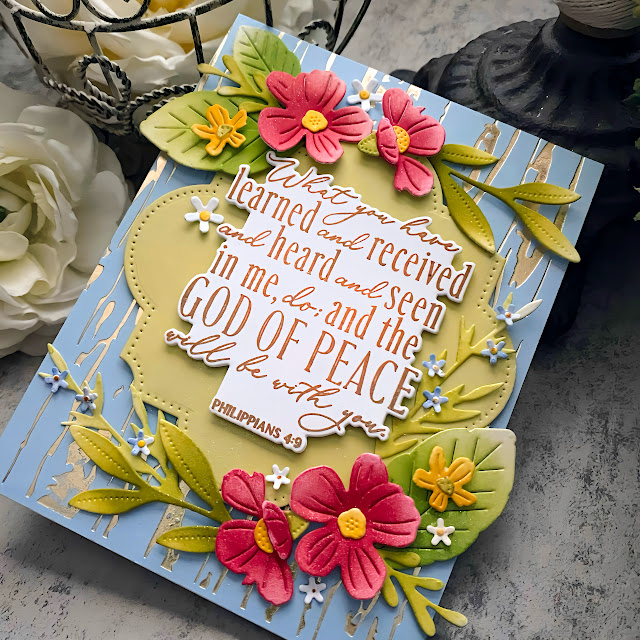
Welcome back for day 3 of the Papertrey Ink July release countdown! My first card for today features the new Reflections: Phillipians 4 Stamp Set, Outline Die, and Reflections: Phillipians 4 Die. I've also paired it with the new Weathered Woodgrain Hot Foil Plate.

I used the highest heat setting on my foil machine and heat the Spring Rain panel for 30 or so seconds with champagne foil. I just love this background. The sentiment was die cut and stamped with rusty hinge and gathered twigs distress oxide ink for an ombre look. I like how it looks like it's glowing to a certain degree.

I layered it onto the largest die cut from the Reflections: Phillipians 4 Die. I really like having the outline Die as an option as well. I specifically asked if they could do that and I was thrilled to see it's being offered now! 

The flowers and foliage are from the Into the Blooms: Wild Wood Die and are cut from white cardstock and then colored with blender brushes and dye ink. I love this color combo so much you'll be seeing it again tomorrow! ha ha!
I arranged the flowers using both liquid glue and foam squares, gave it a good spritz of shimmer spray and then mounted it on a top-folding A2 card base using liquid glue. 
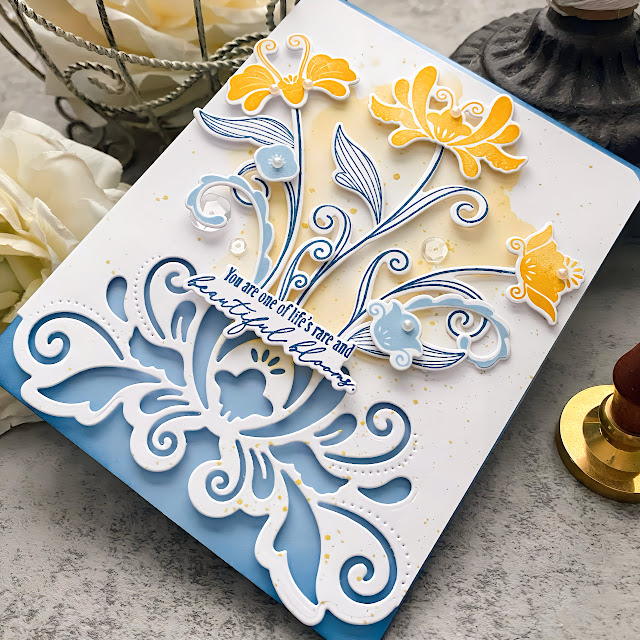
My next three cards features the  beautiful new stamp/die set called In Full Bloom; it is a whimsical style  that allows you to build your own clusters and bouquets using little elements.

To begin, I die cut all of the pieces from the In Full Bloom Die a few times and then stamped them with Enchanted Evening, Spring Rain, and Harvest Gold ink. 

I love both of the sentiments included in this set and I like that they have coordinating dies. 

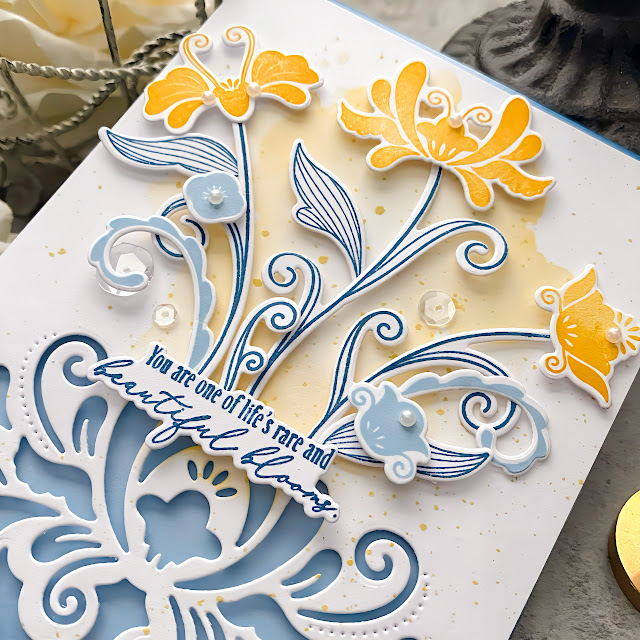
I cut an A2 panel of white cardstock and then cut the decorative details with the Elegant Edges: In Full Bloom Die. I rounded the corners at the top with a punch. 

I created a top-folding A2  Spring Rain card base  and then added the shading around the edges using Enchanted Evening ink. The white panel is added over the top using foam squares. 

I used the Watercolor Wonderful Stencil Collection to create the color for the background. I added some ink splatter to give it even more depth and detail. Once that was done, I arranged the flowers and leaves using foam squares. I added adhesive pearls, sequins, and shimmer spray for additional detail!
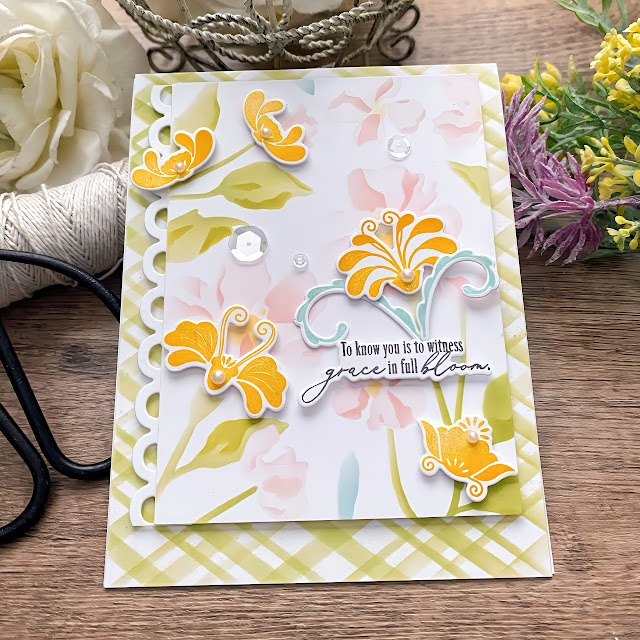
My next card combines the In Full Bloom Stamp Set with the In the Meadow Stencil Collection. I kept the stenciling soft so the die cut flowers wouldn't compete, but rather complement and enhance the overall design. 

For the background, I used the Show Your Stripes Stencil Collection; I used it one way and then flipped it over and used it the opposite way to create the plaid look. You may have remembered  I used this same look on the flap of one of the envelopes on day 1, but it was fun to try it on a card as well. 

I used one of the scalloped edges included in the On the Edge: Scallops Collection and glued it to the edge of the stenciled panel.

The sentiment is the other option included in the set.

I added a few of the stamped details to the flower above the sentiment for added interest. 

I offset the stenciled panel a little bit on the plaid background for something different. I couldn't resist adding some pearl to these flowers as well and a trio of sparkling clear sequins and, you guessed it, shimmer spray! ha ha!
One last card using the new In Full Bloom stamp set; I think I mentioned I'm not quite ready to say goodbye to the red, white, and blue. I always love these colors for summer, so I made a non-patriotic card.

I had a bunch of extra die cuts from the previous two cards, so got to work stamping them in Pure Poppy and Spring Rain. The leaves are stamped in Enchanted Evening and are left over from the first card.

I die cut the background using the Cover Plate: Cross Stitched Die and added the Border Bling: Skinny Dotted Frame over the top with 1/8 inch ScorTape. I adhered that panel to a top-folding A2 Pure Poppy card base using foam squares. In the end, I realize it's hard to tell in the photos, but you can in real life!

I die cut one of the labels from the Just Tags Die from Spring Rain cardstock and then added the die cut sentiment over the top.

I arranged the flowers, leaves, and twirly elements using liquid glue and foam squares. A few pearls because I can't seem to stop and shimmer spray!
Thanks for fluttering by!
P.S. Join me again tomorrow for the 4th and final day of the countdown!


Saturday, July 19, 2025

Papertrey Ink July Release Countdown Day 2

Hello, and welcome back for day 2 of the Papertrey Ink July release countdown! My first card for today features the new Mat Stack: Thank You So Much suite of products!  To begin, I die cut the largest mat included in the die set from Aqua Mist cardstock. I am down to my last few scraps, so I knew I HAD to make this work, not matter what! ha ha! I used one of the stencils included in the Mat Stack: Thank You So Much Stencil Collection to add the Aqua Mist ink around the edges. I kept the middle clear so that the sentiment wouldn't get too busy with the background.

I die cut the sentiment from Bitty Big: Harvest Gold patterned paper and twice from white and then glued them together. I added it to the mat using thin strips of foam tape and then added Glossy Accents over the top. I set that aside to dry while I got to work on the background. 

I cut a panel of white cardstock and then used the new In the Meadow Stencil Collection to create the beautiful background. My next card also features this stencil collection so you'll be able to see it more fully. I layered the sentiment panel over the top using foam squares. 

I didn't participate in last month's release so I was itching to use the beautiful new Build-a-Butterfly Die. I love how it looks with the new stenciled background! I die cut all of the pieces I uses from white cardstock and then added the color using blender brushes. I also used the new Build-a-Butterfly Stencil Collection to give it the beautiful pattern. I played around with adding the gems to some of the wing's detail, but it looked tacky, so I'm glad they came off easily! ha ha!


I added the butterfly to the bottom and then arranged the flowers around the edges.

I added the entire panel to a top-folding A2 card base using liquid glue. 
My second card also features the new In the Meadow Stencil Collection paired with the new Cornered: In Full Bloom Die. This card measures 5 by 7 so I could showcase the beautiful stencil and maximize the beautiful corners.

The sentiment is from the new This Is Big Sentiments: Wishes Stamp/Die set.

To begin this card, I used the In the Meadow Stencils on an A2 panel using a few colors of ink to give the card more interest. Once that was done, I die cut it using the Love to Layer: Notched Die. I didn't want to waste any of the beautiful stencil panel, so I chose that die in particular because it only took off a tiny bit. I also added some Hawaiian Shores ink splatter to the panel.
I cut a piece of white cardstock to measure 5 by 7 and then die cut the corners using the Cornered: In Full Bloom Die. I rounded the corners with a corner rounder punch and then added some Aqua Mist ink around the edges to give them more definition. 

I die cut the bow pieces from Lovely Lady cardstock using the Wrap-it Ribbons Die. I added some Raspberry Fizz ink to give it added depth and interest. I put it together using liquid glue and foam squares for dimension. For the sentiments, I die cut the large Wishes portion and then stamped it in black ink; the companion sentiment is heat embossed on True Black cardstock using white powder. I gave it a good spritz of shimmer spray and then added the entire panel to a 5 by 6 card base using foam squares so you could really see the die cut corners. Join me tomorrow for day 3 of the countdown! Thanks for fluttering by!