Showing posts with label teacher cards. Show all posts

Tuesday, May 5, 2026

You Color My World {Shades of Blue}

It's Teacher Appreciation Week and for day 1, they wanted the kids to dress up in their teacher's favorite color. My son's teacher's favorite color is blue, so I decided to whip up a fun card and tag to go along with a blue-themed gift as well. They had the teachers list some of their favorite things so luckily some of those things came in blue packages. 
To begin, I created the shaped card using the Paint Your World Die collection from Spellbinders. It appears to be retired, unfortunately, but I wanted to share my project here anyway and maybe it will spark some ideas with products you already own! I cut the paint palette twice; once from white cardstock and once from Fine Linen to offset it a bit for added detail and depth.

Next, I added some ink to a scrap of white cardstock in a few different shades of blue and then cut it out using the Simon Says Stamp Fancy Teacher Die. I cut the shadow from vellum and then glued it together. I temporarily positioned it where I would place it so I could do the stamping. I chose the "thanks for coloring in my world" sentiment and I love how it fits in the curves of the teacher word so nicely. I used clear foam squares to attach the teacher word and then got to to work on the paint tube and brush.


I cut the main portions of the tube from Spring Rain cardstock and then added some ink around the edges to give it extra color and depth. The metallic bits are cut using silver cardstock and everything is attached with liquid glue. Back when I got these dies, I bought the entire collection, so one of the die sets had the flowers and leaves so I added those to the paint tube as well. 

The paint brush is cut from Fine Linen, silver cardstock, and white with ink blending at the tip to mimic paint. I attached everything with foam squares. I wanted to add all of the main larger elements so I would know how much "paint" spots to add. I colored them with different shades of blue and then popped them up with foam squares. A bit of ink splatter finishes it off and then I added it to the shaped base using liquid glue.

I created a quick tag with some of the same elements to attach to the bow on the gift.

I added Stickles to the paint and flowers for some sparkle! Thanks for fluttering by!


Thursday, August 21, 2025

Teacher....{Looking} Forward to a Wonderful Year!

Can't stop, won't stop! ha ha! Thanks for joining me today for yet ANOTHER school-themed card! This one is scratching an itch I've had since April or May. I can't remember which company or designer(s) made cards with apples wearing glasses, but I have REALLY been wanting to make my own version! Back-to-School is the perfect excuse, don't you think? But now, I'm thinking how much I NEED to make another card with an apple wearing glasses AND a graduation cap! Of course, that will wait until the spring, but a girl can dream, right?

I mentally rummaged through my endless supplies to think which stamps and dies could help me achieve my dream! To begin, I found the perfect apple; this is the largest apple included in the BotaniCuts Apple Die along with the stem and two leaves. I used a slender blender brush and added some yellow ink to the center of the apple and then added red ink around the perimeter. I also added some of the red ink splatter over the top to give it a more realistic look.  I agonized over what stamp set I could use for the mouth; I didn't trust myself to hand draw it for fear of ruining the entire thing. I landed upon the Baby Face Sentiments Stamp Set and I think it turned out great!

For the eyes, I remembered I had seen two perfectly sized circles in the Patriot Die when I was making the flag for the card I shared the other day. I die cut them from black cardstock and then added the white part using a white gel pen. For the glasses, I used the Framed In Success Die and cut them three times from black cardstock and glued them together. I added some Glossy Accents over the top for the glossy shine! Actually, I created the glasses first thing so they would dry while I was working on the rest of the elements. 

I adhered the glasses using a small strip of black foam squares and then added the eyes with liquid glue; I find that placement is really important to achieve a cute face. Sometimes if the eyes are spaced to far apart it can look a bit goofy so I played around with placement before I committed with glue. ha ha!

I also used the Framed In Success Die for the frame, stars, and books. I die cut the frame three times from Kraft cardstock and then glued them together. I stamped one of the sentiments included in the Teach and Inspire Stamp Set....my all-time favorite school-themed stamp set. The books are die cut from white cardstock and then colored with dye inks and blender brushes.

I used the same sentiment die as my last card which is the Teacher Wafer Die cut from gold cardstock with a vellum shadow. I added glue to the bottom portion of the gold letters and adhered it to the frame. 

I trimmed a piece of notebook paper from MFT....I don't know the name....I will look and edit the post when I get a chance. I used the Watercolor Wonderful Stencil Collection and Aqua Mist ink on the notebook paper. I rounded the corners with a punch to complement the corners of the frame. The frame is added using foam squares and then I layered the book and apple in the middle of the frame with additional foam squares.

I cut the three stars from gold cardstock and added them around the frame. I covered up the apple and sentiments with sticky notes and added some black ink splatter. 

The entire panel is added to a top-folding A2 Pure Poppy card base using foam squares. I also added a piece of white cardstock measuring 4 by 5 1/4 inches to the inside with another sentiment from Teach and Inspire. I gave it the lightest spritzing of shimmer spray and called it good! Thanks for fluttering by!


Wednesday, August 20, 2025

You're Amazing, Teacher!

I just can't stop with the back-to-school themed projects! You could definitely switch out the sentiment on this one and make it an any occasion card, really! The inspiration for this card was the flag, silly as that sounds! I passed a school and saw the flag waving in the wind and I thought, oh, I should do a schoolhouse inspired card! While it didn't end up like that, it was definitely the starting point! ha ha! I had so much fun creating the clock on my last card I thought it would be fun to make a clock for my school card with the flag, but as you can see, there is no clock in sight! The clock just didn't work so I had to pivot, but I'm so glad I did because I really like how this card turned out....soft and summery, with a hint of autumn!

I won't bore you with the details of how I switched gears a thousand times, so let's just dive into how I created it! To begin, I used the cute flag dies included in the Patriot Die to create Old Glory on the cute pole. I cut everything from white cardstock and then used blender brushes and dye ink to color the pieces. The pole is cut from silver cardstock and then I glued everything together with liquid glue. I set that aside to dry and got to work on the the flowers. I used the Into the Blooms: Coneflower Die. I didn't participate in the release when these were introduced, so this was the first time I used them and I am hooked! The bee was left over from another project so I added it to the flower using liquid glue.
I had the notebook and pencil leftover from the previous school-themed projects I've shared over the last week or so. When I was making the acorns for one of the cards, I also made this cluster of white flowers so it was fun to use it on this card.
Fort he sentiment, I die cut the main portion in gold using the Teacher Wafer Dies and then the shadow from vellum. I glued them together and let them dry. The "You're amazing" portion is heat embossed in gold on a strip of Kraft cardstock. I dug through my mini sentiment sets until I found something that would accent the teacher word nicely. This one is from the Just Sentiments: Everyday Mini Stamp Set. It's not one I use very often, but I really should because it has some of those sentiments that can be used for just about anything!

For the background, I used the Cascading Stars Hot Foil Plate with Spellbinders Champagne Foil. I love the champagne foil more than gold because it's not quite so yellow. I had fun adding the elements to the background. The sentiment is strategically attached with liquid glue applied ONLY to the areas where they touch something else.

I added some black ink splatter and then trimmed it down to fit inside the frame. I wanted the card to have additional dimension, so I added the entire framed background to a top-folding A2 card base using foam squares. I think I'm going to save this to be used for teacher appreciation next May, but I had so much fun creating it while getting in to the back-t0-school frame of mind! Thanks for fluttering by!


Monday, May 5, 2025

Teacher Appreciation Week {You Are So Special To Me}

It's Teacher Appreciation Week and this year my son's school went with a country-western theme. I have EXTREMELY limited supplies in that category, but I got creative for today's card and tag! 

I own THIS die, but I didn't want the stitching lines along the edges so I bought a cheap die on Amazon to do the trick! I die cut it from Blueberry Sky cardstock and then added some Blueberry Sky and Enchanted Evening ink around the edges using a blender brush. The silver "rivets" are included in the die and I cut them from silver cardstock and adhered them with liquid glue. 

I pulled out a few of my favorite flowers and leaf dies that had a country feel. For the flowers, I used the Into the Blooms Die; this is the original set in the series so it was fun to pull it out again! The wheat and one of the leaf sprigs comes from the Beautiful Cornucopia Die and then the leaves around the flower coming out of the pocket is from the Into the Blooms: Sunflowers Die


I cut everything from white cardstock and then used my PTI dye inks to color everything with blender brushes. I glued the flowers together with both liquid glue and foam squares for dimension. The "jeans label" was cut using the Just Tags Die from Kraft cardstock and then I stamped the sentiment, which is from the Just Sentiments: To & From Essentials Mini Stamp Set, using Classic Kraft ink. I wanted it to look as realistic as possible and I think it turned out great!

For the background, I used the Woodblock Prints Stencil Collection; Blueberry Sky cardstock cut to an A2 panel and then used Blueberry Sky ink and Enchanted Evening ink around the edges. The panel the pocket is adhered to was cut using the Love to Layer: Torn Edges Die from white cardstock. I added Classic Kraft ink around the edges and then added the smaller print around the bottom using one of the other stencils included in the Woodblock Prints Stencil (linked above).

I added the pocket using foam squares and then attached the flowers, leaves, and wheat using both liquid glue and foam squares.  I decided to make a coordinating tag using the pocket die to attach to the gift that will be sent along with the card. This particular sentiment is from the Thankful For Fall Sentiments Mini Stamp Set and fits with one of the largest labels from the same Just Tags die set.

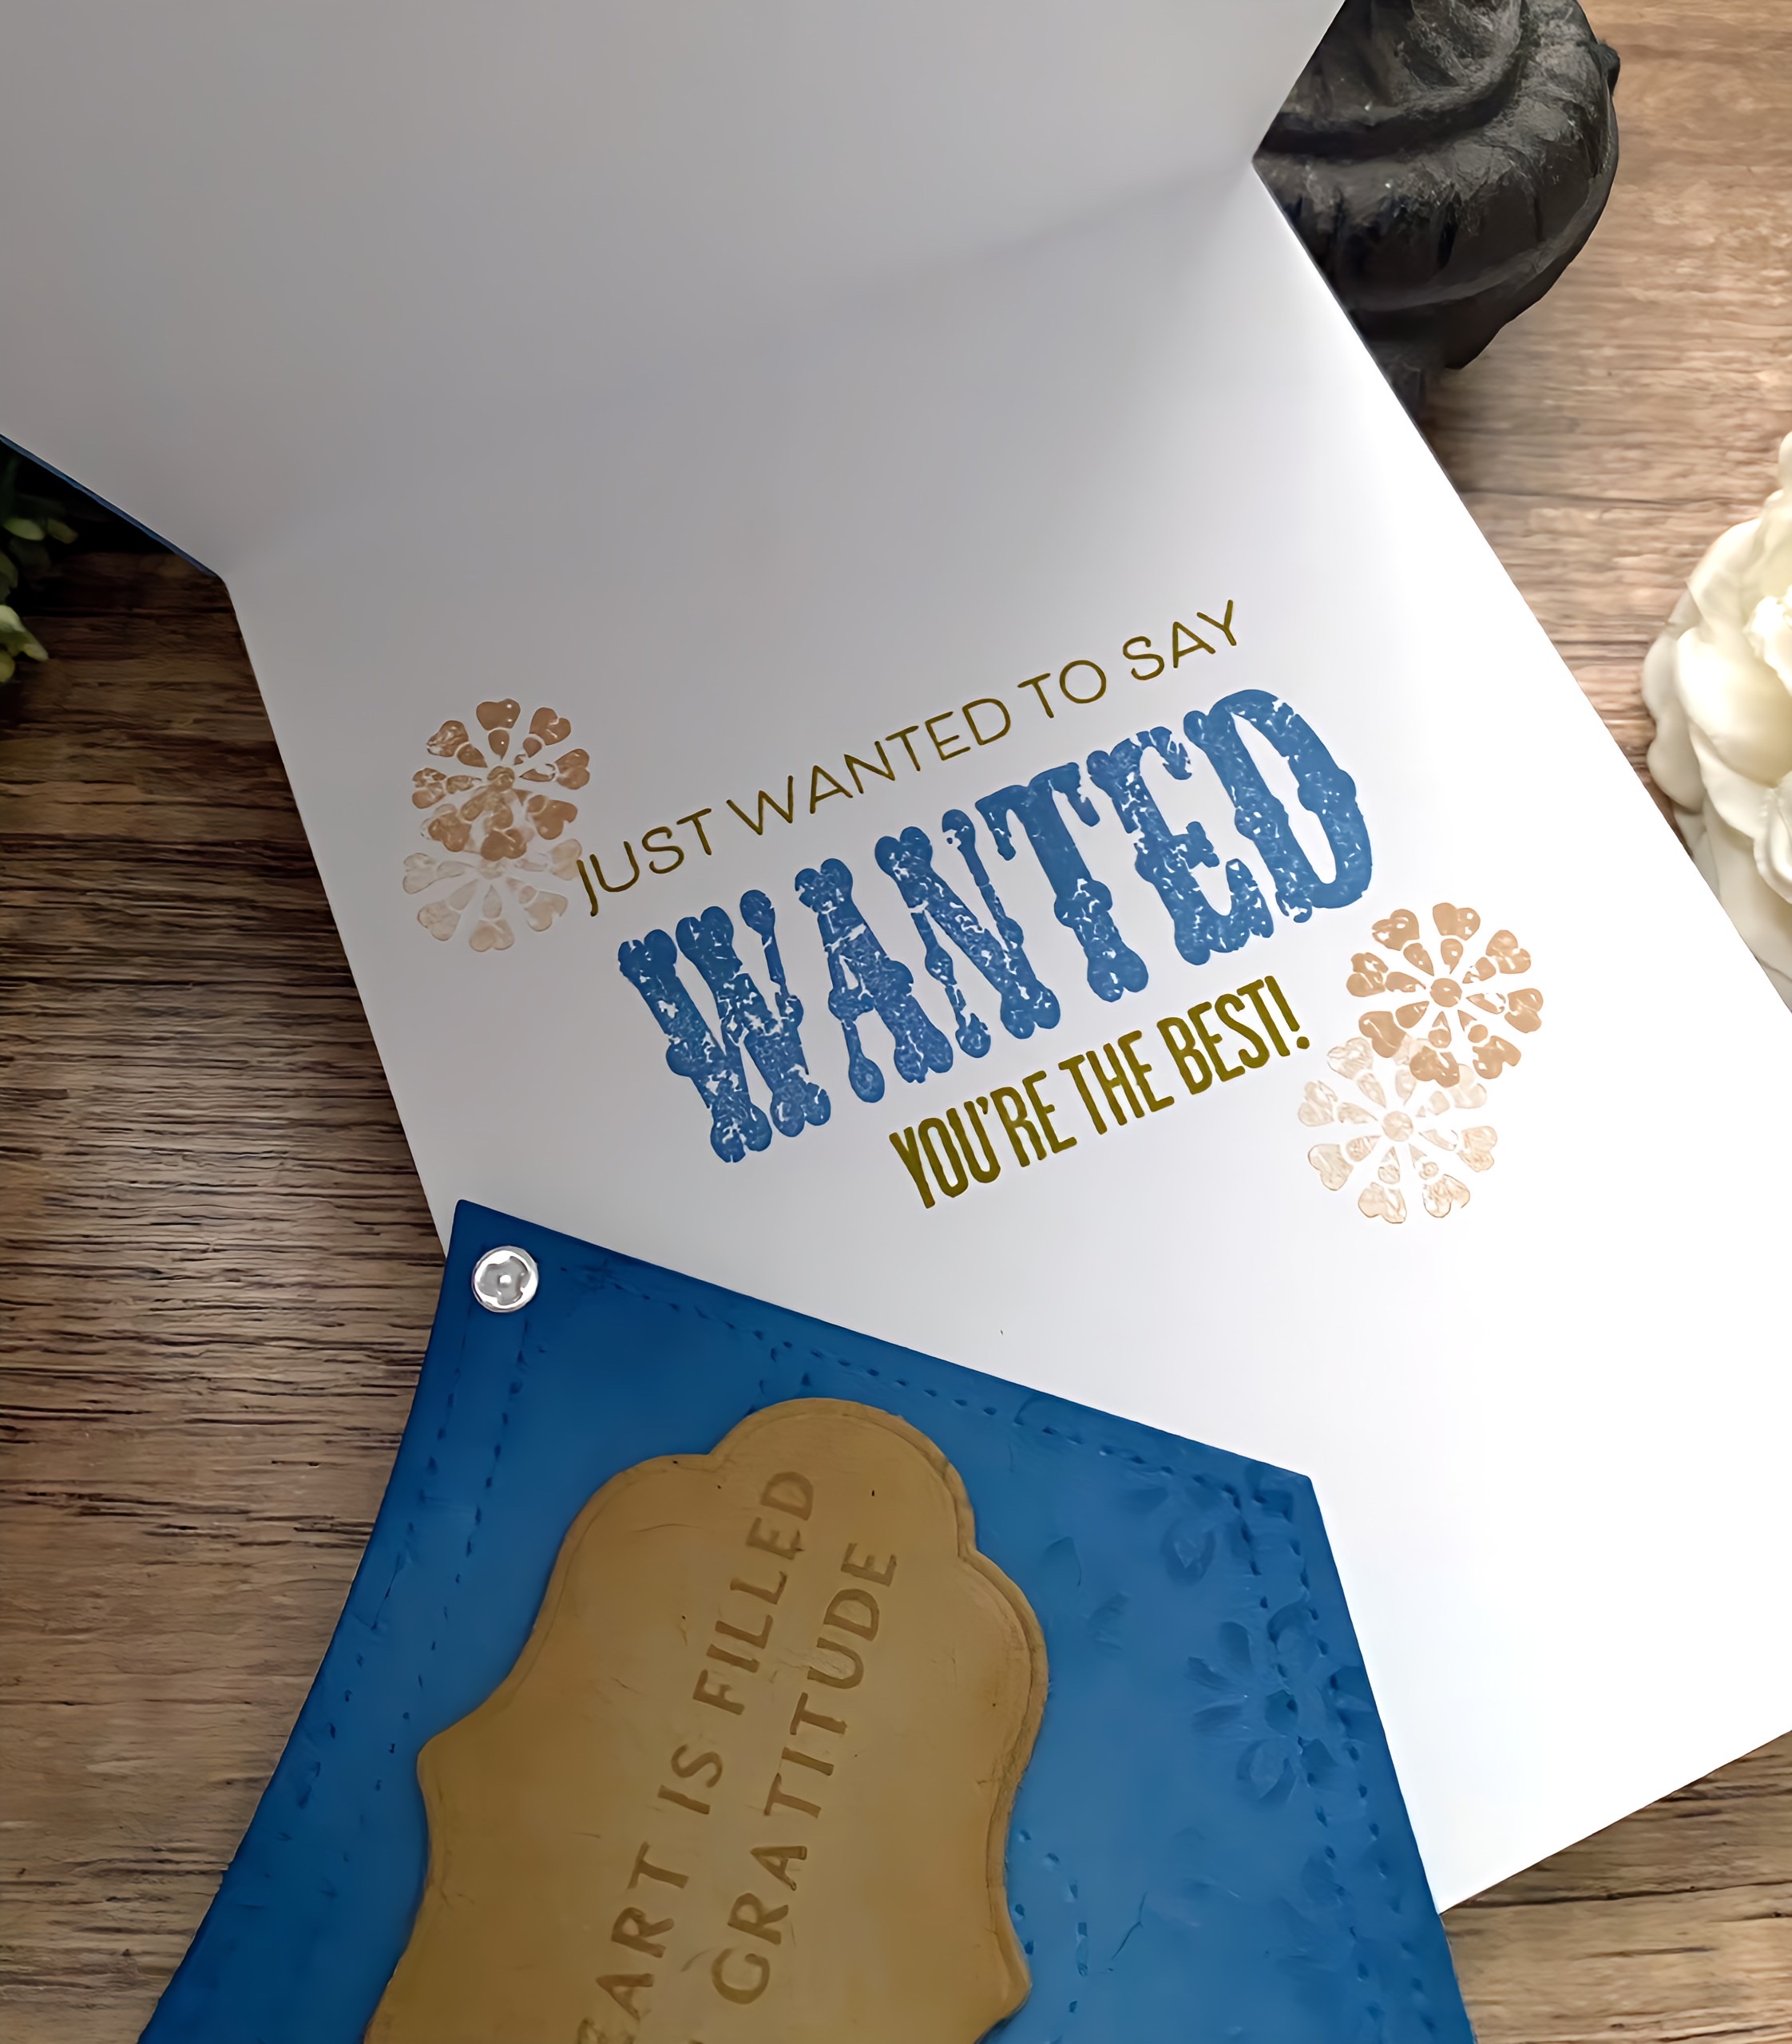
I have been saving the old SU! Wanted Stamp Set for YEARS....I think we're actually at decades if I'm being completely honest! Yikes! That being said, I have been saving this set for a project JUST like this! ha ha! I stamped the big WANTED sentiment using Blueberry Sky ink and then used the Just Sentiments: Just Because Mini Stamp Set to finish off the sentiments. I thought about selectively inking the "just wanted to say" portion to omit the wanted, but it seemed like the risk of messing up was too great! ha ha! I stamped a few of the accent images also included in the old Wanted Stamp Set for some additional western flair! My plan is to have something each day of the week, but we'll see if that actually happens, but stay tuned! ha ha! Thanks for fluttering by!


Wednesday, June 5, 2024

The Greetery {Bushels of Thanks}

Hello friends! It’s that time of year when we’re wrapping up the school year and many thanks are in order! When it comes to thanking teachers, apples are always in season, wouldn’t you agree? I had so much fun creating this card using the darling BotaniCuts Apple Die paired with a few other favorites to bring this scene to life!

To begin, I die cut the greenery for the edge of the focal panel using the A Side of Greens Die from thick white cardstock and then colored it using twisted citron, mowed lawn, and rustic wilderness Distress Oxide inks and a finger dauber. This is a very delicate piece, so be gentle. If you’re worried about it being too delicate for your project, simply cut it an additional one or two times and glue it together. I’ll share my tip on how I handled it for this project in a bit!

I die cut quite a few apples, stems, blossoms, and leaves using the BotaniCuts Apple Die from white cardstock. The leaves are colored using the same ink as the A Side of Greens piece, the apples are colored using twisted citron, abandoned coral, festive berries, and Lumberjack plaid Distress Oxide inks. The stems are colored using gathered twigs. I pushed the stems into the opening at the top of the apples and then secured them using a small piece of Scotch tape.

I used the Bushel Basket Die and Rustic Cream cardstock for the basket. I added some antique linen Distress Oxide ink to the reinforcers and label backing, and black soot for the handles.  I used liquid glue to adhere the basket. The ‘picked fresh’ sentiment is from the Market Basket Sentiments and is heat embossed on True Black cardstock using detail white embossing powder. I then die cut it using the die and slid it into place and secured it with liquid glue. I added it to the Bushel Basket using foam squares for dimension.


For the background, I cut a panel of white cardstock measuring 4 by 5 ¼ inches and then stenciled it using the Tartan Builder Diagonal Stencil Collection. I concentrated the stenciling in the center and let it fade out using speckled egg Distress Oxide ink and a blender brush. I only used two of the stencils, omitting the other two; I just wanted something with a country feel and nothing too fussy or distracting; I love how it turned out! I also added some ink splatter with the same ink for added interest and detail.

Now the fun part….putting it all together! I gently laid the A Side of Greens piece exactly how I wanted it on the focal panel; I needed to give it a little nudge in the right direction(s)! ha ha! Once it was exactly how I wanted it, I used a piece of Glad Press n’ Seal wrap over the top, gently pulled it up and then added liquid glue to the back, making certain to add glue to those small points that I didn’t want poking up. I laid it BACK over the focal panel and pressed down until I felt confident I would be able to remove the Press n’ Seal wrap. Have you tried this technique? I don’t use it often, but I love it for times like this!

I added the basket using foam squares, but made certain to leave enough room to tuck the apples down inside. I added them using additional foam squares and then added the leaves here and there using liquid glue. I couldn’t resist using another apple and apple slice outside of the basket; there is a die for the tiny apply seeds on the slice, but I just used a fine tip brown marker to color them in. There are impression lines so it’s really easy to do! Now, I could have used a thank you sentiment on the basket itself, and let that be enough, but I knew I wanted to add another sentiment to the top, so that’s why I chose ‘picked fresh’.  I used the All Occasion Script Sentiment Stamp/die set. I added it to the top using foam squares! The entire focal panel is added to a top-folding A2 Kraft Gray cardbase (Betsy used it on one of her Seagrass baskets and I just HAD to get it myself) using foam squares. You’ll notice that It’s lined up edge-to-edge on the right-hand side; this made the most sense visually so it didn’t give a floating illusion to the greenery on the side. I love how this card turned out; perfect for a teacher, but not too teacher-y! ha ha! Thanks for fluttering by!

Sunday, March 24, 2024

Papertrey Ink March Release Day 3

Welcome to day 3 of the Papertrey Ink March release countdown! I'm so happy to be hear today sharing a few cards; this first one features the absolutely gorgeous new Always in Bloom stamp set. This is my new favorite floral set...it rivals with Effortless Beauties now in my favorite floral category.

It's very easy to use which makes me so happy! I don't know if I'm getting too old or what, but I just really need easy lately! ha ha! It's easy to use with great results which makes it even more desirable.

This card also features the new Watercolor Wonderful Stencil Collection. This is going to be used A LOT! It allows you to create a realistic looking watercolor background!

I still need a few more Easter cards so I chose to use two of the sentiments from the Thoughts of Easter stamp set. Bobbi used these two together on one of her cards for the last release and I loved it so much I told her I was going to have to give it a try. I love how it turned out on this card.

We're also featuring a fun new set called Bookmarked!

I made a few for my son to give to his teachers! Thanks for fluttering by!


Friday, March 22, 2024

Papertrey Ink March Release Day 1


It's day one of the Papertrey Ink March release! I have a big post for you today using some beautiful new products! My first card for today features the new Pro Stamper's Box: March stamps, dies, and stencils. This is such a wonderful collection that has endless possibilities!
This card features my favorite sentiment included in the set paired with one of the stencil styles and the flowers and leaves that are included.


This card also features the stitched frame; there is also a rectangle frame that I will show on my next card.

I chose to use the stencil on each of the four corners. 

The collection also includes three word dies: hello, wish, and thinking of you. This card features "wish" and another one of the sentiments. 

I chose to use the other stencil design directly in the center and then added some ink blending over the top to soften the lines. I thought the flowers could pass as crocuses, so I clustered them together.

Rather than stamping the leaves, I simply colored them with a small blender brush using Green Parakeet and New Leaf ink.

I used the rectangle frame here and die cut the "wish" from both white and gold specialty cardstock and glued them together for a sturdy piece.

This is actually headed out today for one of the widow's in the neighborhood who is celebrating her birthday today. It's also my grandma's birthday today and I sure wish she was still here to wish a happy birthday! 

My third card using the Pro Stamper's Box: March features the large Thinking of You die. I really wanted to give it center stage. 

To begin, I die cut the sentiment three times from white cardstock and glued the together for a nice, sturdy piece. I let that dry and got to work creating the background. I used the Delicate Circles Hot Foil Plate and champagne foil on Spring Moss cardstock.

I used the Into the Blooms: Gardenia dies; I was only planning on adding the flowers until I realized that I could use the frame die as an added design elements.

This was an unexpected card for me, but I really like how it turned out!

My final card for today uses the versatile Just Notes stamp/die set. I created this to use as a teacher appreciation card, but it really could go to anyone who you need to thank.

This stamp set comes with so many different bits and bobs to really have some fun!

would you believe that the paperclip is paper? It looks like real metal, huh? I can't wait to play around with this set some more! Join me again tomorrow for day 2! Thanks for fluttering by!