Thursday, April 30, 2020

Pinkfresh Studio April 2020 Stamp and Die Release


Hello and welcome! Today is the Pinkfresh Studio April 2020 Stamp and Die Release Blog Hop and it is all smiles, hugs, and rainbows! You're going to fall in LOVE with the entire release, I can guarantee it! I'm sharing three projects with you today, so make sure to scroll to the bottom of the post to see each of the projects! Three lucky winner will receive the entire April release; one from the Pinkfresh Instagram, one from the Pinkfresh Facebook page, and one from the Pinkfresh Studio Blog. One lucky winner will receive a $25 gift certificate to the Pinkfresh Studio shop by leaving a comment here!
There's also a shipping promotion going on for the release as well!
Also, don't forget to hop along to the other designers' blogs to see how they've used these amazing products!

You are invited to the Inlinkz link party!
Click here to enter
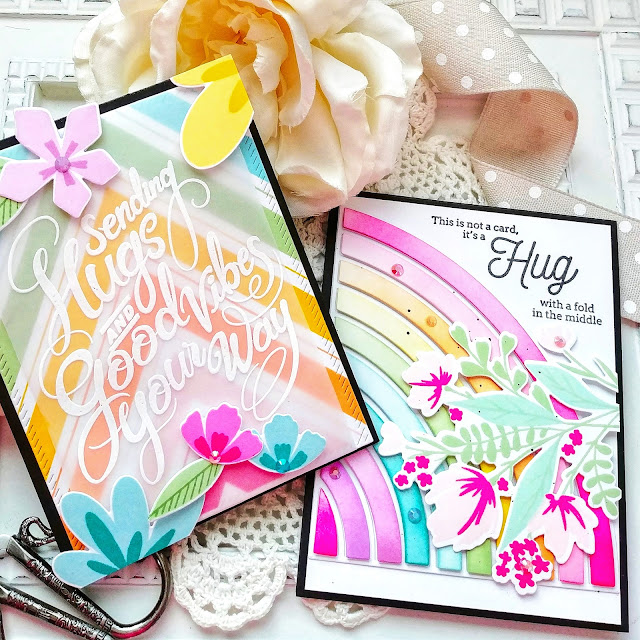
My first card for today's hop uses a fun combination of new products! To begin, stamped the sentiments from the Hugs and Good Vibes Stamp Set. This sweet sentiment is just the cutest thing ever, if I do say so myself! It is perfect to send to out as we are social distancing and wishing we could give hugs! I die cut the amazing new Color Block Rainbow Die out of white cardstock and then used the Pinkfresh Studio Ink Pads to color each of the "rays" of the rainbow! I used foam squares to add them to the white outline that is adhered to the white panel using liquid glue.
I'm completely in love with the new Modern Layered Floral Stamp Set and knew it would be the perfect accent for my rainbow! I die cut it using the Modern Layered Floral Die and then stamped it using my Mini MISTI. I layered it sideways on the rainbow panel and then snipped the excess off using my paper trimmer for a nice, straight edge.


I used a post it note to cover up the sentiment portion and then added some black paint splatter using a fine tip paintbrush. I spritzed the entire panel with Shimmer Spray for some sparkle and shine!

I also added a few Essentials Jewels to both the rainbow and a few of the flowers. I layered the entire rainbow focal panel onto a top folding black card base using foam squares for added dimension.

I'm loving the rainbows, hugs, and flower combination, so I used it again on my next design, but in a different way!

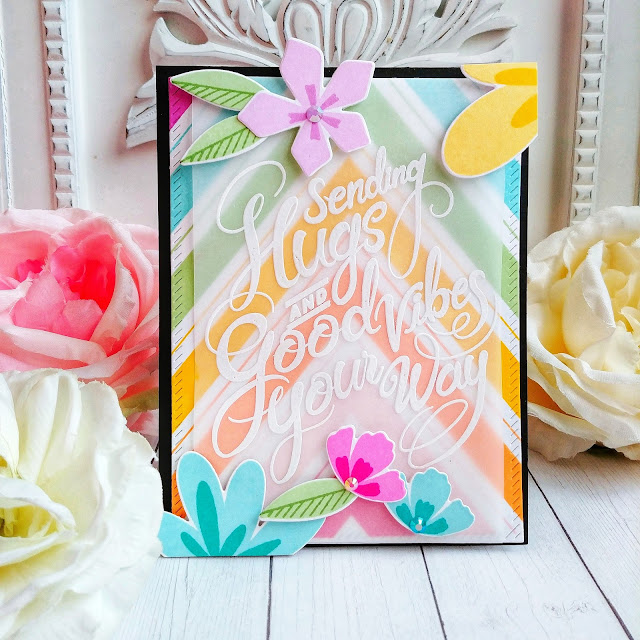
For this card, I used the AMAZING new Chevron Background stamp. This is a red rubber cling mount stamp and has removable pieces so you can stamp it in many colors easily. To begin, I placed the entire background into my mini MISTI and then removed the outer frame edge. This part is not needed for the design, so I removed it for ease in stamping.

Once I had it all placed, I removed everything but the smallest chevron on the bottom. I stamped that and then placed the next piece. Once that was in position, I removed the smallest piece and then stamped the next piece. I continued on like that until I reached the top portion where it splits off into two difference sections (the blue portion). The thing I like about these stamps is that they have very tiny perforations where you split the pieces apart for each section. This leaves a guide so to speak so you can line everything up properly.

Once the stamping was done, I die cut the entire panel using the Essentials Fancy Diagonal Stripes Die Collection. I love how it gives it just the right amount of extra detail! Once that was done, I heat embossed the large sentiment from the Hugs and Good Vibes Stamp Set onto a strip of vellum using white detail embossing powder. I wrapped it around the stamped panel and secured it to the back using clear tape.
I added some of the fun flowers from the previously released Simple Blossoms stamp set here and there for some added interest.  The entire panel is layered onto a top folding A2 card base using foam squares and a few jewels finish this rainbow design!

My third and final project for today is a trio of tags using the new Believe in Yourself Stamp Set with the coordinating Believe in Yourself Die

If you visit my blog regularly, then you'll know that I've been preparing some baskets for May Day tomorrow! These little tags are the perfect accent to add to the baskets.
I bought some tea towels to place in the bottom of the baskets and this floral design reminds me of the pattern. This floral cluster also has solid images to stamp inside of the outline and has a kind of "textile" feel to it which will be perfect to accent the towels.

Each tag is die cut using the Essentials Classic Tags with Fillable Elements and then I added  some inkblending around the edges using ink and a blender brush. I also added some ink splatter to them for some added detail and interest.

The sentiment, which is from the new Simply Sentiments Hello stamp set, is the perfect addition for these tags and says just the right thing! The finishing touch is one of the new Artistic Bows which I am in love with! I can't wait to experiment with them more! 
I had so much fun creating all of these projects for today! Don't forget to leave a comment to be eligible to win a gift certificate! Thanks for fluttering by!

Saturday, April 25, 2020

Keeping Christmas {There's no place like HOME for the Holidays!


Oh, there's no place like HOME for the holidays! I don't think that phrase has hit me quite like it does now, am I right? Welcome to this month's installment of the Keeping Christmas Blog Hop! I missed out on last month, which was a first for me, but I'm back this month with lots to share and see! As you can see, I went with a "Home for the Holidays" theme because I felt it was very fitting for the times. Before I dive into the details of my projects, here is the list of the other designers who are participating in today's hop!
Kelly Lunceford (Creator)
 Vicki Finger (off this month)

Today's projects consist of a set of tags and 6 gift pouches! I absolutely love making these little pouches and have made several variations for different holidays as well. I've been loving this paper pack that my sister gave me. I used it for THESE projects and for THESE. As soon as I saw the particular paper sheet that says "Home Merry Home", I knew the direction I wanted to head for this month's projects.

When I was finished with the 6 pouches, I wasn't quite ready to be done, so I made 3 coordinating tags! These will be perfect for gifts or to package up treats and sweets! I had a comment on THIS post from a sweet reader asking about the caramels that I make. I happened to make some the other day for a friend's birthday, but I usually ONLY make them for Christmas. The recipe I use is from the recipe book called Christmas Recipes from the Lion  House and I wrap them in these cello candy wraps. Gone are the days of me cutting up wonky pieces of waxed paper to get them wrapped! LOL! I buy these by the hundreds from a local kitchen supply store. 

These caramels also gave me the chance for you to see the pouches with a little something inside. I normally have candy canes on hand for photography purposes, but I couldn't find one for today's post. I decided to tuck a few inside so you could see it opened up a bit. When I get these ready for gift giving, I like to put the little tubes of hand lotion and lip gloss from Bath and Body Works, a Truffle bar, a candy cane and maybe some loose little candies as well. Because I do the machine stitching around the edges, it makes these super sturdy and I am able to stuff quite a bit inside!

I cut up one sheet of 12 by 12 pattern paper. This particular sheet of paper is one with lots of different pattern strips so there were three pieces with the "Home Merry Home" printed on them, so I made three like the ones shown above. I also have three others which I will show later on!  To begin, I cut the paper 4 inches by 6 inches which gave me the 6 panels. I cut 6 pieces of Kraft cardstock measuring 4 by 6 1/2 inches. This gave me a little bit of extra space for me to add the diagonal striped paper at the top. I just added a strip so that it would peek out without wasting an entire sheet of paper.  I sewed around the sides and bottom using my sewing machine. Once that was done, I was able to have fun with the embellshments.

I used some oldies, but goodies on today's projects! To begin, I die cut 9 of the snowflakes and added some Vintage Photo distress ink to the edges using the Taylored Expressions Blending Brushes. Next, I added some Martha Stewart Tinsel Glitter to the edges. I set those aside and got to work on the stamped labels that are on the snowflakes. I die cut them with the Mat Stack I die and then stamped them using the Mat Stack I stamp set using black ink. I created the wreath by wrapping a Canadian Pine stem around a Nuvo drops bottle and then glued it with a hot glue gun. I added it to the center of the Mat Stack die using additional hot glue.

I die cut the houses and stamped them using my Mini MISTI. They are from the "Love Lives Here" stamp set that has been discontinued, but the "All Hearts come home for Christmas" is from the Love Lives Here: Holiday stamp set and is the perfect accent for these pouches. I added a bow of ribbon and a silver snowflake embellishment to finish these off! I left one without a bow so you can decide if you like it better with or without the bow. There used to be a day where not having a bow wouldn't have been an option for me! LOL!

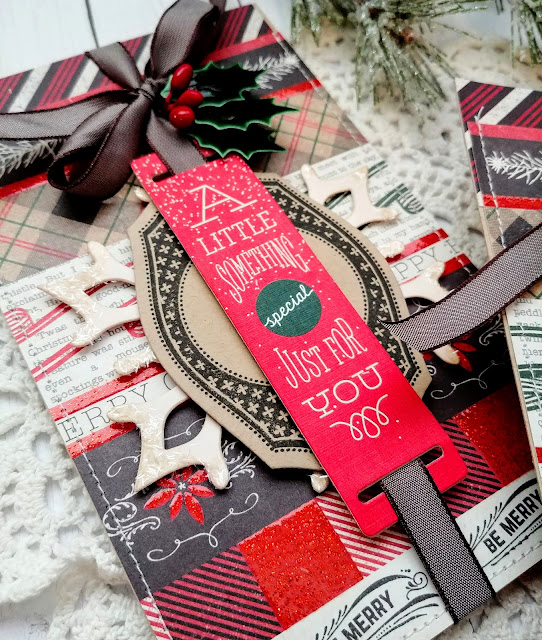
This next set of pouches uses the portion of the pattern paper that didn't have anything that I wanted to show necessarily, such as a focal phrase or image, so I took the opportunity to add some longer embellishments.  These are sewn just like the others and the snowflakes and mat stack piece are created exactly the same. For these, I die cut the Ribbon Slider Tag Pattern Paper, which is on sale for $2 by the way, with the coordinating Ribbon Slider dies. I also die cut another one out of Kraft cardstock so that I could layer them for a sturdier piece. There is also a coordinating Ribbon Slider Sentiments stamp set so you can stamp as many as you'd like!

I normally wouldn't tie the bows so early in the year, but I wanted you to be able to get an idea of how they will look when they're ready to go. I did leave the ribbon a bit long, since I may need some additional length once they are stuffed with all of their goodies!

I hot glued a holly sprig embellishment right below the bow. It is not attached to the bow at all, but rather the pattern paper so that I can still get it untied to fill it up when the time comes! These have always been favorites of mine and I have been able to find them at Hobby Lobby every year. These are leftover from last season, but hopefully they'll have more this year, too!

I don't think any of us really has any idea what the holidays will look like this year, but whatever they bring, I know that I will still have my family and friends! A little pouch like this is perfect thing to drop off on a doorstep!

I happened to turn the TV on while I was editing these photos and Dr. Phil happened to be on and he was discussing that "home" isn't the same for everyone during these trying times. I've been so grateful for my safe and comfortable home, with my children and husband around me as we weather this together. He was talking particularly about the foster care system and how people aren't wanting to take in extra kids right now and if they do happen to have these kids, they are needing activities and things to keep them occupied. Dr. Phil said that we could contact our local Child Abuse center or hotline to find out how we can help these sweet kids! It brought me to tears thinking about it all!

My last project for today is a trio of tags (only two pictured here) using most of the same elements as the pouches. The Basic Book Mark 3 die was the perfect choice for these tags. It is large enough to hold the embellishments, AND the stamped sentiment.

One of our favorite traditions is making Christmas cookies and these button embellishments are the perfect addition. I bought them during last year's holiday season, but I never got a chance to use them! I'm particularly grateful to have them since Hobby Lobby is closed and there's no chance to get any right now! Being a crafty hoarder has been a blessing during all of this!😂😂😂

I added all of the wreaths and embellishments using hot glue for a nice sturdy tag. These would be so cute to package up holiday cookies and treats! I hope you've enjoyed today's hop! Thanks for fluttering by!
P.S. Here are a few things I am thankful for today: My home, my family and friends, my beautiful blossoming trees that smell and look heavenly, uplifting music to keep my spirits up, my Savior Jesus Christ, the smell of cut grass, Christmas, spring flowers, laughter, technology, good books, good movies! What's making you grateful today?


Thursday, April 23, 2020

Handmade Hodgepodge {a little of this and a little of that}


Hello again! I got a Facebook notification that it was my friend's birthday today, and not tomorrow like I thought! Ack! This isn't a post I would normally share, but since I had talked about making caramels and such for May Day, I decided to share a few of the things I worked on today for the birthday gift! I plan on making more of the flower embellishments for paper cones and tags for May Day as well. I made 2 of everything because it also happens to be another friend's birthday as well.
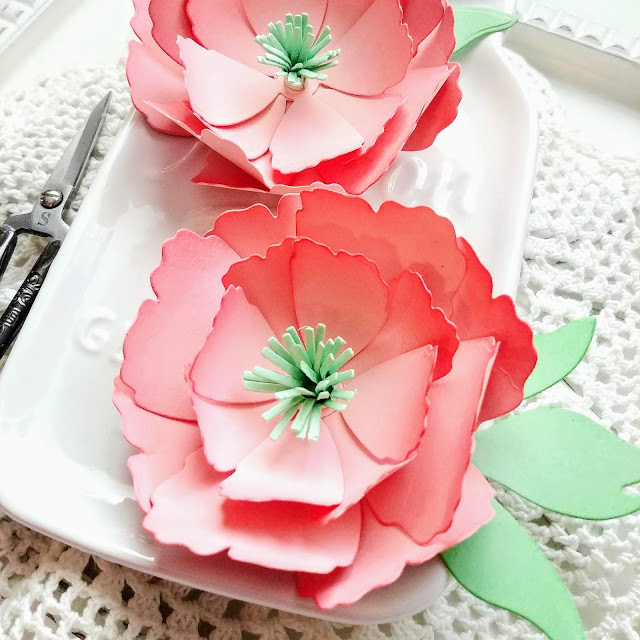
I bought the Small Peony Die from The Stamp Market (and the large) when they were first released but this is the first time I have used them! They are so much fun to make and I can't wait to add them to projects in the future! I learned a few tricks while assembling these that I will share with you. I die cut 2 of the largest petals and 2 of the smaller petals, 1 center and one leaf for each flower. I used Blush cardstock and then added some Coral inkblending around the edges for some contrast. My photos aren't great today because the sun was hidden for most of the day! It came out this evening just in time for me to make my deliveries! Tip #1: Hold the petals with the ink blended side facing the table and use a pencil, or in my case, the quilling tool, to gently wrap the petals around it to achieve the curved edges. I find that it is easier for me to make the curve with the petals going in a downward motion.

I used my quilling tool to create the center portion. Tip #2: Wrap it with the "wrong" side (or side that was on the bottom during the die cutting process) on the outside. Once you fluff out the center, you will want the nicer side to show. I tried it with the nice side out, but then then the ugly side showed when I fluffed it. Hopefully that makes sense. Maybe your die machine doesn't make the back look less appealing than the front! LOL! I used a dab of liquid glue to secure the roll together.
Once that is all done, it is time to assemble the flowers. I just used a small dab of liquid glue to the center of each piece and stacked them, alternating position as I went. The center has a nice amount of glue and is just stuck right in the center. The leaf is also attached with liquid glue. I also added some sentiment strips using the Just Sentiments: Belated Birthday stamp set and the Simply Sentiments I stamp set to give them a little something extra. I spritzed them with Shimmer Spray; I usually do this after I take photos, but I didn't and that's why the black strips have a grainy appearance.

Once again, bad photos with lots of shadows, but I snapped these right before I packaged the gift up! Hopefully you can get the gist! I filled the Frosted Tin Tie bags with the homemade wrapped caramels and attached the flowers with foam squares.

Each of the two gifts included some handmade earrings. I know I've shared quite a few of these recently, but I figured I'd show these, too! These would be sweet additions to May Day baskets or cones as well! This pair was made using the Designer Dangles Pinch Me die set. These are some of my favorites to make and I have gotten the hang of how to thread the jump rings quickly and neatly! For this pair I used the Trendy Colorful Craft Leather and the Metallic Basics leather.

I made quite a few pairs of spring earrings that you can see HERE. These were made today, but are just like the ones that I shared in that post if you are interested in details, including the earring display card.

I made 2 key wristlets because I like them, I have everything on hand, and they are so fun to make! LOL! They are the perfect little gift to give to friends and families. I haven't been inside a store for I don't know how long, so the handmade gifts are working for me!

I recently purchased a new hardware set for the wristlets. It has three different types of metal: silver, this burnished gold, and an oil rubbed bronze looking one. It also came with some amazing pliers with rubber tips so that it doesn't mess up the metal when you clamp them shut! This was the first time I used it and it is so awesome!

I used one of my hoarded "P.S. I love you" tags that I only use when I absolutely HAVE to! LOL! I think it's the perfect addition to the backside of the wristlet! I hope today's post has given you a few ideas of some handmade gifts to make! I sure had fun, even though it was last minute! I'll be back again on the 25th for this month's installment of the Keeping Christmas Blog Hop! Thanks for fluttering by!
P.S. For the birthday cards, I used THESE and added the "Birthday Wishes" sentiment like I used on the flowers across the "BEAUTIFUL" sentiment to make them work for this occasion!

Wednesday, April 22, 2020

Sending Caring Thoughts

Just checking in with you all and hoping you're having a wonderful day! Today has been a beautiful spring day; it started with a little rain but then the sun came out which is so nice! I'm sharing a trio of cards with you today using some older stamp sets from The Greetery
A few weeks ago, I sat down on a Sunday afternoon and stamped a bunch of birds from the Robin and Wren stamp set. I didn't have any clear plan for them, but just enjoyed the process of creating different colored birds to add to projects in the future!
Each of the three cards uses a bird or two which are all colored differently. I have a Facebook friend who posts different birds quite often and a few she shared yesterday caught my eye so I may be working on a whole new flock of birds! LOL!

Right before life got crazy, my son's teacher bought a new house and I had planned on putting together a few "house warming" type gifts, which included some seed packets. The package is still here so I used the colors from that as the inspiration for these flowers, which are from the Fleur Impressions stamp set. I used the Fleur Impressions Die Collection to die cut each of the flowers and then used my Mini MISTI to stamp them assembly line style. 
The cards evolved as I went along and this background is my favorite. I added some ink blending and splatter to the solid piece from the Large Terrarium Die. Once that was done, I added the flowers and leaves using foam squares tucking them here and there.

Each card uses both the solid portion and then a second die cut using the middle piece of the die to create the terrarium panels. I attached them with some liquid glue at the top and then added the tag tied with button twine. I have a strange tip for you, but it really works. When I tie little bows like this, it helps if I turn the project upside down. The bows seem to work out much better that way and end up looking nicer. That being said, I did it on the two other cards, and NOT on this one! LOL!

This bow looks much nicer! Ha ha! For those of you who read my last post, I talked about my plans for May Day which is coming up on May 1st. The 2 "thinking of you" cards will be perfect candidates to tuck with the baskets I have planned! I did read a comment (which I apologize for not responding to yet) asking about what baskets I am using. My Amazon delivery came with the baskets...oh my...they were 1,000 % NOT what I thought they'd be! I had to quickly look for an alternative, which won't be delivered until the last day of April or possibly the 1st of May. I guess I'll be making the deliveries after they arrive!  They are berry basket type containers and they come in a package of 20 so I will be using them for other gifts in the future.

So far, the floral tea towels that will line the containers have come as well as the Burt's Bees lip balm and hydrating sheet masks. I'm still waiting for the seed packets, peet pots, and soap. I have a few neighbor's birthdays that are coming up in a few days so I'm planning on making a batch of caramels for that, so I will sprinkle some of those into the baskets, too! I'm thinking some cookies tucked into decorated cello bags could be a fun addition, and maybe a homemade cloth face mask. I also love a traditional paper cone, so maybe I'll make some of those for a few other doors. I'm planning 6 baskets with the full shabang, but I'll have leftovers of a few things I could tuck into paper cones! Hopefully some of these ideas will spur your own May Day deliveries! Will you share with me what you make? I'd love to know!

Each of the three cards use the sentiments from the Sentiment Suite: Thank You stamp set and then they are die cut using the coordinating Sentiment Suite Basics Die collection.

This particular card turned into a sympathy card. It's so sad when your friends lose their loved ones, especially right now when you can't even have a proper funeral or service. My heart aches for my friend and her family! 
I had so much fun working on these designs and I hope you get a chance to get some floral cards made soon! I'll be continuing to work on my May Day creations so stay tuned! Thanks for fluttering by!