Saturday, November 30, 2019

Ink To Paper November Create-a-thon {Merci}


Well friends, today is the 30th and that means today is the last day of the Ink to Paper November Create-a-thon! Today's featured sets are Birdie and the coordinating Sweet Tweets stamp set. This is one of my favorite sets because you can use it all year long! So far, I've created an Autumn card, a Spring/Summer card (scroll down) and then of course, the arms for these charming Snowmen (scroll down) and I've been dying to use this set to create a winter card! 

I decided to create a seasonal thank you card that I will send out after Christmas. I've only made a few so far and I know I will be needing more! I like my Christmas thank you cards to be seasonal, so this worked out perfectly!
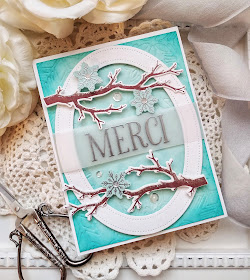
To begin, I used the On the Border: Splendid Snowflakes Frame Die to dry emboss a 4 by 5 1/4 inch piece of Aqua Mist cardstock. Once that was done, I added some Hawaiian Shores ink by using a blender brush and blending it into the corners and sides. I also added an oval frame using the Pierced Feature Frames oval Die Collection and adhered it with foam squares.

The sentiment is heat embossed in Silver Embossing Powder onto a piece of vellum and is wrapped around the Aqua panel and secured on the back using clear tape. The branches are die cut twice for each branch and stamped in Dark Chocolate ink and glued together using liquid glue. I also added some snowy detail by adding a generous amount of coarse crystal glitter to the branches. The branches are added to the frame using additional foam squares.

The snowflakes are heat embossed in silver as well and they are from the It's a Sign: Holiday Sentiments.I added a few sparkling clear sequins to finish off this icy card! I hope you've enjoyed this month long Create-a-thon! Join us for December for even more festivities that you're sure to love! Thanks for fluttering by!

Thursday, November 28, 2019

Inspired By...Pink Christmas {may your Christmas be filled with light and love}

Welcome and happy Thanksgiving! I hope you are all having a wonderful, happy day surrounded by those you hold dear! Today is Thursday and that means that there is a brand-new Inspired By Challenge. I'm in love with this week's inspiration photo; I hope you like it, too and get some time to join us! I ended up by making two almost identical cards for this week's challenge!

I was inspired by the colors, of course, but also the cable knit box, the gold stars on the Kraft wrapping paper, the pine boughs, and the bows!

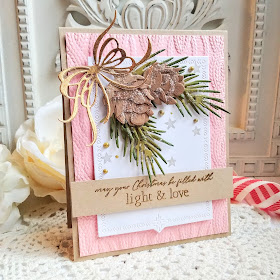
The starting point for today's card was the cable knit background; I used a Gemini embossing folder to dry emboss a 4 by 5 1/4 inch piece of Pale Peony cardstock and adhered it to a top folding A2 Kraft card base.  I also die cut the white panel using the Nordic Frames dies and adhered it to the dry embossed panels using foam squares. 

I used the AMAZING BotaniCuts Pine Bough Die Collection to create the greenery and pinecones. I die cut all of the pieces, enough for two cards, and then added some ink blending and other details to give them extra dimension and a life-like look. Of course they all got a nice dusting of coarse glitter and some white paint splatter.

The sentiment, which is from the Tree Trimmings Stamp Set, is heat embossed in gold onto a strip of Kraft cardstock and adhered using foam squares. The bow is die cut out of specialty gold paper using the Fit To Be Tied die collection and added to the foliage using liquid glue. I also added some small stamped stars and Bright Gold Nuvo Drops for extra detail. I hope you get a chance to join us this week! Thanks for fluttering by!

Monday, November 25, 2019

Keeping Christmas {Merry Christmas Tags}

Well friends, we've arrived at the LAST Keeping Christmas Blog Hop before the big day arrives! As always, the team will be taking next month off, but we'll be resuming again on January 25th with all new Christmas inspiration! I've had people ask me how I do it; how I have so many handmade items ready for Christmas! Well, that's simple; I tell them that I work on it all year long and I LOVE it! For today's project, I've made a series of tags; 5 in total with the remaining two further down in the post. I knew that I wouldn't be able to participate in the 25 Days of Christmas tags this year, with the exception of the day Reverse Confetti was the sponsor, but I still wanted to make a few tags to dress up a few gifts. Honestly, I still have so many left over from previous years that have been waiting their turn to shine, so that is my plan. I'm taking this year off and using everything that I have. These first three tags were made specifically for some wrapping paper that I love. Before I dive into the details of today's project, you'll want to make sure that you stop by the other designers' blogs to see what they have created!


I didn't quite get my fill of the latest release from The Greetery so I decided to use the new Budding Beauties Winter stamp set to adorn these tags. I stamped a few of the holly images and a few of the pine/berry image for these tags.

In the end, these tags ended up being like Russian stacking dolls, so I'm calling these "stacking tags" LOL! Each tag has 3 tags in varying sizes all stacked on top of each other!  The base of each tag was die cut using the beautiful Basic Book Mark 3 Die; two from New Leaf cardstock and 1 from True Black. These are quite large and will make a nice presence on their respective presents! ha ha!

I used the Speed Tagging stamp set to stamp the red tags that are layered on top of the base tags. I used the coordinating Speed Tagging Die to die cut the tags. I only used the largest two tags in the set; I'm especially enamored with the red gingham paired with the holly!  I used the new Fit To Be Tied die collection for the bows which are attached with liquid glue. The finishing touch is another tiny tag from the Sentiment Suite Basics Die stamped with a few of the sentiments from the Budding Beauties stamp set.

My next 2 tags use all of the same products, just in different color ways. The base of each tag is die cut from Stormy Sea cardstock. It complements the pine sprigs in this particular image nicely.

I love how these images spring to life as each step of the multi step stamping is complete! 

Each tag has a length of Pure Poppy Baker's Twine which I leave a little long so that I can tie it to the bows that I use on my gifts. 

I've done zero Christmas shopping which keeps sending shivers down my spine, but I know that I will get it done! Amazon Prime is becoming my new best friend and we don't have as many gifts to buy this year. With the passing of my MIL, the family dynamic has certainly  changed, which has been very difficult for me, but I'm going to bask in the light and love of my children and the joy that Christmas brings! Have a wonderful day and thanks for fluttering by!


Saturday, November 23, 2019

Reverse Confetti Thankful Sale {Giving Thanks for You}

Giving thanks for YOU! Yes, you! I'm here today sharing a fun Thanksgiving project today that I've put together to pass out to my boys' teachers, Librarian, Secretaries, tutors, etc. before they let out for Thanksgiving break! Before I dive into the details though, I do want to express my gratitude to each of you! I truly appreciate you for stopping by and your continued support and your sweet comments; it really means a lot!

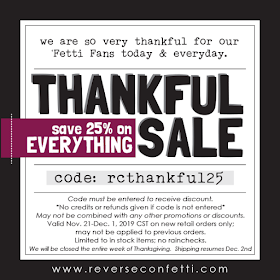
Giving Thanks is the whole reason for this fabulous Reverse Confetti sale that is going on now! I'll be sharing a little bit about how I created today's project and then I'll be sharing a few of my favorite projects from the last year. 
Of course I picked a project that is difficult to photograph (LOL!) but hopefully you can get the gist! I've made little nugget gifts like this in the past, and traditionally around this time of year. I ended up by making 11 in total after I calculated who all I wanted to give one to. With one of my sons in Special Ed, the tutors, aids, etc. really add up, but I am sure thankful for each one and all they do for me sweet little guy!

I used the fun and seasonal This and That 6 by 6 paper pad to wrap up each of the nuggets. The papers are cut to 1 inch by 3 inch and are secured on both ends with ScorTape. I made sure to put them into the cello pretzel bags as soon as I wrapped each one because they have a tendency to come unwrapped, even with the ScorTape! I placed a 1 inch by 6 or so inch backer for the nuggets to rest up against in the bag. I've done them wider in the past so they can be seen from the front, but I opted to keep them hidden behind the nuggets this time.

The flower image and sentiment are both from the With a Thankful Heart stamp set. I stamped the flowers and colored them with Copic markers and then die cut them using the With a Thankful Heart Confetti Cuts. I added some Bright Gold Nuvo Drops to the center of each of the flowers for some extra detail. When I'm doing a relatively simple project like this, I like to add one special detail to bring it up just a notch.

The sentiments are stamped in black and then added to the topper that is stapled in place. I made sure to strategically place the staples so that I could hide them with the images and sentiment. Speaking of staplers; I have a cute story to tell you: I teach the music to the children of my church and I was teaching them a new Christmas song. I brought my kids' Little People Nativity set to help illustrate the song a little bit better while I taught the words. I asked the kids what the "stable" was called and the CUTEST little 4 year old yelled out so confidently " A STAPLER"! 
We all just died laughing because it was so cute; but of course not in a "making fun" kind of way, but one of love and sweetness! I'll always think of that now when I think of a stable! LOL!
Anyway, like I mentioned earlier, I made 11 of these in total and I'll be delivering them next week before the kids get out for Thanksgiving break. My next few projects are some of my favorites from the past year!
I gave these to my boys' teachers at the "Meet Your Teacher" day they had just before school started! I was pleasantly surprised to see my Kindergartner's teacher still had hers on her desk! You can see the full post HERE.
This was also one of my favorites of the year; I was so giddy when I saw that amazing Rainbow Confetti Cut! You can see the whole post HERE
This is another one of my favorites from last year! I really enjoyed making it! You can see the whole post HERE! Remember, everything, and I mean EVERYTHING is 25 percent off RIGHT NOW! Thanks for fluttering by!!


Friday, November 22, 2019

MFT & Friends {You are a FLURRY OF FUN}

Hello and welcome! This is my last post as a MFT "Friend" this month and I've had so much fun! I was so happy to see that the cute, new BB Snow Buddies stamp set have made it back in stock! This is a set that I haven't had a chance to use until now, so I was thrilled they were back!

I'm pretty much a fan of all of the Birdie Brown line of stamps and these cuties are no exception! I can't wait to make cards using this set all winter long! The sentiments are so fun and punny, just perfect for many of the kinds of cards I enjoy making!
I ended up by making two cards for today because these images are just too cute! To begin, I did some ink blending using Tumbled Glass, Broken China, and Faded Jeans Distress Oxide ink. I used the Masking Stencils that are on sale right now, AND are back in stock to create both the circle and rectangle backgrounds.  I used the Rectangle stencil set for this particular card.

Before I removed the stencils, I stamped the snowflake images, which are also from the Snow Buddies stamp set, ink white and Broken China Distress Oxide ink. I also spritzed it with Shimmer Spray and some white paint splatter to really set the snowy scene!

I set the backgrounds aside to dry and got to work stamping and coloring the different images that I planned on using. I used an assortment of alcohol markers in different cool shades; purple, pink, and blue.

Once I was done coloring these cuties, I die cut them using the BB Snow Buddies Die-namics. I added some clear tinsel glitter to the pom poms on the hats and then I used coarse glitter on the snowman to really enhance the frosty feeling! I added a trio of sparkling clear sequins using liquid glue. The entire panel is adhered to a top folding white card base using foam squares.
My second card uses the Circle stencil set and I did the ink blending the same way as in the previous card. 

I think I've mentioned before that I am afraid of dogs; like really bad, so this stamped dog is as close as I'd like to get! LOL! He is super cute and so much fun to color! I added some Crystal Glaze to the dog's nose for some realistic shine and fun detail.

I added some white polka dots to the girl's sweater for some added detail and interest. I forgot to mention that I also added some white details to the girl's puffy coat in the first card to really give it that realistic shine as well.

The snowdrifts on the fence line got a generous dusting of "glitter snow" using a 2 way glue pen as well as the tinsel glitter that is added to the girl's pom pom on her hat! These two cards were so much fun to make! I'm sad my month is over, but I will still be sharing lots more projects in the next little while using many more of this fabulous release! Thanks for fluttering by!

Thursday, November 21, 2019

The Greetery Winter's Song Release Day 2

Welcome to day 2 of the amazing Winter's Song release from The Greetery! Thank you so much for ALL of your sweet comments on yesterday's post! You are all so kind! I had so much fun working on all of these projects! You can head to The Greetery Blog to read all about today's beautiful and amazing projects and as always, make sure you head to the other designers' blogs to see their gorgeous creations!

For today's cards, I've incorporated some of yesterday's reveals along with the new sets for today! Up first is a gorgeous new set called Budding Beauties; this is perfect to fill up the gorgeous jars from the previous releases! I decided to show some other ways to use these branches and stems on today's designs!

I used another one of the sentiments from the Pine Blossoms stamp set that was showcased yesterday. I always love sending out thank you cards for our Christmas gifts and like making them in this type of style; wintery and seasonal! 

To begin this design, I stamped the foliage from the Budding Beauties stamp set using my MISTI so that I could make multiples quickly. I actually stamped each of the three different stem twice ; mistletoe, pine and berries, and the holly and berries. I didn't end up by using the mistletoe, but I saved it so I can use it on another project.

I prepared a panel of a sage colored cardstock by adding some white paint splatter and "frosted" the edges with a white ink pad. I set that aside as well as the stamped images to work on a few other design details. I didn't get a chance to use the Inside and Out Berry Branch die on yesterday's cards, so I used it on this card. I just love how it looks peeking out from behind the focal panel. All of this is layered up onto that sage paint flecked panel I talked about earlier.

I'm head-over-heels in love with the new Fit to Be Tied Die collection, which is what I used to create the bows on the three cards I'm sharing today. I actually combined two of the different bows to create this layered look. There is a smaller detail die that is meant to be used with the larger solid bow, but I just couldn't resist the extra flair the loopy one adds to the design. I added some dew drops here and there to enhance the snowy feel. I added the sage piece to an A2 top folding red cardbase using foam squares.

I hadn't planned on bringing pink into the mix again, but it had a way of sneaking back in! LOL! I created another pink stenciled background like I used in two of my cards yesterday because I loved it so much! It accented this design perfectly and gave it just the feel I was searching for!

I created a layered gold bow for this particular card giving it a luxe feel. I also added some white paint splatter to the red panel that is die cut from the Nordic Frames that were showcased yesterday. The sentiment is heat embossed for a crisp, stark result.

My third and final card for today uses the AMAZING new BotaniCuts Pine Bough die. I'm SOOOOO in love with this and I know I will be using it ALL THE TIME! I really wanted to focus in on all of the fun details of these dies, so I kept the design simple.

To begin, I die cut all of the pieces to create two branches of pine boughs and the two sizes of pinecones. I did some ink blending on the pinecones, branches, and needles to give it some extra detail. I added these to a piece of Kraft cardstock that has some white paint splatter {surprise, surprise}. I used liquid glue and foam squares to get them all secured.

I also added another red bow using the same combination of dies that I used on the first two cards. Like I mentioned earlier, this is not necessarily the way they are supposed to be put together, but I love the look that it gives, so I used them this way.

I used a 2 way glue pen on the pinecones and needles and then sprinkled a generous amount of clear tinsel glitter to give it a realistic icy/snowy look. I also added the sentiment, which is from the previously released Tree Trimmings Stamp Set, onto a strip of rustic white cardstock. This is added to the card using foam squares.

A trio of sparkling clear sequins finish off this rustic design. I have only scratched the surface of the possibilities of ALL of these amazing products! My goal for December is to put these all to use to create even more fun projects! I hope you've enjoyed today's post; remember, all of these beautiful new products go on sale on the 22nd! Thanks for fluttering by!