Hello and welcome to day 4th and final day of the Ink to Paper September release! I have A LOT to share with you today; first up is this fun new stamp set it in the "Watercolor Textures" series called "Watercolor Textures: Christmas! I was able to create this custom stamped "wrapping paper" for this tiny gift using the new Tag Creations: Modern Gift die cuts!
I didn't use the tag base that the die collection comes with, but simply cut a piece of white cardstock to the correct size and the used the holly and berries images from the Watecolor Textures set to create the custom wrap! So easy!
I die cut the poinsettias, tag, greenery, and string and added them to the stamped panel using liquid glue and foam squares. The tag is stamped using the "Joy to the World" sentiment that is included in the new Just Sentiments set. I know this one will be getting a lot of mileage this holiday season!
The sentiment at the bottom, which is from the new Inside Greetings: Holiday Magic stamp set, is heat embossed in gold for that elevated look I love for the holidays!
Once that was done, I was able to add everything to the white card base using foam squares.
This would be another fun one to mass produce!
My boys have a Dick and Jane Christmas book and this card reminds me of it so much! There's something so comforting and nostaligic about old-fashioned colored bulbs glowing from evergreen boughs! It reminds me of Christmas past and was the inspiration for this card!
To begin, I die cut an oval using the Geometrix: Oval Die and then stamped the evergreen boughs from the Watercolor Textures: Christmas stamp set. Once that was done, I stamped the light bulbs in the traditional colors for that nostalgic look. I made sure to angle them here and there to give a more realistic look.
I stamped the sentiment, from the Inside Greetings: Holiday Magic stamp set, in the middle using black ink. I added it to a piece of Pinefeather cardstock that measures 4 by 5 1/4 inches that has some inkblending around the edges using Pinefeather ink.
The other sentiment is heat embossed on the Pleasing Envelopes banner, which now has a die collection to go with it! We are all so excited! This sentiment is from the new Cheerful Tree stamp set that was showcased yesterday! The finishing touch is a bright red bow at the top which was die cut using the Tag Creations: Modern Envelope die collection.
This is my final card using these two new sets, but don't forget to scroll to the bottom because I have one more card to share with you! It is one of my favorites from the release!
As you can see, I'm really loving the twine treatment I've been using this release! I love the homespun feel it gives to these cards!
This sentiment is heat embossed in white onto one of the labels from the Tagged and Labeled die collection. I love how crisp it looks against the red cardstock.
I stamped the images at the top and then added some white paint splatter across the top for a snowy feel. I did this BEFORE I added the tag, of course!
A few sparkling clear sequins finish off this card!
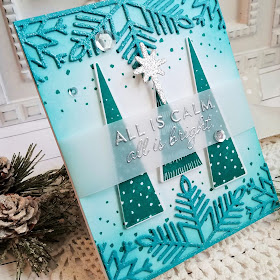
This card, which I mentioned is one of my favorites, uses a new set called Peaceful Forest and is paired with the new Snowflake border that I know you will fall in love with!
To begin this design, I die cut 4 of the Snowflake border pieces and glued two of them together using liquid glue. Once that was done, I smooshed Versamark ink over them and heat embossed them with Shimmer Pearl embossing powder from Nuvo. I love the look it gives any snowy type of project! You can see some cards I made last year with this same technique HERE! Those were some of my favorite cards from last year!
Once those were done, I set them aside and added some inkblending to a piece of 4 1/4 by 5 1/2 inch cardstock using Hawaiian Shores ink. I forgot to mention that the cardstock I used was Hawaiian Shores as well. Please note that when you add versamark and embossing powder to the cardstock, it will darken a shade or two.
I added the scattered snow falling image using Hawaiian Shores ink as well to both the top and bottom. At this point, I added the embossed snowflake borders using liquid glue.
The sentiment is heat embossed in silver on a strip of vellum. It is wrapped around the panel and secured in the back using clear tape.
I die cut and stamped the trees and added them to the panel before I added the vellum. The star is die cut from silver glitter paper and added to the top with foam squares. A few sparkling clear sequins finish this snowy design! Thanks for fluttering by! P.S. all of the new products will be available for purchase on September 15th starting at 10 PM EST!


Beautiful cards. Love them all, especially the first one with the poinsettia.
ReplyDeleteThank you so much, Joann! You're so sweet!
Deletesuch a wonderful collection of cards, with great sentiments! the first is my favorite!
ReplyDeleteThank you, Connie! You're so sweet!
DeleteGreat cards, Kelly!
ReplyDeleteThank you so much!
DeleteThank you so much, Cynthia! You're so sweet!
ReplyDeleteStunning colors and the layout is perfect! Anyone receiving your Christmas cards will treasure them. Super work Kelly!!😊
ReplyDelete