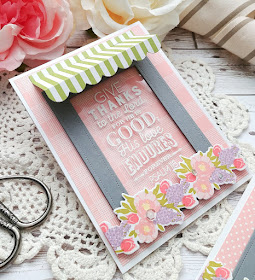
Hello and welcome to this week's Papertrey Ink Design Team Tips! I've got a trio of fun cards to share with you which I am calling "Store Front Window Cards". I had so much fun creating these and I certainly hope you enjoy them as well! My inspiration for today's cards and today's tips came from the new Inspired By Challenge for this week! I unfortunately got my dates mixed up and thought these were both posting the same day, so...you are getting a two for one today! I hope you'll join us for the challenge this week!

As you can see from the awesome inspiration photo that the theme this week is windows. I decided to use some fun elements to create today's cards!
I absolutely love charming stores lining Main Street in any quaint town and especially the fabulous lettering that can be found on the windows! The fonts and layout of the scriptures from the New Every Morning stamp set reminded me of such windows. I took a risk doing some white heat embossing on Clear Cardstock but I was successful. I DO have heat resistent acetate, but wanted to see if this would work. It did warp a little bit, but since I was adhering it to the Pierced Feature Frame, it worked out perfectly.
Oftentimes you will find window boxes bursting with flowers as well, so I thought that the flowers from the Seasonal Borders: Spring would look nicely below the frames to give it just the right touch. I used this same stamp set recently on THESE cards and I just love how the borders turn out.
Of course, the border is a little too long for a vertical card, but I just simply trimmed it to fit. As I mentioned earlier, I adhered the heat embossed acetate to the back of the frame that is die cut out of Weathervane cardstock. I used 1/8 inch scor tape for a secure application.
Once that was done, I adhered the frames to a piece of 4 by 5 1/4 inch Bitty Big: Pale Peony pattern paper using foam squares to give dimension. I really wanted them to look like windows. The flowers are adhered with even more foam squares to give the illusion of them growing right under the window.
The addition of the awning is just so fun! When I was originally thinking of how I would execute these cards, I didn't think of the awning right away, but when the light bulb went off, I was hoping I could pull it off. I knew there was an awning die included in the Make It Market: Market Street and I was thrilled to see that it worked perfectly! It is meant to be used in conjunction with the included stencil, but I found that the Bitty Big: Green Parakeet striped pattern paper was perfect! No, the lines don't match up perfectly, but I think it still looks awesome!
I used a combination of different stripes for the awnings and a few different pattern for the backgrounds as well to really give these cards a fun feel! The awnings will fold flat for mailing, but since they are scored, the recipient can do some quick fluffing and have them pop up in no time! Or...you could hand deliver them as well! It's totally up to you!
I finished off the cards with a trio of sparkling clear sequins nestled in the flower borders form some shine! I have all kinds of new ideas to add to these cards so stay tuned for a future post! Thanks for fluttering by!


Kelly, Your creativity is flowing on these designs! I love them!
ReplyDeleteThank you so much, Ruth! You're so sweet!
DeleteWhat a beautiful window you created Kelly! I'm going to try this too!
ReplyDeleteOh yay! I'm so glad you like them! Thank you so much!
DeleteThese are gorgeous cards, and love all the Christian sentiments!!!
ReplyDeleteThank you so much, Colleen! You're a dear!
DeleteThese are totally adorable! What a clever idea to use the seasonal border as a window box. The awning is the perfect finishing touch on this too cute card!!
ReplyDeleteThank you very much, Birgit! I appreciate you stopping by and leaving such a sweet comment!
DeleteOh, Kelly, what a gorgeous cad, and I just love this stamp set. Love the inspiration you've given me to use it more creativity. Hugs!
ReplyDeleteThank you so much, Cheryl! I appreciate you stopping by and leaving such a sweet comment!
DeleteOh my...LOVE these Kelly!! Think I need to go make some of my own...thanks so much for the wonderful inspiration!! :0)
ReplyDeleteThank you, Marcia! I'm so glad you like them!
DeleteCompletely adorable, Kelly!! Love your projects!!
ReplyDeleteThank you so much, Teresa! I appreciate you stopping by and your sweet comment!
DeleteWow, how gorgeous and clever. Love them!
ReplyDeleteThank you so much, Barbara! Thank you for stopping by today and your sweet comment!
DeleteHi Kelly ! To me, this beautiful card is classic Kelly. Always thinking outside the creative box. I could look at window fronts all day and never come up with a lovely card like you did. I can’t wait to give your idea a try. ALL my thanks!!! :)
ReplyDeleteAwww...thank you so much! What a sweet comment! ❤❤❤
DeleteThank you, Cynthia! You're so sweet!
ReplyDelete