It's release day! Yay! The Garden Party Collection from The Greetery will be available for purchase today beginning at 10 am EDT! I have a bonus project for you today, PLUS a little tutorial on how I made the tea box favor a few of you asked about! You can find the new collection HERE!
Tea for two in the atrium, please! ha ha! My card for today features quite a few of the new products, but shaken up a bit to see them in a new way or with different possibilities! To begin, I used the new Atrium Hot Foil using silver foil on Kraft Gray cardstock. I also had a leftover wisteria branch from yesterday, so I added it to the top of the card using foam squares.
I used the pigment powder method on the two teacups that Betsy shared in her video on day 1. I added some Aqua Mist ink over the top to color the two teacups.
I just HAD to add another sandwich from the Fancy Finger Foods die collection; they are seriously so much fun....much more fun than making real sandwiches! ha ha!
I added some lemons from the lemonade stamp set; just perfect to tuck inside the tea cups! The sentiment is die cut and then stamped using the Brew-Tea-Ful stamp set.
You can see some of the details a little bit better with this close-up photo!
I had a few of you ask how I made the little tea favor box from day 1. It's SO easy and one of my go-to box styles for quick and easy packaging. Here are a few different shots to give you an diea of what the sides look like. This box holds 4-5 tea packets....there is 5 inside the box when I took the photos.
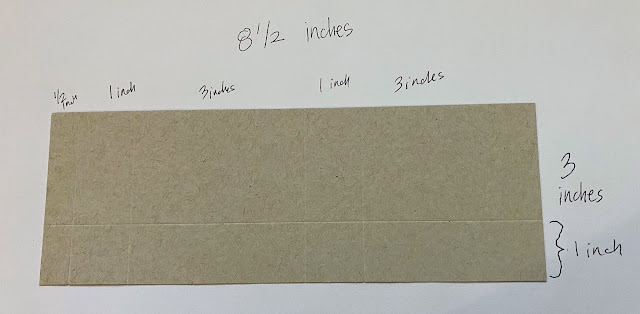
I cut a piece of Gray Kraft cardstock measuring 8 1/2 by 3. Score it at the intervals I've shown. The front and back are 3 inches and the sides and bottom are 1 inch. You will be left with a 1/2 inch 'tab' that you will use to add adhesive.
Use your bone folder and make all of the score lines crisp. Cut from the bottom up to the solid horizontal score line on each of the vertical score lines. Remove the portion that is shown in the bottom left corner.
You can see it a little bit better in this photo.
Add a piece of ScorTape to the 1/2 inch tab.
Add another strip to the INSIDE bottom flap.
Adhere the 1/2 inch tab first and then fold up the bottom and secure with the ScorTape. I found THIS old tutorial that you could use as well for something different, but using all of these fun new tea stamps/dies!
I gussied up the outside with another tea cup that was made using the exact same technique as the two on today's card. I tucked in some extra lemons for some added detail!
Here is the link for the new collection: Garden Party Collection! Thanks for fluttering by!


LOVELY WORK,Kelly! THAT is EXACTLY what I thought when I saw your card, "Tea in the Atrium!" LOL And THANK YOU for the tutorial on the little Tea Box you made as well! STUNNING WORK!!!! & WHAT A SUPER RELEASE!!! ;)
ReplyDeleteStunning work Kelly!
ReplyDeleteLove how you put everything together.
You seem to think of everything.
Thanks for your lovely inspiration.
Oh how Very pretty! I went back after the release and was trying to study how you made your tea box. That for sharing Kelly. Anyone ever tell you that you’re Very Talented? 😊 Have a nice weekend.
ReplyDelete