Well friends, it's day 2 of full reveals for the Hip Hip Hooray collection from The Greetery! I think you're going to be thrilled with the new products being showcased today; they are, in my opinion, squeal worthy! I have three cards to share with you using the featured products for today. Please head to The Greetery Blog for the official "meet and greet" for all of today's products! To be eligible to wink one the 4 prize giveaways for today, make sure to leave a comment here and on each designers' blog along the hop!
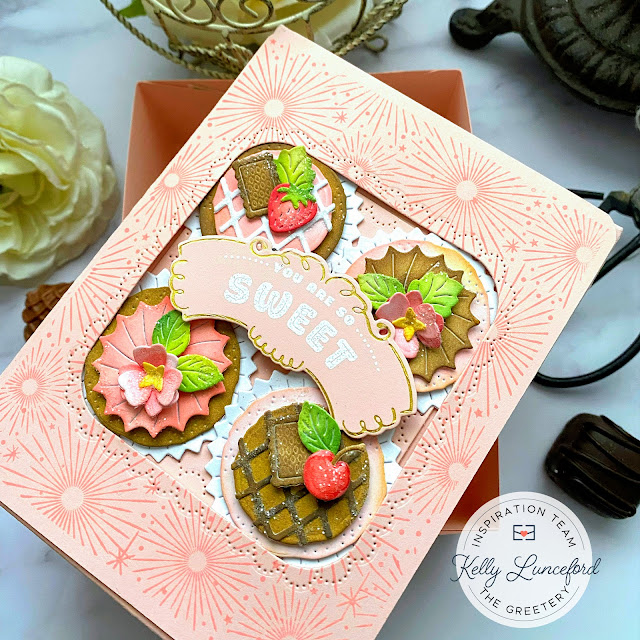
My first card for today used the FABULOUS new Hey Cupcake die and the new Sweet & Fancy Labels stamp set, die, and hot foil! These are all just THE cutest and I know I will be reaching for them often! I actually can't wait to get creating even more cupcakes!
For this card, I chose to make two chocolate, one lemon, and one vanilla or spiced cupcake for a good mix!
The die collection comes with a "base", which technically is supposed to be the top of the cupcake, but since you look at these from an aerial view, the top of the cupcake it actually the bottom! ha ha! Anyway, there are also a few different icing options, flowers and leaves, a cherry and strawberry, etc; the possibilities are endless!
The die set also has the cupcake liner; I chose to die cut mine from pattern paper for some added whimsy. I'm personally obsessed with cute cupcake liners, so I obviously HAD to use pattern paper!
I hot foiled the fancy label, die cut it with the coordinating die and then stamped the sentiments using the Sweet and Fancy Labels Stamp Set. There are a bunch of options that transcend beyond birthday so you can use this collection for many different occasions. I also used the new Window Dressing Dotted Scallop die. This allows you to achieve the look of cupcakes in a box. I didn't want to hide the cute cupcakes underneath the box, so mine isn't accurate, but I just did what I liked! ha ha!

My second card uses the new Gifts Galore suite of products. I used the Gifts Galore Hot Foil plate with different colors of foil and on different colors of cardstock. Please note: there is a coordinating Gifts Galore stencil so you can simply hot foil on white cardstock and then use the stencils to make your presents any color you like. I think I jumped in head first when starting this card, and didn't even think about the stencils! I can't wait to use them on another card!
The new Gifts Galore suite of products coordinates with the previously released Curio: Divider and Details II die. I used it to die cut the presents, but then used the AMAZING new Hidden Messages die over the top of panel stamped with the Sparkler Background that was showcased yesterday, to cut out the different windows. If you love Lift-the-Flap books, you're going to love these dies! Here you can see that I die cut three windows using the three different sized dies. Once they were cut, I added the die cut presents over the top using foam squares.
I used different sentiments that are included in the Sentiment Suite: Birthday sentiments set. You could also tuck cash, different images, etc. underneath the flaps, but I just chose to use sentiments on this card. I gussied up the hot-foiled presents using the bows and tags that are included in the Gifts Galore die set. The bows just make the presents so darn cute! I heat embossed a sentiment from the new Tear Strip Tags: Birthday stamp set onto Raspberry Fizz cardstock using white detail powder. I die cut it using the Tear Strip Tags Die and then used the cute new Tear Strip Tags Toppers die for the cute detail on the end. This card was a lot of fun to make, but I also can't wait to try using the stencils!
Last, but CERTAINLY not least, is the GORGEOUS new Takes the Cake stamp + stencil, Banner die, Stand die, Floral Details die! I'm obsessed and I barely even scratched the surface of possibilities with this one! I had so much fun bringing this floral cake to life!
To begin, I used the stencil set to create the cake portion; I knew I was going to die cut the cake stand so I didn't do any of the stenciling for that. Once it was all stenciled, I used the coordinating Takes the Cake stamp set to add the remaining leaf detail.
I layered it onto a white cake base that was also cut using the die set using foam squares. In hindsight, I would have die cut it first and THEN stenciled. I will have to try it that way and give you my opinion on what works best!
There's a couple different options for the banner; I simply die cut it from white cardstock, added the ink blending and then stamped the sentiment. There is, however, a coordinating banner stamp in the Takes The Cake stamp set that you can add color that way as well!
I die cut the cake stand using the Takes the Cake Stand die from specialty gold paper and then glued it to white cardstock for stability. I absolutely love how it looks and wish that I had a real one to use for celebrations! I know that many of the other designers used more of the details like candles, and the different layers, so you'll fortunately be able to see lots of options today! I kept mine simple and sophisticated, but I can't wait to go crazy with the different choices! Thanks for fluttering by!


