Saturday, July 30, 2022

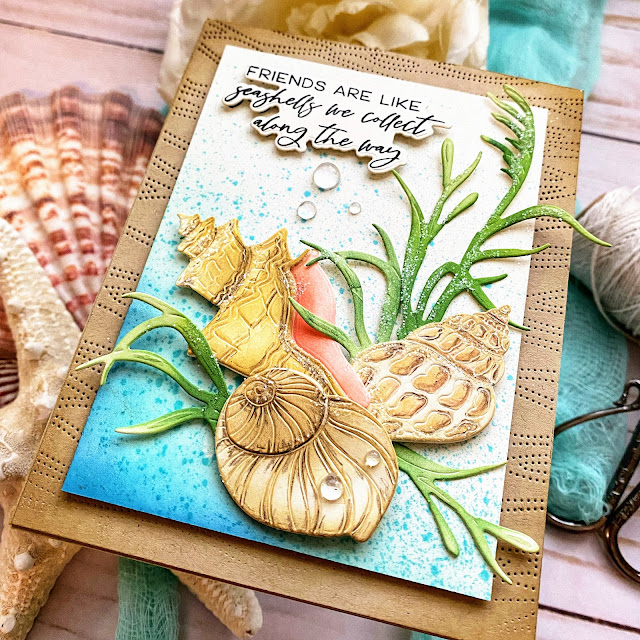
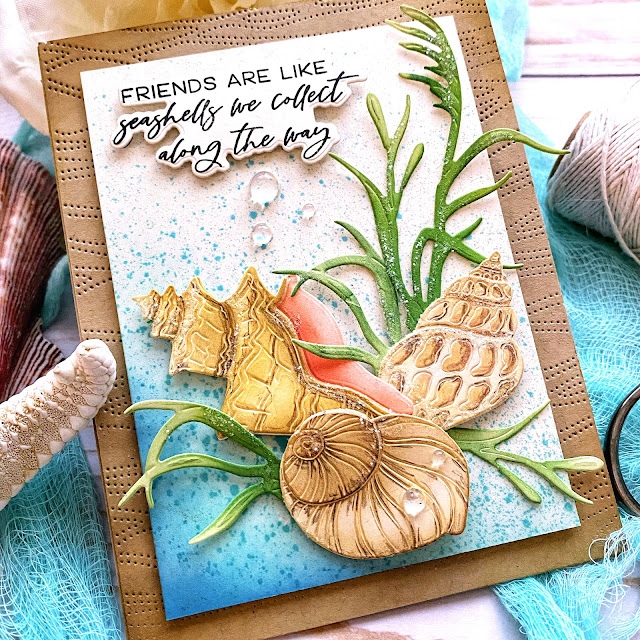
Friends Are Like Seashells....

Hello friends! I treated myself to a few goodies from the latest Honey Bee Stamps release and couldn't wait to start playing! I decided to use the new Lovely Layers: Seashore dies first paired with the new Seas The Day sentiment stamp set.  I had so much fun coloring these beautiful layered shells!

To begin, I die cut all of the pieces for the three shells and the sea grass. I colored the grass using Twisted Citron, Mowed Lawn, and Rustic Wilderness Distress Oxide inks. I actually ended up using two clusters of the grass, but torn into different pieces so I could use them here and there as I liked.

The shells got just a hint of ink and then the rest of the details were enhanced using an assortment of  different colored pencils! I really like the deeply etched lines so you can let the pencil easily fall into the grooves.
I cut a panel of cream cardstock and added some Vintage Patina and Unchartered Mariner Distress Oxide ink in the bottom left corner and then spritzed it with Vintage Patina Distress spray. I adhered the shells onto the panel using foam squares and then tucked the grass bits here and there until I was happy with the arrangement.

I had originally stamped the sentiment directly onto the panel, but it stamped a little uneven, so I decided to use the coordinating Seas The Day Honey Cuts so I could cover it up with a new stamped/die cut sentiment! ha ha!
I also die cut a panel of Kraft cardstock using the Waves Pierced A2 Cover Plate and added it to a top-folding A2 card base. I used a bit of Walnut Distress Oxide ink around the corners for contrast. I layered the focal panel onto the cardbase using foam squares. A bit of glitter and dew drops finish off this fun sea-inspired design! Thanks for fluttering by!
P.S. I bought a few more things from this release, so stay tuned for more inspiration!


Friday, July 29, 2022

A Very Wonderful and Happy Birthday

You may have seen this card on the @papertreyink Instagram page the other day, but I wanted to post it here just in case anyone wanted a few details on how I created it! It was one of those crafty sessions where I wasn't headed in any clear direction, but just had fun playing with this and that!


To begin, I die cut a panel of Kraft cardstock using the Cover Plate: Trellis Die (back in stock) and then glued it to an A2 panel of Kraft cardstock for a tone-on-tone look. As you can see, I left the smallest little centers in some of the pieces of the Trellis background. These ones don't come out easily and I don't poke them out because I like how it looks AND it gives me additional places for liquid glue so it is glued securely! ha ha!

I also die cut a Vintage Cream frame using the Border Bling: Skinny Dotted Frame. Once it was cut, I added some Classic Kraft ink around the edges using a blender brush. I, unfortunately, needed to buy a new Classic Kraft ink pad; remember when I was so excited about ink blending with metallic gold ink for THIS card? Well, I used my brown blender brush and when I put the brown blender brush into my Kraft inkpad, it still had metallic ink on it and ruined both the pad AND the brush! So, the lesson to be learned is that you need to keep a brush exclusively for metallic inks! ugh! Oh well.....live and learn! 

I used the Border Bling: Skinny Postage Frames for the focal image; I die cut it from Vintage Cream cardstock and then had fun gussying it up! I used the newer Vintage Postage Stamp Set
for the large birthday sentiment (stamped in black) and then the top right portion. The circle outline is from the newer Penciled Outlines stamp set; these elements are all stamped in Weathervane ink.

 I used the versatile Stencil Basics: dots Stencil Collection to add some light polka dots here and there on the focal panel; I love the soft detailing that it adds to the overall design.
As I mentioned earlier, I didn't really have any set ideas on how this was going to turn out, so I rummaged around in my "leftover" pile and found this beautiful bloom that was created using the Into the Blooms II die collection (also back in stock). I love how it looks like a real postage stamp!

I used one of the beautiful new photo corners included in the Vintage Blooms die collection and glued one on each corner using liquid glue. I also die cut a vellum circle using the Love to Layer: Scalloped Circles and glued it behind the focal panel for additional softness! 

For not knowing where I was headed, I really like how this card turned out! I actually made another version while I had everything out, but I used the Inspired: Lord die and the Inspired: Lord Mini Stamp Set for the focal panel and a few more blooms framing the sentiment. I had to get it off to a camp to thank a speaker who would be sharing her story with the youth of our church (their theme this year is Trust in the Lord) so I didn't have time to take pictures (which I'm really bummed about)! Anyway, I think this particular layout works so well for many occasions, so I thought I'd at least type out what I used so your creative juices could start flowing if you wanted! ha ha!
Thanks for fluttering by!


Thursday, July 28, 2022

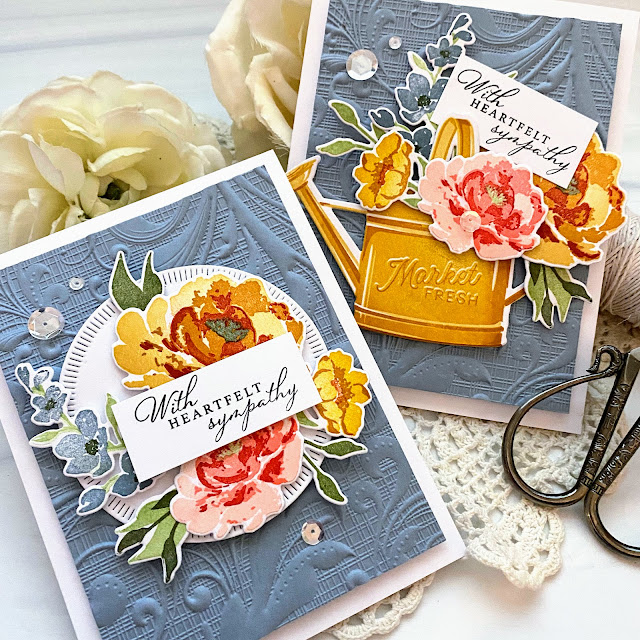
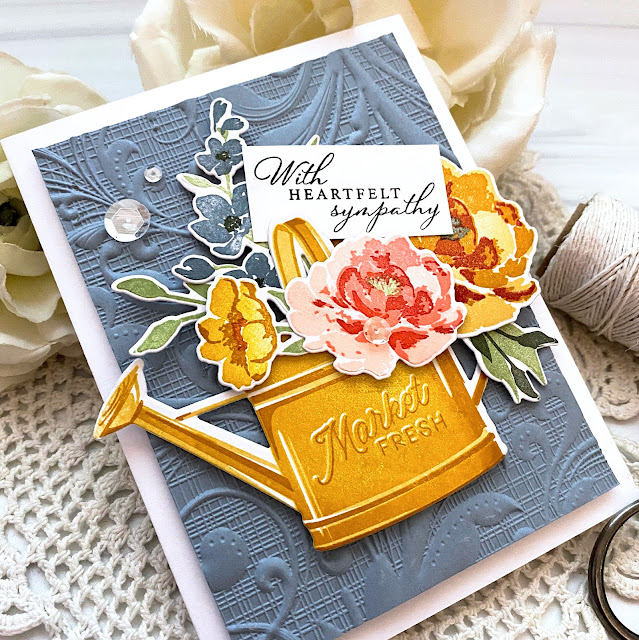
The Greetery {With Heartfelt Sympathy}

I have a really bad habit of making sympathy cards that cannot be mailed, yet I generally NEED to mail them! Even though I have a nice stash ready to go, I really needed two that could be mailed! It's been a minute since I used the Fleur Impressions stamp set from The Greetery, so I pulled it out and had some fun inking up the beautiful blooms!

I hadn't decided on a particular color scheme, so I just started adding and layering ink until I was happy with the result. These are all SU! ink pads, which I am finding myself reaching for more and more. They have been neglected for YEARS, yet they have the most prominent and accessible location on my desk, thanks to the fabulous carousel I bought back in my demonstrator days! They are still so juicy and nice, so I may as well use them, right? I still have all the coordinating cardstock as well (thank you crafty hoarder self) ha ha!

Anyway, I'm rambling....once I had the first, larger bloom inked, I decided to go for warm oranges, ruby, and blush hues for the blooms, but then switched gears for the Bordering Blue tall cluster of flowers. Since these two colors are on opposite sides of the color wheel, you are pretty much guaranteed success!


Both cards feature the same embossed background; I cut two pieces of Bordering Blue cardstock measuring 5 by 3 3/4 inches and embossed them with the Regency Swirls embossing folder; this was included with my Gemini Jr. when I got if for Christmas a few years ago. Because it is so deeply detailed, it made the cardstock very floppy so I adhered each panel to a white piece of card stock that is cut to the same size.

I went rummaging in my "leftover" pile and found this beautiful, yet wonkily cut, watering can! I thought with some strategic flower placement I could make it appear less wonky! ha ha! The recipient of this card is old and doesn't have the best eyesight, so I felt I'd be safe! Now I just need you all to be forgiving, too! LOL!

I used my favorite sympathy stamp set and tucked it up top! I added a trio of sequins and skipped glitter, like I normally would use on a floral design like this.
I also found this die cut circle in my leftover pile so I figured I'd use it as well. I simply clustered the flowers and leaves together and placed the sentiment over the top.

Both focal panels are added to white cardbases using foam squares. I tried hard not to use too much dimension, so hopefully these can still be mailed after all that! ha ha! Thanks for fluttering by!


Sunday, July 24, 2022

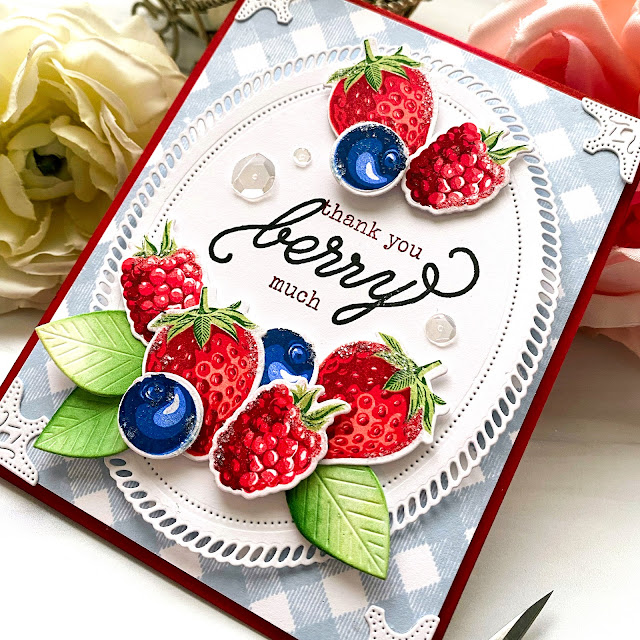
Thank You Berry Much!

I guess I'm on a summer food-themed creative spree! ha ha! I just really enjoy soaking up all of the delights of summer and delicious-looking berries (stamped and real) are at the top of the list! There is something about gingham and berries that go so well together, don't you think?  I've always been so enchanted by the multi-step stamps that have such realistic looking results! I bought the Berry Bliss stamp set and Berry Bliss dies last year and made a few tags using the cherry image, but for today, I chose to use JUST the berry images for something "berry" sweet.

I had quite a few berries already die cut from last year; I kept the dies wired together, but since I only used the cherries, I had a lot of extra pieces. I was pleased with myself that I had them all ready to stamp! I chose a hodge-podge assortment of ink pads to get the desired results I was hoping for.


I'm fairly certain I didn't ink up the last step of the raspberries correctly, but I think they look ok! Once I had all the berries inked and ready to go, I switched gears to the background.
As I mentioned earlier, there's something vintage and wonderful about gingham paired with fruit, don't you think? My favorite gingham background is the Gingham Background Stamp from Concord & 9th; I inked it up in Spring Rain ink!

I grabbed the Shape Shifter Oval 2 die to use as the focal panel for the sentiment and berries. At this point I realized that I have never clipped the wired edges as cleanly as they should and I didn't want those pesky indentations that occur without clean snips. Once I did that, I must have left a tiny shard of metal that went directly into my right thumb (I'm right handed) and it became impossible for me to remove! Can you believe that I tried to use a Misti magnet to coax it out? ha ha! It didn't work! Needless to say, I had to abandon my creative session and get to work removing the metal sliver! Have you ever tried to remove a sliver from the thumb on your dominant hand with old eyes? ha ha!

I was finally able to revisit my project a few days later, but because I'd come so far, I only needed to add the sentiment and a few extra details! I added photo corners to the edges of the gingham panel. I used the beloved Berry Patch Sentiments stamp set to stamp the "thank you berry much". 

I arranged the berries here and there around the bottom of the sentiment and a trio at the top! I added a few die cut leaves to add extra texture, detail, and interest to the design. I added some glitter and sequins for sparkle and shine; the berries look like they're ready to be baked in a pie!
I had a few berries left over so I made a coordinating tag; something quick to accent the card! I'm sure I'll find something berry-themed to give as a gift and the tag will be perfect!

I added the entire gingham focal panel to a top folding A2 Pure Poppy card base using foam squares. I also added a bit of Scarlet Jewel ink around the edges to give it a little bit of depth and contrast. This was such a delightful card to create, despite my annoying injury! I hope you have a fabulous day! Thanks for fluttering by!


Saturday, July 23, 2022

You Are So Cool!

Summer is obviously in full swing and so is the popsicle consumption around here! It has been SO, SO hot the past few weeks, so a cool treat in the afternoon is the perfect thing! I'm summer-card obsessed, so when I saw the new Sweet Summer Dies and Sweet Summer Stencil Pack from Concord & 9th, I just HAD to have them! They arrived during the PTI release countdown, so I didn't have time to play right away, which was torture! I finally pulled them out to create this fun, citrusy card!

I felt that the impact of two pops on one card would be much greater, so I did some ink blending on a standard A2 panel of white cardstock; I chose Squeezed Lemonade, Twisted Citron, and Spiced Marmalade. I was able to die cut two popsicles from the one panel, which was awesome! I also die cut two "sticks" and colored them with ink as well.

Once they were die cut, I was able to add the citrus slice pattern using the stencils. I used Mowed Lawn, Abandoned Coral, and a heavier hand with the Spiced Marmalade to achieve the look I was hoping for!
The background is created with the Bubbly Stencil; I bought this to use with underwater/sea cards, but I thought it worked so nicely in the background with the pops!

I opted not to get the sentiments that go with the popsicle dies, but decided to make something custom using alphabet dies and selectively embossing the "You are so" portion of the sentiment. I simply die cut the letters from the leftover blended panel. I also die cut each letter from white cardstock so I could glue them together; it helps since I added the Nuvo Cyrstal Glaze over the top! I also die cut a few leaves and tucked them here and there for aded detail! I also added some dew drops and glitter for sparkle and juicy detailing! Thanks for fluttering by!


Thursday, July 21, 2022

The Greetery {You've Been So Kind}

A friend of mine reached out to me a few week ago asking if she could purchase 20 thank you cards; I told her she could simply HAVE the cards. I love layers, so many of the cards in my stash aren't easily mailed so I thought I'd sit down quickly to add a few more to the ones I thought would suit her needs. Since I've been in the middle of the latest PTI release, I felt like creating, but I didn't necessarily feel creat-IVE, if that makes sense! ha ha!

Cue the Print Shop: Spring Mix Stamp + Stencil; the perfect thing to reach for when your creative juices have run dry but you want to make something! The only decisions that need to be made are what color combinations you'd like to use! In fact, you're probably thinking to yourself that you've already seen cards like this from me; so true...this is one of those posts mostly for me!

Because my friend wanted to be able to mail her cards,  the only portion that is popped up with foam is the "You've been so kind" portion of the sentiment. Unfortunately, I lost my Embossing Buddy (anti-static tool) when I made one of my release cards the other day so I fear there is quite a bit of stray white embossing powder on the strips! ugh! Hopefully my little buddy shows up soon and didn't end up in the depths of the bin!

I've said it on more than one occasion and I'll say it again: this stamp/stencil combo is SO ADDICTIVE! I literally want to stop typing and go make another stack of cards! If you're interested in a more in-depth "how to", you may get your questions answered HERE. Thanks for fluttering by!


Wednesday, July 20, 2022

Papertrey Ink July Release Countdown Day 4

It's seems like the countdown has just whizzed by, doesn't it? I can't believe we're on the final day! I have two cards to share with you today that I'm really excited about! Both of these cards were a joy to create and I think you're really going to love the products that are being showcased today!


Up first is this autumnal harvest card that features the new Cornered: Wispy Tree dies! I ended up not snipping the dies apart and used them together on both sides of the Dark Indigo panel. I die cut it first using the Love to Layer: Notched Die from both Dark Indigo and Kraft cardstock. I used the Cornered: Wispy Tree dies ( still wired together) on the top and bottom of the panel and then glued the blue one on top of the Kraft panel.

At this point, I fitzed and fussed over what to do and then I remembered the extra Country Handbasket Die I had made when it was first released! I knew it would be the perfect thing to accent the die cut panel AND to hold some of the flowers and foliage from the new Spruce and Sprigs: Fall that was showcased on day 1. 

Believe it or not, there is a small oval from the Love to Layer: Oval die collection underneath the basket! I really thought the edges might show, but I got a little carried away filling the basket with all of the cute stamped images!

I heat embossed one of the sentiments from the new Inside Greetings: You're on my Mind stamp set. I really wanted to use this particular sentiment from the set as opposed to some of the other smaller sentiments so I chose to use vellum so that the die cut tree could show through. I layered the entire panel onto an A2 Honey Nut card base using foam squares.

Now for something a little bit brighter and summery! This card features the smaller of the two new stencils included in the Dotted Hexagon Stencil collection. I was inspired by a bathroom design that features hexagon tiles, a basket of Eucalyptus, and a floral shower curtain using these hues.

I think I mentioned on day 2 when we showcased the new Eucalyptus Elegance stamp set that I envisioned the branches with the Effortless Beauties stamp set; I was right....a match made in heaven! I have to admit that Effortless Beauties is my favorite floral stamp set from PTI right now!

I stenciled the background panel using black ink; I set it aside and die cut and stamped ALL  of the flowers and foliage. I die cut the medium size oval and stamped yet another sentiment from the new Just Sentiments: You're on my Mind stamp set in the middle. I adhered it to the stenciled panel using foam squares.

I arranged the leaves and flowers here and there using foam squares and liquid glue. Once I was happy with the arrangement, I added the "a loving hello" portion of the sentiment, which is included in the Effortless Beauties set, and glued it strategically between the flower and the leaf.

I added a trio of sequins and a generous amount of glitter before adhering it to a Soft Stone card base using foam squares. 
This concludes the countdown and everything will be available for purchase tomorrow at 10 PM ET! Thanks for fluttering by!


Tuesday, July 19, 2022

Papertrey Ink July Release Countdown Day 3

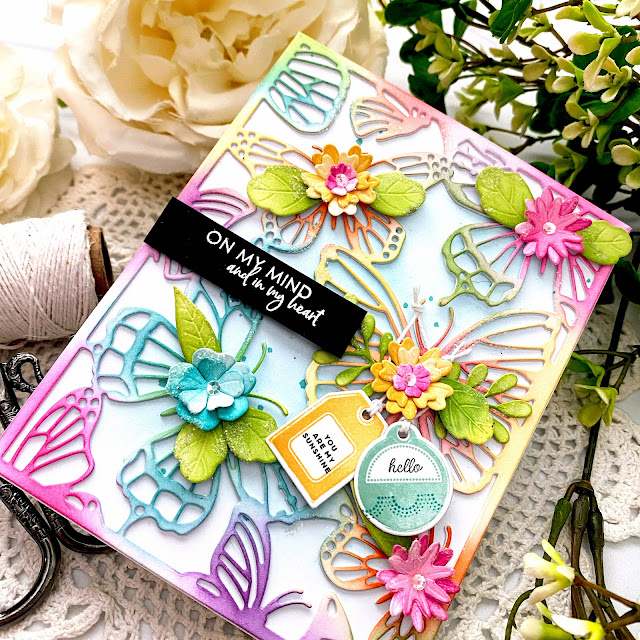
As promised, things have gotten a bit more colorful for day 3 of the Papertrey Ink July release countdown! Up first is this fun and vibrant butterfly card using the new Cover Plate Flutter die paired with the cute new Tag Its: mini stamps and dies! I had a few different design ideas in mind for this new Cover Plate, but eventually settled on something bright and cheerful!

 I die cut it twice from white cardstock (my white cardstock order arrived in the nick of time) ha ha! and then I glued them together using liquid glue. Once that was done, I simply used residual ink on my blender brushes to apply all of the different colors. Once I was happy with the colors and saturation, I set it aside and got to work on the cute tags. I originally only planned on using one tag, but once I got started, I wanted to stamp ALL of the tiny tags. There are quite a few different shapes, patterns, sentiments; the design possibilities are endless. I always adore the way Melissa Phillips uses cute little tags so I'm excited to use these!

I heat embossed the sentiment using white powder on a strip of black cardstock. I'm slightly obsessed with the Sweet Celebration Die so I inked up a few flowers and leaves to accent the bodies of the butterflies; love how cute and whimsical they look!

The background was created by simply adding some Aqua Mist ink on a white panel and then I added some Hawaiian Shores ink splatter for added interest. I layered the butterfly panel over the top! The tags are hung around the flower using crochet thread. I secured them at an angle using foam squares.

My second project for today uses the new Crafting Queen stamp set; there are so many cute and fun crafting supply images and everything works so well with the previously released Baseball T die

I didn't use the pocket that comes with the die collection but decided to use the circle stencil that is included in the Special Guy Stencil Collection to anchor the sentiment. There are quite a few different sentiments included in the set to give you different options depending on who you are creating for!

This particular ensemble is headed to my backyard neighbor for using her Cricut magic to make some custom vinyl letting that I need for a community float I've been helping build! I thought I'd use the T-shirt as a tag for a goodie and then I can write my thanks in the card.

This card uses the new Flutter Frame die, so it gives you the center to design how you'd like. I chose to use it to highlight one of the cute sentiments. I had a few flowers left over from the first card so I added a few here and there.
Tomorrow is the 4th and final day of the countdown and everything will be available for purchase on Thursday at 10 PM ET.
Thanks for fluttering by!