I can't believe we're halfway through the June Ink to Paper release countdown! I'm sharing quite a few projects with you today using some super fun products that you're sure to fall in love with!
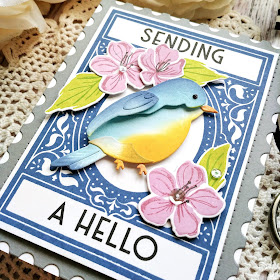
This first card features some of my favorites of the entire release. There is a fabulous new stamp set with a coordinating sentiment set called Vintage Postage and Vintage Postage Sentiments! I know this one will be used again and again! I can't wait to create some Christmas cards with it! I also used the new Border Bling: Postage Frames, which you will be seeing a lot more of!
The bird is from a new die set called Feathered Friends 1 die. This was so fun and easy to create. I die cut it out of white cardstock and then used Distress Oxide inks to add some inkblending to the pieces. I also added a bead of Nuvo Crystal Glaze on the eye for some realistic shine and dimension.
I also used some foam squares on the head piece as well as the wing portion to give the bird some added depth. The other pieces, like the belly piece and the beak and feet, are adhered using liquid glue.
I colored the eye using a black Sharpie marker and then added a white dot using a gel pen. Once that was done, I added the Crystal Glaze and let it dry.
The Postage Frame is die cut from Weathervane cardstock and adhered to a top folding A2 card base using a tape runner. The actual postage image is stamped in Faded Jeans Distress Oxide ink to match the bird. I love the crisp impression I get with this type of ink.
I had a few flowers left over from my next card I'll be showing you, so I added them around the bird to set the scene! Honestly, it looked good without the flowers, too, if you're needing something quick. The "Sending" and "a Hello" sentiments are included in the Vintage Postage Sentiments.
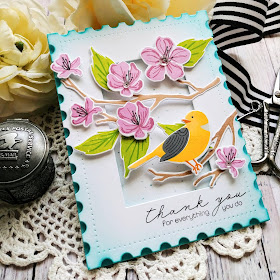
My next card uses another sweet little bird and sentiment! These are both from the new Feathered Friends 1 Mini stamp set. This bird was just begging to perch on these Blossoming Branches.
This card also features the new Border Bling Postage frame, but this time I used it as an actual frame. I added some Hawaiian Shores ink around the edges and added some ink splatter as well.
I stamped the "thank you " sentiment in black directly onto the frame for visual movement.
The birds are squawking at each other like crazy lately. I think the babies have been born and they're all a little on edge! LOL! I had the window open while I was creating this card and I was definitely feeling the bird vibes! ha ha!
Next up is something a little more masculine feeling! I chose to use two of the birds for the focal point to make a bigger impact.
I layered them onto a heart that is die cut using the Limitless Layers Hearts that has been stamped with the Background Basics: Birch Stamp Set. I layered that onto a panel that was die cut using the new Border Bling: Skinny Postage dies. There are 3 sizes and these cut both the outline and the center portion.
I stamped it with the fabulous Nifty Plaid Stamp Set in Fresh Snow ink. I added the white frame around it for contrast.
The Hello there sentiment is also from the new Feather Friends stamp set and is arced to fit inside the banner. I only used one banner this entire release...are you proud of me? LOL!
I added some white paint splatter for additional detail. I covered up the birds using a post-it note, but didn't cover the sentiment like I usually do...well...that was a huge mistake! The white paint was like a magnet to it and looked like the birds had been perched there for some time, if you know what I mean! LOL! I ended up having to fix the sentiment, but it was an easy fix! I thought you all might like a little chuckle today!
I'm sharing one last card using the Vintage Postage stamp set, this time for a fun birthday design. I stamped it in Berry Sorbet ink to coordinate with the die cut pieces from the fun Sweet Celebration Die set. I also used the coordinating Sweet Celebrations Mini stamp set to heat emboss the candle image.
I die cut all of the pieces out of white cardstock and then did some inkblending on each piece to get the varied shades of color. As I am looking at this photo, I'm noticing the shocking lack of crystal glitter! Woops! I guess I forgot to add it! That will DEFINITELY need to be done before it heads to its recipient! ha ha!
I did, however, die cut the cupcake liner from Bitty Big: Harvest Gold pattern paper and added some shading around the edges.
I used the Vintage Postage sentiments for the Happy Birthday sentiment stamped in black. This was such a fun card to make and will be headed to a special birthday girl very soon! I hope you've enjoyed today's countdown! Thanks for fluttering by!


these are gorgeous, love the dimension in them!!
ReplyDeleteFantastic card ideas, Kelly! You are a whiz at card creations and very inspirational! Thanks
ReplyDeleteVintage postage + birds + You = the most delightful cards!
ReplyDeleteMarisela Delgado said: Girl, you are AWESOME! You always rock it! mariandmonsterd@yahoo.com
ReplyDeleteoh my gosh - your cards are absolutely stunning. I could sit here all day looking at all your creations - drooling over them. YOU ARE AWESOME just as someone else commented. Definitely a fan now...so glad I visited here!
ReplyDeleteHi Kelly, hope you’re having a nice Sunday! When I first saw your yellow bird I was so excited. I have a picture of a bird very similar to the yellow one, but in different colors against a black background. I’ve been wanting to recreate it for a long time. Can’t wait to try!. Your post with all of your beautiful designs is just amazing, including attention to every detail. You’re a real talent, thank you for the never ending inspiration! 😊
ReplyDelete