Hello and welcome! I'm so thrilled to be here today sharing this special post with you! I'm on the Spellbinders Blog today, which is such an honor, sharing three different series of projects using these amazing new dies by Sharyn Sowell. I'll be sharing everything here as well so thanks for joining me today!
My first project features the Shapeabilities Starry Forrest Etched dies. I wanted to create a night time scene with the animals and trees in silhouette.
I cut a panel of white cardstock measuring 4 by 5 1/4 inches and then added some Faded Jeans Distress Oxide ink around the edges using a blender brush. I kept it light around the bottom and the center to create some illumination. I gave it a nice coat of Shimmer Spray for some winter-y sparkle! I added the sentiment, which is from the Penned Elegance stamp set, stamped in black ink using my Mini MISTI. The trees and bunnies are die cut two times each and glued together using liquid glue for stability. I adhered them to the blended panel using foam squares. I added some white Nuvo drops here and there to make it look like falling snow!
This card was created in the same way but I chose a horizontal layout and stamped the sentiment in the right corner. The animals are all die cut twice, just like I did on the first design.
I added a few sparkling clear rhinestones here and there to mimic the look of stars. I had so much fun on both of these similar, yet different designs. I love creating serene and peaceful designs that also capture what the season is really about!
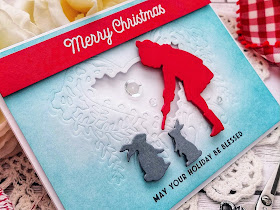
My second project uses two of the new dies; the Shapeabilities Winter Friends Etched Dies paired with the Shapeabilities Peace on Earth Etched dies. This project is probably my favorite of the series and I hope you like it as much as I do!
To begin this design, I blended Tumbled Glass Distress Oxide ink around the edges using a blender brush, making sure to leave the center light. Once that was done, I used the Shapeabilities Peace on Earth Etched Dies and embossed the design, rather than die cut it using an embossing mat in my die cutting machine. I stamped the "may your holiday be blessed" in black ink at the bottom.
After that was done, I used the die that cuts out the center of the heart. This set a perfect scene to add in the sweet little girl and the pair of bunnies. Each one is die cut twice and glued together using liquid glue. I added them to the embossed/die cut panel using foam squares.
The "Merry Christmas" sentiment, which is from the Sentiment Staples: Christmas, stamp set is heat embossed in white onto a red strip of cardstock and adhered to the top of the card using foam squares. I added a trio of sparkling clear sequins here and there for some sparkle and shine!
My final project uses the Shapeabilities Love Came Down Etched die to create this intricate card. I die cut it twice out of white cardstock and glued it together using liquid glue.
Once that was done, I added some selected ink blending to the rose, the green vines, the angels, and the baby Jesus and hay.
I added it to the green panel using foam squares. I added some sparkling clear sequins here and there for some added sparkle. The green panel is adhered to a standard A2 top folding red card base using foam squares for added dimension. I had so much fun creating all of these festive projects! Thanks for fluttering by!


Hi there! I live in Florida on the east coast, just south of Melbourne so you can imagine what I’ve been doing. As in watching the weather. Not to worry, we’re totally ready. With everything done, my thoughts turned to your awesome blog. I’m so enamored with your Christmas cards. Kelly, you amaze me. Seriously. There isn’t one card that you’ve made, that I don’t ohhh and ahhh over. I love your Christmas silhouettes! You’re a wonderful artist and teacher & I’m so grateful for everything you share. Happy Labor Day! 😊
ReplyDelete